- Google Slides Presentation Design
- Pitch Deck Design
- Powerpoint Redesign
- Other Design Services
![50 tips on how to improve PowerPoint presentations in 2022-2023 [Updated]](https://slidepeak.com/wp-content/uploads/2021/09/2-1170x372.png "this enhances viewer experience in powerpoint presentation")
- Design Tips
- Guide & How to's
- 50 tips on how to improve PowerPoint presentations in 2022-2023 [Updated]
While PowerPoint helps create a compelling presentation, a business meeting or a lecture can easily turn boring if the information is less engaging or distracting. This post acts as a guideline on how best to improve PowerPoint presentation and make your message remembered by any audience, whether business owners, students or even homemakers. Plus, you will also learn the easiest ways to make a better PowerPoints presentation without it taking forever and convey the content in the best possible way by presenting it with maximum impact. So let’s get down to it!

Create a memorable opening slide
Your presentation’s opening slide resembles a book cover. You choose whether to open and read the book based on what you see. The same often holds true for PowerPoint slides. To make better PowerPoint slides that immediately catch the audience’s attention, you should always make sure the opening slide contains an intriguing headline and a noticeable image.
These tips will help you create a perfect opening slide:
- Come up with a catchy headline.
- Keep your ppt slides tidy.
- Impress with sophisticated colors and images.
Remember, for your PowerPoint slides makeover to get the desired results, your slides have to be designed following the best practices.

Keep your presentation simple
Do you often find yourself typing, “how to improve my presentation,” but can’t seem to get a definitive answer? The answer could be a PowerPoint slide makeover. Too much text on a PowerPoint makes the presentation forgettable, hard to pay attention to, confusing, and overwhelming.
To improve PowerPoint presentation:
- Ensure that your slides don’t have too many words.
- Go for a PowerPoint redesign where a striking image is teamed with a simple but clear message.
- Use the 1-6-6 ppt presentation redesign rule to include not more than six bullet points and six words per slide.
Pros usually improve PowerPoint presentation by limiting the words on the slides to allow the audience to listen to you and not focus more on reading. So instead of using complete sentences in your ppt redesign, use short forms that improve your memory. That way, a presenter can focus on each specific point and make it easier for the audience to comprehend which point in the ppt slides is being covered.
Present one idea per slide
If you want to craft a powerful PowerPoint like a pro, the first tip is to have only one idea per slide. But why is it necessary to have one main point per slide?
The first reason is to improve PowerPoint presentation. Your slides should not read like a textbook or novel. Otherwise, you might redo the whole thing or get a PowerPoint slide makeover. So let’s uncover more reasons why you should have only one idea per slide.
- The audience will focus on a single idea that prevents them from getting confused or overwhelmed by the slides.
- It allows the presenter to give more details orally, which motivates students to attend class.
- It prevents giving out too much information that dilutes the central message in the slides.

If you are worried about the low word count in your slides, go for a PowerPoint redesign and add impactful imagery or visual aids. Ensure each point is consistently structured and there is a clear transition in all slides.
Relevance and quality of content are key
There is plenty to consider when making a PowerPoint slide makeover. However, the relevance and quality of the content are among the top factors. The text has to be supported by relevant and quality images to ensure the presentation exudes professionalism.
In addition, PP slides created specifically for students must be aimed at improving learning. Some quick tips to ensure your slides are relevant and of decent quality are:
- Before presenting the content, ensure it engages the audience.
- Maintain quality by ensuring a slide is not full of text.
- Use structure to keep the content organized.
- If it does not fit in a single line, chances are high it is not relevant.
Ensure your slides don’t have too much information, as it reduces relevance. Since the human brain process images faster than text, convert any long paragraphs into appropriate visual formats.
Eliminate unnecessary text
The first step to improve PowerPoint is removing unnecessary text that might reduce the white space and make the slide look uncluttered. If the text is too much, your audience will focus more on reading the slides than what you want to say.
Don’t know how to make your slides simple? Use these tips:
- Remove any content that is not intended for your audience.
- Any phrases that are not clear should be eliminated.
- Be brief and clear.
- Only add two to three sentences on each slide.
- Replace words with visual elements.
No need to cram everything into a single slide redesign. Instead, include main phrases that help you remember what you want to talk about and ensure the listeners absorb the information you are conveying.

Always use one story per slide
The correct way to improve PowerPoint presentation is to use one story per slide. That way, your ppt slides won’t overwhelm your audience with too much information. Moreover, if you improve a ppt redesign, it will also prevent the presenter from diverting away from the main topic. Besides, people don’t attend lectures to read the ppt slides. But rather to hear you speak because you are an expert in that subject matter.
When you include only one story in a ppt redesign, it gives the audience a chance to:
- Concentrate on what you are saying.
- Quickly digest the information.
- Use the texts on the ppt slides to support your verbal presentation.
The story is what helps you focus on the central message and drive the point home. But even if you put a single story in each slide, ensure there is a great transition to avoid confusing the listeners. Also, make sure the story is consistently structured and doesn’t generalize the subject under discussion.
Use white space to make texts more readable
Using white space to your advantage is another way to improve PowerPoint presentation. How? With a good redesign, you will improve the readability of the text and add a professional effect to your slides. Without white space in a redesign, the information on your slides becomes disorganized, hard to read, and showcases clutter.
We all know that cluttered PowerPoint presentation slides are unattractive. But how do you know you need white space in your PowerPoint presentation slides? If you try to add white space but run out of space, your slides could probably benefit from less content and a redesign.
To improve PowerPoint presentation and make your redesign effective, consider active and passive white space and micro and macro white space. Overall, the type of white space to use to improve your redesign is determined by:
- User research
- The message being conveyed
- User interface design

White space is also crucial in directing the audience to focal points and helps improve specific text parts. So play around with the number of white spaces to improve your ppt redesign and shine the spotlight on specific points. If you are still wondering, “how do I redesign my presentation?” try improving the white or negative space.
Rework text-heavy PPT screens
Most people, especially in formal presentations, focus on making text-heavy slides. This often bores the audience and results in a disastrous presentation. Such a case leads a presenter to wonder, “how do I improve my presentation.” Ensure your slides are not loaded with text, as it reduces the chances of the audience paying attention to what you have to say.
Instead, the audience will be busy reading the heavy text screens, which reduces learning or understanding of the information. If you have heavy text slides and urgently need to enhance PowerPoint presentation, here are three tips to help you change them into impressive slides:
- Change data into graphs, charts, diagrams, or appropriate visual elements.
- Use infographics to showcase step-by-step procedures.
- Use different shapes to show the relationship between subjects or items.
- Convert long texts into bullets.
Finally, remove all text irrelevant to the central message and include only short phrases.
Visualize data
Do you have a lot of data in text format and want to change it to improve your slides? Visualize that data to enhance PowerPoint presentation. For complex data that can be compared, consider changing it into a graph format. This helps to reduce heavy text usage and makes the information easier to comprehend.
Wondering, “how do I improve my presentation through data visualization?” Use these tips:
- Go for visual elements that tell a story.
- Tweak the elements to make them easier to comprehend.
- Always opt for visual consistency.
- The headers for graphs and charts should be simple.
- Use one color to represent one type of data.

Data visualization is a great option for those who want to improve PowerPoint presentation. It makes it easier to convey a lot of information and still uses limited space. It also allows the audience to comprehend complex data.
Use original PowerPoint presentation templates
Looking at the same old PowerPoint template slides can make a fascinating topic boring. That’s why if you wish to make better PowerPoint slides, you must use original templates from trustworthy sites. For example, Microsoft PowerPoint has original template slides that you can use to create a great visual experience for the audience.
But why do you need original ppt template slides?
- To access a wide range of ppt redesign choices.
- To make it easy to create professional and visually appealing ppt presentations.
And the best part is that you don’t have to be an IT pro to use the ppt template slides.
Overall, original ppt template slides improve the redesign and give you confidence in the work you are presenting. They also eliminate the time-wasting factor of looking for and arranging the ppt redesign slides from scratch. When you redesign a PowerPoint template, the slides are already prepared and laid out for you. Adding fancy fonts, graphics, and relevant photos helps to improve your PowerPoint slides makeover even more.
These template examples can provide some inspiration:

Remember, even after you improve the slides and have a ppt template at your disposal, you can still create custom slides. So take advantage of all the great features such as themes, shapes, and editing tools to improve a ppt redesign and give it a professional look.
Don’t let PowerPoint decide how you use it
If you allow the default settings of PowerPoint to dictate how you will create and present your slides, you are more likely to come up with a less creative piece. Instead, opt to improve your PowerPoint presentation with a ppt redesign.
Consider PowerPoint as a blank canvas but keep the design simple. That way, you won’t get overwhelmed by what to do or, worse, end up with a confusing ppt slide. Listed below are important tips to use when creating PowerPoint slides.
- Make better PowerPoints when dealing with macro details or concepts.
- Balance the text and image appropriately to avoid losing the audience’s attention.
- Make the message in the ppt slide clear and clutter-free.
After PowerPoint slides makeover, ensure that the content or concept is easy to absorb. Remember, there is no one-size-fits-all approach, and PowerPoint slides are effective for a large audience of around 20 people.
Create a new PPT presentation for a template or blank page
When you start a project in PowerPoint, you have to create a new presentation. This can either be from a ppt template or blank slides. You can also opt to open a previously made or an existing presentation and edit it to improve PowerPoint. The great part about making professional ppt slides is that you can work with the same presentation without making several changes.
Using a predesigned ppt presentation or template is also advantageous and time-saving. This is because ppt templates have custom formatting options that allow you to save designs. This, in turn, reduces the need to start a new ppt project from scratch. With a ppt template acting as the foundation, each presentation will inherit:
While ppt templates come with the material you can recycle for future presentations, they are often harder to modify. In such a case, it’s better to consider a PowerPoint redesign and start with a blank presentation.
Use slide master to edit your PPT slide template design
Knowing how to redesign a slide template is a great skill for anyone who wants to improve PowerPoint presentation. Editing a template allows the user to make the necessary changes that translate to an effective ppt presentation.
When you redesign your favorite ppt template or one that you really love, it creates custom designs that are clean and professional-looking. So how do you edit a PowerPoint template?
- First, pick a suitable ppt template.
- Add the number of ppt slides that fit the content elements you want to include.
- Adjust the ppt fonts and color.
- Remove the ppt slides you don’t need to make the redesign process easier.
The trick with good ppt slides redesign is to use the slide master placed under view and ensure the slides grouping fits what you want. Note that while the slide master is open, any changes you make to one ppt slide affect the entire pack.
Use duplicate slides to save time
Are you asking yourself, “how do I redesign my presentation without spending a lot of time doing it?” Use duplicate ppt slides! Using slides from a previous presentation eliminates the need to redesign the entire PowerPoint lecture.
The duplicate slide and copy-paste are some methods used to create duplicate ppt slides. The easiest method to duplicate ppt slides is to use the copy and paste method. For this ppt procedure to work, follow these steps:
- Start by right-clicking the ppt slide you want to duplicate.
- Select “copy” from the menu.
- Move it to a specific section on the ppt slide.
The duplicate technique involves opening the ppt slides show and selecting the sliding thumb from the slide you wish to duplicate. Then, when you right-click on any of the ppt slides, a menu will appear, allowing you to click on the duplicate slide option.
Select the right font
Font can make or break your PowerPoint presentation. When chosen right, it will improve PowerPoint presentation. Unfortunately, most presenters make the mistake of choosing a fancy font to add visual appeal to the content. That is a big mistake. When it comes to professional presentation, stick to a standard-looking font that doesn’t detract from the main message.
Some of the standard fonts that give slides a professional and clean look while making the text readable include:
- Times New Roman
You don’t even need to download these fonts as they are accessible in all PowerPoint slides. So if you are still wondering, “which is the easiest way to redesign my presentation,” the answer is to use the appropriate font. Comic Sans and Mistral should be avoided, and using fonts like Forte sparingly is better. Serif and Helvetica are great for headers.
Make sure you use the proper font size
Your content font size greatly impacts how the audience perceives the information you are presenting. For example, it can affect navigation speed, the amount of content included in a single slide, and a reader’s experience. That’s why presenters who ask, “how do I improve my presentation?” are often advised to check the font size.
But which font size is appropriate for a PowerPoint presentation?
- Larger than 18 points improve readability.
- For titles, the font size is between 36 and 44.
- For text, maintain a range of between 24 and 36.
- Use a font size of 18-20 when adding explanatory text to a diagram or graph.
Overall, use a big enough fit to ensure anyone sitting at the back of the room can clearly see the slides’ contents.
Settle on specific style and color to use in a redesign
Thanks to its numerous features, PowerPoint has become the go-to option for making professional and impactful presentation redesign. That’s why when considering a PowerPoint slide makeover, style and color are some of the first things you should look into. For your redesign to improve, you can choose a specific style, color, and design with themes. To create consistency and improve the redesign, use the same style or design in all the slides.
Use the following tips to improve the style and color of your redesign:
- Experiment with different ppt theme styles before settling on a specific one.
- Mix and match color, effects, and font until you get a unique ppt look that fits your presentation.
- Customize the themes to fit the style and color you want.
Using themes makes it easier to get clues on the general style, design, and color you wish to have. But for a ppt redesign, go further and customize the themes by modifying the color, font, background styles, and effects.
Avoid PPT templates with too many colors
One of the things you should do when you want to improve PowerPoint presentation is to use different colors to your advantage to inspire your audience. Unfortunately, ppt templates with too many colors distract and fail to drive the message home.

But the right color combination evokes the right emotions that lead to enjoyment of the PowerPoint presentation. For example:
- Blue shows trust, peace, and confidence.
- Yellow portrays optimism and happiness.
- Red shows passion and grabs attention.
- Green is associated with nature and the environment.
When selecting a ppt template with the right colors, consider the following:
- Your brand or that of the company you are representing.
- Niche or industry.
So if you need to improve PowerPoint presentation redesign quickly, use colors that are easy on the eyes and look harmoniously together. Use ppt templates with complementary color schemes when you want to draw attention to a specific point or data.
Stick to using basic coloring
Color themes are a powerful thing that can easily improve PowerPoint presentation. You can use colors to emphasize specific information or draw attention to a specific element in a slide. Yes, if you are a pro, you can use more than two colors in a slide, especially when giving an informative PowerPoint presentation. However, if you are giving a formal presentation to adults, stick to basic coloring.
Young kids will enjoy bold and vibrant colors in a presentation. However, when dealing with adults, consider using neutral hues. Besides considering your target audience, what else should you do when it comes to colors?
- Use color to create contrast.
- Use colors to make information pop and direct the train of thought.
- Take advantage of complementary and monochromatic color schemes.
- Brighter or vibrant colors balance dark backgrounds.
Don’t use more colors than needed in one slide, as it affects balance and creates confusion. On the other hand, the right colors improve PowerPoint presentation and deliver excellent results.

Contrast in a presentation is essential
One of the most effective ways to improve PowerPoint presentation is through contrast. It draws the eye towards something specific. Colors help to show contrast in slides and draw the viewer to something specific.
But when choosing to use different colors as a way to create contrast, remember that some of your viewers might have color blindness issues. While there are different types of contrast, including shape, shade, color, and size, here are the top tips for creating contrast:
- Black and white provide the strongest contrasts.
- The colors in the background and foreground should be different.
- The colors in the slides should be 30% lighter than what you see on your laptop.
The display for your slide, whether a laptop or projector, and even the room you will be giving the presentation might alter the color and brightness. So check the colors in dark and light to see the contrast difference.
In PPT, images are more powerful than words

Our brains process images faster than text. That’s why visuals or images will be a good option for when you need to improve PowerPoint presentation. Besides, it’s easy to get overwhelmed by text in a ppt redesign.
On the other hand, images add visual appeal to the ppt slides, improve concertation and engagement. Having fewer texts and more images in slides also applies to academics and scientific ppt presentations.
But how many images are too many in ppt? Pros tend to combine beautiful images with text. However, it’s better to have more relevant images than text to redesign the ppt and make the content engaging. We are not just talking about pictures but also infographics, animations, and GIFs added to ppt.
Incorporating images in ppt slides has the following advantages:
- Saves time by preparing the ppt slides.
- Reduces boredom or dullness associated with class PowerPoint presentations.
- Helps to make complex concepts presented in a ppt redesign easy to comprehend.
Overall, the best PowerPoint slides makeover is rich in memorable imagery.
Use high-resolution clip art for your PPT redesign
Adding clip art is one of the things that can spice up a PowerPoint presentation. Instead of having ppt slide after slide, clip art breaks the monotony of the text and adds a striking visual effect to the PowerPoint redesign presentation. It also allows the presenter to showcase additional information not included in the PowerPoint slides. The advantages of adding clip art to a ppt redesign include:
- Helps get rid of using too many words.
- Keeps the audience’s attention.
- Improves the information in the ppt redesign and makes it memorable and engaging.
While, in some cases, outdated clip art makes your redesign presentation look unprofessional, it’s a great PowerPoint slide makeover if only it’s of high quality and can be scaled without distortion. So support your ppt redesign text with clip art as it assists the audience in visualizing the words.
Add meaningful visuals and interactions
Want a PowerPoint slides makeover to ensure your presentation makes a lasting impression? Add meaningful visuals and interactions. Most times, what differentiates a great PowerPoint presentation from a bad one is the content and visuals.
High-quality, relevant images make a presentation more visual. The trick is not to get carried away with the number of visuals included in a single slide. Instead of subjecting your audience to one boring slide after another, make a PowerPoint redesign and create an interactive presentation. How?
Tailor the presentation redesign to suit a wide range of audiences without having to edit the slides beforehand. When it comes to visuals and interactions in a redesign, stick to these three principles:
- Less is more.
- Consistently use high-resolution and quality images.
- Treat each slide as a special visual object.
Not all visuals will fit your message or the redesign you want. So choose correctly and avoid those with too many focal items, color, and contrast.
Align elements properly
Icons, shapes, and images are the most common elements in a PowerPoint presentation. Keeping these crucial elements properly aligned showcases professionalism in ppt and helps to grab the audience’s attention. It also keeps the ppt slides organized and makes it easier to convey the main message effectively.
Here are some tips to help you align elements like a PowerPoint redesign expert:
- Always select the object you want to align.
- Use ppt redesign guides are a reference to align objects correctly.
- For ppt redesign, have the option to align two or more objects.
- In a ppt redesign, you can align left, right, center, top, or bottom.
When you choose a specific position, for instance, to align the center if it’s two or more objects, they will be aligned vertically but centered on the ppt slides. For users who want a ppt redesign, aligning the text is another way to go. This involves tweaking the text placed inside the ppt text box.
Include a good background picture to improve your slides
Are your slides lacking a unique look? The simplest step to improve a ppt redesign is to include a background picture that will improve your PowerPoint presentation and clarify the message. A good background photo will personalize your PowerPoint presentation redesign and take it to the next level.

Here are five tips to help improve and select a great background image for a redesign:
- Go for a photo with a high resolution.
- Avoid choosing small photos as they will be distorted if the slide size is bigger.
- Ensure the picture makes it easier to see the text in the slides.
If the background image obscures the text, improve PowerPoint presentation redesign by adjusting the transparency or fine-tuning the text percentage. If you want to use that same background image in all the slides, don’t forget to select the “apply all” option when redesigning.
Incorporate interactive mockups
Don’t be fooled into believing that screenshots and diagrams can improve PowerPoint presentation. They add too much information to a slide and, in turn, make the presentation boring and visually unappealing. A quick way to improve a PowerPoint redesign is to use interactive mockups.
Even if you don’t have exceptional design skills, a mockup is a great way of ensuring your presentation makes a lasting impression. 3D mockups are also unique and a great tool for conveying your message. In case you feel stuck and require a unique way to make better PowerPoints, consider these tips:
- Use screenshots to create unique mockups.
- Copy the screenshots on a blank ppt slide.
- Edit and crop the image to hide unnecessary elements.
- Ensure the changes made on your mockups are duplicated in all the slides.
It’s optional to use PowerPoint hyperlinks to create interactive mockups. However, always test the mockup on different platforms such as laptops and mobile phones to ensure the font size is not affected regardless of the medium used.
Add relevant images to the redesign
Creating a redesign with engaging presentation slides that summarize the key points and capture attention is not easy. That’s why most professional presenters add pictures to improve PowerPoint presentation slides. But in a formal setting or when presenting complex or scientific information, most people don’t add photos to improve the redesign. However, that’s a mistake because it reduces the overall success of your redesign and PowerPoint presentation.
Before you add a specific visual aid to the redesign, consider its purpose. For example, apart from assisting in ppt redesign, use visual aids to:
- Summarize information.
- Reduce the total words to be included in redesign slides.
- Improve and enforce the points being talked about in the redesign.
- Make a stronger impact.
- Engage your audience and capture their attention.
While there are many benefits of using pictures in a ppt redesign, avoid cluttering them as it will make your work look unprofessional. So if you are asking yourself, “which is the ideal way to improve my presentation slides?” use these redesign tips:
- Use images consistently in all ppt redesign slides.
- Go for pictures that tell a story and improve the ppt slides.
- Incorporate photos that improve understanding of the ppt slides.
- Prioritize clarity and simplicity in your ppt redesign.

Adjust and format images appropriately in a redesign
PowerPoint has numerous effective features that can help correct a picture. That means you can play around with color, resizing, saturation, and even apply artist effects. This is a great option for anyone looking for “quick ways to fix my PowerPoint presentation.” What’s to love about PowerPoint redesign is that it ensures no non-destructive editing for adjusting photos.
If you realize that you have made a mistake in your PowerPoint presentation redesign, you can quickly reset, remove any changes, and get your original image. The editing and redesign option allows you to format your photo to ensure it holds the audience’s attention. Some of the tips that you can use to make your photo better and redesign your slides include:
- Sharpen the image to refine edges and correct slightly blurry images in the presentation redesign.
- Use brightness and contrast to improve the pictures and the redesign.
- Scale an image to fit your redesign slides.
Crop any parts of the images that you don’t want to appear on the redesign slides.
Use graphs to increase understanding of content
Graphs come in handy when ppt data is too large or complicated to be represented in the text. Graphs are a great tool when you need to “fix my PowerPoint presentation” or redesign the project because they can help showcase trends or similarities between two variables. The benefits of incorporating graphs in a PowerPoint presentation include:
- Improve comprehension of data added in the ppt redesign.
- Improve the visual interpretation of any complex numerical to be included in a ppt redesign.
- Highlight and improve the interpretation of salient features of the ppt data.
- Showcase relationships that may not be that obvious when viewing the ppt redesign.
- Improve comparison of a different set of data.
While a specific presentation may call for different types of graphs, all of them work to enhance PowerPoint presentation. Graphs improve focus and allow the audience to concentrate on one salient point. That’s why a presenter should create graphs with one clear message that is simple to understand and find meaning in presented data. Graphs also allow a user to back up their claims.

Modify graphs to suit the data in the presentation
Did you know that one great way to improve PowerPoint presentation is by enhancing the appearance of a chart? To improve it, override the default graph format and edit. However, if not used correctly, graphs can be distracting. So to improve a redesign, keep each graph simple and easy to comprehend.
That way, the audience won’t get confused or spend much time deciphering what the graph from your redesign means. For large data, convert it to graphs but follow these redesign tips to ensure you improve the slides’ visual aid:
- To improve a redesign, you have to choose a specific graph presentation that tells a story.
- The elements included in the graphs should not be distracting but improve the redesign and PowerPoint presentation.
- To improve a redesign, use colors to highlight the key message.
- To improve a redesign, use different colored lines to improve and contrast two items or variables.
Another trick to improve a ppt redesign is adding titles to your graphs with information you want the audience to remember. Then, for a simple PowerPoint slides makeover, apply the simple formatting commands that adjust the font size, color, and style.
Add bulleted lists to organize ideas
Writing, whether in an academic or professional setting, must be clear, concise, and organized. Bullet points can help to organize ideas. For example, to use them to “redesign my presentation and improve it,” list out key points or items from the PowerPoint presentation.
This is mostly because even in a PowerPoint presentation , the audience might scan your content instead of reading it line by line. A bulleted list will break up long blocks of text, improve it, and motivate your audience to read the information.
But for bullet points to be effective in a ppt redesign, you should do the following:
- To improve the ppt redesign, keep bullets short in order to motivate the reader to move through the presentation.
- To improve the ppt redesign, the bullets must be brief and act as mini headlines.
- Bullets should be formatted the same way as the text in the PowerPoint presentation.
Since bullet points should be thematically related to the text, you might wonder how they can help redesign or improve PowerPoint presentation. A bulleted list in a ppt redesign breaks up long blocks of texts into digestible chunks and keeps the audience reading down the slides.

Make the slides pop with the 2/4/8 rule
One of the quickest ways to enhance PowerPoint presentations or give a PowerPoint redesign a fresh look is to use the 2/4/8 rule. To improve your redesign, you should not spend more than 2 minutes on a slide. Moreover, a single slide should not have more than four bullets. Finally, a bullet point should not have more than eight words.
This powerful rule is popular among professional presenters. So to help you out, here are some pointers for the 2/4/8 rule that can help improve a redesign:
- Ensure that 2 minutes are enough to inform the audience about the key points.
- The four bullet points should highlight the main points.
- Adding only eight words per line to every slide ensures the audience doesn’t get bored.
The 2/4/8 rule works to ensure that your slides are not cluttered. It also shows that there is no need to squeeze all the information into a single slide. Instead, it helps supplement the short words with a lengthy verbal presentation
Replace long bullet lists with pictures
Replace a long bulleted list with a high-quality image. Combining graphics and information to create infographics is another great way to achieve an impactful PowerPoint slide makeover.
Since the infographic accommodates varying font types, font sizes, color contrasts, and imagery, it eliminates monotony and adds visual appeal. So which is the correct way to add infographics to PowerPoint slides? Follow these tips:
- Use data visualization to turn lengthy data in slides into fascinating pictures.
- Opt for a ppt slides redesign to play with different shapes and diagrams.
- In your ppt redesign, include icons to improve the overall look.
- Use vector graphics that can be customizable per your preference to improve the ppt redesign.
While bullets in a ppt redesign were meant to break long blocks of text and make paragraphs easier to digest, sometimes they fail to create a fascinating visual aid. But when replaced with a picture or infographic, your message becomes memorable and works to enhance PowerPoint presentation.
Make use of PowerPoint redesign presentation examples
If you want to improve your PowerPoint presentation by always ending up with a blank page, find appealing and relatable redesign examples online. The redesign samples will act as guidelines and inspiration for your next project. With a redesign example to follow, you will know which colors to use and what to include to ensure your PowerPoint slides makeover is a success. The trick is to use online redesign examples from reputable sites. When looking at examples, follow these tips:
- Go for redesign examples that capture your attention and note which areas you focus more on.
- Use the redesign example to check how the slides have been customized and use that aspect to create your pieces.
- Use the redesign sample to determine whether the PowerPoint presentation is image-heavy or text-heavy or combines the two approaches.
It’s often best to combine text and images in equal proportion to help give PowerPoint presentation redesign in a conversational style.

Improve the layout
Did you know that you can improve clarity with layouts? This is simple but important to help improve PowerPoint presentation. When the layout has too much content, including a chart, text, and picture, in a single redesign or slide, the audience often gets confused. That’s why when it comes to a perfect redesign, avoid complex layouts and stick to simple ones.
Not all PowerPoint slides will be equal. However, when it comes to ppt redesign, here are essential tips that result in a great layout:
- Always limit the number of items you add in a single slide layout.
- Ensure every text added to the layout is readable.
- Don’t overfill the entire layout.
- For a stunning redesign, leave white space between each element.
Use placeholders in the slide layout to set a good position for texts, images, graphs, and other visual elements. You can also create custom layouts and save them within the chosen ppt template.
Use shapes to redesign a winning PPT presentation
Are you fond of asking, “how do I redesign my presentation?” Shapes can enhance your PowerPoint presentation. Using other format options, PowerPoint shapes will elevate your slides and add a visual appeal to the content.
What’s even greater is that you don’t have to stick to using common shapes such as rectangles, circles, and ovals. Instead, opt for sleek shapes that transform your ppt presentation.
Shapes can help you create simple or even complex ppt illustrations that will showcase your professionalism. But what’s so great about shapes, and what are their benefits in PowerPoint redesign?
- PPT shapes can be resized without getting distorted or losing image quality.
- PPT shapes offer immense flexibility.
- PPT shapes come in a variety of sizes, from large to small.
- PPT shapes are great for creating flowcharts, illustrations, and other basic diagrams.
Use the rule of thirds to improve PowerPoint slides
Anyone looking for a quick way to improve PowerPoint presentation should use the rule of thirds. It offers an easy way to make attractive slides that capture attention. The rule of thirds is based on the principle of dividing the slides into nine equal parts with two horizontal and vertical intersections.
Based on the rule, you should keep important visual elements in your redesign within the intersections. To use the principle effectively to redesign slides, follow these tips:
- Use the guide feature in PowerPoint to draw four lines on the slides and improve your redesign.
- Both the vertical and horizontal lines should divide your images into thirds and make the redesign better.
- In the redesign, ensure the lines intersect at four points, also known as the power points.
Note that even if your image has several elements, the viewer’s eye will be focused on the power points. Therefore, when you need to improve PowerPoint redesign and achieve maximum impact, place the key elements in the power points.
Add GIFs to your PowerPoint slides
Is your ppt presentation missing a wow factor that can appeal to a target audience? Are you asking yourself, “how do I fix my PowerPoint presentation and make it less boring? Insert a GIF into your ppt slides. A well-placed GIF makes the ppt presentation entertaining, which appeals to a younger audience. The ppt slides redesign can also add humor and capture attention.
Most people might refrain from adding GIFs to PowerPoint presentations because they believe it requires special skills or tools. However, inserting a GIF into ppt slides is just like adding an image. The steps include:
- Download a GIF.
- Open PowerPoint slides.
- Insert a picture.
- Choose the location where you placed the downloaded GIF.
- Insert the GIF in a specific position in the ppt slides.
Depending on the device you are using or the version of PowerPoint, you may choose clip art or picture instead.
Make slides advance automatically
PowerPoint allows users to improve their presentation with special effects. For example, you can create slides that advance automatically using the autoplay feature. This eliminates the need to keep clicking a slide whenever you want to move to the next one.
For a presentation, having an automatic advance feature shows professionalism and that you are well prepared. On the other hand, clicking a slide during a PowerPoint presentation can be distracting and cause you to lose flow or rhythm.
If you want an effective PowerPoint slide makeover, consider creating a slide show that advances automatically. But before setting the advance option, consider the following:
- Have you practiced beforehand to ensure your slides advance with your speech?
- Do you want to focus on the audience instead of looking at the slides?
A self-advancing PowerPoint slide would fit your needs if you answered yes to any of these questions.
Use animations wisely
Animation can improve PowerPoint presentation. It’s also a go-to option for anyone who wants to make better PowerPoints. While adding animation to ppt slides is risky, especially if it’s distracting, it will often improve the presentation redesign.
The trick is to use animations that complement your ppt message. That way, the audience understands what the animation represents, eliminating misunderstandings. If you want to incorporate animations as a way to improve PowerPoint, consider these tips:
- Use animation as a tool to help your audience connect with the message in the ppt.
- Use eye-catching animations to break the monotony of the ppt text and capture attention.
- For long ppt presentations, use animations to engage the audience and prevent fatigue.
- Use animations to draw attention to key points or new terms in the ppt.
While animations are great for presentations, they can only be effective if kept simple. So avoid using several animations in a single slide and use them consistently.
In PPT, it’s better to keep transition effects at a minimum
Animation and slide transition effects have a poor reputation among many professional PowerPoint presenters because they can distract the audience. However, simple animations and quick slide transitions can add meaning and improve PowerPoint presentation or redesign. But before you include a transition and animation into your slide as a way to “improve my presentation redesign,” consider the following:
- Context and relevancy.
- Whether the ppt redesign presentation involves complex or simple data.
- Which points need more attention and can help improve the ppt redesign.
If you fail to use transition effects or animations, your PowerPoint presentation can appear boring. Adding only one or two animation effects is a great PowerPoint slide makeover. This ensures that the effects of the redesign don’t overpower the message.
PPT slide transitions also add professional impact and draw attention to important data. When appropriately customized, you can use the effects to control the speed at which the PowerPoint slides appear on the screen.
Change slide size to fit your presentation
PowerPoint usually has two common slide sizes: 16:9 and 4:3. The first size is ideal for ppt presentations that involve a modern projector. However, 4:3 is great when you are using an old model device. But what if I want to redesign my presentation? Are these the only slide sizes appropriate for ppt? Of course, not.
You can customize the slides to fit the size you want. This is often an option if 4:3 and 16:9 are unsuitable for the ppt redesign. But before you customize the size of your slides, here are some tips to consider:
- 4:3 is great for creating multipurpose ppt content to be printed or shown across different platforms.
- 16:9 is great for high visual ppt content.
- Use 4:3 when the ppt slides are not going to be projected on the LCD screen.
It would be best if you also educated yourself on the ppt aspect ratio. For instance, the 4:3 aspect ratio is 1024×768 pixels, ideal for smaller ppt slides and screens.

When in doubt, dump the slides
Thanks to PowerPoint, it’s possible to have a ppt redesign that creates engaging content. However, sometimes even after looking at several examples, you can find out that your presentation is still dull. For example, if you have tried several times to improve PowerPoint presentation, but the result is slides that will bore the audience, then dump the whole project and start over.
The main aim of a PowerPoint presentation is to hook the audience on the message you are conveying and make them understand it. That is, if your ppt redesign does not have the necessary elements to hook the audience from the word go, it’s best to trash it. To make your next PowerPoint redesign a success, adhere to these tips:
- Replace large chunks of texts in ppt with stunning visual elements.
- Use animations, clip art, and GIFs sparingly in ppt.
- Instead of adding text in ppt, think like an editor and delete what can be omitted.
Finally, be consistent with font size, color schemes, font types, and bullets used in any ppt redesign.
Now that you know how to create a perfectly-balanced presentation, let’s find out how to present it to your audience in the best possible way. These tips will be especially relevant for teachers, lecturers, and presenters.
Present PPT material in short phrases
Presenting the material in short phrases rather than full sentences is another way to improve PowerPoint redesign. It ensures you don’t focus more on reading from ppt slides as it’s an ineffective way to teach. Instead, adding only a few short phrases to improve PowerPoint presentation allows you to focus on one idea and make the topic easier for the audience to understand.
The benefits of shorter phrases in a PowerPoint presentation redesign are as follows:
- It leaves less room for your audience to focus more on what is written on the ppt slides.
- It allows your audience to focus on your thoughts, explanation, and insights on the subject discussed in the ppt redesign.
- It lets the audience know and focus on the main point presented in the ppt redesign.
To improve PowerPoint presentation at any time, stick to short phrases that do not exceed 30 words or one line. Emphasize the short phrases with bold or bigger font sizes.
Include verbal explanations for pictures/graphs
It’s without a doubt that visual aids improve PowerPoint presentation redesign. PPT slides increase an audience’s understanding of the topic. That’s why pictures and graphs are great for anyone asking themselves, “how do I fix my PowerPoint presentation redesign.”
But without a verbal explanation, it can be challenging to comprehend the information in the ppt redesign presentation. So to give PowerPoint slides makeover, accompany visual aids with verbal explanations. Adding verbal explanations in ppt redesign slides is important because:
- A real-time ppt presentation allows the audience to ask questions about the visual aids used in the redesign.
- It enables your audience to assimilate the content better and freely discuss any doubts.
- It allows the lecturer or presenter to give real-time answers to any relevant question asked.
Simplicity in the verbal explanation is key in assimilating the message and a great way to improve a redesign or a PowerPoint presentation.
Don’t make the audience read the information on the slides
It’s hard for people to concentrate on what you are saying and still read the content on the slides. So if you want to make better PowerPoint presentation, don’t make your audience read the slides. Instead, allow them to listen to you and digest the information you have given in the redesign.
When the audience reads the slides, there is a high chance that they will not listen attentively. This reduces the concentration and retention of relevant information. It also beats the purpose of PowerPoint slide makeover. Besides, listening makes it easier for the audience to take notes and remember the key points in the redesign. When making a redesign, instead of allowing your audience to read the slides on their own, consider these four tips:
- At the beginning of the PowerPoint presentation, tell the audience what to expect.
- Elicit conversation to prevent the audience from focusing on the slides.
- Use the redesign to open with a story that ties to the topic to captivate your audience.
- Blackout the screen to ensure you are not competing with the PowerPoint redesign slides.
Fade to black when speaking
In search engines, the phrase “redesign my presentation” is commonly asked by presenters who want to be pros. However, one answer that is often overlooked but can easily improve PowerPoint presentation is the fade-to-black effect.
It’s often considered a transition that prevents the audience from concentrating too much on the slides. Instead, it allows the listeners to focus on the presenter. If fade-to-black is a new concept to you, check out the tips below:
- Use the fade-to-black effect to carry and improve your narrative.
- Fade-to-black provides room to pause and move on to the next slide.
- Use fade-to-black to get undivided attention and connect with the audience.
The chances are high that you have not been using the fade-to-black effect in your presentation. However, we recommend you try it because you are definitely missing out on a big opportunity that can enhance PowerPoint presentation.

Use PowerPoint slides to boost note-taking skills
One efficient way to make better PowerPoint presentation slides is to ensure your lectures improve note-taking skills. How?
With PowerPoint slides that summarize the subject or topic under discussion, students will have all it takes to improve and make good notes. In addition, learners will be able to follow what the lecturer is saying to understand key points given in the ppt slides.
The key to improving note-taking skills is to do it when the professor is not talking, decreasing information retention and learning. If a professor realizes that students focus more on taking notes than listening, they might have to do a PowerPoint redesign. For starters, ensure the ppt slides don’t have too much text that takes too much time for students to write down. When presenting your ppt slides, promote active listening by:
- Repeating the main points stated in the ppt slides.
- Asking questions to help learners focus on what is being said in the ppt slides.
- Don’t cover what is not included in the ppt slides.
- Don’t speak too fast or often point at the ppt slides.
And last but not least, take breaks or pauses between ppt slides to allow students to catch up and not miss any crucial information.
Give PowerPoint slides before the lecture
Do you sometimes see a specific student struggle to understand your ppt presentation? The solution might lie in the PowerPoint slide makeover. Most professors are used to presenting the slides during the actual lecture. This is because some students will not attend class if given the ppt slides before the lesson. However, there are numerous advantages to making the ppt slides available before the lecture.
- The ppt slides act as a guide for note-taking.
- When you improve a ppt redesign, it allows your audience to add information that was verbally discussed during class.
- PPT redesign increases student participation and concentration.
PowerPoint slides given before class allow the audience to gauge which sections they might find difficult to comprehend and ask relevant questions. However, if your students don’t attend class after getting the slides and you ask yourself, “how do I fix my PowerPoint presentation?” we recommend considering the quality of the slides. Ensure the slides don’t divulge every important detail. That way, you leave room for a verbal presentation to fill in the blanks and explain the subject matter further.
Use PowerPoint slides structure to complement lectures
Every teacher has used PowerPoint slides to improve lectures. But some of the teachers end up creating the slides in a dull way that makes students bored. However, the appropriate use of PowerPoint slides can be a great teaching tool as long as it follows a logically sound structure. This is another great tip to improve PowerPoint presentation redesign.
So how do you structure slides and improve PowerPoint presentations?
- As a way to improve the ppt slides, include the outline view to help you get a quick overview of the content
- Ensure slides from the ppt redesign include the table of contents to ease navigation
- Combine ppt slides into collapsible and expandable sections
The trick to improve PowerPoint slides is to make the presentation just like any other narration. Ensure the ppt redesign has an introduction, body, and conclusion. Besides, you can also give the PowerPoint presentation slides to students before class to enhance understanding and memory.
Wrapping up
PowerPoint presentations can be a great tool to get information across, demonstrate your expertise, projects, and accomplishments, as well as supplement a lecture. However, slides have to be created using best practices to get you the result you want.
Observance of a few simple principles will help you easily make effective PowerPoint presentations in 2022:
- Design your PowerPoint slides in one style. Use font, color, and shapes to create a visual hierarchy.
- Arrange elements so that everyone can immediately read the most important message.
- Highlight key elements with color, shape, or layout. Create a contrast or color spot.
- In the text, try to highlight the most critical phrases. This can be done using the color, thickness, or size of the text.
- Choose flat icons and simple shapes instead of 3D elements and rendered details.
- Use the built-in alignment tools (ruler, guides, and grid in PowerPoint).
- Copy slides and elements instead of re-creating them. An excellent PowerPoint presentation design is the reproduction of items, colors, and other objects.
In case you’re not good at slide design, don’t worry. SlidePeak can help you ensure each slide of your PowerPoint presentation looks professional and grabs your audience’s attention from the first line.
#ezw_tco-2 .ez-toc-widget-container ul.ez-toc-list li.active::before { background-color: #ededed; } Table of contents
- Presenting techniques
- Keynote VS PowerPoint
- Types of presentations
- Present financial information visually in PowerPoint to drive results

8 rules of effective presentation

How to make a presentation interactive

The biggest trends in graphic design for presentations in 2022/2023
How to Use the PowerPoint Presenter View
September 1, 2014 / Blog, PowerPoint Tips, PowerPoint Tutorial Powerpoint, Presenter View
Time is an important factor to the success of any presentation. As we’ve discussed in the past, audiences tend to lose interest after 10 minutes and they constantly need to be re-engaged. For this reason, you want to keep your presentation concise and straight to the point. The longer you go on about a certain point, the more likely you’ll lose everyone’s attention.
You can constantly check the time using your watch or smartphone, but that would look awkward and unprofessional. So how will you know if you’re spending too much time on one part of your presentation? You can try making use of PowerPoint’s Presenter View.
What is Presenter View?
Presenter View allows you to facilitate presentations by giving you access to some useful tools and functions. By enabling it, PowerPoint gives you a “secret” look at your notes and upcoming slides. It has a clock and timer to see how long your presentation has been running. Without your audience seeing, you can easily jump to any slide you wish. You can also use the Pen or Highlighter tools to write on the current slide.
What you see via Presenter View:

How can I use Presenter View?
Presenter View will only run on computers or laptops that have dual screen capabilities. It’s specifically designed for use when your device is connected to a projector or an external screen. To set up for your presentation, simply hold the Windows key together with the letter P . When a window pops up, choose Extend .

After configuring dual display for your device, open your PowerPoint deck and head to the Slide Show tab. Tick the check box for Use Presenter View . Make sure your slides are set to appear on the secondary screen or projector by checking the Show On dropbox.

When you’re ready to start your presentation, simply hit the F5 key.
PowerPoint’s Presenter View doesn’t just help you keep track of time. It also gives you access to some useful tools as you give your presentation. Be a presentation expert by utilizing one of PowerPoint’s most helpful basic functions.
Featured Image: VFS Digital Design via Flickr
About SlideGenius
Popular Posts

Common Challenges in Tailoring Presentations—and Solutions

Dos and Don’ts of Pre-Seed Pitch Deck Creation

How to Write a Teaser Pitch Deck that Captivates

Tips for a Persuasive How It Works Slide

What Not to Do When Presenting Funding History

Why Raising Funds Without a Pitch Deck Can Backfire
Understanding Presenter View in PowerPoint: A Deep Dive Guide

Origin and Evolution of Presenter View
Why presenter view is a game-changer for professionals, activating and customizing presenter view in powerpoint, in-depth features of the presenter view, common mistakes and how to avoid them, advanced tips for a power presentation, final tips for enhancing your presentation game, introduction to presenter view.
Have you ever found yourself awkwardly toggling between slides and speaker notes during a presentation? Or wished you could preview the next slide without your audience seeing? Enter Presenter View in PowerPoint, a feature designed to make presenting smoother and more professional.
In essence, Presenter View is a special mode in PowerPoint that allows the presenter to see their speaker notes on one screen, while the audience views the note-free presentation on another screen. This dual-screen setup means you can have your notes, upcoming slides, and timer conveniently on one screen while your audience remains blissfully unaware.
“Presenter View is the unseen ally behind many successful PowerPoint presentations.”
Microsoft’s PowerPoint, with its roots tracing back to the late 1980s, has undergone several metamorphoses. Over the years, as technology improved and presentation dynamics changed, Microsoft introduced new features to make the software more user-friendly and versatile. One such innovation is the Presenter View.
Back in the early days of PowerPoint, presenters had to rely on printouts or separate documents for their speaker notes. The advent of Presenter View in the early 2000s was a game-changer. It allowed presenters to merge their slides and speaker notes into one cohesive presentation experience.
The beauty of Presenter View lies not just in its conception but in its evolution. Over different versions of PowerPoint:
- 2003 : Introduction of a basic Presenter View with slides and notes.
- 2007 : Enhanced screen setup with better dual-monitor support.
- 2010 : Introduction of slide zoom and laser pointer features.
- 2013 & Beyond : Integration with touch features, improved UI, and annotations.
Each version brought refinements, making it more intuitive and packed with features, tailoring to the evolving needs of presenters globally.
Fun Fact : Presenter View wasn’t initially as popular as it is today. It took a few iterations and user feedback loops for Microsoft to perfect the balance between utility and user experience.
The Core Components of Presenter View
Presenter View in PowerPoint is like the cockpit for pilots: it’s where all the essential controls and information are at the presenter’s fingertips. Whether you’re a newbie to PowerPoint or a seasoned professional, understanding these components can transform your presentation experience.
- This provides a glance at your current, previous, and upcoming slides. It ensures you’re always prepared for what’s coming next and can seamlessly transition between points.
- The soul of your presentation, speaker notes, are discreetly placed at the bottom or side, only visible to you. These notes can be elaborate explanations, quick pointers, or even personal reminders. They’re like your secret cheat sheet!
- Ever worried about running over time? This feature shows the elapsed time since you began the presentation and, in some versions, allows you to set a countdown. Stay on track and manage your pace efficiently.
- Interactive features that allow you to draw on slides or use a virtual laser pointer. These are especially helpful when you want to emphasize or explain specific points visually.
- Navigate between slides effortlessly and zoom into specific parts of a slide to draw attention or elaborate on details.
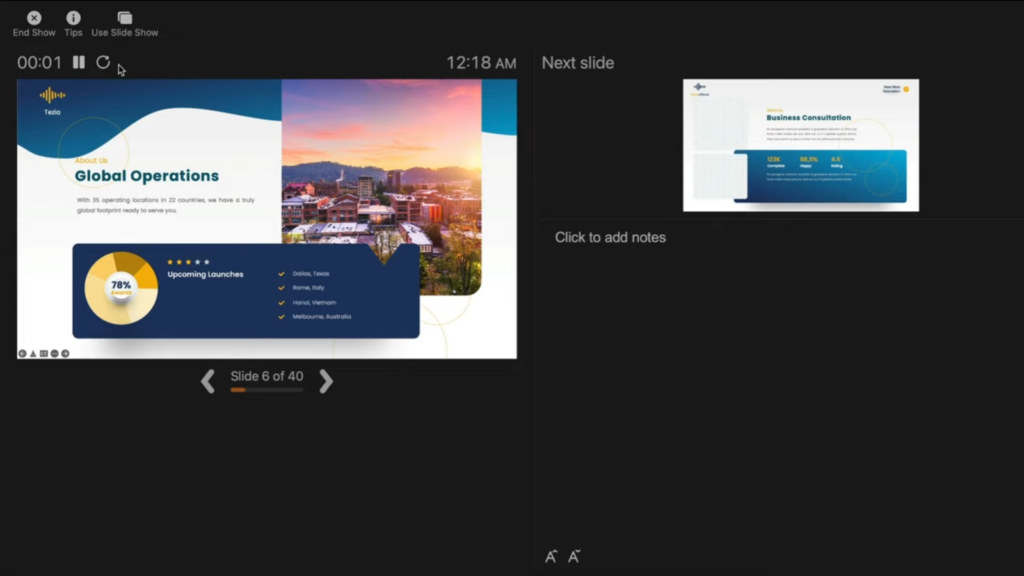
Table: Core Components Overview
Quote : “Presenter View is to a presenter what a dashboard is to a driver. It empowers, directs, and enhances the journey of your narrative.” – Jane Harris, Lead PowerPoint Expert – Powerbacks team
Understanding these components is one thing, but leveraging them effectively during a presentation can make a significant difference. Let’s delve into the ‘why’ behind the significance of Presenter View.
Stepping onto the stage or presenting in a boardroom can often be an overwhelming experience. The constant juggle between capturing the audience’s attention and keeping track of your slides can lead to nervousness. But what if there was a way to have everything you need right in front of you, ensuring smooth sailing through your presentation? Enter Presenter View.
- Having a preview of the upcoming slides and personal notes right in front of you can be a massive boost to confidence. You’re always one step ahead, knowing exactly what’s coming next.
- Instead of turning back to view the screen repeatedly, Presenter View lets you face your audience directly. This creates a more engaging and personal interaction.
- Gone are the days when you’d hold a bunch of cue cards or sheets of paper. With digital speaker notes, you have a cleaner, more organized setup.
- Using the annotation tools and laser pointer, you can make your presentation more interactive, leading to better retention and engagement from your audience.
- There’s no denying that seamlessly transitioning between slides, using interactive tools, and having no physical notes gives a more polished and professional look.
Table: Benefits of Using Presenter View
Quote : “Embracing the Presenter View is not just about leveraging a tool; it’s about amplifying your message and connecting more profoundly with your audience.”
It’s evident that the Presenter View has undeniable advantages for professionals. But how do you activate it and customize it to suit your needs? Let’s walk through the steps.
Starting with PowerPoint 2013, Microsoft enhanced the Presenter View to ensure that it’s both intuitive and user-friendly. Activating it and making it work for you is simple, as outlined in the following steps:
Step-by-Step Guide to Activate Presenter View :
- Start by opening your PowerPoint presentation. This will be the one you intend to deliver.
- At the top, you’ll notice several tabs. Click on the one labeled ‘Slide Show’.
- Within the Slide Show tab, you’ll spot a checkbox labeled ‘Use Presenter View’. Ensure that it’s ticked. If it’s not, simply click on it.
- If you’re using an external projector or display, make sure it’s connected. PowerPoint will automatically detect it and use the Presenter View on your primary display, showing the main presentation on the external one.
- Start your presentation by either pressing F5 on your keyboard or clicking on ‘From Beginning’ in the Slide Show tab.
- Next Slide Preview : Gives a preview of what’s coming next.
- Speaker Notes : Displays your notes for the current slide.
- Slide Navigation : Use this to jump to a specific slide.
- Annotation Tools : Highlight or draw on your slides in real-time.
- Timer : Keeps track of how long you’ve been presenting.
- You can move around the different elements, increase font size of your notes for better readability, or even hide specific components if they’re not required.
Table: Quick Access Tools in Presenter View
Quote : “The beauty of PowerPoint’s Presenter View is the control and flexibility it offers. It’s like having a personal assistant during your presentations.” – Linda Green, Presentation Expert
Now that we know how to activate and customize the Presenter View let’s delve deeper into its features and tools for maximum efficiency during presentations. Shall we proceed?
PowerPoint’s Presenter View is not just a simple “next slide” preview; it’s a hub of tools and functionalities designed to make the presenter’s job easier and the presentation more engaging.
H3: Slide Preview This is arguably the most straightforward feature but also the most helpful. At a glance, you can see what’s coming up, ensuring that you’re always prepared for the next topic or section.
- Smooth Transitions : Eliminates awkward pauses between slides.
- Improved Pacing : Know when to speed up or slow down based on upcoming content.
- Reduced Anxiety : No unpleasant surprises during your presentation.
H3: Speaker Notes For those who don’t rely on pure memory, speaker notes are a lifesaver. They’re your secret weapon, visible only to you, that provides additional context or reminders about what to say.
- Bold the crucial points to ensure they stand out.
- Use concise bullet points for easier and quicker reading.
- Add time cues if you’re aiming to cover specific points within certain timeframes.
H3: Slide Navigation While it’s always best to move sequentially through your slides, there might be instances when you need to skip ahead or return to a previous point. With the slide navigation tool, you can effortlessly hop around your presentation.
- Case Study : During a corporate presentation, John, a sales manager, was posed with a sudden question about Q2 performance. Thanks to slide navigation, he quickly reverted to the relevant slide, addressed the query, and resumed without any hiccups.
H3: Annotation Tools Engage your audience by turning your presentation into an interactive canvas. Whether you’re highlighting an essential statistic or drawing a quick graph, these tools can make a significant impact.
- Use contrasting colors to ensure visibility.
- Don’t overdo it; the aim is to emphasize, not to overwhelm.
- Practice beforehand to ensure you’re comfortable with these tools during the presentation.
H3: Timer It’s easy to lose track of time during a presentation. With Presenter View’s timer, you can keep tabs on the elapsed time, helping you manage the pace and duration of your talk.
- Tip : Always allocate a buffer period. If you’re presenting for 30 minutes, aim to finish in 25. This allows for Q&A or any unexpected delays.
Quote : “PowerPoint’s Presenter View is like a dashboard for presenters. It provides every tool one might need, all within arm’s reach, ensuring a seamless and interactive presentation experience.” – Michael Roberts, Tech Analyst
Understanding the features of the Presenter View is the key to unlocking its potential. With practice and familiarity, it becomes an extension of the presenter, leading to more confident and impactful presentations.
Making the Most of Presenter View
If you’ve ever wanted to feel like a presentation Jedi, mastering the Presenter View is your path to the force. But having the tool isn’t enough – it’s about leveraging its features optimally. Here’s a detailed guide on maximizing the benefits of the Presenter View:
H3: Setup and Access Before harnessing its power, you need to ensure you can access Presenter View without hitches.
- Connect your computer to the projector or external display.
- Launch PowerPoint and open your presentation.
- Go to the Slide Show tab and select Set Up Slide Show .
- In the pop-up, ensure Browsed by an individual (window) is selected.
- Start the slide show. Presenter View should appear on your computer, while the audience sees only the slides.
H3: Customize the Display Remember, it’s your dashboard; make it as comfortable and efficient for you as possible.
- Within Presenter View, hover over the bottom to reveal the toolbar.
- Click on the gear icon to adjust settings.
- Reorder tools based on your preference or hide those you don’t need.
H3: Practice, Practice, Practice The tool’s efficiency relies heavily on your familiarity with it. Do dry runs to ensure you know where everything is and how each feature works.
- Pro Tip : Mimic the presentation environment during practice. If you’re presenting in a large hall, practice with the same setup.
H3: Seamlessly Integrate Other Media If your presentation includes videos, animations, or other media, ensure they play seamlessly in Presenter View.
- Deep Dive : Always embed media within the presentation. Relying on external links or files can disrupt the Presenter View experience.
H3: Engage the Audience Use the tools not just to aid your presentation but to engage your audience. Pose questions, use the pen tool to sketch quick diagrams based on audience inputs, and make it interactive.
- Table of Engagement Techniques :
H3: Master the Art of Transitions Smooth transitions are key to maintaining audience attention. With a preview of the next slide, prepare your narrative to flow seamlessly.
Even with the most powerful tools, human error can play a spoilsport. The Presenter View, as intuitive as it may be, has its quirks. Here’s a list of common pitfalls users face and ways to steer clear of them:
H3: Not Checking Hardware Setup Before you even start the presentation, ensure your hardware is correctly set up. This includes checking the display connection, ensuring the projector or external monitor is detected, and setting up the correct display settings.
- Pro Tip : Always keep a spare HDMI or VGA cable. Technical glitches often come from the most unexpected sources.
H3: Overlooking Speaker Notes Having made the effort of adding speaker notes to your slides, it would be a shame not to use them. They serve as a discreet prompt, ensuring you don’t miss any critical points.
- Fact : According to a study, presenters who actively used speaker notes were 25% more consistent in delivering their core messages.
H3: Ignoring the Timer Time management is crucial. If you have a fixed time slot, exceeding it can inconvenience others and may appear unprofessional. Conversely, finishing too early can leave your audience unsatisfied.
- Actionable Advice : Always have a buffer. If your slot is 30 minutes, aim for a 25-minute presentation, leaving room for Q&A or unexpected delays.
H3: Relying Exclusively on Presenter View Despite its usefulness, never be wholly dependent on Presenter View. Technical glitches happen, and the ability to continue smoothly without it showcases professionalism.
- Case Study : At a major tech conference in 2018, a renowned speaker’s Presenter View malfunctioned. Instead of panicking, he smoothly transitioned to the standard view, using his printed notes as a backup. The audience lauded his adaptability, and his message wasn’t overshadowed by the hiccup.
H3: Not Adapting to Audience Feedback The tools in Presenter View, like slide navigation, are meant to enhance adaptability. If you sense your audience resonating more with a particular topic, don’t be afraid to dwell on it a bit longer or even revisit slides.
By sidestepping these common mistakes, you not only harness the full potential of Presenter View but also project confidence and control. Next, we’ll explore some advanced features to elevate your presentation game even further.
Mastering Presenter View basics can tremendously improve your presentation skills. But if you’re looking to elevate your game and leave a lasting impression, dive into these advanced features:
H3: Seamless Transition Between Slides The art of a great presentation lies not just in the content but also in the delivery. A choppy slide transition can disrupt the flow. PowerPoint offers a plethora of transition effects — from subtle fades to dynamic 3D effects.
- Go to the Transitions tab.
- Browse and select your preferred effect.
- Adjust the transition duration if needed.
- Click Apply To All to maintain uniformity.
H3: Use Zoom to Focus on Details Occasionally, you might want to draw attention to specific details on a slide. Instead of making your audience squint, use the in-built Zoom feature.
- Tip : Combine zoom with a laser pointer or pen tool for emphasis.
H3: Ink Annotations Annotating directly on your slides can be beneficial for interactive sessions or workshops. PowerPoint’s “Ink” feature allows you to do just that.
- Did You Know? : Ink annotations made during a presentation can be saved for future reference!
H3: Embed Multimedia for a Rich Experience Modern presentations often go beyond static slides. Consider embedding videos, audio clips, or even live web content to keep your audience engaged.
- Navigate to the Insert tab.
- Choose Video or Audio and select your file.
- Adjust playback settings under the Playback tab.
H3: Custom Slide Show Sometimes, different segments of your audience require varied content. Instead of having multiple PPT files, create a custom slideshow within the same presentation.
PowerPoint’s Presenter View is akin to a secret weapon, waiting in the wings, ready to empower speakers, educators, and presenters globally. Whether you’re a novice taking your first steps into the world of presentations or a seasoned speaker aiming to refine your skills, the Presenter View, along with the myriad features PowerPoint offers, ensures your content shines in the best light.
Remember, a successful presentation doesn’t merely rely on flashy slides or multimedia elements. It’s the seamless blend of content, delivery, and engagement. And with tools like Presenter View, you’re equipped to handle the technical aspects, allowing you to focus on what truly matters – connecting with your audience.
As Bill Gates once said:
“If you think the PowerPoint presentation is there for you as the presenter, you’re wrong. It’s there for the audience.”
So, the next time you’re gearing up for that crucial pitch, workshop, or lecture, take a moment to familiarize yourself with Presenter View. Your audience — and your confidence — will thank you for it.
Happy presenting!
Save my name, email, and website in this browser for the next time I comment.
How to Use Presenter View in PowerPoint with Projector?
Elevate your presentations with Presenter View in PowerPoint. Dive into our guide on “How to Use Presenter View in PowerPoint with Projector” to master the art of delivering engaging and professional slideshows effortlessly.
Table of Contents
How to Use Presenter View in PowerPoint with Projector
Introduction.
Making impactful presentations requires more than just projecting slides. Utilizing Presenter View in PowerPoint with a projector allows presenters to have a comprehensive control center, enhancing engagement and delivering a polished performance.
Leveraging Presenter View for Seamless Presentations
Presenter View in PowerPoint is designed to provide presenters with a variety of tools to manage and control their presentations effectively. When using a projector, follow these steps to make the most out of Presenter View:
Step-by-Step Guide
- Ensure your projector is connected to your computer or device.
- Launch your PowerPoint presentation.
- Navigate to the “Slide Show” tab in PowerPoint.
- Locate and click on the “Presenter View” option.
- Adjust display settings to ensure Presenter View appears on the correct screen.
- Explore features like speaker notes, slide previews, and upcoming slides for a comprehensive control panel.
Answering Questions
How do i extend a powerpoint presentation on a projector.
Extending a PowerPoint presentation on a projector involves configuring your display settings to extend the desktop. Follow these steps:
- Connect your projector.
- Open PowerPoint.
- Go to the “Slide Show” tab.
- Click “Set Up Slide Show.”
- Choose “Extend the desktop” under Multiple Displays.
Now, your PowerPoint presentation will be extended to the projector, and Presenter View can be utilized.
How Do I Use Presenter View in PowerPoint with One Monitor?
If you have only one monitor, you can still use Presenter View in PowerPoint. Follow these steps:
- Click “Use Presenter View.”
Presenter View will appear on your primary monitor, allowing you to view speaker notes and control your presentation while the audience sees the slides.
In conclusion, mastering Presenter View in PowerPoint with a projector can significantly enhance your presentation skills. Whether you’re extending your presentation or using a single monitor, these steps empower you to engage your audience and deliver a seamless, professional presentation. Explore the features, practice, and make your next presentation a memorable success.
Leave a Comment Cancel reply
Save my name, email, and website in this browser for the next time I comment.

How-To Geek
7 powerpoint features you should use during presentations.
Are you using the right features to engage your audience?
Quick Links
Presenter coach for practicing, cameo for a live camera feed, subtitles for showing spoken words, presenter view for tools during the show, pen, highlighter, and laser pointer for visual emphasis, zoom for a closer view, speaker notes for talking points.
As you may already know, Microsoft PowerPoint offers a robust feature set for creating presentations. But what kind of tools are useful for actually presenting a slideshow? We'll walk you through several features that can help you engage your audience.
Before it's time for your presentation, you can practice with help from PowerPoint itself. Using Presenter Coach , you can receive feedback as you walk through your slideshow.
Related: How to Practice Your Presentations with PowerPoint's Presenter Coach
To use Presenter Coach, head to the Slide Show tab and select "Rehearse with Coach." When your slideshow opens in full screen mode, click "Start Rehearsing" to begin.
You'll see feedback in real-time as you speak and move through your presentation. You can also view a rehearsal report after you finish that summarizes your time spent practicing, filler words you use, your pace, and more.
Plan ahead for your presentation by practicing with this handy built-in tool.
For a personal touch or a way to communicate visually, consider using a live camera feed. With the Cameo feature, you can put your face and voice front and center during your slideshow.
To add the Cameo object, go to the slide, open the Insert tab, and select "Cameo" in the Camera section.
You can then move or resize the object, see a preview using the camera icon, and customize the object using the Camera Format tab that appears when you select it.
If you add the Cameo element to additional slides, your camera feed continues seamlessly through your presentation.
For complete details on this feature, take a look at our how-to for using a live camera feed in PowerPoint .
Related: The Best Webcams of 2023
You may have audience members viewing your PowerPoint presentation who have a hearing impairment or speak a different dialect. With subtitles, you can display every word you say during a presentation in the language of your choice.
Related: How to Set Up and Use Subtitles in Microsoft PowerPoint
To set up the subtitles , go to the Slide Show tab and select the Subtitle Settings drop-down menu. You can then adjust the spoken and subtitle languages, the microphone you want to use, and the placement of the captions.
You can check the box above the menu to Always Use Subtitles or use the Toggle Subtitles icon (Windows) or Closed Caption button (Mac) to turn them on and off during your presentation.
For an excellent way to accommodate your audience during your slideshow, give the subtitles feature a try.
When you present your slideshow, you probably want every tool available to you, and PowerPoint has many. To access those tools like a laser pointer or your presenter notes, check out Presenter View .
To use the feature on Windows, go to the Slide Show tab and check the box for Use Presenter View in the Monitors section of the ribbon. Then, start your presentation as normal. On Mac, simply click "Presenter View" on the Slide Show tab.
To start Presenter View during the slideshow, click the three dots on the bottom left and pick "Show Presenter View."
Next, you'll see a dashboard-like screen with everything you need. On the top left is the current slide, to the right is the next slide, and below that you have your notes.
On the left, you can open additional tools, turn subtitles on or off, black or unblack the show, toggle the camera, and end the show.
Presenter View puts everything you need at your fingertips during your presentation.
These may seem like super basic tools, but they can be quite handy while presenting a slideshow. You can use a pen to circle an image or draw an arrow, a highlighter to call out certain text, or a laser pointer to emphasize parts of a slide.
Related: Turn Your Mouse into a Laser Pointer in PowerPoint
To access the tools in Presenter View, select the Pen and Laser Pointer Tools icon (pen) below the current slide.
To access the tools without Presenter View, select the Pen and Laser Pointer Tools icon on the bottom left of the slide.
Choose a tool and then use your cursor to control it. For the pen and highlighter, you can also pick a color in the pop-up window.
To "put away" the tool you're using, access it using the steps above and deselect it.
Along with using the tools above for making parts of your presentation stand out, you can take advantage of the Zoom feature. With it, you can zoom in on part of a slide , move around if you like, and then zoom back out.
As of November 2022, this feature is not available in PowerPoint on Mac.
In regular slide show view or Presenter View, select the zoom icon (magnifying glass) on the bottom left.
You'll then see a rectangle on your screen indicating the zoom area. Move that rectangle to the spot you want to enlarge and click.
You can then drag to move around the slide while it's zoomed in. Right-click or use your Escape key to zoom back out to the original view.
Just like giving a speech with index cards for your talking points, notes in PowerPoint are just as beneficial. You can include information you want to highlight or further details for text or images you use.
Related: How to Insert a Check Mark or Checkbox in PowerPoint
To add presenter notes to your slideshow, open the notes panel. Either select "Notes" in the status bar or drag up from the bottom of the slide in the PowerPoint window.
Then when it's time to present, use Presenter View to display your notes during the show.
With an update to PowerPoint in 2022, you can also edit your notes while you present. This is a good way to capture additional points you think of while presenting or if an audience question pops up.
Place your cursor in the notes area on the right side and add or remove text. You can also use the buttons at the bottom to increase or decrease the font size.
Having your speaker notes with you during a slideshow is a key element in a successful presentation.
When you finish creating your PowerPoint slideshow , prepare to present it by trying out these features ahead of time. Then, incorporate them into your slideshow where it makes sense. Your audience will be glad you did!
How to See Your Notes When Presenting in PowerPoint

As a presenter, delivering a seamless and confident presentation is key to making a lasting impression. However, it can be challenging to remember every detail of your presentation, especially if you have a lot of content to cover. Fortunately, with PowerPoint’s Presenter View, you can easily access your notes and confidently deliver your presentation. In this article, we will cover all aspects of using PowerPoint’s Presenter View to enhance your presentation.
Table of Contents
Why You Need to See Your Notes When Presenting in PowerPoint
Presenting without having your notes at hand can be daunting and can affect the quality of your presentation. Whether you are presenting in front of a small group or a large audience, you will need to have access to your notes. This will help you deliver your presentation confidently, as you will have a clear idea of what to say or do next. In addition, having your notes visible can help you stay focused on the topics you want to cover and avoid straying off-topic.
Another reason why it is important to see your notes when presenting in PowerPoint is that it can help you manage your time effectively. By having your notes visible, you can keep track of the time and ensure that you are covering all the important points within the allocated time frame. This can help you avoid rushing through the presentation or running out of time before you have covered all the key points.
Furthermore, having your notes visible can also help you engage with your audience better. When you are confident and well-prepared, you are more likely to make eye contact with your audience and use body language effectively. This can help you build a connection with your audience and keep them engaged throughout the presentation.
How to Access Presenter View in PowerPoint
Before you can access Presenter View, you need to have a PowerPoint presentation open in Slide Show mode. Once your presentation is open, simply click on the ‘Slide Show’ tab and check the box beside ‘Use Presenter View.’ Your screen will then automatically switch to Presenter View, allowing you to see your notes and other helpful controls.
Presenter View is a great tool for giving presentations, as it allows you to see your notes and upcoming slides while your audience only sees the current slide. You can also use Presenter View to zoom in on specific parts of your slide, draw on your slides, and even use a virtual laser pointer to highlight important information. To exit Presenter View, simply press the ‘Esc’ key on your keyboard.
Understanding the Presenter View in PowerPoint
Presenter View is a powerful tool that enables you to manage your presentation effectively. It comprises several elements, including:
- The slide display area, which shows the slide that your audience sees.
- The notes section, which displays any text that you have added as notes or comments.
- The timer, which can help you stay within your allotted time.
- The navigation controls, which let you move forward and backward in your presentation easily.
- The zoom slider, which enables you to zoom in and out of your slides for added detail.
- The laser pointer and highlighter tools, which allow you to emphasize important points on your slides.
Presenter View also allows you to preview upcoming slides, giving you a chance to prepare for the next section of your presentation. This feature can be especially helpful if you need to refer to specific information on a later slide.
In addition, Presenter View provides a way to keep your audience engaged by allowing you to add annotations to your slides. You can draw attention to specific areas of your slide, highlight key points, or even add additional information that may not be included in the slide itself.
Setting Up Presenter View: Step-by-Step Guide
If you want to customize your Presenter View experience, follow these steps:
- On the ‘Slide Show’ tab, click ‘Set Up Slide Show.’
- Under ‘Multiple Monitors,’ select the ‘Use Presenter View’ checkbox.
- If you’re using a single monitor, select the ‘Display slide show on’ option and choose your primary monitor.
- If you’re using dual monitors, select the ‘Display slide show on’ option and choose the monitor that you want to display Presenter View on.
- Customize the Presenter View by selecting the options that you want to use, such as speaker notes, the timer, and the navigation controls.
- Click ‘OK.’ Your Presenter View should now be set up.
It’s important to note that not all versions of PowerPoint have the Presenter View feature. If you don’t see the ‘Use Presenter View’ checkbox under ‘Multiple Monitors,’ it’s likely that your version of PowerPoint doesn’t support this feature. In this case, you may need to upgrade to a newer version or use a different presentation software that offers Presenter View.
How to Customize Presenter View Settings in PowerPoint
If you have specific preferences for Presenter View, you can customize it by following these steps:
- Click the ‘Settings’ button in the Presenter View toolbar.
- Select the options that you want to use, such as the color scheme, font size, and slide size.
- Click ‘Save Changes’ to apply your changes.
Customizing your Presenter View settings can greatly enhance your presentation experience. For example, you can choose to display your notes on one screen while your audience sees only the slides on the other screen. Additionally, you can select the option to display a timer or a clock to help you keep track of time during your presentation. Experiment with different settings to find what works best for you and your audience.
Using Presenter View on Dual Monitor Setup
If you have a dual-monitor setup, you can use Presenter View to present your slides on one screen while managing your notes and tools on the other screen. To do this, simply select the ‘Use Presenter View’ checkbox under ‘Multiple Monitors’ in the ‘Set Up Slide Show’ dialog box. Once you start presenting, the Presenter View screen will appear on the secondary monitor, while the slides will appear on the primary screen.
Presenter View is a great tool for presenters who want to keep their notes and tools hidden from the audience. With Presenter View, you can see your notes, upcoming slides, and a timer, while your audience only sees the current slide. This feature is especially useful for longer presentations, where you may need to refer to your notes or keep track of time.
Another benefit of using Presenter View is that it allows you to easily navigate through your presentation. You can use the arrow keys on your keyboard to move forward or backward through your slides, or you can use the thumbnails on the Presenter View screen to jump to a specific slide. This makes it easy to adjust your presentation on the fly, without having to interrupt the flow of your presentation.
Troubleshooting Common Issues with Presenter View in PowerPoint
If you experience common issues with Presenter View, such as notes not displaying correctly, audio not working, or distorted visuals, try these troubleshooting tips:
- Make sure that your computer meets the minimum system requirements for using Presenter View.
- Check that the correct audio output is selected in the control panel.
- Review your slides and notes to ensure that there are no formatting errors.
- Try closing other open applications to free up system resources.
- Ensure that your computer is updated with all available updates.
- Try reinstalling or repairing PowerPoint to eliminate any software conflicts.
However, if these troubleshooting tips do not resolve your issues, there may be other factors at play. One possible cause of issues with Presenter View is outdated or incompatible drivers for your computer’s graphics card. Check with your computer manufacturer or graphics card manufacturer to see if there are any updates available.
Another potential issue could be related to your computer’s display settings. Make sure that your display settings are optimized for the resolution and aspect ratio of your presentation. You may also want to try adjusting the scaling settings to see if that improves the display of your slides and notes.
Tips and Tricks for Effective Note-taking During Presentation
To get the most out of Presenter View, try these effective note-taking tips:
- Organize your notes by slide or topic to stay on track during the presentation.
- Use bullet points and keywords to keep your notes concise and easy to read.
- Include cues or action words to remind you of any demonstrations, animations, or other interactive elements in your presentation.
- Use the highlighter tool to draw attention to the most critical points.
Enhancing Your Presentation with Presenter View
Presenter View can enhance your presentation in several ways, such as by allowing you to add visual aids and multimedia elements, manage your time effectively, and engage your audience. By using Presenter View, you can keep your presentation on track, highlight key information, and maintain your audience’s attention throughout.
The Importance of Rehearsing Your Presentation with Presenter View
Practicing your presentation with Presenter View can help you become familiar with the interface, identify any errors or issues, and ensure that your presentation will run seamlessly. Use Presenter View during your presentation rehearsal to simulate the actual presentation environment and get a feel for how it works.
Taking Advantage of the Laser Pointer and Highlighter Tools in Presenter View
The laser pointer and highlighter tools are handy for emphasizing key points on your slides and improving audience engagement. To use them, simply press and hold the ‘Ctrl’ key and click the mouse to activate the laser pointer or highlighter. Release the key to deactivate them.
How to Switch Between Slides and Notes during a Presentation
If you need to switch between slides and notes during your presentation, simply click the ‘Notes’ button in the Presenter View toolbar. This will display your notes and allow you to scroll through them as needed.
Utilizing the Timer and Countdown Features of Presenter View
The timer and countdown features are useful for keeping your presentation on track and ensuring that you do not exceed your allotted time. To use them, simply enable the ‘Timer’ feature in the ‘Settings’ section of Presenter View. You can then set the countdown time and choose whether to display it during the presentation or keep it hidden.
Sharing Your Screen Using Presenter View in Microsoft Teams or Zoom Meetings
If you are using Microsoft Teams or Zoom Meetings to deliver your presentation remotely, you can still use Presenter View by sharing your screen. To do this, simply select the ‘Share Screen’ option and choose the ‘Presenter View’ screen. This will allow you to present your slides while keeping your notes and controls visible to you for an uninterrupted presentation experience.
By following the steps and tips outlined in this article, you can use PowerPoint’s Presenter View to deliver a polished and professional presentation that wows your audience. Always remember to rehearse your presentation before the actual day so that you’re comfortable with the tools and settings for Presenter View, and ready to tackle any issue that might arise.
By humans, for humans - Best rated articles:
Excel report templates: build better reports faster, top 9 power bi dashboard examples, excel waterfall charts: how to create one that doesn't suck, beyond ai - discover our handpicked bi resources.
Explore Zebra BI's expert-selected resources combining technology and insight for practical, in-depth BI strategies.

We’ve been experimenting with AI-generated content, and sometimes it gets carried away. Give us a feedback and help us learn and improve! 🤍
Note: This is an experimental AI-generated article. Your help is welcome. Share your feedback with us and help us improve.

- Use Presenter View Video
- Add speaker notes Video
- Practice and time your presentation Video
- Record a presentation Video
- Print a presentation Video

Use Presenter View

PowerPoint Presenter View shows you the current slide, the next slide, and your speaker notes, to help you focus while presenting and connect with your audience.
Select the Slide Show tab.
Select the Use Presenter View checkbox.

Select which monitor to display Presenter View on.

In Presenter View , you can:
See your current slide, next slide, and speaker notes.
Select the arrows next to the slide number to go between slides.
Select the pause button or reset button to pause or reset the slide timer in the upper left.
See the current time to help you pace your presentation.
Select the font icons to make the speaker notes larger or smaller.
Select the annotations pen icon to draw on the screen in real time, or select a laser pointer.
Select the thumbnail icon to see all the slides in your presentation and quickly jump to another slide.
Select the magnifying glass icon to zoom in on a particular part of a slide.
The screen icon let's you make the screen temporarily black to focus the attention on you.
Select END SLIDESHOW when you're done presenting.
Start the presentation and see your notes in Presenter view

Need more help?
Want more options.
Explore subscription benefits, browse training courses, learn how to secure your device, and more.

Microsoft 365 subscription benefits

Microsoft 365 training

Microsoft security

Accessibility center
Communities help you ask and answer questions, give feedback, and hear from experts with rich knowledge.

Ask the Microsoft Community

Microsoft Tech Community

Windows Insiders
Microsoft 365 Insiders
Was this information helpful?
Thank you for your feedback.

< Go back to Login
Forgot Password
Please enter your registered email ID. You will receive an email message with instructions on how to reset your password.

The Golden Rules of holding the audience attention in presentations
There are innumerable ways to structure PowerPoint presentations based on the context and the requirements. However, presentations, not unlike other forms of communication, do have some ground rules that are often considered cardinal regardless of what is being presented. Savvy presenters understand that they cannot take the audience’s attention span for granted and work smartly to get the most out of the time the audience gives them.
A lot of research has been done on the methods of presentation delivery. SlideUpLift has compiled a list of these rules for you to create an impact when you adopt these practices.
In this blog, you will learn
Importance Of Organizing For Attention Capture
10-20-30 Rule
Single Big Idea
The 15-75-10 Narrative
- SlideUpLift Templates For Business Presentations
Many forms of media and communication take the idea of attention capture very seriously- think about the last time you saw a TV ad the ad was likely a few seconds long and the creators worked very hard to get the message across in those few seconds- every aspect was optimized knowing fully well that precious attention from the audience is likely to wander off if anything goes off tangent in the advertisement. There is more: think of posters, of banner ads on websites- all of these are designed around constraints of space or time- limiting how much time and attention the audience could really give.
Now think of PowerPoint presentations: the audience behavior is likely to not deviate much: In fact, studies have indicated that the average duration of focused attention span is 8 seconds, down from 12 seconds in 2020; there are enough distractions in today’s digital world that drive these trends.
Bottom line is, presenters need to actively think about the topic of holding the attention of their audience. The ease of editing slides in tools like PowerPoint is a proverbial double-edged sword -since it is so easy to add slides, text, graphics, etc that the presenters often can do too much without seeing the slippery slope they are on when that occurs.
Presentation Rules To Maximize Attention Span
Each of the following rules presents powerful ideas towards capturing and holding the audience’s attention. These can be used in isolation or combined to cater to your specific requirements and objectives for a presentation.
Guy Kawasaki , a venture capitalist well versed in making and assessing presentations, came up with the 10-20-30 Rule. He created this rule in response to hundreds of entrepreneurs pitching their ideas to him using dense 60+ slides PowerPoint presentations to explain something that could have been explained in 10. While he made the rule in the realm of venture capitalism and start-up pitches , the 10-20-30 Rule can be applied pretty much unanimously for every business need.
The rule states that each presentation should have no more than 10 slides each. The total time taken for the presentation should not exceed 20 minutes. And the font size for all the text in the presentation should not be less than 30 px.
10 Slides – This is in reference to people’s attention spans and the power of retention. For the average human, the information given concisely and carefully is more effective, rather than long-winded explanations and detailed descriptions. Thus, 10 slides are the optimum number of slides to put relevant information that can actually be retained.
20 Minutes – This is the maximum time an audience is willing to give you after experiencing several bouts of attention loss. So, wrap up your presentation within 20 minutes to keep the audience interested and focused.
30 px font size – The dilemma of putting in more information at the expense of font size is a struggle every presenter’s faces. However, having the bottom line read 30 px for the font size constrains a presenter into making their information short and effective, rather than relying on long-winded explanations crammed onto a page in 10px font size.
Business Pitch Deck
Source: Business Pitch Deck by SlideUpLift
The 5-5-5 Rule follows the principles of the 10-20-30 Rule, in the sense that it seeks to quantify the structure of a presentation. However, it delves deeper into the details of PowerPoint presentations through the number 5 and talks about structuring information within a single slide.
The three 5s stand for
5 words – There should be no more than 5 words in one sentence (in a slide). This keeps the sentence focused only on the objectives, rather than creating a whole story around it.
5 sentences – There should be no more than 5 sentences or lines of text on a single slide. This makes each slide that much more approachable and readable for the audience.
5 slides – There should not be 5 text-heavy slides within a presentation in a row. Space them out as much as possible. Having text-heavy slides back to back can cause information overload and fatigue in the audience.
One of our guiding principles is the notion of a “Single Big Idea”. The premise of this idea is two-fold. The overall presentation should be focused on the main vision and goal of the presentation. For instance, if the goal is customer acquisition, the whole presentation, tonality, graphics, story flow, messaging should be focused on customer acquisition.
Moreover, each slide should also follow the concept of a “single big idea”. Treat each slide with the reverence given to the overall presentation, ensuring that each element, be it visual or textual, aligns with and reinforces the larger idea being presented on that slide.
One of the best tools in a presenter’s toolbox for making presentations is storytelling . We as human beings love stories and absorb messages without even realizing it.
One of the ways to structure your PowerPoint presentations is to narrativize them. The 15-75-10 rule is one way to do it
The 15% Introduction : This should be about 15% of the whole presentation, wherein you introduce yourself if needed, and the larger idea that you intend to convey within the presentation. You can also establish your touchpoints and objectives right at the beginning.
The 75% Body : Consisting of about 75% of the presentation, the body is where each of your touchpoints is elaborated on using anecdotes, examples, statistics, and information related to them. The body should answer the questions of what, why, and how for the topic.
The 10% Conclusion : The last 10% of your presentation should be the conclusion. A good conclusion is not just a conclusion slide with a thank you note on it. A solid conclusion summarises the presentation, talks about key points of focus, provides contact information, has a call-to-action, and prompts audience engagement to recall and revise everything said during the presentation. Conclusions are brief but powerful parts of a presentation.
Also learn a few tips on effective public speaking .
SlideUpLift Templates for PowerPoint Presentations
SlideUpLift consists of a team of visual design and business experts that are well-versed in both presentation structures, and business foundations for communication. As such, each presentation is made keeping in mind their impact and effectiveness for each topic.
All SlideUpLift presentations work with the rules of structuring that best fit that particular topic. From project reviews to SWOT analysis , each template is guided by the golden rules of presentation structuring to create a unified and cohesive template that fits all business requirements. Creating impactful, engaging, and effective PowerPoint presentations has never been easier.

Value Proposition PowerPoint
Source: Value Proposition powerPoint by SlideUpLift

Customer Journey Executive Summary
Source: Customer Journey Executive Summary by SlideUpLift

Ladder Diagram
Source: Ladder Diagram by SlideUpLift

Puzzle PowerPoint Template
Source: Puzzle PowerPoint Template by SlideUpLift
Project Kickoff
Source: Project KickOff Presentation by SlideUpLift
It’s a given that a good presentation needs a great structure. But understanding the rules that govern human psychology is extremely important to make an impact when presenting, whether to a group of people or an individual. Using presentation templates that pre-bake such insights and are created specifically to capture the audience’s attention is a smart thing to do.
Now you don’t have to scour the web to find out the right templates. Download our PowerPoint Templates from within PowerPoint. See how ?
Related Articles

Table Of Content
Related posts from the same category.

1 Feb, 2022 | SlideUpLift
Powerful Words and Statements To Use In Presentations
No matter what industry you work in, you will have to deliver a presentation at some point. At first, this may be quite nerve-racking, if not simply terrifying. The good

12 May, 2023 | SlideUpLift
Advantages And Disadvantages Of Using Google Slides In Presentations
Have you been pondering whether to put time into Google Slides? Google Slides is gaining popularity as an alternative to Microsoft PowerPoint because of innovative features offered by Google. Is

3 Feb, 2022 | SlideUpLift
8 Tips Ahead Of Your Big Day: The Big Presentation Tips
Are you preparing for your next big presentation? Aside from preparing, writing, and practicing your speech, there are certain other actions you should do to ensure you are truly prepared

20 Jun, 2022 | SlideUpLift
6 Ways to Make the Perfect and Impactful PowerPoint Presentations
Creating a PowerPoint presentation might seem easy. Learning the nuances of sharing content through this medium can reinforce your message correctly. PowerPoint Presentations are a mode of communication where you

20 Aug, 2021 | SlideUpLift
Storytelling Tips to Change the Way You Present Ideas
A piece of oft-given advice surrounding making presentations is that in order to engage an audience, your presentation and speech need to have a narrative. And we wholeheartedly agree with

28 Oct, 2021 | SlideUpLift
How Much Time Does It Take To Prepare A Presentation?
How much time does it take to prepare a presentation? It depends Duh! Two big factors decide that- The complexity of your presentation and your familiarity with the topic. Add

8 Jun, 2023 | SlideUpLift
How To Present Data In The Best Way?
Having accessible means to analyze and understand data is more vital than ever in our increasingly data-driven environment. After all, employers increasingly value people with strong data abilities, and every

4 Oct, 2023 | SlideUpLift
The Best And Worst PowerPoint Presentation Examples
Engaging presentations are the lifeblood of effective communication in today's information-driven world. Whether you're in a boardroom pitching a new idea, standing in front of a classroom of curious learners,

10 May, 2023 | SlideUpLift
Advantages and Disadvantages of Using PowerPoint for Presentations
If you want to make visually captivating and professional-looking presentations, understanding PowerPoint and the benefits of PowerPoint is vital for you. Microsoft PowerPoint is a popular presentation tool used by

1 Feb, 2024 | SlideUpLift
The Best Board Meeting Agenda Guide [With Examples & Sample Agendas]
You might have had a meeting that went completely off. It might be overly prolonged and had numerous off-topic discussions. It has happened with most professionals at some point in
Forgot Password?
Privacy Overview
Necessary cookies are absolutely essential for the website to function properly. This category only includes cookies that ensures basic functionalities and security features of the website. These cookies do not store any personal information
Any cookies that may not be particularly necessary for the website to function and is used specifically to collect user personal data via ads, other embedded contents are termed as non-necessary cookies. It is mandatory to procure user consent prior to running these cookies on your website.
Presentation Guru
5 ways to make your presentation more visual and effective.

Visualizing slides (just a fancy word for transforming slides full of text into more visual slides) is a big part of my job, but you don’t need to be a PowerPoint expert to apply some basic visualization techniques to your presentations. Even minimal changes can make your presentations much more effective and can help people understand your messages better.
Listening to someone present, who is just reading a slide full of text, doesn’t add to understanding. It actually distracts, because the audience will end up reading the text on the slides themselves instead of listening to what the presenter is saying.
On the other hand, slides with less text and more visuals, whether it be graphs, pictures or diagrams can help the audience retain more information, because visuals and speech work hand-in-hand rather than compete for attention in the brain.
It’s a proven concept we follow at BrightCarbon, and one that we often preach about on our own blog . So, to get you started, here are 5 simple things that you can do to make your presentations more visual and more effective.
1) Cut down text on slides
Bullet-point filled slides have been plaguing audiences since PowerPoint began. But they aren’t just painfully dull: bullet points are really ineffective for communicating information to an audience.
So, the easiest way you can quickly make your presentation 1000 times better is by simply cutting out some of the text.
The easiest way to cut down text is to first break it down into chunks, then break it into key points – so, one short bullet-point per chunk – and then to get rid of filler words. This will help you take large paragraphs of text and break them into short and snappy phrases that can fit into text boxes or other shapes.
For example, let’s look at the following block of text:
Peonies are my favorite type of flower. They’re pretty to look at because they come in a range of beautiful shades of pink. They also smell amazing and make great perfume. Lastly, they are larger than a lot of other flowers and make a gorgeous, lush bouquet.
Instead of filling an entire paragraph, we could break this text into three key points:
- Peonies come in range of pink shades
- They make great perfume
- They make a gorgeous bouquet
Then, if we get rid of any filler, we are left with:
- Pink shades
- Great perfume
- Gorgeous bouquet
And voila! You have yourself some bullets that are ready to be fit into shapes. By allowing your text to fit into shapes you gain the ability to organize it in a linear way and then you can animate it on clicks, to stagger the flow of information and tell a more compelling story.
So, BEFORE :

and AFTER :

If you want to learn more about how to ditch the bullet points for good, find out more here .
2) Show locations on maps
I’ve worked on quite a few presentations at this point and I think it’s safe to say most of them include a list of locations at some point. This is because it is really common for companies to have a narrative that includes showing their impact on a national, or global, scale by showing their locations. Often, this is just presented as a list of places. But it’s a lot more interesting – and memorable – to show locations on a map.
For example, if a company has opened a couple stores per year, in different locations, they could animate icons representing these stores on a map and have information such as the year, location or size of store in a box next to the icon.
This is a good way to make the slides illustrate a story about the company’s growth, in a way that is easy for the audience to understand.
3) Add color cues
Adding color to slides in an organized way can enable you to manipulate the audience’s attention and increase their understanding of your content.
For example, if every element on your slide is blue and then you color one object yellow, people will understand that the differently colored object is important or different in some way.
The same idea of ‘color coding’ works when you want the audience to get certain ideas from colors e.g. yellow and black mean warning; green is positive; red is negative.
Keep in mind that these associations are partly based on cultural teachings, so they might not apply if the people you are presenting to have a different cultural understanding of color.
You can also use color to set a ‘mood’ for your presentation. For example, if your company is heading a green initiative then using green tones in your presentation will make it feel more environmentally friendly. Most brands already apply this theory in their logos and brand guidelines, so continuing this thought process in your slides can create even more cohesion and understanding.
Find out more about using color effectively here .
4) Use Timelines

A great way to organize text-heavy slides that involve dates and events is to divide them into a timeline.
This is similar to the map idea above, in that it requires a certain type of information to be successful, but if you have dates and information, it’s much more effective to see them organized linearly than in a list of bullet points.
A timeline is a pretty simple element to create on PowerPoint and just involves a line and some evenly aligned and distributed boxes. Create your boxes using the Insert -> Shape functionality, then use the built-in alignment tools to space everything out neatly .
5) Replace text with labelled images
The last, and arguably most important, point is to get rid of text all together, and replace it with images.
For example, if you want to talk about a new product and its features, the best way of doing this is to insert an image of the product and just label it with key words.
You can insert shapes to pin-point areas you’d like to highlight and then animate them in on clicks so you can stagger the rate at which you mention each feature, which can help the audience follow along.
It’s also useful to have images of the product being used by customers so that you can show the audience exactly how it will look and work.
Being complacent and adding tons of text or bullet points to your presentations won’t do you any favors, because people will become instantly bored and disengaged while you’re presenting, and will start reading what’s on the screen instead of listening to the important things you’re saying.
By applying a couple of easy-to-learn tips to your next presentation, you can significantly increase its effectiveness and make it much more visually appealing. Your audience will stay engaged throughout your presentation and will remember more of the content you are sharing.
It’s amazing how much visuals can do to improve communication between a presenter and an audience, so just remember that the next time you’re pasting reams of text into a 25-slide deck: there are better ways.
- Latest Posts
Latest posts by Amy Post ( see all )
- A Quick Guide to More Effective Animations - 28th February 2019
- Master the Slide Master - 20th March 2018
- 5 Ways to Make Your Presentation More Visual and Effective - 6th April 2017
Craig Hadden (@RemotePoss)
11th April 2017 at 4:05 am
These are great ideas, so thanks for sharing. Recently I’ve tried to use colour in a more systematic way, so I was especially interested to read your thoughts on that.
You might also like this makeover I did on a (real) slide. It was stuffed full of bulleted text, but ended up being far less wordy and much more visual. See what your think. (And any comments or questions are always welcome!)
15th April 2017 at 12:47 pm
Thanks for this. and if you’d like to write that piece for us, to help the thousands of designers and presenters out there, we’d love to publish that piece too. The guru is our community after all!
Abigail Lee
25th June 2019 at 12:11 pm
Great article. Prior to stumbling upon your article on Google, I have found similar another engaging article on this website https://www.slideteam.net/blog . It has a collection of enthusiastic articles on PowerPoint as well as professional slides. Feel free to explore all of them.
Your email address will not be published. Required fields are marked *
Follow The Guru

Join our Mailing List
Join our mailing list to get monthly updates and your FREE copy of A Guide for Everyday Business Presentations

The Only PowerPoint Templates You’ll Ever Need
Anyone who has a story to tell follows the same three-act story structure to...

How to get over ‘Impostor Syndrome’ when you’re presenting
Everybody with a soul feels like an impostor sometimes. Even really confident and experienced...
The Ultimate Guide to PowerPoint Viewer: Enhance Your Presentation Experience

Introduction
When it comes to creating and delivering impactful presentations, Microsoft PowerPoint has remained a cornerstone tool for professionals, educators, and students alike. The ability to convey ideas, information, and visuals in a compelling and organized manner is paramount, and PowerPoint has consistently risen to the occasion. One crucial aspect of the PowerPoint ecosystem that often goes overlooked is the PowerPoint Viewer – an auxiliary tool that brings an enhanced presentation experience to both creators and viewers. In this comprehensive guide, we'll delve into every facet of the PowerPoint Viewer, from its features and benefits to tips and tricks for optimal utilization.
Understanding PowerPoint Viewer
PowerPoint Viewer is a dedicated application designed to allow users to view PowerPoint presentations without requiring the full Microsoft PowerPoint software. Whether you're a presenter who wants to share your content seamlessly with others or an audience member who wishes to access and interact with presentations without the editing capabilities, PowerPoint Viewer has you covered.
Key Features of PowerPoint Viewer
Interactive Viewing : PowerPoint Viewer enables users to engage with presentations, zoom in on details, and navigate through slides intuitively.
Formatting Integrity : Maintains the original formatting and design of the presentations, ensuring that your content is displayed exactly as intended.
Slide Show Experience : Offers a seamless slide show experience, complete with animations, transitions, and embedded multimedia elements.
Print Capabilities : Allows users to print presentations directly from the viewer, retaining the visual quality of the slides.
Compatibility : Supports a wide range of PowerPoint file formats, ensuring accessibility to presentations created on different versions of the software.
Accessibility Features : Incorporates accessibility features to ensure that presentations are usable by individuals with diverse needs.
Making the Most of PowerPoint Viewer
Maximizing the potential of PowerPoint Viewer involves understanding how to use its features effectively. Let's explore some strategies to enhance your presentation experience:
Optimal Presentation Design
Creating presentations that are well-structured and visually appealing is the first step towards a successful delivery. With PowerPoint Viewer, your design choices are showcased with fidelity, making it imperative to focus on:
Slide Consistency : Maintain a consistent theme and layout throughout your slides to provide a cohesive visual experience.
Visual Elements : Utilize high-quality images, charts, and graphs to support your content and enhance audience engagement.
Engagement and Interaction
PowerPoint Viewer empowers both presenters and viewers to engage and interact with the content. Here's how you can leverage this aspect:
Navigational Aids : Implement clear navigation buttons and hyperlinks to allow viewers to move between slides seamlessly.
Annotations : Encourage viewers to annotate directly on the slides, fostering interaction and collaborative discussions.
Accessibility Considerations
To ensure your presentations are accessible to a wider audience, follow these accessibility guidelines:
Alt Text : Add descriptive alt text to images and visual elements, making the content understandable for individuals with visual impairments.
Font and Color Choices : Opt for legible fonts and color contrasts to enhance readability, particularly for those with visual or cognitive challenges.
Is PowerPoint Viewer Available for Mac Users? Unfortunately, PowerPoint Viewer is not available for Mac users. However, Mac users can use other methods to view PowerPoint presentations, such as using the online version of PowerPoint or converting presentations to PDF format.
Can I Edit Presentations in PowerPoint Viewer? No, PowerPoint Viewer is a read-only application. You cannot edit presentations or create new ones using this tool. Its primary purpose is to provide a seamless viewing experience.
Are Embedded Videos Supported in PowerPoint Viewer? Yes, PowerPoint Viewer supports embedded videos within presentations. Viewers can watch videos directly from the slides during the presentation.
Can I Use PowerPoint Viewer on Mobile Devices? As of now, there is no dedicated mobile app for PowerPoint Viewer. However, PowerPoint files can be viewed on mobile devices using the PowerPoint mobile app or other compatible apps.
Is PowerPoint Viewer a Free Tool? Yes, PowerPoint Viewer is available for free download from the official Microsoft website. It's a standalone application separate from the paid Microsoft Office suite.
Can I Play Animations in PowerPoint Viewer? PowerPoint Viewer supports many animations and transitions. However, complex animations or those involving certain custom effects might not work as intended in the viewer.
In the world of presentations, where conveying information effectively is crucial, PowerPoint Viewer emerges as an indispensable tool. Its ability to faithfully reproduce the original design, animations, and interactive elements of presentations makes it an asset for both creators and viewers. Whether you're a presenter looking to share your content seamlessly or an audience member seeking an immersive viewing experience, PowerPoint Viewer has you covered. By understanding its features, optimizing your presentation design, and considering accessibility, you can harness the full potential of this remarkable tool. Explore the power of PowerPoint Viewer and elevate your presentation experience today.
#1 News & Blogs Hub
Discover the pinnacle of informed discourse with our #1 English-language portal for news, blogs, and articles, powered by cutting-edge AI technology. Stay ahead of the curve with the most advanced and innovative content available anywhere. Dive in now and experience the future of informed engagement.
this enhances viewer experience in powerpoint presentation
Unlock the Power of Live Streaming: 5 Tips to Deliver a Live PowerPoint Presentation

- Tips & Tricks

Ashish Arora
- December 21, 2023
- 3 Mins Reading Time
In an era ruled by digital connectivity, live streaming has emerged as a versatile tool, offering a platform for sharing ideas, delivering presentations, and fostering interactive discussions. One of the most impactful ways to utilize it is by sharing PowerPoint presentations, combining the power of visual storytelling with that of online interaction. Thus, the ability to engage and keep your audience invested has become a game-changer for professionals, educators, and content creators alike. Wondering how to create a PowerPoint presentation that can be live-streamed like a pro? In this article, we have included tips and tricks for live-streaming your PowerPoint presentation.
In this Article:
Prepare your powerpoint presentation slides.
Begin planning by defining the key objectives and messages you want to convey through your PowerPoint presentation slides. Outline a clear, logical structure that guides your audience through the main points. Each slide should contribute to a cohesive narrative, ensuring that your viewers can easily follow the flow of information.
Consider integrating engaging multimedia elements, such as images, videos, and infographics, or using professional PowerPoint templates to enhance visual appeal and reinforce critical concepts. Break down complex information into digestible elements, and remember that visual variety and simplicity are key elements in maintaining audience interest.
Moreover, you must also strategize how you will interact with your audience during the livestream. Plan designated moments for Q&A sessions, polls, or interactive discussions to foster engagement.
Pick an Appropriate Streaming Platform
The live streaming platform plays a fundamental role in live streaming and can make or break your presentation. Thus, it is essential to consider the characteristics of your target audience and compare the features of various hosting sites.
You must opt for a streaming solution that allows seamless live streaming, is compatible with PowerPoint, and has excellent reviews. It will enable you to deliver your presentation without glitches or technical errors. OneStream Live, with over two million active users, is an optimal choice when it comes to multistreaming your PowerPoint presentation on multiple social media platforms such as Facebook, YouTube, Instagram, LinkedIn, and Twitch, all at once. It’s innovative screen-sharing feature easily allows you to share your PowerPoint presentations with your viewers, to absolutely ace your game.
Moreover, check for any specific guidelines or recommended settings for live streaming. Understanding these aspects can prevent last-minute issues and ensure a seamless transition from your presentation software to the live streaming platform.

Set Up the Equipment
Equipment setup beforehand is crucial for achieving an uninterrupted and engaging broadcast. Ensure your computer meets the technical requirements and has a relatively powerful CPU, sufficient RAM, and a dedicated graphics card that can contribute to a smoother streaming experience.
If you plan to include a video feed of yourself, a good-quality webcam or camera is essential. Many laptops have built-in webcams, but an external webcam or a DSLR/mirrorless camera with a clean HDMI output can be used for higher quality.
Clear and crisp audio is also vital for maintaining audience engagement. Consider a USB microphone for convenience and ease of setup. A portable microphone can be a great option if you need to move around during your presentation.
Keep your laptop or streaming device plugged in during the presentation to avoid any disruptions due to a low battery. Consider having a backup power source in case of unexpected outages.
By paying attention to these equipment and setup considerations, you will be well-prepared to deliver a polished and professional live stream.
Pay Attention to Lighting and Background
Imagine attending a live presentation, and all that you can see is clutter behind the presenter’s back. His face seems dull as there is no direct light on him, and everything seems chaotic. Would this not draw your attention away? Of course, it would.
Therefore, proper lighting is critical to a professional-looking video. Position yourself in a well-lit area facing the light source. Consider investing in essential equipment, such as softboxes or ring lights, to improve visibility and reduce shadows on your face.
Choose a clean and uncluttered space, or opt for a virtual background if you do not have such a space. Ensure your environment is quiet to minimize background noise during your presentation.
Test Your Setup
Executing a thorough test run is a critical step in the pre-live checklist . Launch your streaming software and check the camera feed for clarity and framing. Assess the audio quality by speaking at varying volumes to ensure your microphone captures your voice accurately without distortion or background noise.
Simultaneously, open your PowerPoint presentation within the streaming software to confirm that all slides are visible and that transitions occur seamlessly.
Pay close attention to potential technical hiccups such as lag, screen freezing, or audio delays during this test. Navigate through different PowerPoint presentation slides as you would during your actual presentation, mimicking the flow of your content.
Involve a colleague or friend to join the test run and provide feedback on the overall presentation quality. This extra set of eyes and ears can help identify issues you might overlook and contribute valuable insights to enhance the viewer experience.
If any issues arise during the test run, take the time to troubleshoot and resolve them before going live. Such problems may include poor internet connectivity, software conflicts, or hardware issues. Check your internet speed, close unnecessary applications to free up system resources, and ensure all software is current.
Read More: Guide for Troubleshooting Common Live Streaming Errors
The fusion of traditional presentation tools with the dynamic nature of live streaming allows for a more engaging and inclusive audience experience. By planning your content, selecting the right platform, and mastering the technical intricacies, you empower yourself to deliver seamless and compelling live presentations.
Remember, the essence of live streaming lies not just in the information shared but in the interactive dialogue it fosters. So, step confidently onto the virtual stage, share your insights, and connect with your audience in a way that transcends geographical boundaries.
Your PowerPoint presentation has the potential to inspire, educate, and leave a positive impression on those who tune in from around the world.
OneStream Live is a cloud-based live streaming solution to create, schedule, and multistream professional-looking live streams across 45+ social media platforms and the web simultaneously. For content-related queries and feedback, write to us at [email protected] . You’re also welcome to Write for Us !
- TAGS : Live Presenations , Live Streaming , PowerPoint Presenations
👉 Recommended for you

Live Stream Security: 6 Tips To Safeguard Your Broadcasts from Unauthorized Access
- April 2, 2024

5 Document Management Tools Every Live Streamer Should Know About
- March 29, 2024

How To Build A Community on Amazon Live
- March 25, 2024

Top 8 Proven Strategies To Secure Your Video Content In 2024
- March 12, 2024

Tips On Live Streaming a Business Event

7 Game-Changing Apps for Streamers and Content Creators
- March 11, 2024
Stay in the Loop: Subscribe to our Newsletter

Want to expand your industry knowledge?
Live Stream On The Go!
OneStream Live mobile app is available for real-time and pre-recorded streaming.

Understanding Presenter View in PowerPoint: A Deep Dive Guide
Origin and Evolution of Presenter View
Why presenter view is a game-changer for professionals, activating and customizing presenter view in powerpoint, in-depth features of the presenter view, common mistakes and how to avoid them, advanced tips for a power presentation, final tips for enhancing your presentation game, introduction to presenter view.
Have you ever found yourself awkwardly toggling between slides and speaker notes during a presentation? Or wished you could preview the next slide without your audience seeing? Enter Presenter View in PowerPoint, a feature designed to make presenting smoother and more professional.
In essence, Presenter View is a special mode in PowerPoint that allows the presenter to see their speaker notes on one screen, while the audience views the note-free presentation on another screen. This dual-screen setup means you can have your notes, upcoming slides, and timer conveniently on one screen while your audience remains blissfully unaware.
“Presenter View is the unseen ally behind many successful PowerPoint presentations.”
Microsoft’s PowerPoint, with its roots tracing back to the late 1980s, has undergone several metamorphoses. Over the years, as technology improved and presentation dynamics changed, Microsoft introduced new features to make the software more user-friendly and versatile. One such innovation is the Presenter View.
Back in the early days of PowerPoint, presenters had to rely on printouts or separate documents for their speaker notes. The advent of Presenter View in the early 2000s was a game-changer. It allowed presenters to merge their slides and speaker notes into one cohesive presentation experience.
The beauty of Presenter View lies not just in its conception but in its evolution. Over different versions of PowerPoint:
- 2003 : Introduction of a basic Presenter View with slides and notes.
- 2007 : Enhanced screen setup with better dual-monitor support.
- 2010 : Introduction of slide zoom and laser pointer features.
- 2013 & Beyond : Integration with touch features, improved UI, and annotations.
Each version brought refinements, making it more intuitive and packed with features, tailoring to the evolving needs of presenters globally.
Fun Fact : Presenter View wasn’t initially as popular as it is today. It took a few iterations and user feedback loops for Microsoft to perfect the balance between utility and user experience.
The Core Components of Presenter View
Presenter View in PowerPoint is like the cockpit for pilots: it’s where all the essential controls and information are at the presenter’s fingertips. Whether you’re a newbie to PowerPoint or a seasoned professional, understanding these components can transform your presentation experience.
- This provides a glance at your current, previous, and upcoming slides. It ensures you’re always prepared for what’s coming next and can seamlessly transition between points.
- The soul of your presentation, speaker notes, are discreetly placed at the bottom or side, only visible to you. These notes can be elaborate explanations, quick pointers, or even personal reminders. They’re like your secret cheat sheet!
- Ever worried about running over time? This feature shows the elapsed time since you began the presentation and, in some versions, allows you to set a countdown. Stay on track and manage your pace efficiently.
- Interactive features that allow you to draw on slides or use a virtual laser pointer. These are especially helpful when you want to emphasize or explain specific points visually.
- Navigate between slides effortlessly and zoom into specific parts of a slide to draw attention or elaborate on details.
Table: Core Components Overview
Quote : “Presenter View is to a presenter what a dashboard is to a driver. It empowers, directs, and enhances the journey of your narrative.” – Jane Harris, Lead PowerPoint Expert – Powerbacks team
Understanding these components is one thing, but leveraging them effectively during a presentation can make a significant difference. Let’s delve into the ‘why’ behind the significance of Presenter View.
Stepping onto the stage or presenting in a boardroom can often be an overwhelming experience. The constant juggle between capturing the audience’s attention and keeping track of your slides can lead to nervousness. But what if there was a way to have everything you need right in front of you, ensuring smooth sailing through your presentation? Enter Presenter View.
- Having a preview of the upcoming slides and personal notes right in front of you can be a massive boost to confidence. You’re always one step ahead, knowing exactly what’s coming next.
- Instead of turning back to view the screen repeatedly, Presenter View lets you face your audience directly. This creates a more engaging and personal interaction.
- Gone are the days when you’d hold a bunch of cue cards or sheets of paper. With digital speaker notes, you have a cleaner, more organized setup.
- Using the annotation tools and laser pointer, you can make your presentation more interactive, leading to better retention and engagement from your audience.
- There’s no denying that seamlessly transitioning between slides, using interactive tools, and having no physical notes gives a more polished and professional look.
Table: Benefits of Using Presenter View
Quote : “Embracing the Presenter View is not just about leveraging a tool; it’s about amplifying your message and connecting more profoundly with your audience.”
It’s evident that the Presenter View has undeniable advantages for professionals. But how do you activate it and customize it to suit your needs? Let’s walk through the steps.
Starting with PowerPoint 2013, Microsoft enhanced the Presenter View to ensure that it’s both intuitive and user-friendly. Activating it and making it work for you is simple, as outlined in the following steps:
Step-by-Step Guide to Activate Presenter View :
- Start by opening your PowerPoint presentation. This will be the one you intend to deliver.
- At the top, you’ll notice several tabs. Click on the one labeled ‘Slide Show’.
- Within the Slide Show tab, you’ll spot a checkbox labeled ‘Use Presenter View’. Ensure that it’s ticked. If it’s not, simply click on it.
- If you’re using an external projector or display, make sure it’s connected. PowerPoint will automatically detect it and use the Presenter View on your primary display, showing the main presentation on the external one.
- Start your presentation by either pressing F5 on your keyboard or clicking on ‘From Beginning’ in the Slide Show tab.
- Next Slide Preview : Gives a preview of what’s coming next.
- Speaker Notes : Displays your notes for the current slide.
- Slide Navigation : Use this to jump to a specific slide.
- Annotation Tools : Highlight or draw on your slides in real-time.
- Timer : Keeps track of how long you’ve been presenting.
- You can move around the different elements, increase font size of your notes for better readability, or even hide specific components if they’re not required.
Table: Quick Access Tools in Presenter View
Quote : “The beauty of PowerPoint’s Presenter View is the control and flexibility it offers. It’s like having a personal assistant during your presentations.” – Linda Green, Presentation Expert
Now that we know how to activate and customize the Presenter View let’s delve deeper into its features and tools for maximum efficiency during presentations. Shall we proceed?
PowerPoint’s Presenter View is not just a simple “next slide” preview; it’s a hub of tools and functionalities designed to make the presenter’s job easier and the presentation more engaging.
H3: Slide Preview This is arguably the most straightforward feature but also the most helpful. At a glance, you can see what’s coming up, ensuring that you’re always prepared for the next topic or section.
- Smooth Transitions : Eliminates awkward pauses between slides.
- Improved Pacing : Know when to speed up or slow down based on upcoming content.
- Reduced Anxiety : No unpleasant surprises during your presentation.
H3: Speaker Notes For those who don’t rely on pure memory, speaker notes are a lifesaver. They’re your secret weapon, visible only to you, that provides additional context or reminders about what to say.
- Bold the crucial points to ensure they stand out.
- Use concise bullet points for easier and quicker reading.
- Add time cues if you’re aiming to cover specific points within certain timeframes.
H3: Slide Navigation While it’s always best to move sequentially through your slides, there might be instances when you need to skip ahead or return to a previous point. With the slide navigation tool, you can effortlessly hop around your presentation.
- Case Study : During a corporate presentation, John, a sales manager, was posed with a sudden question about Q2 performance. Thanks to slide navigation, he quickly reverted to the relevant slide, addressed the query, and resumed without any hiccups.
H3: Annotation Tools Engage your audience by turning your presentation into an interactive canvas. Whether you’re highlighting an essential statistic or drawing a quick graph, these tools can make a significant impact.
- Use contrasting colors to ensure visibility.
- Don’t overdo it; the aim is to emphasize, not to overwhelm.
- Practice beforehand to ensure you’re comfortable with these tools during the presentation.
H3: Timer It’s easy to lose track of time during a presentation. With Presenter View’s timer, you can keep tabs on the elapsed time, helping you manage the pace and duration of your talk.
- Tip : Always allocate a buffer period. If you’re presenting for 30 minutes, aim to finish in 25. This allows for Q&A or any unexpected delays.
Quote : “PowerPoint’s Presenter View is like a dashboard for presenters. It provides every tool one might need, all within arm’s reach, ensuring a seamless and interactive presentation experience.” – Michael Roberts, Tech Analyst
Understanding the features of the Presenter View is the key to unlocking its potential. With practice and familiarity, it becomes an extension of the presenter, leading to more confident and impactful presentations.
Making the Most of Presenter View
If you’ve ever wanted to feel like a presentation Jedi, mastering the Presenter View is your path to the force. But having the tool isn’t enough – it’s about leveraging its features optimally. Here’s a detailed guide on maximizing the benefits of the Presenter View:
H3: Setup and Access Before harnessing its power, you need to ensure you can access Presenter View without hitches.
- Connect your computer to the projector or external display.
- Launch PowerPoint and open your presentation.
- Go to the Slide Show tab and select Set Up Slide Show .
- In the pop-up, ensure Browsed by an individual (window) is selected.
- Start the slide show. Presenter View should appear on your computer, while the audience sees only the slides.
H3: Customize the Display Remember, it’s your dashboard; make it as comfortable and efficient for you as possible.
- Within Presenter View, hover over the bottom to reveal the toolbar.
- Click on the gear icon to adjust settings.
- Reorder tools based on your preference or hide those you don’t need.
H3: Practice, Practice, Practice The tool’s efficiency relies heavily on your familiarity with it. Do dry runs to ensure you know where everything is and how each feature works.
- Pro Tip : Mimic the presentation environment during practice. If you’re presenting in a large hall, practice with the same setup.
H3: Seamlessly Integrate Other Media If your presentation includes videos, animations, or other media, ensure they play seamlessly in Presenter View.
- Deep Dive : Always embed media within the presentation. Relying on external links or files can disrupt the Presenter View experience.
H3: Engage the Audience Use the tools not just to aid your presentation but to engage your audience. Pose questions, use the pen tool to sketch quick diagrams based on audience inputs, and make it interactive.
- Table of Engagement Techniques :
H3: Master the Art of Transitions Smooth transitions are key to maintaining audience attention. With a preview of the next slide, prepare your narrative to flow seamlessly.
Even with the most powerful tools, human error can play a spoilsport. The Presenter View, as intuitive as it may be, has its quirks. Here’s a list of common pitfalls users face and ways to steer clear of them:
H3: Not Checking Hardware Setup Before you even start the presentation, ensure your hardware is correctly set up. This includes checking the display connection, ensuring the projector or external monitor is detected, and setting up the correct display settings.
- Pro Tip : Always keep a spare HDMI or VGA cable. Technical glitches often come from the most unexpected sources.
H3: Overlooking Speaker Notes Having made the effort of adding speaker notes to your slides, it would be a shame not to use them. They serve as a discreet prompt, ensuring you don’t miss any critical points.
- Fact : According to a study, presenters who actively used speaker notes were 25% more consistent in delivering their core messages.
H3: Ignoring the Timer Time management is crucial. If you have a fixed time slot, exceeding it can inconvenience others and may appear unprofessional. Conversely, finishing too early can leave your audience unsatisfied.
- Actionable Advice : Always have a buffer. If your slot is 30 minutes, aim for a 25-minute presentation, leaving room for Q&A or unexpected delays.
H3: Relying Exclusively on Presenter View Despite its usefulness, never be wholly dependent on Presenter View. Technical glitches happen, and the ability to continue smoothly without it showcases professionalism.
- Case Study : At a major tech conference in 2018, a renowned speaker’s Presenter View malfunctioned. Instead of panicking, he smoothly transitioned to the standard view, using his printed notes as a backup. The audience lauded his adaptability, and his message wasn’t overshadowed by the hiccup.
H3: Not Adapting to Audience Feedback The tools in Presenter View, like slide navigation, are meant to enhance adaptability. If you sense your audience resonating more with a particular topic, don’t be afraid to dwell on it a bit longer or even revisit slides.
By sidestepping these common mistakes, you not only harness the full potential of Presenter View but also project confidence and control. Next, we’ll explore some advanced features to elevate your presentation game even further.
Mastering Presenter View basics can tremendously improve your presentation skills. But if you’re looking to elevate your game and leave a lasting impression, dive into these advanced features:
H3: Seamless Transition Between Slides The art of a great presentation lies not just in the content but also in the delivery. A choppy slide transition can disrupt the flow. PowerPoint offers a plethora of transition effects — from subtle fades to dynamic 3D effects.
- Go to the Transitions tab.
- Browse and select your preferred effect.
- Adjust the transition duration if needed.
- Click Apply To All to maintain uniformity.
H3: Use Zoom to Focus on Details Occasionally, you might want to draw attention to specific details on a slide. Instead of making your audience squint, use the in-built Zoom feature.
- Tip : Combine zoom with a laser pointer or pen tool for emphasis.
H3: Ink Annotations Annotating directly on your slides can be beneficial for interactive sessions or workshops. PowerPoint’s “Ink” feature allows you to do just that.
- Did You Know? : Ink annotations made during a presentation can be saved for future reference!
H3: Embed Multimedia for a Rich Experience Modern presentations often go beyond static slides. Consider embedding videos, audio clips, or even live web content to keep your audience engaged.
- Navigate to the Insert tab.
- Choose Video or Audio and select your file.
- Adjust playback settings under the Playback tab.
H3: Custom Slide Show Sometimes, different segments of your audience require varied content. Instead of having multiple PPT files, create a custom slideshow within the same presentation.
PowerPoint’s Presenter View is akin to a secret weapon, waiting in the wings, ready to empower speakers, educators, and presenters globally. Whether you’re a novice taking your first steps into the world of presentations or a seasoned speaker aiming to refine your skills, the Presenter View, along with the myriad features PowerPoint offers, ensures your content shines in the best light.
Remember, a successful presentation doesn’t merely rely on flashy slides or multimedia elements. It’s the seamless blend of content, delivery, and engagement. And with tools like Presenter View, you’re equipped to handle the technical aspects, allowing you to focus on what truly matters – connecting with your audience.
As Bill Gates once said:
“If you think the PowerPoint presentation is there for you as the presenter, you’re wrong. It’s there for the audience.”
So, the next time you’re gearing up for that crucial pitch, workshop, or lecture, take a moment to familiarize yourself with Presenter View. Your audience — and your confidence — will thank you for it.
Happy presenting!
Save my name, email, and website in this browser for the next time I comment.
PowerPoint Tips Blog
Helping you with presenting, PowerPoint, and speaking
Presenter View: Your secret presentation tool
March 15, 2024 by Ellen Finkelstein 30 Comments
Presenter View is a secret view that’s only for you! It’s a way of seeing your notes and upcoming slides while your audience sees only the current slide as usual.
Here’s what Presenter View looks like.
What can you do with Presenter View?
As you can see, Presenter View has 3 panes: your slide, your notes, and the upcoming slide or animation. Plus there are several controls at the top and bottom. Here are some great Presenter View features:
- You can resize the panes by dragging on their border. For example, you might want to make the Notes pane larger and the Slide pane smaller
- At the bottom of the Notes pane, you can use the Zoom In and Zoom Out buttons (they look like the letter “A”) to get the Notes text just the size you want, so it’s easily readable.
- At the upper-left of the slide is a timer that keeps you on track.
- Beneath the slide, you have easy access to both forward and back navigation arrows.
- You can also access pen and pointer features by clicking the Pointer Options button below the slide.
- Beneath the slide, you see your current slide and the total number of slides.
- If you have an updated version of PowerPoint, you can edit your notes from within Presenter View. (This is a fairly new feature.)
Here are the controls you can use at the top:
- Show Taskbar displays the Windows taskbar so you can navigate outside of your presentation.
- Display Settings lets you swap which monitor or screen shows the Slide Show and which shows Presenter View. OR you can choose to show Slide Show on both monitors.

The Slide Show Display Menu below the slide gives you options that are similar to right-clicking in Slide Show view:

How do you set up Presenter View?
To use Presenter View, you need to be set up to use 2 monitors (but see my exception below). You need the following:
- The computer must have multiple monitor capability. I’ve never seen a laptop that didn’t, but some old desktop computers require two video cards.
- You may need to enable multiple monitor support by setting the display options. This is a Windows function and varies with your version of Windows. You can usually press the Windows key + P and choose one of the options. Most laptops also have an F key that sets this up. For example, you might press the Fn key and the F5 key together.
Go into PowerPoint and click the Slide Show tab. Check the Use Presenter View check box. Then go into Slide Show view by clicking the Slide Show view icon at the bottom of your screen or pressing F5 (to go to the 1st slide) or Shift+F5 (to go to the currently displayed slide).
The problem is, this may not work! The check box may be grayed out or you may get a message saying that you need two monitors. That’s because Presenter View is designed to be used with your computer plus a projector or second screen.
But wait! What if you don’t have a second monitor?
Presenter View is a great tool for presenting, but it’s also excellent for practicing. By the time you are ready to present, if you practice enough, you may not need your notes, but you’ll certainly need them for practicing.
The problem is that you usually don’t have a projector with you when you’re practicing (although practicing with a projector is a great idea).
It turns out that you can trick Windows into thinking you have 2 monitors and then you can display Presenter View on your computer. Use the keyboard shortcut I gave you earlier, Windows key + P, and choose Extend.
Now, go to your presentation and check the Use Presenter View check box.
Go into Slide Show view by clicking the Slide Show icon at the bottom of your screen and you should see Presenter View.
You can also try going into Slide Show view, right-clicking, and choosing Show Presenter View.
Let me know in the comments if this helps you with your practicing.
Related posts:
- Create a video zoom effect from photos in PowerPoint
- Get the best price on technology purchases, clothing — and anything else!
- Designing a web-style, menu-based presentation
- Adjust font spacing — both vertical and horizontal
30 Leave a Reply
I was excited to read your article about Presenter View. Alas, the trick does not appear to work in Windows Vista. When I press the Windows key and the P key, nothing happens at all. ;(

What happens when you press Windows key + X? Do you see the Windows Mobility Center? On the lower-left, choose Connect Display. Do you see the 4 options?

I have been using power point presentations for training since last two decades but never came across such wonderful and trainer friendly tip. Great Idea !!
Thanks Ellen

I have Windows 7 but only one monitor and my computer does not seem to support more than one monitor. I was not able to change the setting from the control panel. But, I did use your tip (i.e., Windows + P) to select two monitors. I was still not able to put PowerPoint into Presenter View mode. This is kind of frustrating because I wouldn’t mind viewing the presentation in normal mode if only my hyperlinks would work in that mode. It’s a 247 slide presentation that I am reviewing and can’t seem to bookmark pages and make comments … Read more »
Hyperlinks work in regular Slide Show view; you don’t need Presenter View. Do you want this to test the hyperlinks during practice? Have you tried the quarter-size slide show view? Also, having a list of slides can help you navigate. These other tips might help: http://www.ellenfinkelstein.com/pptblog/view-slide-show-in-a-smaller-window-so-you-can-see-another-presentation-or-program/ http://www.ellenfinkelstein.com/pptblog/display-a-quarter-size-slide-show-view/ http://www.ellenfinkelstein.com/pptblog/create-a-slide-list/

Hi Ellen, I tried this in the past (as you may recall) and just tried it again but my desktop still tells me I need 2 monitors.

[…] Presenter View: Your secret presentation tool « PowerPoint Tips Blog powerpoint-tips-prseenter-view-1. What can you do with Presenter View? As you can see, Presenter View has 3 panes: your slide, your notes, & slide thumbnails at the bottom. Here are some tremendous Presenter View features: … http://www.ellenfinkelstein.com/pptblog/ […]

I would like to play a video clip (hyperlinked) in presenter view (for my work) as an instructor. When NOT IN PRESENTER VIEW I click on a box (that looks like a camera) on the PP slide then the video (which is linked) plays. When finished I close the video & see the PP automatically returning to the slide I was on prior to clicking the link. It would be great to do this in Presenter View. When I click on the hyperlink box the PP moves to the next slide, & does not play the hyperlinked movie clip. Please … Read more »

Thank you so much for this Windows-P tip! I looked all over, and it is exactly what i want! Thanks!!!

How do I get out of Slide Show Presenter? We run 2003 version of Power Point and use it for our scroll on a community tv channel. One of our volunteers accidently put us into the slide show presenter and we are unable to figure out how to get out of it.
In Slide Show, Set Up Slideshow, uncheck the Use Presenter View check box. Is that what you mean?

Thank you Ellen. I have already known about presenter view but the “win + P” tric will help me a lot.
[…] Details: http://www.ellenfinkelstein.com/pptblog/presenter-view-your-secret-presentation-tool/ […]

The size of notes section in Presenter View by default is too narrow for my purpose. For every presentation I open, I have to drag the line to increase the size of the notes section. Is there a setting that can increase the default size of the notes section? I am currently using Power Point 2010 on Windows 7.
As far as I know, there’s no way to set the default size of the notes section in Presenter View.

how can we see next slide in presenter view

Hi, I know this is an old thread, but I just wanted to say Thanks! The “extend tip” works great on win 8 as well. Saved my day. =D

Was the question that David Thomas had on 17/7/2013 ever answered? I too have noted that in Presenter View, when I click on a hyperlink I have inserted, PPT moves to the next slide, and does not go to the hyperlinked document.
I just tested a hyperlink on the first slide going to the third slide and it works in Presenter View.
Sorry, maybe I should have been more clear. The hyperlinks work fine if one is a) not using a projector but rather using Presenter View with a PC and/or b) not hyperlinking to a document outside of PPT.
If one does either, the hyperlink does not work. The only workaround I came up with is a) exit Presenter View b) click the hyperlink c) return to Presenter View. It slows one’s presentation down and is cumbersome.

does this extended view work with Windows 10? I tried it but failed. Thanks for any help you might give me.

@DorothyH, I totaly get what you are saying. I have exactly your issue. I have hyperlinks to videos outside of the slideshow. In presenter view, the vid plays on my laptop when I click the link, not on the projector.
I too would like a solution!

Thanks for the tips. Your ideas quickly solved a webinar recording problem. Kudos!

Thank you so much for these tips…I’m already spreading them.
I present within WebEx often and can’t seem to figure out how NOT to show my Presenter view to my audience…without ruining presenter view for myself. I’ve played around with the “Display Settings”, but this doesn’t help. Any thoughts?
Glad my tips have helped! I’m not so familiar with WebEx, but you might ask their support. Usually, webinar services let you choose which monitor to display and if you have 2 monitors, you can display the slide show view but still have Presenter view on your other monitor. Also, in recent versions of PowerPoint, in Presenter View, you can choose Display Settings, Swap Presenter View and Slide Show view. You can also disable Presenter View. Go to Slide Show tab, Set Up Slide Show and uncheck the Use Presenter View check box. Does that help?

I would like to know how to review the notes on the hidden ppt slides when using presentation view? The Slide is marked correctly hidden however the notes will not display and if you do click on the hidden slide it portrays the slide as if it was never hidden.
I don’t really understand. In Presenter View, you don’t see the hidden slide, it goes from the previous slide to the following slide. If you go into Slide Show view from the hidden slide, you see the notes in Presenter view.

Presenter view option is greyed out. what can I do

Do you (or anyone else) know the shortcut to exit presenter view WITHOUT ending the slideshow? I.e., how do you just go back to regular presentation mode? This is really important if you need to click on a link on the slide or use an interactive module, like Poll Everywhere. I can’t seem to find an answer to this anywhere online. The best I can come up with is “Esc, then Shift-F5” but this becomes cumbersome when we have to switch back and forth all the time…Either way, thanks for this otherwise helpful article!
[…] Presenter view to see your notes (put what you’ll say in the Notes pane in […]
Present Better with PowerPoint Presenter View: Tips & Tricks
The PowerPoint presenter view is the ideal tool for your presentation. The PowerPoint presenter view is the ideal tool for your presentation. It allows you to display your speaker notes and slides on your computer while presenting. Meanwhile, your audience will see the presentation without your notes on another screen or projector.
What is PowerPoint presenter view?
The PowerPoint presenter view is a presentation mode that allows presenters to see a preview of the next slides as well as their speaker notes. The advantage of this mode is that your audience will only see the current slide and nothing else.
PowerPoint presenter view: advantages

Presenter view offers a number of features that can help you streamline and improve the flow of your presentations:
1. You can add notes to each slide. This gives you more freedom and you won’t have to struggle with clumsy index cards. You can individually design the notes for each slide and, when you switch slides, you’ll see that slide’s notes as well.
2. You always see the current slide number (e.g., slide 5 of 13). That way, you can begin preparing for the next slide. You receive an overview of the entire presentation throughout.
3. A preview image on the side of your presentation always shows you the next slide.
4. A timer notifies you of how much time has elapsed. This is especially helpful if you have a limited amount of time to present.
5. You can use the pen tools to mark, highlight and augment your slide content . These freehand markups can even be saved afterwards.
6. You can view a thumbnail overview of all your presentation slides. This lets you choose slides freely and jump from slide to slide.
7. You can use the magnifying glass to enlarge individual sections of the current slide. The virtual laser pointer allows you to highlight specific points .
8. During breaks and discussions, you can fade to a black screen and don’t have to turn off the projector. This allows you to restart the presentation in less time.
How to set up PowerPoint presenter view with a projector
PowerPoint presenter view requires two separate monitors. This often includes a projector. Here’s how to properly set up a projector:
1. Connect your laptop to the projector. Make sure the laptop isn’t switched on.
2. When you turn on the laptop, the projector will recognize it as a second screen.
3. When you start Microsoft PowerPoint, you should see the same image on both screens.
4. Now press the Windows + P key combination and then select Extend . Click on the check mark to the right of Presenter View in the Slide Show tab.

5. You’ll now see the different views on your two monitors. As the presenter, you’ll see the presenter view while your audience will see the current slide.
6. Normally, presenter view is automatically displayed on the correct monitor (namely, yours). If it still appears on the audience screen, set it to Primary Monitor in the Monitor drop-down menu. Presenter view should now run on your monitor.

How to disable PowerPoint presenter view
To disable presenter view during your presentation, simply uncheck the Presenter View box in the Slide Show tab.
Tips for optimal use of the PowerPoint speaker view
1. practicing the presentation in advance.
If you want to use this tool effectively, you should be confident in using it . Therefore, test it extensively beforehand to be able to confidently operate the tool when it matters. In addition, also go through your presentation whilst projecting the speaker view. This way you can guarantee a more fluent presentation and fill in missing or insufficient notes.
2. Designing effective presentation notes
To ensure your notes are effective, keep them concise and to the point so you can access them quickly and easily during the presentation. Avoid long paragraphs and instead focus on bullet points that summarize the main ideas and important details .
By highlighting key terms or using abbreviations , you can make your notes easier to read. Your notes should also be large enough. To adjust the size of notes and previews, simply drag the edges of the relevant elements until they reach the desired size.
Be sure to structure your notes well to support the flow of your presentation and ensure a smooth transition between slides.
3. Managing time and breaks during the presentation
The integrated timeline allows you to always keep track of time during the presentation. To make the best use of your time, it is important to plan your presentation carefully and include breaks, if necessary, to give your audience time to process the information.
Be sure to use pauses deliberately, for example, to answer questions or emphasize important points. Also use the time display to keep track of your presentation speed so you don’t speak too fast or too slow to keep your audience’s attention.
This way, you guarantee a well-structured and engaging presentation that is both informative and enjoyable for your audience.
4. Integration of interactive elements
It’s no secret that interactivity in presentations helps keep the audience’s attention . Speaker View in PowerPoint offers the possibility to insert media and interactive elements into your presentation to make it more visually appealing and interesting.
For example, you can integrate videos, audio clips, animations, and interactive polls . Use the Speaker View to control the flow of media playback and make sure everything works smoothly.
For more ideas on how to make your presentations interactive, see the article “ Interactive presentations “.
5. Updating slides
PowerPoint presenter view allows you to update slides during your presentation. Dies This is really useful if you’ re in a team working on your presentation and changes are still being made, possibly right up to the last minute. To activate this setting, go to Set Up Slide Show from the Slide Show tab and select Keep slides updated .

Pro tip: Use shortcuts during your presentation
Shortcuts are keyboard combinations that allow you to quickly access certain PowerPoint functions. Here are five useful shortcuts which can simplify your presentations, especially in presenter view:
- Fade to the next slide by pressing the Enter key or the right or down arrow keys .
- To go back to the previous slide, press either the up or left arrow key .
- To jump to the last slide of your presentation, press the End key .
- If you want to skip slides during your presentation, press the slide number on your keyboard + Enter .
- To make your screen appear white or black, select either W or the comma key for a white screen and B or the period key for a black screen . These functions can be especially helpful when you want to make sure that the audience’s entire attention is on you and not the screen.
For more useful shortcuts to make working with PowerPoint easier, feel free to check out our blog .
Use PowerPoint presenter view for better presentations
Presenter view makes it much easier for you to present and navigate your presentation. Thanks to many useful features, you can make your presentation more fluid and hold your audience’s attention.
Feel free to contact us at [email protected] with any questions about presenter view and PowerPoint in general. We’ll help you out.
Are you looking for visually supportive and professionally designed slide templates? Feel free to have a look around our store. Here we have numerous slides prepared for you to download on a wide variety of (business) topics. Take a look today! ► To the store
Share this post
- share
- save

Design Thinking: Problem Solving with a Difference

Why Corporate Mission Statements Are So Important

7 Tips & Learnings from the Apple Keynote
A step-by-step guide to captivating powerpoint presentation design.
november 20, 2023
by Corporate PowerPoint Girl
Do you often find yourself stuck with a lackluster PowerPoint presentation, desperately seeking ways to make it more engaging and visually appealing? If your boss has ever told you to "please fix" a presentation and you didn't know where to start, you're not alone. In this article, we'll walk you through a straightforward method to transform your PowerPoint slides into a visually captivating masterpiece.
Let's dive right in!
Clean up your slides
The first step in this journey to presentation excellence is all about decluttering your slides and elevating their impact. Say goodbye to those uninspiring bullet points that often dominate presentations. Instead, focus on what truly matters – the key call-out numbers. By increasing the font size of these numbers, you ensure they take center stage, immediately drawing your audience's attention.
To make those numbers pop, consider breaking the text after the numbers into the next line and adding a touch of color. The contrast created by pairing a dark color with a lighter shade, like dark teal and light teal or burnt orange with peach, can work wonders. This simple adjustment makes your data more engaging , enhancing the overall impact of your presentation.
Add dimension with boxes
Now, let's introduce an element of depth and organization to your slides. By adding boxes, you'll create a visually pleasing structure that guides your audience through the content. In the "Insert" menu, select "Table" and opt for a one-by-one table. Change the table color to a light gray shade, elongate it, and position it neatly to the left of your text.
To improve readability and aesthetics, increase the spacing between text phrases. A small adjustment in the before spacing setting (setting it to 48) significantly enhances the visual appeal of your slides.
Insert circles
To further enhance the visual appeal and engagement of your slides, let's introduce circles. In the Insert menu, navigate to Shapes and choose the circle. Adjust the circle's height and width to 1.2, ensuring it complements your content seamlessly. Match the circle's shape fill color with the corresponding text color for a harmonious look.
Avoid using colored outlines for the circles, as they may distract from the overall aesthetic. This simple addition of circles adds an element of visual interest to your presentation, making it more captivating.
Choose icons
Now, it's time for a touch of creativity. Selecting icons to complement your text can elevate the clarity and appeal of your slides. In the "Insert" menu, you can search for relevant keywords to find the perfect icon from PowerPoint's extensive library .
For instance, if your text discusses investment portfolio yield, search for "growth" and choose an upward arrow growth icon. These icons add an extra layer of visual appeal and clarity to your content, making it more engaging and informative.
Final touches
To wrap up the transformation process, we come to the final touches that give your presentation a polished, professional finish. Align your icons with their corresponding circles and change the shape fill color to white. This simple adjustment creates a crisp, cohesive look that ties everything together seamlessly.
In conclusion, by following these steps, you've embarked on a journey to enhance your PowerPoint presentation . These initial steps are just the beginning of your exploration into the world of design elements and styles that can cater to your specific presentation needs. The key to a stunning PowerPoint presentation lies in the details. By following these steps, you can turn a lackluster set of slides into a visually engaging and dynamic presentation that will captivate your audience. So, the next time your boss says, "Please fix," you'll know exactly where to start. Happy presenting!
Related topics
- PowerPoint Themes
- Latest PowerPoint Templates
- Best PowerPoint Templates
- Free PowerPoint Templates
- Simple PowerPoint Templates
- PowerPoint Backgrounds
- Project Charter
- Project Timeline
- Project Team
- Project Status
- Market Analysis
- Marketing Funnel
- Market Segmentation
- Target Customer
- Marketing Mix
- Digital Marketing Strategy
- Resource Planning
- Recruitment
- Employee Onboarding
- Company Profile
- Mission Vision
- Meet The Team
- Problem & Solution
- Business Model
- Business Case
- Business Strategy
- Business Review
- Leadership Team
- Balance Sheet
- Income Statement
- Cash Flow Statement
- Executive Summary
- 30 60 90 Day Plan
- SWOT Analysis
- Flow Charts
- Gantt Charts
- Text Tables
- Infographics
- Google Slides Templates
- Presentation Services
- Ask Us To Make Slides
- Data Visualization Services
- Business Presentation Tips
- PowerPoint Tutorials
- Google Slides Tutorials
- Presentation Resources
10 Ways To Make Interactive And Engaging Presentations In PowerPoint
Professionals across the spectrum will stand by the fact that compelling presentations can be an important force of influence at the workplace. Many people at the same time also struggle to make presentations in an effective and engaging way.
How can one tackle this problem?
One tactic seasoned presenters use – make the presentations more interactive!
During a presentation, the audience tends to pay more attention if they know that at some point it will turn interactive. Audience participation is key to the success of any presentation. So next time you create a presentation bear in mind these 10 tips to make it more interactive.
Remember, the goal is audience engagement and active listening. The key to a successful presentation is understanding that the presentation should complement your speech, not be gimmicky and not be the point of focus. Make use of our Google Slides Themes to create presentations in a fraction of time. Here are a few tips:
- Icebreakers are always the safest way to start the session
- Use Audio/Visuals in Your Presentation
- People love a good story
- Use Transitions and Animations Smartly
- One Slide, One Topic
- Live polling Keeps the audience engaged
- Surprise Them!
- Use hashtags, spread the word
- Add a reflection at the end
1. Icebreakers are always the safest way to start the session
This is universal to any form of interaction, not just limited to presentations. Building a rapport with the audience is key to presenting successfully.
This can be achieved either through a round of personal introductions or if the audience is larger, there are numerous ice breaker games that can be used.
The objective here is to get your audience’s undivided attention. By using an ice breaker, you set the tone for the rest of the presentation.
2. Use Audio/Visuals in Your Presentation
Audio-visuals in a few slides are bound to get the audience’s attention. Use your own video or embed one from YouTube.
Embed a video into one of your slides to draw your audience’s attention. This also serves as a break for you from speaking. Videos give them a break from monotony.
3. Questions
The easiest way to engage the audience is by asking questions. Some presenters prefer to do it at the end of the presentation and then there are those who prefer to have it at various points during the session to gauge the audience’s subject understanding.
Asking questions to the audience also makes them feel important, builds trust, and radically increases engagement levels.
4. People love a good story
Many say that humans are wired for stories and it could not be more true when it comes to presentations. Even dense numbers and statistics can be made accessible via good storytelling.
A story well told can create an immersive effect. It can make the audience feel they are witnessing something important unfold. Tap into their psyche, their emotions, make the presentation memorable to them.
5. Use Transitions and Animations Smartly
Make your presentations visually appealing. You can do this by animating, transitioning, and morphing techniques. Use transitions intelligently and make these relevant and deeply linked to your content as opposed to just adding gimmicks. But make sure the look and feel throughout the presentation are consistent.
6. One Slide, One Topic
The primary objective of a presentation should be to keep your audience paying attention to your speech. To draw their attention, use one topic per slide. Don’t go overboard! While it is easy to create the presentation, it also helps the audience keep pace with you. Keep the content light so the audience can ask questions and interact as you go along.
7. Live polling Keeps the audience engaged
One of the most popular go-to tools by presenters is live polling. It encourages the audience to participate and give real-time feedback. It is also a fun and interactive means.
You could either use multiple choice questions or use polling tools online eg Mentimeter.
8. Surprise Them!
Presentations can get boring, especially for people with a short attention span. Interactive presentations are an active experience. To ensure total attention hide small pieces of interesting information within the presentation itself. It could be a video, or audio or new information. Hide infographics and let the audience track them. People are never bored when it comes to tracking for new or additional information. This helps you keep them engaged while also allowing them to learn something new.
9. Use hashtags, spread the word
We live in an age where most of our time is spent staring at a screen. Chances are it will be the same during presentations as well. People would be on Facebook or Instagram or tweeting their thoughts through Twitter. Some may even be conducting their business through their smartphone.
Capitalize on this by creating presentation-centric hashtags and encouraging your audience to share news and updates about it. It is just smart marketing; word of mouth, event promotion and social interaction all act parallelly for the same event.
Such hashtags encourage people to create and engage in discussions about your presentation through other social domains. While it promotes your event, you can also view responses and customer opinions through relevant tags.
10. Add a reflection at the end
While ice-breakers are key to a good start, reflective questions make sure the presentation receives a good ending. A reflective question gives you an idea of the audience’s take-away from the presentation while encouraging them to share their feedback and inputs.
Reflective questions can be asked verbally or in the form of an interactive slide at the end of the presentation.
These ten tips will enable you to create an interactive, informative, and engaging presentation. Implementing these tips will certainly take you a long way and ensure that your presentation isn’t just another snooze fest. Happy Presenting!
You can browse through our collection of PowerPoint Templates & Google Slides Templates to create stunning presentations. Here are a few examples of presentation templates:
Source: Timeline Animation By SlideUpLift
Source: Quiz Animation By SlideUpLift
Source: BarCode Template By SlideUpLift
Now you don’t have to scour the web to find out the right templates. Download our PowerPoint Templates from within PowerPoint. See how ?
1639142940401 -->
![How To Create A Timeline In PowerPoint And Google Slides? [2024 Guide]](https://slideuplift.com/wp-content/uploads/2021/10/How-to-create-a-timeline-in-powerpoint.jpg "How to create a timeline in powerpoint")
Privacy Overview
Necessary cookies are absolutely essential for the website to function properly. This category only includes cookies that ensures basic functionalities and security features of the website. These cookies do not store any personal information
Any cookies that may not be particularly necessary for the website to function and is used specifically to collect user personal data via ads, other embedded contents are termed as non-necessary cookies. It is mandatory to procure user consent prior to running these cookies on your website.
How to See Your Notes When Presenting in PowerPoint
As a presenter, delivering a seamless and confident presentation is key to making a lasting impression. However, it can be challenging to remember every detail of your presentation, especially if you have a lot of content to cover. Fortunately, with PowerPoint’s Presenter View, you can easily access your notes and confidently deliver your presentation. In this article, we will cover all aspects of using PowerPoint’s Presenter View to enhance your presentation.
Table of Contents
Why you need to see your notes when presenting in powerpoint.
Presenting without having your notes at hand can be daunting and can affect the quality of your presentation. Whether you are presenting in front of a small group or a large audience, you will need to have access to your notes. This will help you deliver your presentation confidently, as you will have a clear idea of what to say or do next. In addition, having your notes visible can help you stay focused on the topics you want to cover and avoid straying off-topic.
Another reason why it is important to see your notes when presenting in PowerPoint is that it can help you manage your time effectively. By having your notes visible, you can keep track of the time and ensure that you are covering all the important points within the allocated time frame. This can help you avoid rushing through the presentation or running out of time before you have covered all the key points.
Furthermore, having your notes visible can also help you engage with your audience better. When you are confident and well-prepared, you are more likely to make eye contact with your audience and use body language effectively. This can help you build a connection with your audience and keep them engaged throughout the presentation.
How to Access Presenter View in PowerPoint
Before you can access Presenter View, you need to have a PowerPoint presentation open in Slide Show mode. Once your presentation is open, simply click on the ‘Slide Show’ tab and check the box beside ‘Use Presenter View.’ Your screen will then automatically switch to Presenter View, allowing you to see your notes and other helpful controls.
Presenter View is a great tool for giving presentations, as it allows you to see your notes and upcoming slides while your audience only sees the current slide. You can also use Presenter View to zoom in on specific parts of your slide, draw on your slides, and even use a virtual laser pointer to highlight important information. To exit Presenter View, simply press the ‘Esc’ key on your keyboard.
Understanding the Presenter View in PowerPoint
Presenter View is a powerful tool that enables you to manage your presentation effectively. It comprises several elements, including:
- The slide display area, which shows the slide that your audience sees.
- The notes section, which displays any text that you have added as notes or comments.
- The timer, which can help you stay within your allotted time.
- The navigation controls, which let you move forward and backward in your presentation easily.
- The zoom slider, which enables you to zoom in and out of your slides for added detail.
- The laser pointer and highlighter tools, which allow you to emphasize important points on your slides.
Presenter View also allows you to preview upcoming slides, giving you a chance to prepare for the next section of your presentation. This feature can be especially helpful if you need to refer to specific information on a later slide.
In addition, Presenter View provides a way to keep your audience engaged by allowing you to add annotations to your slides. You can draw attention to specific areas of your slide, highlight key points, or even add additional information that may not be included in the slide itself.
Setting Up Presenter View: Step-by-Step Guide
If you want to customize your Presenter View experience, follow these steps:
- On the ‘Slide Show’ tab, click ‘Set Up Slide Show.’
- Under ‘Multiple Monitors,’ select the ‘Use Presenter View’ checkbox.
- If you’re using a single monitor, select the ‘Display slide show on’ option and choose your primary monitor.
- If you’re using dual monitors, select the ‘Display slide show on’ option and choose the monitor that you want to display Presenter View on.
- Customize the Presenter View by selecting the options that you want to use, such as speaker notes, the timer, and the navigation controls.
- Click ‘OK.’ Your Presenter View should now be set up.
It’s important to note that not all versions of PowerPoint have the Presenter View feature. If you don’t see the ‘Use Presenter View’ checkbox under ‘Multiple Monitors,’ it’s likely that your version of PowerPoint doesn’t support this feature. In this case, you may need to upgrade to a newer version or use a different presentation software that offers Presenter View.
How to Customize Presenter View Settings in PowerPoint
If you have specific preferences for Presenter View, you can customize it by following these steps:
- Click the ‘Settings’ button in the Presenter View toolbar.
- Select the options that you want to use, such as the color scheme, font size, and slide size.
- Click ‘Save Changes’ to apply your changes.
Customizing your Presenter View settings can greatly enhance your presentation experience. For example, you can choose to display your notes on one screen while your audience sees only the slides on the other screen. Additionally, you can select the option to display a timer or a clock to help you keep track of time during your presentation. Experiment with different settings to find what works best for you and your audience.
Using Presenter View on Dual Monitor Setup
If you have a dual-monitor setup, you can use Presenter View to present your slides on one screen while managing your notes and tools on the other screen. To do this, simply select the ‘Use Presenter View’ checkbox under ‘Multiple Monitors’ in the ‘Set Up Slide Show’ dialog box. Once you start presenting, the Presenter View screen will appear on the secondary monitor, while the slides will appear on the primary screen.
Presenter View is a great tool for presenters who want to keep their notes and tools hidden from the audience. With Presenter View, you can see your notes, upcoming slides, and a timer, while your audience only sees the current slide. This feature is especially useful for longer presentations, where you may need to refer to your notes or keep track of time.
Another benefit of using Presenter View is that it allows you to easily navigate through your presentation. You can use the arrow keys on your keyboard to move forward or backward through your slides, or you can use the thumbnails on the Presenter View screen to jump to a specific slide. This makes it easy to adjust your presentation on the fly, without having to interrupt the flow of your presentation.
Troubleshooting Common Issues with Presenter View in PowerPoint
If you experience common issues with Presenter View, such as notes not displaying correctly, audio not working, or distorted visuals, try these troubleshooting tips:
- Make sure that your computer meets the minimum system requirements for using Presenter View.
- Check that the correct audio output is selected in the control panel.
- Review your slides and notes to ensure that there are no formatting errors.
- Try closing other open applications to free up system resources.
- Ensure that your computer is updated with all available updates.
- Try reinstalling or repairing PowerPoint to eliminate any software conflicts.
However, if these troubleshooting tips do not resolve your issues, there may be other factors at play. One possible cause of issues with Presenter View is outdated or incompatible drivers for your computer’s graphics card. Check with your computer manufacturer or graphics card manufacturer to see if there are any updates available.
Another potential issue could be related to your computer’s display settings. Make sure that your display settings are optimized for the resolution and aspect ratio of your presentation. You may also want to try adjusting the scaling settings to see if that improves the display of your slides and notes.
Tips and Tricks for Effective Note-taking During Presentation
To get the most out of Presenter View, try these effective note-taking tips:
- Organize your notes by slide or topic to stay on track during the presentation.
- Use bullet points and keywords to keep your notes concise and easy to read.
- Include cues or action words to remind you of any demonstrations, animations, or other interactive elements in your presentation.
- Use the highlighter tool to draw attention to the most critical points.
Enhancing Your Presentation with Presenter View
Presenter View can enhance your presentation in several ways, such as by allowing you to add visual aids and multimedia elements, manage your time effectively, and engage your audience. By using Presenter View, you can keep your presentation on track, highlight key information, and maintain your audience’s attention throughout.
The Importance of Rehearsing Your Presentation with Presenter View
Practicing your presentation with Presenter View can help you become familiar with the interface, identify any errors or issues, and ensure that your presentation will run seamlessly. Use Presenter View during your presentation rehearsal to simulate the actual presentation environment and get a feel for how it works.
Taking Advantage of the Laser Pointer and Highlighter Tools in Presenter View
The laser pointer and highlighter tools are handy for emphasizing key points on your slides and improving audience engagement. To use them, simply press and hold the ‘Ctrl’ key and click the mouse to activate the laser pointer or highlighter. Release the key to deactivate them.
How to Switch Between Slides and Notes during a Presentation
If you need to switch between slides and notes during your presentation, simply click the ‘Notes’ button in the Presenter View toolbar. This will display your notes and allow you to scroll through them as needed.
Utilizing the Timer and Countdown Features of Presenter View
The timer and countdown features are useful for keeping your presentation on track and ensuring that you do not exceed your allotted time. To use them, simply enable the ‘Timer’ feature in the ‘Settings’ section of Presenter View. You can then set the countdown time and choose whether to display it during the presentation or keep it hidden.
Sharing Your Screen Using Presenter View in Microsoft Teams or Zoom Meetings
If you are using Microsoft Teams or Zoom Meetings to deliver your presentation remotely, you can still use Presenter View by sharing your screen. To do this, simply select the ‘Share Screen’ option and choose the ‘Presenter View’ screen. This will allow you to present your slides while keeping your notes and controls visible to you for an uninterrupted presentation experience.
By following the steps and tips outlined in this article, you can use PowerPoint’s Presenter View to deliver a polished and professional presentation that wows your audience. Always remember to rehearse your presentation before the actual day so that you’re comfortable with the tools and settings for Presenter View, and ready to tackle any issue that might arise.
By humans, for humans - Best rated articles:
Excel report templates: build better reports faster, top 9 power bi dashboard examples, excel waterfall charts: how to create one that doesn't suck, beyond ai - discover our handpicked bi resources.
Explore Zebra BI's expert-selected resources combining technology and insight for practical, in-depth BI strategies.
We’ve been experimenting with AI-generated content, and sometimes it gets carried away. Give us a feedback and help us learn and improve! 🤍
Note: This is an experimental AI-generated article. Your help is welcome. Share your feedback with us and help us improve.
- Use Presenter View Video
- Add speaker notes Video
- Practice and time your presentation Video
- Record a presentation Video
- Print a presentation Video
Use Presenter View
PowerPoint Presenter View shows you the current slide, the next slide, and your speaker notes, to help you focus while presenting and connect with your audience.
Select the Slide Show tab.
Select the Use Presenter View checkbox.
Select which monitor to display Presenter View on.
In Presenter View , you can:
See your current slide, next slide, and speaker notes.
Select the arrows next to the slide number to go between slides.
Select the pause button or reset button to pause or reset the slide timer in the upper left.
See the current time to help you pace your presentation.
Select the font icons to make the speaker notes larger or smaller.
Select the annotations pen icon to draw on the screen in real time, or select a laser pointer.
Select the thumbnail icon to see all the slides in your presentation and quickly jump to another slide.
Select the magnifying glass icon to zoom in on a particular part of a slide.
The screen icon let's you make the screen temporarily black to focus the attention on you.
Select END SLIDESHOW when you're done presenting.
Start the presentation and see your notes in Presenter view
Need more help?
Want more options.
Explore subscription benefits, browse training courses, learn how to secure your device, and more.
Microsoft 365 subscription benefits
Microsoft 365 training
Microsoft security
Accessibility center
Communities help you ask and answer questions, give feedback, and hear from experts with rich knowledge.
Ask the Microsoft Community
Microsoft Tech Community
Windows Insiders
Microsoft 365 Insiders
Was this information helpful?
Thank you for your feedback.
The Ultimate Guide to PowerPoint Viewer: Enhance Your Presentation Experience
Introduction
When it comes to creating and delivering impactful presentations, Microsoft PowerPoint has remained a cornerstone tool for professionals, educators, and students alike. The ability to convey ideas, information, and visuals in a compelling and organized manner is paramount, and PowerPoint has consistently risen to the occasion. One crucial aspect of the PowerPoint ecosystem that often goes overlooked is the PowerPoint Viewer – an auxiliary tool that brings an enhanced presentation experience to both creators and viewers. In this comprehensive guide, we'll delve into every facet of the PowerPoint Viewer, from its features and benefits to tips and tricks for optimal utilization.
Understanding PowerPoint Viewer
PowerPoint Viewer is a dedicated application designed to allow users to view PowerPoint presentations without requiring the full Microsoft PowerPoint software. Whether you're a presenter who wants to share your content seamlessly with others or an audience member who wishes to access and interact with presentations without the editing capabilities, PowerPoint Viewer has you covered.
Key Features of PowerPoint Viewer
Interactive Viewing : PowerPoint Viewer enables users to engage with presentations, zoom in on details, and navigate through slides intuitively.
Formatting Integrity : Maintains the original formatting and design of the presentations, ensuring that your content is displayed exactly as intended.
Slide Show Experience : Offers a seamless slide show experience, complete with animations, transitions, and embedded multimedia elements.
Print Capabilities : Allows users to print presentations directly from the viewer, retaining the visual quality of the slides.
Compatibility : Supports a wide range of PowerPoint file formats, ensuring accessibility to presentations created on different versions of the software.
Accessibility Features : Incorporates accessibility features to ensure that presentations are usable by individuals with diverse needs.
Making the Most of PowerPoint Viewer
Maximizing the potential of PowerPoint Viewer involves understanding how to use its features effectively. Let's explore some strategies to enhance your presentation experience:
Optimal Presentation Design
Creating presentations that are well-structured and visually appealing is the first step towards a successful delivery. With PowerPoint Viewer, your design choices are showcased with fidelity, making it imperative to focus on:
Slide Consistency : Maintain a consistent theme and layout throughout your slides to provide a cohesive visual experience.
Visual Elements : Utilize high-quality images, charts, and graphs to support your content and enhance audience engagement.
Engagement and Interaction
PowerPoint Viewer empowers both presenters and viewers to engage and interact with the content. Here's how you can leverage this aspect:
Navigational Aids : Implement clear navigation buttons and hyperlinks to allow viewers to move between slides seamlessly.
Annotations : Encourage viewers to annotate directly on the slides, fostering interaction and collaborative discussions.
Accessibility Considerations
To ensure your presentations are accessible to a wider audience, follow these accessibility guidelines:
Alt Text : Add descriptive alt text to images and visual elements, making the content understandable for individuals with visual impairments.
Font and Color Choices : Opt for legible fonts and color contrasts to enhance readability, particularly for those with visual or cognitive challenges.
Is PowerPoint Viewer Available for Mac Users? Unfortunately, PowerPoint Viewer is not available for Mac users. However, Mac users can use other methods to view PowerPoint presentations, such as using the online version of PowerPoint or converting presentations to PDF format.
Can I Edit Presentations in PowerPoint Viewer? No, PowerPoint Viewer is a read-only application. You cannot edit presentations or create new ones using this tool. Its primary purpose is to provide a seamless viewing experience.
Are Embedded Videos Supported in PowerPoint Viewer? Yes, PowerPoint Viewer supports embedded videos within presentations. Viewers can watch videos directly from the slides during the presentation.
Can I Use PowerPoint Viewer on Mobile Devices? As of now, there is no dedicated mobile app for PowerPoint Viewer. However, PowerPoint files can be viewed on mobile devices using the PowerPoint mobile app or other compatible apps.
Is PowerPoint Viewer a Free Tool? Yes, PowerPoint Viewer is available for free download from the official Microsoft website. It's a standalone application separate from the paid Microsoft Office suite.
Can I Play Animations in PowerPoint Viewer? PowerPoint Viewer supports many animations and transitions. However, complex animations or those involving certain custom effects might not work as intended in the viewer.
In the world of presentations, where conveying information effectively is crucial, PowerPoint Viewer emerges as an indispensable tool. Its ability to faithfully reproduce the original design, animations, and interactive elements of presentations makes it an asset for both creators and viewers. Whether you're a presenter looking to share your content seamlessly or an audience member seeking an immersive viewing experience, PowerPoint Viewer has you covered. By understanding its features, optimizing your presentation design, and considering accessibility, you can harness the full potential of this remarkable tool. Explore the power of PowerPoint Viewer and elevate your presentation experience today.
#1 News & Blogs Hub
Discover the pinnacle of informed discourse with our #1 English-language portal for news, blogs, and articles, powered by cutting-edge AI technology. Stay ahead of the curve with the most advanced and innovative content available anywhere. Dive in now and experience the future of informed engagement.
Readability in PowerPoint: What Is It and Why it Matters?
June 3, 2023 / Blog

PowerPoint presentations have become integral in communication in various fields. While we often focus on the content and design of our slides, one crucial aspect that is often overlooked is readability.
Readability refers to how easily text can be read and understood. It encompasses factors such as font choice, size, and color contrast .
Need a Presentation Designed? Click Here To View Our Amazing Portfolio
In this blog, we will explore the concept of readability in PowerPoint and why it is essential for creating effective and engaging presentations.
Understanding Readability in PowerPoint
To grasp the importance of readability, let’s delve into its key components.
Definition of readability
Readability in PowerPoint refers to how easily your audience can read and comprehend the text on your slides. It is essential to strike a balance between visually appealing design and clear, legible text.
Elements such as font choice , size, and color contribute to the overall readability of your presentation.
Font Choice
The choice of font can significantly impact the readability of your slides. It is crucial to select fonts that are easy to read, even from a distance.
Avoid decorative or complex fonts that can hinder comprehension. Stick to sans-serif fonts like Arial or Calibri, which are highly readable.
Font size plays a crucial role in ensuring readability—too small, and your audience may struggle to read the text; too large, and it may appear cluttered and unprofessional.
Maintain a font size that is legible from various viewing distances. For titles and headings, use larger font sizes, while body text can be slightly smaller but still easily readable.
Color Contrast
Color contrast is vital for enhancing readability, especially for individuals with visual impairments or color vision deficiencies.
Ensure a clear contrast between your text and background color. Avoid using combinations that make the text difficult to read, such as light gray text on a white background. Furthermore, opt for high-contrast color combinations, such as black text on a white background, to maximize readability.

The Importance of Readability in PowerPoint Presentations
Now that we understand what readability entails, let’s explore why it matters in PowerPoint presentations.
Engaging the Audience
Readability directly impacts audience engagement and comprehension.
If your text is hard to read or understand, your audience will likely lose interest and may miss key information. Clear, legible text helps capture and maintain the audience’s attention , enhancing their understanding of the content.
Designing accessible presentations is crucial to ensure inclusivity. Readability plays a significant role in accessibility.
Prioritize readability to make your presentations more accessible to individuals with visual impairments or color vision deficiencies. This consideration helps create an inclusive environment and ensures your message reaches a wider audience.
Professionalism and Credibility
Readability is closely linked to the overall professionalism and credibility of your presentation. A well-designed and readable slide deck demonstrates attention to detail and a commitment to delivering a clear message.
When your content is easily readable, it reflects positively on your expertise and enhances your credibility with the audience.
Best Practices for Improving Readability in PowerPoint
Let’s explore some best practices to enhance it in our PowerPoint presentations.
Simplify the Content
Avoid overwhelming your slides with excessive text.
Simplify your content by focusing on key messages and using concise language. Break down complex information into digestible chunks, using bullet points or subheadings to enhance clarity.
Use Visual Elements
Visual elements , such as images, charts, and graphs, can complement your text and make it more engaging. They help convey information visually, breaking the monotony of plain text and enhancing comprehension.
Choose visuals that support your message and ensure they are appropriately sized and positioned.
Consider Slide Layout
The layout of your slides can impact readability.
Organize content logically and coherently, ensuring proper spacing and alignment. Leave enough white space to avoid overcrowding and maintain a clean, uncluttered look.
Practice Consistency
Consistency is key to maintaining readability throughout your presentation.
Use consistent font choices, sizes, and color schemes across your slides. This consistency fosters a sense of cohesion and professionalism, making it easier for the audience to follow along.
By understanding the elements of readability and implementing best practices, we can create engaging and accessible slides that enhance audience comprehension and support our overall message. Strive for clear and legible content in our PowerPoint slides and unlock the full potential of our presentations.
Popular Posts
Save your deck: methods to recover an unsaved powerpoint file.

Twitter: Lessons from Social Media

Oscar Speech Sounds A Lot Like…..

Olympians Can Teach Presenters a Thing or Two

Overcoming a Public Speaking Disaster: A Lesson from Michael Bay

The Similarities Between Presentations and Advertisments : Super Bowl Edition
- 402-984-9297
- Request Information

3 Ways to Enhance Your PowerPoint Presentations
A common pitfall when making a PowerPoint presentation is the urge to share EVERYTHING you want to cover in your training. The way we typically do this is by copying the material from our training manual or notes straight onto the slides. Then, we pick a design template, arrange your text in bullet points, and add a title slide. Finally, we save the presentation and it’ll serve us for many years to come. Here are two creative and one technical tip to improve your PowerPoint slides.
1. Less is More
If your slides are filled to the brim with text, you will intimidate your audience. Truth is, that you, the speaker, might be just as intimidated! As a result, you may simply start repeating what’s written on the slide. This doesn’t create engagement. When you have a lot of text on a slide, think about how you can transform your message into a story and simply show a picture that fills the slide. Be sure the graphic you choose is high-quality. Avoid using Clip Art and stick figures, your audience has seen those a million times before. If you are sharing a list of key points you want to elaborate on, dedicate a whole slide to each point. This will prevent your viewers from reading ahead and blanking out on what you are saying to support the information on your slide.
2. Limit Animations
Subtlety and consistency are key here. If you want your presentation to look professional, a simple fade or wipe animation will be all you need. Avoid the fly and swirl animations that scream for attention and are simply distracting your viewer from your content. If you opt to add transitions between your slides, choose one for the entire presentation for the same reason.
3. Aspect Ratio
These days, virtually all monitors and projectors have a 16:9 aspect ratio. The aspect ratio of a screen describes the proportional relationship between its width and its height, not how big or small the screen is. Before the 21 st century, the common aspect ratio used to be 4:3. If you are still using this ratio today it screams to the viewers: “I haven’t updated this PowerPoint in many years”. Unless the equipment you use in your business is still using a 4:3 aspect ratio, this simple trick changes the aspect ratio of your PowerPoints to 16:9:
Open the PowerPoint you want to convert. Click on Design in the menu ribbon. Find the Slide Size option and switch it to 16:9.

Next, you will be presented with two options about how you want your existing content to behave.

Maximize scales up your content up to fill the extra width the 16:9 ratio has over the 4:3 ratio. This option could result in your content not fitting on the slide and may need more manual tweaking. Ensure Fit scales down your content. This could make your content appear smaller but ensures all content fits on your slide. In both cases, you should check all your slides to make sure they look professional after the conversion.
Remember, you are the speaker. The PowerPoint slides are merely there to support what you are teaching. Don’t let the PowerPoint derail or complicate your presentation!
Go get your geek on,
Maarten Cappaert
The Effectiveness of MS PowerPoint: Take Your Presentation to the Next Level

It’s safe to say that everyone has had to prepare an MS PowerPoint presentation at least once. Nowadays, proficiency in PowerPoint is considered a fundamental skill. This tool is especially useful when it comes to giving speeches in school or at work.

Whether this is your first experience with MS PowerPoint or you just want to learn more about creating a professional and engaging presentation – this article by IvyPanda.com is for you! Here, we will:
- cover the best way to structure your presentation;
- give best PowerPoint presentation tips for students;
- share 7 excellent free templates.
- 🤔 Why Is Structure Important?
- 💡 How to Structure a Presentation
- 📜 Presentation Text Length
- 🎨 Design Tips
- ✨ 7 Free Templates
- 😃 Bonus Presentation Tips
🔗 References
🤔 your presentation’s structure: why is it important.
When you start working with MS PowerPoint, the structure is the most crucial thing to consider . Information that is presented logically is easier for the viewer to understand. Besides, if you accompany your presentation with a speech, a good structure will help you feel confident, stay on topic, and avoid awkward silence.
💡 How to Structure Your Presentation
A good presentation always has a message to deliver or a story to tell. It is usually divided into 3 parts: introduction, body, and conclusion . Let’s look at each of these parts in more detail.
The introduction is singularly the most important part of your presentation. It sets the tone for the entire performance and captures the audience’s attention. Although the introduction takes only about 10-15 % of your speaking time, it should still be informative and include the following parts:

Title & Cover Page
The cover page is your first slide. Its main goal is to present all the necessary information about the topic and the presenter. A good cover page can also pique the audience’s interest in your subject and grab their attention. For that reason, investing time in creating a visually pleasing and informative title page is never a bad idea.
Want to know the best way to create your first slide? Check out these simple steps:
- Come up with a suitable title. Try to keep your title short but straightforward and descriptive. If you struggle to summarize the main idea in a title, you can use a subtitle to give further detail.
- Add some information about the speaker. Identify the group or person who’s going to present. Sometimes you may also need to include your student ID, department, or company’s name and logo.
- Pay attention to your cover page’s tone and aesthetics. A well-designed first slide conveys a sense of professionalism and shows how well you are prepared. To create a visually pleasing cover page, you don’t need to be a professional designer: you can simply use an MS PowerPoint template.
Although a table of contents is optional, it’s a must if you want your presentation to look professional. It shows the audience what the presentation will consist of. In addition, a well-made table of contents makes the structure clearer.
Tracking the progress of the presentation is even easier if you add hyperlinks to your slides . It will allow you to refer back to the required slide faster when questions arise.
When you create a presentation, there’s always an objective : a point you want to prove or an idea you want to convey. Make sure you state your goals in the first couple of slides. It will let your audience know what to expect from your presentation and what they will learn from it.
Definitions
Sometimes you need to explain certain words that are unknown to your audience. Creating a slide with the definitions of new terms makes it easier for the listeners to follow your ideas. Make your explanations as simple as possible.
The main body is the most informative part of your presentation . It covers all the necessary aspects of your work and determines if your ideas will persuade the audience.
One of the things you want to do while delivering your presentation is to ensure the body is well-organized. A good strategy is to structure the points according to one specific criterion. Here are some suggestions:
And here are some additional tips to help you create a well-structured main body for your presentation:
- Limit yourself to 3-5 points. If you mention more than five ideas, your audience may get lost, and it will be harder for them to follow your presentation.
- Include smooth and clear transitions between your points. Transitions are another factor that contributes to your presentation’s success. You can use them for an enumeration or count your ideas as steps:
- Make sure your facts are accurate and understandable. It’s essential to have enough detail that you cover the topic comprehensively. And, of course, all your information needs to be credible.
A summary’s main objective is to outline your presentation’s main points. In this part, you can also suggest sources that can give your audience more information on the topic. Just make sure not to include anything that hasn’t been mentioned before.
The conclusion is a section that ties all the parts of your presentation together . Similar to the introduction, it should be short, straight, and to the point. Here are the best strategies that will help you create a great conclusion:
📜 Presentation Text Length: Importance & Strategies
Now that we’ve discussed the structure of your presentation, let’s look at the visual component. It’s vital to present information in a way that’s easy for the audience to digest. If this sounds like a daunting task, don’t worry: our tips will help you ace it.
The first rule is to avoid adding too much text to your slides . There are several reasons why you shouldn’t do that:

- It’s hard for the audience to read and listen simultaneously. If there’s too much text, they will stop listening to what you are saying and focus on reading instead.
- The audience starts taking notes. When people come to a watch presentation, they want to learn new things. There are chances that your audience will begin writing down everything that is on the screen because they will assume that the information is essential. It will make them even more distracted.
- As a result, the audience can’t catch up. When the listeners start to make notes, they may fail to notice when you switch to the next slide. It becomes more challenging for them to concentrate on the message and hear everything you say.
Naturally, you want to avoid this kind of situation. We’re going to share some of the best strategies to help you with that: keep reading!
Use Less Text
Using less text is the best strategy for preventing your audience’s confusion. So, how do you do that? Well, there are several ways:
- Limit each slide to one idea. This will help you use fewer words and organize your presentation better.
- Use bullet points to cover the components of each idea.
- Keep each bullet point to 1-2 lines.
- Limit the number of bullet points per slide to 4-6.
- Use simple words to describe your ideas.
- Limit the number of words you put on a slide. We recommend you not to use more than 30 words per slide.
Include Images
One of the best ways to get rid of extra text is to use images. Of course, you can’t include pictures on every slide, but there are times when illustrations are just what you need to save the day. If you decide to have images in your presentation, ask yourself:
If you answered “yes” to these questions, then go ahead and use an image to convey your idea. But be careful not to overuse illustrations: they may distract the audience.
🎨 How to Boost Your PowerPoint Design: 12 Best Tips
Now it’s time to talk design. The look of your presentation is another crucial factor that determines how well the audience gets your message. In this section, we’ve collected the most helpful presentation tips for students that will help you create a visually engaging presentation.
Font Tips for Your Presentation
The font is an element that adds character to your slides. Choosing the right font ensures that your presentation looks pleasing and professional. Here we have a couple of suggestions on how to decide on a suitable font:

- Choose font style depending on the purpose of your presentation. There are 4 popular font styles: serif, sans-serif, script, and decorative. Each of them has unique characteristics that are worth considering.
Serif fonts have a more classic feel. They might be the best option if you are going for something simple. Sans-serif fonts are perfect if you are going for a more modern and round-looking design. As for script and decorative fonts, they are unique and stylized. You may want to use them for special purpose presentations.
- Use easily readable fort styles. Popular examples include Arial, Tahoma, Veranda, Garamond, and Times New Roman.
- Standardize the font. Make sure it’s the same throughout the slides.
- Mind the font size. Use size 40 points for the headings and 32 points for the subheadings. Don’t use a font size smaller than 24 for the content text.
Color and Contrast Tips
The choice of color may seem inessential, but it’s definitely worth considering when working on your presentation. To choose the perfect color scheme for your slides, keep several things in mind:
- Use harmonious colors. If you want to make your presentation visually pleasing, you can pick complementary, triadic, or tetradic colors with the help of the color wheel.
- Use a high-contrast color scheme. Sometimes there’s not enough contrast between the shades chosen for the text and the background. To be on the safe side, choose lighter colors for the text if you have a darker background and vice-versa.
- Keep it simple. Even though using a variety of shades may be tempting, it’s still best to keep things simple and choose only primary colors.
Animation Tips for Your Presentation
Now let’s turn our attention to animation. Animated elements can make your presentation more engaging or serve as a distraction. So, be wise when incorporating animation into your work. Here are some suggestions:
- Use subtle animation. For instance, you can make the points appear on the screen one after the other. It will give the audience more time to read and digest the information.
- Make objects disappear. Effects such as removing separate elements from the slide can make your presentation more exciting.
- Don’t shy away from simple animation. Sometimes even the most common effects like zoom or fade can help emphasize a certain point. Besides, they are less distracting compared to more showy effects.
- Avoid using too much animation. An overabundance of visual effects will make your presentation too hard on the eyes and distract the audience.
- Don’t go overboard. Stick to a couple of animation effects throughout the whole presentation.
✨ 7 Best Free Templates
If you are new to PowerPoint or don’t have much time to work on a layout, you can always use free templates. We’ve compiled our favorites in the list below. These templates will help you organize your content and ideas in a way that suits you best:
- Group project presentation (Berlin themes, widescreen) This group project template is designed with teamwork in mind. It’s perfect for you if you’re planning to delegate the parts of your presentation for different team members to complete. With this template, each member gets a set of slides with a coordinating sample chart, a table in a 16:9 format, and SmartArt.
- Rainbow presentation This template is perfect for creating an outdoor-oriented presentation. It is already formatted, so all you need to do is start editing.
- General Purpose Thin Style PowerPoint Template This template will help you create a presentable company profile. It includes editable text areas, infographic icons, and high-resolution replaceable images.
- E-Learning Presentation Deck This presentation template focuses on internet education. It contains 20 slides for online education. It will help you introduce courses, teaching plans, and methods.
- Social Media Map Users Free PowerPoint Template and Keynote This template shows a world map and social media results. It can be used in your report to visually present information regarding your research question or the data you’re using.
- Product Design Template This template is created specifically for startups who wish to present their project and company profile. It includes 20 blue-themed slides and features such as SWOT analysis diagrams, pie diagrams, sales analysis charts, etc.
- Member Profile Slides These are team introduction templates that include placeholders for text, data reports, and photos. This template is perfect for introducing one person.
😃 Bonus Tips for an Effective Presentation
Finally, we want to share with you some additional tips for creating an excellent presentation in PowerPoint for students:
Thanks for reading our article! We hope our tips and strategies will help you create fantastic presentations. Feel free to share your thoughts and ideas in the comment section below.
- Parts of a Presentation: Oregon State University
- How to End Your PowerPoint Presentation with a Strong Close: Envato
- PowerPoint Presentation Guidelines: McGill University
- Part 2: Design Principles: Purdue Writing Lab
- Teaching with PowerPoint: Northern Illinois University
- Writing a PowerPoint Presentation: George Mason University
- PowerPoint Presentations: MIT Alumni Association
- Design Tips for PowerPoint: UNSW
- General Guidelines for PowerPoint Presentations: Virginia Tech
- Tips for Creative Effective PowerPoint Presentations: University of Nebraska–Lincoln
- Share via Facebook
- Share via Twitter
- Share via LinkedIn
- Share via email
You might also like

Economics Essay Topics: 162 Practical Ideas & Useful Tips

162 Persuasive Writing Prompts & Topics: Examples & Tips
![187 Impressive Higher English Persuasive Essay Topics [2024]](https://ivypanda.com/blog/wp-content/uploads/2020/10/front-view-of-books-with-blue-background-309x208.jpg "this enhances viewer experience in powerpoint presentation")
187 Impressive Higher English Persuasive Essay Topics [2024]
Hi ivypanda.com admin, You always provide in-depth analysis and understanding.
Thanks for the awesome feedback, Lauri!
Hello ivypanda.com webmaster, You always provide great examples and case studies.
We are glad to hear your opinion! Thank you, Anke!
- Tips and Guides
- Industry Information

7 PowerPoint Mistakes to Avoid for Outstanding Presentation
Ramachandiran.
- July 26, 2023

Business professionals use PowerPoint in their everyday routines, making it an integral part of our professional lives.
Byway, it’s overcrowded slides, a lack of visual appeal, or a monotonous delivery, these mistakes can quickly turn your audience off and make them distracted.
This is why it’s crucial to be aware of these mistakes and take proactive steps to avoid them.
We’re here to help you to avoid these pitfalls and create presentations that captivate and impress. By doing so, you can ensure that your presentation stands out from the rest and leaves a lasting impression on your audience.
Let’s explore the seven most common PowerPoint mistakes and provide you with practical tips and strategies to overcome them. So, grab your notepad and get ready to take your presentation skills to the next level!
Before that, there is another option to avoid these mistakes: simply sign up and download free PowerPoint templates online. Here, we’ll explore common mistakes made when creating an investor pitch deck for your business upgrade.
Overwhelming Slides with Too Much Text

Presenters often make the mistake of overwhelming their audience with text on their slides. This can make it difficult for the audience to focus on the main points of the presentation. Slides should complement the presentation, not serve as a script.
To avoid this mistake, presenters should keep their text brief and use bullet points to highlight the key points. This will make it easier for the audience to scan the slides and identify the main ideas.
Presenters should also break down complex information into smaller, more manageable chunks. This will make it easier for the audience to understand and remember the information.
By following these tips, you can create slides that are clear, concise, and visually appealing. This will help your audience to focus on the key points of your presentation and retain the information.
Slide Design and Visual Elements
A clear and attractive slide design is essential in PowerPoint to capture and maintain audience attention.
Using too many colors, fonts, or complicated graphics can make your slides look cluttered and unprofessional.
To create an attractive slide, keep your design simple and consistent.
Stick to a limited color palette and use fonts that are easy to read. You can also incorporate relevant images, charts, or graphs to enhance understanding and engagement.
Always keep in mind that less is more in slide design, and simplicity often leads to better comprehension and retention.
Lack of Consistency in Your Style
Consistency is key when it comes to PowerPoint presentations.
Using different tools like fonts, colors, and styles on each slide can make your presentation look disjointed and unpolished. It’s important to establish a visual theme and stick to it throughout your presentation.
Choose your font and color scheme that aligns with your message and brand. Use the same fonts and colors consistently on each slide to create a harmonious and professional look.
According to some psychology-proven facts, Consistency in font, color, and style will not only make your presentation visually appealing but also help reinforce your message in the minds of your audience.
Additionally, pay attention to the size and spacing of your text to ensure readability.
Explore presentation design services to create impactful and effective slides that leave a lasting impression on your audience.
Importance of the Structure
Storytelling and structure are two essential elements of any good PowerPoint presentation. When used effectively, they can help you connect with your audience, make your message more memorable, and persuade them to take action.
However, many presenters make the mistake of ignoring the importance of storytelling and structure. They focus on simply presenting information, without taking the time to tell a story or create a clear structure. This can result in presentations that are boring, confusing, and ineffective.
Start with a strong introduction that captures your audience’s attention. Your introduction should set the tone for your presentation. Use clear and concise language that is easy to understand. Your audience should be able to follow your presentation without getting lost.
They help you to connect with your audience. When you tell a story, you are essentially creating a bond with your audience. They will be more likely to listen to you and understand your message if they can relate to it on a personal level!
By following these thoughts, you can create PowerPoint presentations that are clear, engaging, and memorable. And by using storytelling and structure to your advantage, you can increase the chances that your audience will connect with your message and take action.
Not Practicing Properly
Among the most common slip-ups by presenters is not practicing and rehearsing their presentations adequately.
Not practicing your presentation can lead to a number of problems, including stumbling over your words, losing track of your thoughts, or going off on tangents. This can damage your credibility and make your audience lose interest.
To avoid these problems, it is important to set aside dedicated time for practice and rehearsal.
First, familiarize yourself with the content and flow of your presentation. This means reading through your slides and notes several times so that you know the material inside and out.
You should also practice delivering your presentation aloud, paying attention to your tone, pace, and body language.
Second, rehearse in front of a mirror or record yourself. This will help you to identify any areas that need improvement, such as awkward pauses or repetitive phrases.
You can also use this time to experiment with different delivery techniques, such as using gestures or facial expressions.
The more you practice, the more confident and polished you will be during the actual presentation. This will make you appear more credible to your audience and help you to keep their attention throughout your talk.
Overusing Animations and Transitions
Add animations and transitions in your presentation to avoid distractions. Overusing them can also lead them away from your message. So try to be it enough you need and void presentation.
Here are some tips for using animations and transitions effectively:
Use them sparingly. Too many animations and transitions can be overwhelming and distracting.
Choose simple and subtle effects. Avoid flashy or gimmicky animations that will take away from your message.
Use animations and transitions to highlight key points. This will help your audience to focus on the most important information.
Use animations and transitions to guide your audience’s attention. This can be done by animating text or objects to move around the slide or by using transitions to move from one drop to the next.
Remember, the goal is to enhance your message, not overshadow it with unnecessary visual effects.
Neglecting the Audience’s Needs and Preferences
Presenters should also tailor their presentation to the audience’s needs and preferences.
Understanding your audience’s background, knowledge level, and expectations is essential for creating a presentation that resonates with them.
Research your audience beforehand and tailor your presentation accordingly. Consider their interests, industry-specific terminology, and learning preferences. Adapt your content and delivery style to meet their needs and engage them on a deeper level.
By doing so, you’ll be able to connect with your audience and deliver a presentation that is both informative and relevant.
After you give your presentation, ask your audience for feedback. This will help you to identify any areas where you can improve your presentation for future audiences.
PowerPoint presentations have the power to engage, inform, and inspire. However, common mistakes can hinder your ability to deliver a stellar presentation that leaves a lasting impact on your audience. By avoiding overcrowded slides, poor design choices, lack of consistency, and neglecting storytelling and audience needs, you can elevate your presentation skills and captivate your audience from start to finish.
Remember, a well-crafted PowerPoint presentation is a powerful tool that can help you communicate your message effectively and achieve your presentation goals. So, take the time to avoid these common mistakes, implement the tips and strategies mentioned in this blog, and watch as your presentations become truly stellar.
Related Blogs

Why Graphic Design Services are Essential for Your Business

Seven Essential Tips for a Successful Business Presentation
About the author.

Subscribe Newsletter
By clicking “Subscribe” you agree to Deckez and consent to Deckez using your contact data for newsletter purposes
More Articles

- PowerPoint Design Company
Join our PPT experts community
Meet and learn the tips and tricks from creators & companies who share how they use PowerPoint to create better presentations in minutes.
- Customer Testimonials
- PowerPoint Design Services
- Investor Pitch Decks
- Dedicated Designers
- Master Templates Design
- Enterprise Presentations
- Other Design Services
- Terms & Conditions
- Privacy Policy
- Refund/Cancellation Policy
- Disclaimer Notice
Security Policies
- DMCA Policy
- GDPR Policy
- CCPA Policy
- Cookies Policy
Copyright © 2024 Deckez. All rights reserved.
Template egg.
7+ PowerPoint Skills to Showcase in your Resume (with Real-Life Examples)
Last updated on December 26th, 2023

In today’s digital era, Microsoft PowerPoint skills are among the most coveted competencies in a vast range of job descriptions. From academia to business, from consultancy to marketing, effective PowerPoint presentations can significantly impact your professional journey. This article seeks to provide readers with an overview of the essential PowerPoint skills to include in your resume and corresponding real-life examples to illustrate their importance. So, what are the 7 presentation skills to?
1. Proficiency in PowerPoint Basics
This involves understanding the fundamental features of PowerPoint, including creating and formatting slides, adding and modifying text, and inserting and adjusting images, shapes, and text boxes. It’s the foundation upon which more advanced skills are built, and mastery of these basics can help you design clear and concise presentations.
Real-life Example : As an entry-level marketing executive, you might be required to create a company presentation incorporating the mission, vision, products, and services. Familiarity with PowerPoint basics such as creating slides, adding text, and inserting images or logos becomes crucial to deliver an engaging and professional-looking presentation.
2. Mastering Advanced Design Features
Advanced PowerPoint skills include creating customized slide themes, designing templates, adding and customizing transitions and animations, and creating interactive slides. These features add a visual appeal to presentations, enhancing engagement and audience comprehension.
Real-life Example : A sales manager pitching a product to potential investors will significantly benefit from advanced PowerPoint features. This can involve designing customized themes, applying transitions and animations, and creating interactive slides with hyperlinks or embedded videos to make the presentation more dynamic and persuasive.
3. Data Visualization Skills
Data visualization in PowerPoint involves the ability to create and manipulate charts, tables, and graphs effectively. This skill allows you to present complex data in a simplified and understandable format, aiding in effective communication and decision-making processes.
Real-life Example : If you’re an analyst, your role might involve presenting complex data in a straightforward and understandable manner. Proficiency in creating charts, tables, and graphs, or importing them from Excel, can help you effectively communicate intricate information and trends to your audience.
4. Incorporation of Multimedia Elements
This skill entails the ability to incorporate multimedia elements like videos, audio clips, and animated GIFs into presentations. Utilizing multimedia can enhance viewer engagement, making the information more memorable and stimulating.
Real-life Example : As an educator, you might need to make your lectures more interactive and engaging. Incorporating multimedia elements such as videos, sound clips, and animated GIFs can help stimulate your students’ interest and enhance their learning experience.
5. Knowledge of PowerPoint Collaboration Features
PowerPoint offers features like real-time co-authoring, commenting, and sharing via the cloud. These collaboration tools are vital in today’s team-based working environments, enabling smooth cooperation and coordination between team members.
Real-life Example : If you’re working in a team-based environment, you might need to collaborate on a presentation with your colleagues. PowerPoint’s collaboration features, such as real-time co-authoring, commenting, and sharing through the cloud, will enable efficient teamwork and a streamlined workflow.
6. Expertise in Presentation Design Principles
Understanding and applying key design principles such as consistency, contrast, hierarchy, and balance can enhance the aesthetic appeal of your presentation. These principles help to create visually attractive presentations that hold the viewer’s attention and effectively communicate your message.
Real-life Example : Suppose you’re a consultant presenting a business strategy to clients. In this case, understanding presentation design principles such as consistency, contrast, hierarchy, and balance can help you create a visually appealing and effective presentation that enhances your professional credibility.
7. Proficiency in Delivering PowerPoint Presentations
Aside from creating presentations, knowing how to deliver them effectively is a crucial skill. Proficiency in presentation mode features, including using the presenter view, navigating slides, and annotating during a presentation, enhances the delivery of your content, facilitating audience engagement and understanding.
Real-life Example : A motivational speaker should not only create inspiring slides but also deliver them effectively. Proficiency in presentation mode features, such as using presenter view, navigating slides, and annotating during a presentation, can help you deliver a seamless and impactful presentation.
Incorporating PowerPoint skills into your resume demonstrates your competence in effectively communicating and presenting information. This, in turn, can make you stand out in the competitive job market. Whether you’re just starting your career or are an experienced professional, continually improving and showcasing your PowerPoint skills can lead to countless opportunities in your professional journey. If you want to improve your presentation skills, you can refer to our other article on how to improve your presentation skills .
Leave a Comment Cancel reply
Your email address will not be published. Required fields are marked *
Sign up to our newsletter
We will send you our curated collections to your email weekly. No spam, promise!
Livestreaming Design Elements to Enhance Viewer Experience. Your deck plays a key role in the impact of your presentation and there are many ways to make your presentation accessible. Because the presentation is being streamed from your source, you won't need to worry about losing any of your custom fonts. That's a common pain when people ...
This extra set of eyes and ears can help identify issues you might overlook and contribute valuable insights to enhance the viewer experience. If any issues arise during the test run, take the time to troubleshoot and resolve them before going live. ... Your PowerPoint presentation has the potential to inspire, educate, and leave a positive ...
Then, open your PowerPoint file and go to the Slide Show tab. In the Monitors group, check the box that says Use Presenter View and select the display that you want to show your slides to the ...
Select the Slide Show tab. Select the Use Presenter View checkbox. Select which monitor to display Presenter View on. Select From Beginning or press F5. In Presenter View, you can: See your current slide, next slide, and speaker notes. Select the arrows next to the slide number to go between slides. Select the pause button or reset button to ...
Turn On PowerPoint Presenter View. In PowerPoint for macOS, simply click on Presenter View on the Slide Show tab to kick off the presentation in Presenter view. Turn on Presenter View by clicking on Presenter View on the Slide Show tab. You'll see the Presenter View interface on one screen.
Check the box beside the "Use Presenter View." Select from the "Start Slide Show" section to start your presentation "From the Beginning." Click the three dots menu on your full-screen slideshow view and select "Show Presenter View." When your presentation displays "Presenter View," you can scroll and use it for your speech.
View your speaker notes as you deliver your slide show. Draw on or highlight slides during a presentation. Turn your mouse into a laser pointer. Add speaker notes to each slide in a presentation. Training: Presenter view is like a dashboard that contains in one window everything you need to run your slide show. You control the show on a ...
Step-by-Step Guide to Activate Presenter View: Open Your Presentation: Start by opening your PowerPoint presentation. This will be the one you intend to deliver. Navigate to the Slide Show Tab: At the top, you'll notice several tabs. Click on the one labeled 'Slide Show'. Check the 'Use Presenter View' Option:
Most laptops also have an F key that sets this up. For example, you might press the Fn key and the F5 key together. Go into PowerPoint and click the Slide Show tab. Check the Use Presenter View check box. Then go into Slide Show view by clicking the Slide Show view icon at the bottom of your screen or pressing F5 (to go to the 1st slide) or ...
3. When you start Microsoft PowerPoint, you should see the same image on both screens. 4. Now press the Windows + P key combination and then select Extend. Click on the check mark to the right of Presenter View in the Slide Show tab. 5. You'll now see the different views on your two monitors.
Dave Paradi has over twenty-two years of experience delivering customized training workshops to help business professionals improve their presentations. He has written ten books and over 600 articles on the topic of effective presentations and his ideas have appeared in publications around the world. His focus is on helping corporate ...
In the "Insert" menu, select "Table" and opt for a one-by-one table. Change the table color to a light gray shade, elongate it, and position it neatly to the left of your text. To improve readability and aesthetics, increase the spacing between text phrases. A small adjustment in the before spacing setting (setting it to 48) significantly ...
To set up for your presentation, simply hold the Windows key together with the letter P . When a window pops up, choose Extend. After configuring dual display for your device, open your PowerPoint deck and head to the Slide Show tab. Tick the check box for Use Presenter View. Make sure your slides are set to appear on the secondary screen or ...
By using an ice breaker, you set the tone for the rest of the presentation. 2. Use Audio/Visuals in Your Presentation. Audio-visuals in a few slides are bound to get the audience's attention. Use your own video or embed one from YouTube. Embed a video into one of your slides to draw your audience's attention.
If you want to customize your Presenter View experience, follow these steps: On the 'Slide Show' tab, click 'Set Up Slide Show.'. Under 'Multiple Monitors,' select the 'Use Presenter View' checkbox. If you're using a single monitor, select the 'Display slide show on' option and choose your primary monitor.
One crucial aspect of the PowerPoint ecosystem that often goes overlooked is the PowerPoint Viewer - an auxiliary tool that brings an enhanced presentation experience to both creators and viewers. In this comprehensive guide, we'll delve into every facet of the PowerPoint Viewer, from its features and benefits to tips and tricks for optimal ...
By pressing the Windows key + P you will gain access to the monitor control settings. Select "Expand.". On Mac devices, launch System Preferences, click on "Displays," select the relevant monitor, and drag it into place as main or side display. Activate PowerPoint Presenter view. Within Presenter view, click on the display settings ...
Definition of readability. Readability in PowerPoint refers to how easily your audience can read and comprehend the text on your slides. It is essential to strike a balance between visually appealing design and clear, legible text. Elements such as font choice, size, and color contribute to the overall readability of your presentation.
Avoid the fly and swirl animations that scream for attention and are simply distracting your viewer from your content. If you opt to add transitions between your slides, choose one for the entire presentation for the same reason. 3. Aspect Ratio. These days, virtually all monitors and projectors have a 16:9 aspect ratio.
Whether this is your first experience with MS PowerPoint or you just want to learn more about creating a professional and engaging presentation - this article by IvyPanda.com is for you! Here, we will: cover the best way to structure your presentation; give best PowerPoint presentation tips for students; share 7 excellent free templates.
Presenters often make the mistake of overwhelming their audience with text on their slides. This can make it difficult for the audience to focus on the main points of the presentation. Slides should complement the presentation, not serve as a script. To avoid this mistake, presenters should keep their text brief and use bullet points to ...
2. Mastering Advanced Design Features. Advanced PowerPoint skills include creating customized slide themes, designing templates, adding and customizing transitions and animations, and creating interactive slides. These features add a visual appeal to presentations, enhancing engagement and audience comprehension.
- business plan
- course work
- research paper

An official website of the United States government
The .gov means it’s official. Federal government websites often end in .gov or .mil. Before sharing sensitive information, make sure you’re on a federal government site.
The site is secure. The https:// ensures that you are connecting to the official website and that any information you provide is encrypted and transmitted securely.
- Publications
- Account settings
Preview improvements coming to the PMC website in October 2024. Learn More or Try it out now .
- Advanced Search
- Journal List
- v.19(9); 2019 Sep
Seven tips for giving an engaging and memorable presentation
Effective and memorable presentations should be fun, and informative for the presenters and the learners. Engaging presenters stimulate connections with the audience. Excellent presentations not only provide information, but also give opportunities to apply new ideas during and after the talk to ‘real-life’ situations, and add relevant ‘take-home’ messages. 1 In this article we highlight educational techniques that can be used to enhance the impact of a presentation. Although all these techniques can be incorporated in the modified form into large plenary lectures, we suggest that the ‘think-pair-share’, ‘role-playing’, and ‘flipped classroom’ techniques may be more effective in smaller classroom settings.
Tip 1: Know your audience—before and during your talk
Every audience has a different level of interest, knowledge, and experience. A presentation about asthma should be different when given to patients compared with intensivists. The presenter should have a clear a priori idea of why the learners are coming to this lecture, what may motivate them, and what would be valuable to them . Whenever feasible, an assessment of the audience's needs is helpful for the presenter to focus on meaningful points. Sometimes needs-based assessments are prepared in advance, depending on the lecture or meeting, and this information may be available from the organisers of the meeting. However, if the information is not available beforehand, there are methods for collecting real-time assessments that are themselves engaging to learners. Another benefit of engaging audiences in this way is that an audience response system (ARS) can provide real-time feedback before, during, and after a presentation. 2 ARS can range from low-technology (hand raising), to newer generation ‘iClicker’ devices, or online websites such as Poll Everywhere, which can also be used to collect free-text responses. The audience's responses can help learners reinforce the importance of the topic, and provide a gauge for the presenter to customise subsequent information. Furthermore, research has shown that incorporation of multiple-choice questions to allow for ‘test-taking’ is an effective way of solidifying new knowledge. 2 Advantages of web-based ARS programs are that they are free, user-friendly, and accessible by various mobile devices. The potential disadvantages are reliability of Wi-Fi or cell phone carrier connectivity in a lecture theatre. In the absence of connectivity, an invitation to raise hands can engage participants, although without anonymity.
Tip 2: Tell a story
Stories connect people. A story that is personal to the speaker can evoke memories that are relatable and add concrete meaning to the presentation. 3 Consider starting your presentation with a story that shows why the topic is important to you. In addition, stories focus the audience on the speaker, rather than a slideshow. Even when the stories are not based on personal experiences, they can invoke learners to imagine themselves in similar situations applying knowledge to solve a problem. Descriptions of clinical cases that focus on initial presentations of patients allow learners to imagine seeing that patient and stimulate critical thinking. Experiencing the case vicariously makes the learning more memorable.
Tip 3: Trigger videos
Trigger videos are short (ideally 30 s to 3 min) audiovisual clips that represent a case or problem. Videos can be created using a handheld video recorder or smartphone, and edited using movie-editing software. Alternatively, videos can be found online and incorporated into presentations with appropriate attributions. Chosen well, trigger videos can present a thought-provoking dilemma that encourages discussion and debate. 4 They can alter the dynamics of a presentation. Success requires careful linking or embedding the videos into the presentation, making sure they play on the computer and projector, and confirming appropriate loudness of the audio settings.
Tip 4: Think-pair-share
When introducing a novel concept to a small group, consider using the ‘think-pair-share’ technique. In this technique, learners first think quietly about the challenging idea, then pair with neighbours to discuss, and then share their collective thoughts with the audience. 5 This technique gives the audience time to pause, think, and reflect on educational content. Encouraging the audience to come to work with the knowledge in a collaborative way incorporates experiential learning into your presentation. To be successful, allow for extra time in the presentation, ensure the audience's seating arrangement is conducive to small conversations, and display summarised ideas for referencing throughout the presentation. 5 , 6
Tip 5: Role play
When presenting an abstract concept that is controversial or thought-provoking, the use of scripted actors can be helpful. Both exemplary and poor examples can be demonstrated for topics such as obtaining informed consent, speaking up about safety concerns, or giving difficult feedback. Similarly, small group role-play can allow audience members to practice and experiment with actions and language with their peers. 7 The instructor should introduce the exercise in a way that helps assure psychological safety among learners, with an emphasis on deliberate practice rather than perfect performance.
Tip 6: ‘Flip’ the classroom
In situations where homework is assigned, consider ‘flipping’ the classroom experience where work is prepared by the learners before the teaching session. Preparatory work can comprise reading material or watching videos of lectures or demonstrations. This allows for more active collaborative learning, for example learners can solve a diagnostic challenge together, debate the pros and cons of a controversial topic, or practice skills. 8 The classroom experience is enriched by the interaction of many learners, rather than the perspective of a single presenter.
Tip 7: Applying the ‘take-home message’
Many are familiar with the framework of ‘ tell them what you are going to say, say it, and then summarise what you just said. ’ We advocate an additional component in the conclusion, where learners are challenged to commit to a change in their behaviour as a result of something they just learned: ‘ What is something you can do differently and better tomorrow or with your next patient as a result of this presentation? ’ Incorporating this question in the evaluation of a presentation can help facilitate behaviour change by having the learners write an example. Similarly, incentives can be offered for behaviour change: ‘ We have your email addresses, and with your permission we would like to follow-up with you in 2 weeks to see if you have any stories to share about applying this new information. We'll be collecting the responses and having a raffle to select one person to receive a gift card... ’ Not only does this provide an incentive to experimentation, but it also gives valuable and often heart-warming feedback to the presenter.
Dynamic educational techniques increase the engagement of the audience. We emphasise the importance of connecting with the learners and obtaining a commitment to apply the new knowledge for change and improvement. The extent to which these techniques are used will depend on the level of audience expertise, time constraints, and access to audiovisual aids. When used, they can result in a more memorable experience for both learners and presenters.
Declaration of interest
The authors declare that they have no conflicts of interest.
Biographies
Christine Mai MD MS-HPEd is assistant professor of anesthesia at Harvard Medical School and program director of the Pediatric Anesthesia Fellowship at Massachusetts General Hospital. Her clinical and research interests are in simulation education and graduate medical education.
Rebecca Minehart MD MS-HPEd is assistant professor of anesthesia at Harvard Medical School and program director of the Obstetric Anesthesia Fellowship at Massachusetts General Hospital.
May Pian-Smith MD is associate professor of anesthesia at Harvard Medical School and director of quality and safety for the Department of Anesthesia, Critical Care and Pain Medicine at Massachusetts General Hospital.
Matrix codes: 1H02, 2H02, 3J02
- Tips and Guides
- Industry Information

7 PowerPoint Mistakes to Avoid for Outstanding Presentation
Kavithalaya.
- July 26, 2023
Table of Contents
Business professionals use PowerPoint in their everyday routines, making it an integral part of our professional lives.
Byway, it’s overcrowded slides, a lack of visual appeal, or a monotonous delivery, these mistakes can quickly turn your audience off and make them distracted.
This is why it’s crucial to be aware of these mistakes and take proactive steps to avoid them.
We’re here to help you to avoid these pitfalls and create presentations that captivate and impress. By doing so, you can ensure that your presentation stands out from the rest and leaves a lasting impression on your audience.
Let’s explore the seven most common PowerPoint mistakes and provide you with practical tips and strategies to overcome them. So, grab your notepad and get ready to take your presentation skills to the next level!
Before that, there is another option to avoid these mistakes: simply sign up and download free PowerPoint templates online. Here, we’ll explore common mistakes made when creating an investor pitch deck for your business upgrade.
Overwhelming Slides with Too Much Text
Presenters often make the mistake of overwhelming their audience with text on their slides. This can make it difficult for the audience to focus on the main points of the presentation. Slides should complement the presentation, not serve as a script.
To avoid this mistake, presenters should keep their text brief and use bullet points to highlight the key points. This will make it easier for the audience to scan the slides and identify the main ideas.
Presenters should also break down complex information into smaller, more manageable chunks. This will make it easier for the audience to understand and remember the information.
By following these tips, you can create slides that are clear, concise, and visually appealing. This will help your audience to focus on the key points of your presentation and retain the information.
Slide Design and Visual Elements
A clear and attractive slide design is essential in PowerPoint to capture and maintain audience attention.
Using too many colors, fonts, or complicated graphics can make your slides look cluttered and unprofessional.
To create an attractive slide, keep your design simple and consistent.
Stick to a limited color palette and use fonts that are easy to read. You can also incorporate relevant images, charts, or graphs to enhance understanding and engagement.
Always keep in mind that less is more in slide design, and simplicity often leads to better comprehension and retention.
Lack of Consistency in Your Style
Consistency is key when it comes to PowerPoint presentations.
Using different tools like fonts, colors, and styles on each slide can make your presentation look disjointed and unpolished. It’s important to establish a visual theme and stick to it throughout your presentation.
Choose your font and color scheme that aligns with your message and brand. Use the same fonts and colors consistently on each slide to create a harmonious and professional look.
According to some psychology-proven facts, Consistency in font, color, and style will not only make your presentation visually appealing but also help reinforce your message in the minds of your audience.
Additionally, pay attention to the size and spacing of your text to ensure readability.
Explore presentation design services to create impactful and effective slides that leave a lasting impression on your audience.
Importance of the Structure
Storytelling and structure are two essential elements of any good PowerPoint presentation. When used effectively, they can help you connect with your audience, make your message more memorable, and persuade them to take action.
However, many presenters make the mistake of ignoring the importance of storytelling and structure. They focus on simply presenting information, without taking the time to tell a story or create a clear structure. This can result in presentations that are boring, confusing, and ineffective.
Start with a strong introduction that captures your audience’s attention. Your introduction should set the tone for your presentation. Use clear and concise language that is easy to understand. Your audience should be able to follow your presentation without getting lost.
They help you to connect with your audience. When you tell a story, you are essentially creating a bond with your audience. They will be more likely to listen to you and understand your message if they can relate to it on a personal level!
By following these thoughts, you can create PowerPoint presentations that are clear, engaging, and memorable. And by using storytelling and structure to your advantage, you can increase the chances that your audience will connect with your message and take action.
Not Practicing Properly
Among the most common slip-ups by presenters is not practicing and rehearsing their presentations adequately.
Not practicing your presentation can lead to a number of problems, including stumbling over your words, losing track of your thoughts, or going off on tangents. This can damage your credibility and make your audience lose interest.
To avoid these problems, it is important to set aside dedicated time for practice and rehearsal.
First, familiarize yourself with the content and flow of your presentation. This means reading through your slides and notes several times so that you know the material inside and out.
You should also practice delivering your presentation aloud, paying attention to your tone, pace, and body language.
Second, rehearse in front of a mirror or record yourself. This will help you to identify any areas that need improvement, such as awkward pauses or repetitive phrases.
You can also use this time to experiment with different delivery techniques, such as using gestures or facial expressions.
The more you practice, the more confident and polished you will be during the actual presentation. This will make you appear more credible to your audience and help you to keep their attention throughout your talk.
Overusing Animations and Transitions
Add animations and transitions in your presentation to avoid distractions. Overusing them can also lead them away from your message. So try to be it enough you need and void presentation.
Here are some tips for using animations and transitions effectively:
Use them sparingly. Too many animations and transitions can be overwhelming and distracting.
Choose simple and subtle effects. Avoid flashy or gimmicky animations that will take away from your message.
Use animations and transitions to highlight key points. This will help your audience to focus on the most important information.
Use animations and transitions to guide your audience’s attention. This can be done by animating text or objects to move around the slide or by using transitions to move from one drop to the next.
Remember, the goal is to enhance your message, not overshadow it with unnecessary visual effects.
Neglecting the Audience’s Needs and Preferences
Presenters should also tailor their presentation to the audience’s needs and preferences.
Understanding your audience’s background, knowledge level, and expectations is essential for creating a presentation that resonates with them.
Research your audience beforehand and tailor your presentation accordingly. Consider their interests, industry-specific terminology, and learning preferences. Adapt your content and delivery style to meet their needs and engage them on a deeper level.
By doing so, you’ll be able to connect with your audience and deliver a presentation that is both informative and relevant.
After you give your presentation, ask your audience for feedback. This will help you to identify any areas where you can improve your presentation for future audiences.
PowerPoint presentations have the power to engage, inform, and inspire. However, common mistakes can hinder your ability to deliver a stellar presentation that leaves a lasting impact on your audience. By avoiding overcrowded slides, poor design choices, lack of consistency, and neglecting storytelling and audience needs, you can elevate your presentation skills and captivate your audience from start to finish.
Remember, a well-crafted PowerPoint presentation is a powerful tool that can help you communicate your message effectively and achieve your presentation goals. So, take the time to avoid these common mistakes, implement the tips and strategies mentioned in this blog, and watch as your presentations become truly stellar.
Related Blogs

What are the biggest mistakes people make when designing presentations?

Template vs. Customization: What's the Best Fit for Your Presentation?

The Most Common Pitfalls in DIY Presentation Design and How to Avoid Them?
About the author.

Subscribe Newsletter
By clicking “Subscribe” you agree to Deckez and consent to Deckez using your contact data for newsletter purposes
More Articles
- PowerPoint Design Company
Join our PPT experts community
Meet and learn the tips and tricks from creators & companies who share how they use PowerPoint to create better presentations in minutes.
- Customer Testimonials
- PowerPoint Design Services
- Investor Pitch Decks
- Dedicated Designers
- Master Templates Design
- Enterprise Presentations
- Other Design Services
- Terms & Conditions
- Privacy Policy
- Refund/Cancellation Policy
- Disclaimer Notice
Security Policies
- DMCA Policy
- GDPR Policy
- CCPA Policy
- Cookies Policy
Copyright © 2024 Deckez. All rights reserved.
Template egg.
Byte Bite Bit
How to Enable PowerPoint’s Automatic Advance Slide Feature: A Step-by-Step Guide
Crafting a PowerPoint presentation that progresses slides automatically can elevate the professionalism of your presentation and facilitate smooth flow during a speech, meeting, or informational display. This feature is particularly useful when you want to ensure consistent timing or create a hands-free experience. Let’s take a moment to discuss how we can enable PowerPoint presentations to advance slides without manual input.

We often encounter situations where engaging the audience’s attention is crucial, and having to manually advance slides can disrupt our connection with them. By setting up a PowerPoint presentation to auto-advance, we can maintain a seamless narrative. Whether for a timed assessment, a trade show booth, or an educational video, this functionality is an essential skill to master.
Using PowerPoint’s built-in tools, we can customize the timing of each slide to match the rhythm and pace of our content. This customization can include specific delays before a slide advances, applying transitions, and even integrating multimedia elements without the need to click through slides. We’ll walk through the necessary steps to achieve this level of automation, ensuring that your presentation delivers a polished and engaging viewer experience.
- 1.1 Accessing the Transitions Tab
- 1.2 Choosing Transition Effects
- 1.3 Customizing Transition Timing
- 2.1 Automatic Slide Advance
- 2.2 Rehearsing Slide Timings
- 2.3 Controlling Advance on Mouse Click
- 3.1 Setting Up Self-Running Presentations
- 3.2 Preparing for Speaker-Led Events
- 3.3 Adjusting for Individual Browsing
- 4.1 Incorporating Audio and Video
- 4.2 Utilizing Narration and Annotations
Setting Up Slide Transitions

Setting up slide transitions in PowerPoint enhances your presentation by creating a smooth flow from one slide to the next. We’ll guide you through accessing the transition options, selecting effects, and customizing the timing to suit your needs.
Accessing the Transitions Tab
Firstly, we need to navigate to the Transitions tab to access all the transition-related features. Open your PowerPoint presentation, and you’ll find this tab at the top of the PowerPoint ribbon. Once here, you’ll view a range of different transition effects available.
Choosing Transition Effects
In the Transitions tab, you have various transition effects to choose from, like the popular Fade or more dynamic options. Each effect offers a preview, so by clicking on different options, you can visualize how your slide will appear during the transition.
Customizing Transition Timing
Lastly, it’s vital to set the right pace for your presentation by customizing the timing of your slide transitions. In the Transitions tab, locate the timing options:
- Duration: Adjust the length, in seconds, that the transition effect will take to complete.
- Advance Slide: Here, you can choose when the slide will advance—either after a certain time has elapsed or on mouse click.
If you aim for consistent pacing across all slides, the Apply to All button is a straightforward solution. By selecting this after setting your preferences, all slides will inherit these timing settings, ensuring a uniform transition throughout the presentation.
Managing Slide Advancement
We will guide you through setting up automatic slide transitions, rehearsing timings to perfect your presentation’s flow, and controlling slide advancement manually. Ensuring your slides advance at the right moment is essential for a smooth presentation experience.
Automatic Slide Advance
To have slides advance automatically, we configure settings in the “Timing group” of PowerPoint’s “Transitions” tab. Here’s how:
Rehearsing Slide Timings
Rehearse timings to polish the flow of our presentation. Here’s our process:
- Click on the “Slide Show” tab and choose “Rehearse Timings.”
- Advance the slides as you would during the actual presentation. PowerPoint will record the time it takes for you to advance each slide.
- Once completed, you can choose to keep the recorded timings, ensuring every slide advances as practiced.
Controlling Advance on Mouse Click
For more control over slide transition, we utilize the “on mouse click” feature:
- Under the “Transitions” tab, in the “Advance Slide” section , you’ll find the option to check or uncheck “On Mouse Click.”
- If unchecked, slides won’t wait for a mouse click to advance. They will stick to the automatic timings you’ve set previously or will not advance until manually triggered.
- Checking it means you’ll control when to move on to the next slide with a simple click, which can be combined with automatic advancement if desired.
Configuring for Different Presentation Types
In PowerPoint, ensuring your slides align with the event type is crucial. We’ll guide you through setting up various configurations for self-running presentations, speaker-led events, and individual browsing.
Setting Up Self-Running Presentations
Preparing for speaker-led events, adjusting for individual browsing, enhancing presentations with multimedia.
To truly captivate an audience, incorporating multimedia such as audio and video, alongside narration and annotations, can transform a standard presentation into an engaging experience. Through these elements, we ensure our message is both heard and seen, creating a dynamic atmosphere that resonates with our audience.
Incorporating Audio and Video
To keep our audience engaged, we use animations to sync with media playback, making the content more memorable. Here’s a simple way to insert and set up media on our slides:
Utilizing Narration and Annotations
Narration is a powerful tool to guide our audience through the presentation. Using a microphone, we record our voice to elaborate on slides, providing context that might not be immediately evident through text and images alone. We often include speaker notes as a reference while recording to maintain precision and relevance in our commentary.
To aid our delivery, we use the following steps to add and manage our narration and annotations:
Related posts:
- How Many SATA Ports Do I Have: Figure Out the Number With Ease
- Is Alienware Good: A Detailed Guide Covering Its Features
- Power Supply Clicking: Learn How To Solve Clicking Sound Issues in PSU
- Belkin N450 DB Review: Discovering Its Uses, Benefits and Drawbacks
- Private Folders Mac: How to Access Your Important Files
- How to Add AirPods to Find My iPhone: A Step-by-Step Guide
- Are PSU Extension Cables Safe? Understanding the Risks and Benefits
- How to Break Bar Chart Axis in MS Excel: Step-by-Step Guide
- Can ProtonMail Be Traced? Understanding Email Privacy and Security
- Cant Install Windows 10 from Bootable USB: Troubleshooting Steps for a Smooth Setup
- Why is One Airpod Louder Than the Other? Understanding Uneven Audio Output
- You Don’t Have Permission to Open Outlook on Mac: Troubleshooting Guide
Leave a Comment Cancel reply
Save my name, email, and website in this browser for the next time I comment.
6 Built-In Features in PowerPoint to Enhance Presentations with Visual Slides
Last updated on May 1st, 2024

The use of visually appealing content in reports and presentations makes them more persuasive. You can use attractive content in your slides such as images, graphics, and videos to make your slides more engaging. However, despite your best effort and hours of work, your presentation slides can often look dull. To make your job easy, you can use the built-in features in PowerPoint to visually enhance your presentations.
Why Use Visual Aids in Presentations?
Visual aids in slides can help make outstanding academic, scientific, educational, or professional presentations. For this purpose, you can use the simple methods mentioned below to enhance the visuals for your presentations. These techniques cannot only be used with PowerPoint but also Google Slides, especially now that the conversion from PowerPoint to Google Slides has been streamlined. But before we show you how to use PowerPoint to make your slides more engaging and enhance your presentation visuals, let’s look at a few reasons why visual aids in presentations can help you make the most out of your slide decks.
1. To Makes Your Presentations More Engaging
The use of visual aids can make presentations more engaging. Appropriate visuals that are eye-catching can be attention-grabbing and help you engage your audience. Whether you’re making a presentation for an interactive session or need to present before an audience without much or any interaction, visuals can be your storyboard to take your audience on a journey.
2. A Picture is Worth a Thousand Words
Do you need to explain a complex concept, model, or process in a presentation? The use of infographics, diagrams, and videos incorporated in presentations can help you save time and make your content easier to understand. The term ‘a picture is worth a thousand words’ is literally applicable here. The difference is you can also substitute the picture with a video to make the explanation even easier.
3. Helps Communicate Your Message More Effectively
There are very few presenters that can keep the audience engaged with just the tone of their voice. Most presenters also need visual aids and something to keep the audience awake. This is especially true when it comes to low attention spans due to the frequent use of digital devices by the modern audience.
4. Makes Your Content Memorable
In a previous post, we discussed the Principle of Recency to make your content memorable. Another factor that makes content memorable are visuals that the audience can remember because of their visual appeal. It’s just like how brands use logos, pictures, and dynamic imagery to attract customers by making their brand names, products, and corporate images a part of people’s lives. When you present a slide deck, the use of visual aids can make at least parts of your presentation memorable due to factors like images that stand out or resonate with the audience, humor, the novelty of something in your presentation, or even your accent.
When making a presentation, you can ask yourself what type of content might be memorable for you? If you’re a teacher presenting the diagram of the solar system before your students, do you think they might pay more attention to a static image or an animated slide?
5. To Avoid Death by PowerPoint
While a picture speaks 1,000 words, in the quest to catch your audience’s attention, you can easily fall prey to Death by PowerPoint . Using visual aids proportionally and appropriately can help you stay away from traditional bullet points, text-heavy slides, and dull layouts and enable you to combat Death by PowerPoint .
Make Visually Appealing Slides in PowerPoint – Insert Images, Illustrations, Cutout Pictures, Stickers, Scenes, and Icons
Back in 2014, Microsoft caused quite a stir when it removed clipart. While many users seemed a bit perturbed regarding the move to replace clipart in favor of Bing images at the time, Microsoft has gradually introduced a number of useful alternatives. One of these are visual enhancements provided in PowerPoint. Available via the Insert tab, different options such as the Icons option or Pictures -> Stock Images enable presenters to insert not only icons but a wide range of royalty-free images, Illustrations, cutout pictures, stickers, scenes (videos), and icons.
The first section in this menu provides images. You can quickly search for the desired image type or use the various categories to find one that resonates with your slide deck. These high-quality images offered by Microsoft are free to use without the need for you to purchase premium images from expensive stock photo websites to enhance your PowerPoint presentations. With that said, you may still want to use an AI photo enhancer tool to sharpen, zoom in, or crop the image to fit into your slides better. If this is a branded project, you’ll want to showcase visuals that make sense to you and your stakeholders, which may require quickly editing or tweaking the look and feel of your photos.

2. PowerPoint Icons
The icons available in PowerPoint can help you make your content easier to understand with the use of icons that can be universally understood. The vast icons library offered by powerPoint can cater for almost any topic, such as business, animals, weather, communication, arts, processes, analytics, celebration, medical science, travel, and tourism, etc.
By using relevant icons for PowerPoint, you can make your slides easier to grasp and create your diagrams and infographics to show complex ideas with simple illustrations. For example, a process diagram can be made with small icons on each step, depicting the kind of step in the process under discussion. Similarly, a business presentation can use icons related to finance, analytics, bookkeeping, etc.
3. PowerPoint Cutout Pictures
This is perhaps the most exciting part of the Icons menu and another great feature of PowerPoint. You can pick cutouts of people in different situations to insert in your slides to make them visually descriptive. You can even create storyboards using these human figures with different postures and design layouts with a picture book style layout.

4. Stickers in Presentations
Stickers are a common feature available in social media and messaging apps. This feature has also been incorporated in the latest version of PowerPoint. You can pick different stickers to add some humor to your slides to make them fun and memorable. The use of stickers is more likely to resonate with Millennials and Generation Z audience members. Stickers are also one of the great features of PowerPoint to add some emotions to reflect a digital language that most young and middle-aged audiences are now quite accustomed to.
There are a wide variety of sticker categories to choose from and a quick search can help you instantly find something to make your slides fun and exciting.

5. Presentation Videos
With various videos providing presenters with scenes related to nature, technology, art, food, and a range of other categories, the videos section in PowerPoint provides presenters with the utility to create video presentations with something unique and novel in just a click. These videos can also be used as animated backgrounds, to complement your text, to announce a mid-presentation break, etc.

6. Illustrations for Presentations
Perhaps the closest replacement of conventional clipart are illustrations. These are clipart like graphics that can be used to create anything from basic presentation slides to diagrams, timelines, PowerPoint infographics, roadmaps, etc. Like other types of content mentioned earlier, you can also edit the incorporated Illustrations in PowerPoint.

In our other article with websites for presentations we have compiled a list of other website resources that you can use to find great illustrations and graphics to use in your PowerPoint slides.
How to Manipulate the Graphics Inserted in PowerPoint
Graphics are inserted as vectors, which have some additional properties when compared to traditional PowerPoint shapes.
Convert Vector Object to PowerPoint Shape
By using the Convert to Shape option in PowerPoint (select the shape, right-click and then click Convert to Shape ) you can easily convert the vector graphic into a PowerPoint shape.

Alternatively, you can use a free SVG blob generator tool to generate organic shapes in SVG format, and then insert them into your PowerPoint slides.
Use the Format Shape Options to Customize the Shape Properties
You can easily adjust the graphics colors, by changing the properties of the image. Illustrations inserted in PowerPoint can also be edited using the Graphics Format option in the Ribbon menu or via Format Graphics from the right-click menu. By changing the color of the graphic, resizing it, or animating it, you can make changes to its original structure.

Use of PowerPoint Designer to Edit Visuals
The images, icons, graphics, cutouts, stickers, and videos inserted in your slides also come with suggestions via PowerPoint Designer (Design Ideas). This is a PowerPoint feature that provides automatic suggestions to help design slides using layouts that can appear visually appealing and professionally crafted. The below image shows Design Ideas providing suggestions for an illustration and video background mashed up in a single slide. You can learn more about automatic design suggestions in PowerPoint from our post about PowerPoint Designer .

Other Alternatives to Built-in Features in PowerPoint to Design Presentations
As an alternative to inserting graphics using built-in features, resources like SlideModel can help to boost the productivity at the time of designing presentations. By reusing 100% editable templates, designers, presenters and professionals can get access to a huge catalog of presentation templates, slide designs and design elements to use in their presentations.
If you are looking for free resources, then the free templates and resources we publish at FPPT.com can be of help. Our catalog of free templates includes a collection of free PowerPoint templates and presentation assets that you can use to make slides with great looking background templates for presentations.
Final Words
Over the years, the number of PowerPoint features has evolved, as we can learn reading the history of PowerPoint . Visual aids provided by PowerPoint can help presenters to incorporate high-quality pictures, graphics, and videos to support their existing content. This can not only save time and money but also help presenters get instant ideas to visually enhance their slides and make them more visually descriptive.
Leave a Comment Cancel reply
Your email address will not be published. Required fields are marked *
Save my name, email, and website in this browser for the next time I comment.
Sign up to our newsletter
We will send you our curated collections to your email weekly. No spam, promise!
IMAGES
VIDEO
COMMENTS
Select the Slide Show tab. Select the Use Presenter View checkbox. Select which monitor to display Presenter View on. Select From Beginning or press F5. In Presenter View, you can: See your current slide, next slide, and speaker notes. Select the arrows next to the slide number to go between slides. Select the pause button or reset button to ...
Livestreaming Design Elements to Enhance Viewer Experience. Your deck plays a key role in the impact of your presentation and there are many ways to make your presentation accessible. Because the presentation is being streamed from your source, you won't need to worry about losing any of your custom fonts. That's a common pain when people ...
1 Enable Presenter View. To use Presenter View, you need to have two displays connected to your computer, such as a laptop and a projector, or a monitor and a TV. You also need to set up your ...
Then, with this shape still selected, press Ctrl+C (copy), and then Ctrl+V (paste). In the second box, type 9. With the Animation Pane still open and this second shape selected, click the drop-down arrow and choose "Timing" again. Change the Start option to "After Previous," and make sure the Delay option is 1 second.
Keep reading to find out more about using Presenter View in PowerPoint and the best features to try out.. Turn On PowerPoint Presenter View. In PowerPoint for macOS, simply click on Presenter View on the Slide Show tab to kick off the presentation in Presenter view. Turn on Presenter View by clicking on Presenter View on the Slide Show tab.. You'll see the Presenter View interface on one screen.
For example, Microsoft PowerPoint has original template slides that you can use to create a great visual experience for the audience. ... It draws the eye towards something specific. Colors help to show contrast in slides and draw the viewer to something specific. ... One of the quickest ways to enhance PowerPoint presentations or give a ...
Dave Paradi has over twenty-two years of experience delivering customized training workshops to help business professionals improve their presentations. He has written ten books and over 600 articles on the topic of effective presentations and his ideas have appeared in publications around the world. His focus is on helping corporate ...
To set up for your presentation, simply hold the Windows key together with the letter P . When a window pops up, choose Extend. After configuring dual display for your device, open your PowerPoint deck and head to the Slide Show tab. Tick the check box for Use Presenter View. Make sure your slides are set to appear on the secondary screen or ...
Step-by-Step Guide to Activate Presenter View: Open Your Presentation: Start by opening your PowerPoint presentation. This will be the one you intend to deliver. Navigate to the Slide Show Tab: At the top, you'll notice several tabs. Click on the one labeled 'Slide Show'. Check the 'Use Presenter View' Option:
How to use visual communication to raise your presentation game. Use images and icons. Use visual metaphors. Master the use of color. Use geometric shapes. Use charts and graphs. Convert complex explanations into diagrams and infographics. Create the right mood with typography. Try using GIF and video.
If you have only one monitor, you can still use Presenter View in PowerPoint. Follow these steps: Connect your projector. Open PowerPoint. Go to the "Slide Show" tab. Click "Use Presenter View.". Presenter View will appear on your primary monitor, allowing you to view speaker notes and control your presentation while the audience sees ...
Cameo for a Live Camera Feed. Subtitles for Showing Spoken Words. Presenter View for Tools During the Show. Pen, Highlighter, and Laser Pointer for Visual Emphasis. Zoom for a Closer View. Speaker Notes for Talking Points. As you may already know, Microsoft PowerPoint offers a robust feature set for creating presentations.
If you want to customize your Presenter View experience, follow these steps: On the 'Slide Show' tab, click 'Set Up Slide Show.'. Under 'Multiple Monitors,' select the 'Use Presenter View' checkbox. If you're using a single monitor, select the 'Display slide show on' option and choose your primary monitor.
Select the Slide Show tab. Select the Use Presenter View checkbox. Select which monitor to display Presenter View on. Select From Beginning or press F5. In Presenter View, you can: See your current slide, next slide, and speaker notes. Select the arrows next to the slide number to go between slides. Select the pause button or reset button to ...
5 sentences - There should be no more than 5 sentences or lines of text on a single slide. This makes each slide that much more approachable and readable for the audience. 5 slides - There should not be 5 text-heavy slides within a presentation in a row. Space them out as much as possible.
1) Cut down text on slides. Bullet-point filled slides have been plaguing audiences since PowerPoint began. But they aren't just painfully dull: bullet points are really ineffective for communicating information to an audience. So, the easiest way you can quickly make your presentation 1000 times better is by simply cutting out some of the ...
One crucial aspect of the PowerPoint ecosystem that often goes overlooked is the PowerPoint Viewer - an auxiliary tool that brings an enhanced presentation experience to both creators and viewers. In this comprehensive guide, we'll delve into every facet of the PowerPoint Viewer, from its features and benefits to tips and tricks for optimal ...
Unlock the Power of Live Streaming: 5 Tips to Deliver a Live PowerPoint Presentation. Tips & Tricks; Ashish Arora. December 21, 2023; 3 Mins Reading Time; In an era ruled by digit
Excellent presentations not only provide information, but also give opportunities to apply new ideas during and after the talk to 'real-life' situations, and add relevant 'take-home' messages. 1 In this article we highlight educational techniques that can be used to enhance the impact of a presentation. Although all these techniques can ...
Presenters often make the mistake of overwhelming their audience with text on their slides. This can make it difficult for the audience to focus on the main points of the presentation. Slides should complement the presentation, not serve as a script. To avoid this mistake, presenters should keep their text brief and use bullet points to ...
Automatic Slide Advance. To have slides advance automatically, we configure settings in the "Timing group" of PowerPoint's "Transitions" tab. Here's how: Select the slide you wish to set a timing for. In the "After" box, enter the time period that works best for you. This duration determines when the slide will automatically ...
One of these are visual enhancements provided in PowerPoint. Available via the Insert tab, different options such as the Icons option or Pictures -> Stock Images enable presenters to insert not only icons but a wide range of royalty-free images, Illustrations, cutout pictures, stickers, scenes (videos), and icons. 1.