- Slidesgo School
- PowerPoint Tutorials

How to Use the Presentation Modes and the Screen Recording Features in PowerPoint

After designing all the slides for your presentation, the next and last step is presenting in front of your audience. In this new Slidesgo School tutorial, you’ll see how the presenter view works and how you can record your presentation .
Presentation Modes
Presentation modes — set up slide show, presentation modes — record slide show.
- There are different presentation modes in PowerPoint, besides the one you can find at the bottom of the screen.
- To access the presentation modes, go to the Slide Show tab.
- The first two options allow you to start the presentation from the beginning or from the currently selected slide.

- If you choose Present Online, an URL will be generated, which you can then share with your potential online viewers. After clicking this button, a new window will open, displaying info about the Microsoft Office online presentation service and a checkbox to enable remote download for your online audience. To enjoy this service, you need an Office 365 account. When you’re ready, click Connect to generate the URL.
- If you choose Custom Slide Show, you can select which slides to display in your presentation. First, create a new custom slide show and select the slides that you want to display. Then, click Add, enter the name of the presentation and click OK. This new custom presentation will appear on the list. Select it and click Show to begin the presentation.
- In the Set Up group you’ll find options to set up the presentation, hide slides, rehearse your presentation and even record it.
- Click Set Up Slide Show to adjust several settings regarding your presentation. You’ll find more information in the next section of this tutorial .
- If you click Hide Slide, the selected slide won’t show up during your presentation. Hidden slides will appear faded out on the list and their numbers will be crossed out.
- If you click Record Slide Show, you’ll be able to record your presentation from the beginning or from the current slide. We’ll go into detail in the last section of this tutorial.
- There are several checkboxes regarding whether to play narrations, use timings and show media controls.

- In the Monitors group you can choose which screen to display your presentation.
- The last group, Captions & Subtitles, is only available in Office 365. You’ll find options to enable subtitles, which will be generated out of your speech (so you’ll need to have a mic). There are settings to change the language and the position of the subtitles.
- Open your presentation in PowerPoint.
- Go to the Slide Show tab.
- In the Set Up group, click Set Up Slide Show. A new window will open, where you’ll find several options.
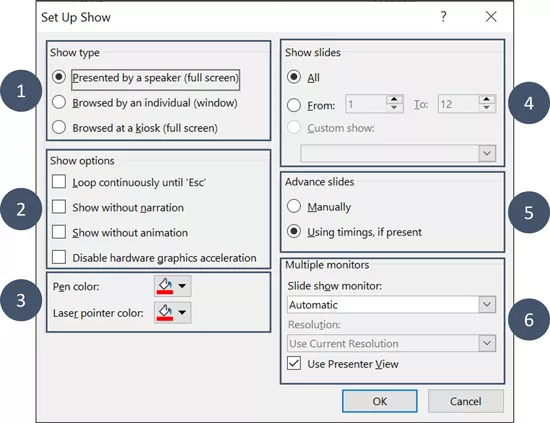
- In the top-left corner, under “Show type”, you can choose whether the presentation will be in fullscreen with speaker notes, windowed, or in fullscreen without speaker notes or the menu bar.

- Under “Show options” you can choose whether to show the presentation without narration or animations, or disable the hardware graphics acceleration (for better performance). You can also set the pen and laser pointer color.

- Under “Show slides”, you can choose which slides to show in your presentation. You can select all of them, a specific range or a custom slideshow.
- There are other settings to determine how to advance slides (manually or using timings), what the resolution will be and whether to use the presenter view.
- Click Record Slide Show. From the drop-down menu, select From the Current Slide or From the Beginning.
- A new window will open, along with the presentation in fullscreen mode. At the top-left you’ll find a button to start recording.
Do you find this article useful?
Related tutorials.

How to Use the Presenter View in Google Slides
Google Slides, like PowerPoint, has different presentation modes that can come in handy when you’re presenting and you want your slideshow to look smooth. Whether you’re looking for slides only, speaker notes or the Q&A feature, in this new Google Slides tutorial, you’ll learn about these and their respective settings. Ready? Then let’s explore the presenter view!

How to Download Google Slides Templates
When preparing a presentation, many people start panicking because they realize how much time it will take to edit each and every slide. Creating them from scratch, filling them in, looking for pictures, moving the elements...How stressful! But there is a solution that saves you a lot of time. We're sure that you've browsed the internet for templates, or basically, pre-established designs and elements, that can be downloaded for free and can be edited to your liking. Are we right? Then, we have some good news for you!

Discover our collection of printable templates
With the advance of technology, printing has become something that is no longer a necessity. Smartphones have made the paper format less and less frequent, but there are still certain cases in which having physical resources is much more convenient. Whether it's for taking notes, handing out assignments, making worksheets or handing out business cards or invitations, it's necessary to print your customized designs.From now on, in every Slidesgo printable presentation that you download, you will find the instructions for printing on the third slide. Depending on the style, colors or format of each presentation, we will tell you if you can...

How to Add Superscript and Subscript in Google Slides
Let’s take the most famous formula: E=mc^2, Einstein’s relativity equation. It wouldn’t be the same if it was E=mc2, right? Okay, yes, some people write it like that because it’s very famous and it won’t be misunderstood. But technically… It can! This is where the sophistication of superscript or subscript enters the room! Do you know how to write them in equations, copyright brands or even footnotes in your presentations? Let’s figure out how.
Stack Exchange Network
Stack Exchange network consists of 183 Q&A communities including Stack Overflow , the largest, most trusted online community for developers to learn, share their knowledge, and build their careers.
Q&A for work
Connect and share knowledge within a single location that is structured and easy to search.
With dual-monitors, how can I set up one screen so it won't affect the other?
At work, we have a dual monitor to check-in at. One screen displays a PowerPoint, while the other displays the check-in. Every time a person clicks on the right hand screen to check in, the PowerPoint stops.
How can I set it up so that the PowerPoint continues to play even after somebody clicks on the right screen?
- multiple-monitors
- microsoft-powerpoint
- 1 The details you've provided aren't enough to answer. What operating system do you use? What program is running in the other screen? ... – Máté Juhász Mar 18, 2016 at 12:02
- I'm sorry - I am not that great with computers. The other screen has Google Chrome up on it for check in. As for the operating system, Microsoft Windows I believe. – Haley Mar 18, 2016 at 12:09
- For us to be able to help, we need to know what version of PowerPoint and what the slideshow settings are. Without more details, we will only be guessing. Go Blue! – CharlieRB Mar 18, 2016 at 12:56
- @CharlieRB, it's PowerPoint 2010. Everything listed below is checked off. Each slide changes automatically, but once you even click on the secondary monitor, the powerpoint stops, as if you're clicking on both screens. Love that, go Blue!!! – Haley Mar 18, 2016 at 13:52
- I'm sorry I am so unclear by the way -- I don't really know how to use anything but a Mac – Haley Mar 18, 2016 at 13:54
4 Answers 4
Adjust your slideshow settings to run in a window. To do this, go to Setup Slideshow .

Set it to loop until you press Esc . If you have the choice under multiple monitors to uncheck Show Presenter View and select the monitor you want it shown on (I only have one monitor, so mine is greyed out in the image) . If you do not have a choice for monitor, you will need to drag the window to the monitor you want it showing on.

Click OK , then save your presentation. Now when you run the slideshow, it will be in a window. Maximize the window and open your browser on the other monitor.
Since I only have one monitor resized the window and the presentation played while I am typing this.
On the slide show tab, on monitors, set your monitor to primary monitor, and untick the box underneath it that says use presenter view.
- Can you give specific instructions with one or more screenshots? How is your answer an improvement on the answer given years ago? – Charles Kenyon Mar 4, 2021 at 20:17
Go to slide show menu and select "Set Up Slide Show" under Set Up group.
A Set Up Show window appear, there deselect the check box "Use Presenter View" under Multiple monitors section.
As far as I am concerned...after following all this advice on countless forums I can state categorically that if you have two monitors you cannot stop powerpoint operating on two monitors.
It is a curse
I can only work on a single monitor system as a consequence.
Powerpoint on two monitors is cumbersome, ineffective, confusing and unnecessary.
I have lectured for over 40 years and I do not see the need for it.
- Your answer could be improved with additional supporting information. Please edit to add further details, such as citations or documentation, so that others can confirm that your answer is correct. You can find more information on how to write good answers in the help center . – Community Bot Oct 20, 2022 at 7:04
You must log in to answer this question.
Not the answer you're looking for browse other questions tagged multiple-monitors microsoft-powerpoint ..
- The Overflow Blog
- Would you board a plane safety-tested by GenAI?
- An open-source development paradigm
- Featured on Meta
- Testing a new version of Stack Overflow Jobs
- What deliverables would you like to see out of a working group?
Hot Network Questions
- LTspice third party model gives problem with transient analsys
- The application of logic to knowledge seems problematic
- Am I a football enthusiast if I don't play football? Also, is there any field/subject/activity that is weird to use the word "enthusiast" with?
- Is it possible to invoke the empty function?
- Why did deportation of illegal immigrants drop so much under Biden, compared to Obama?
- Why do I get binary solution even when I solve a LP problem with continuous variables?
- Is it multiple comparisons?
- Why so many repeats in classical music?
- Seamless cliff mesh with array
- How to create creative plot hooks?
- Implementation of a `shared_any`
- Photodiode Circuit Output Saturating to 0V. Is there a way to salvage these boards?
- A client did an unannounced penetration test on our platform
- How to handle a collaborator who doesn't work?
- Hilbert's Satz 90 for real simply-connected groups?
- Understanding the meaning of the + and - signs after completion of a task run in background
- How to say "it is thought" in German?
- Ways in which total volume changes
- My use case diagram is a mess. What can I do?
- Top Tips on misleading readers on the motives/true personality of a character
- high atmosphere combat - designing the optimal bomber
- Doubts regarding absolute value
- If gravitation is negligible for small masses, how was Cavendish's experiment successful with balls much smaller than celestial objects?
- Is mindfulness of feeling the middle way?
How to Change the Powerpoint Default Presentation Screen
Is there a particular view in Powerpoint that you like to use, and you’re tired of having to switch to it anytime you open a presentation or create a new one? If so, then knowing how to change the Powerpoint default presentation screen is something that could improve the way you use Microsoft’s presentation software.
Fortunately, Powerpoint for Office 365 has a setting that lets you specify which view should be used whenever you open a presentation in the program.
Our article below will show you where to find this setting so that you can select your preferred view from a handful of options. This includes options like various Normal view configurations, Outline, Slide Sorter, and more. This is a really handy setting for people that don’t like the default view and want to use one of the many other possibilities within Powerpoint.
How to Change the Default Display Setting in Powerpoint for Office 365
- Launch Powerpoint.
- Click File .
- Select Options .
- Choose Advanced .
- Click Open all documents using this view , then select one.
Our guide continues below with additional information on changing the display settings for your slide show in the Powerpoint window, including pictures of these steps.
How to Set a Default View in Powerpoint for Office 365 (guide with Pictures)
The steps in this article were performed in Microsoft Powerpoint for Office 365. By adjusting this setting you will be affecting a default setting within the application. Once you make this change, all future existing and new slideshows will open using the view that you have specified.
Step 1: Open Powerpoint.
Step 2: choose the file tab at the top-left of the window..

Step 3: Click the Options button at the bottom-left of the window.

Step 4: Select the Advanced tab.

Step 5: Scroll down and click the dropdown menu to the right of Open all documents using this view , select the desired view, then click the OK button.

Our tutorial continues below with additional discussion about the Microsoft Powerpoint change default presentation screen process.
More Information on the Powerpoint – Change Default Monitor Steps
The options available for the default view selection are:
- The view saved in the file
- Normal – outline, notes and slide
- Normal – thumbnails, notes and slide
- Normal – outline and slide
- Normal – thumbnails and slide
- Normal – notes and slide
- Normal – slide only
- Outline Only
- Slide Sorter
Now if you close the current presentation and open another one, it will open with the view that you specified.
If you change this setting a few times and ultimately determine that you would rather go back to the original setting, then simply change the selection in step 5 above to The view saved in the file option.
If you are looking to learn how to change the Powerpoint default presentation screen because your computer has multiple monitors, then that is going to require a different set of steps that we discuss further below.
Note that the Slide Show tab has a number of other options concerning the display of your current theme.
- If you have multiple monitors connected to your computer, such as if you use two monitors normally and use one monitor for one application for one task and a second screen for something else, then you might want to specify that. If you click the drop down menu to the right of Monitor you can select screen options by either choosing Automatic, or one of the listed monitors.
- Under the monitor selection is a check box for Use Presenter View. If you enable that setting then you are going to enter a full screen mode for your presentation where you see the current slide, any speaker notes that you added, as well as a small preview of the next slide. if you turn off Presenter View then you are only going to see your presentations the same way that your audience sees them.
When you click the Design tab at the top of the window you are able to see a list of the available themes. if you click on one of those themes you can apply it to the current presentation.
However, by right-clicking on one of those themes you will see some additional options, including one to Set as Default Theme. Choosing that option will apply the selected theme as the default option for new slides that you create the next time you create a new presentation.
Would you like to disable all of the animations in a slideshow that you are working on? Find out where to make this change so that you can present and edit without any of the animations that exist in the presentation.

Kermit Matthews is a freelance writer based in Philadelphia, Pennsylvania with more than a decade of experience writing technology guides. He has a Bachelor’s and Master’s degree in Computer Science and has spent much of his professional career in IT management.
He specializes in writing content about iPhones, Android devices, Microsoft Office, and many other popular applications and devices.
Read his full bio here .
Share this:
- Click to share on Twitter (Opens in new window)
- Click to share on Facebook (Opens in new window)
- Click to email a link to a friend (Opens in new window)
- Click to share on LinkedIn (Opens in new window)
- Click to share on Reddit (Opens in new window)
- Click to share on Pinterest (Opens in new window)
- Click to share on Tumblr (Opens in new window)
Related posts:
- How to Duplicate a Slide on Google Slides
- How to Hide a Slide in Google Slides
- How to Delete a Slide on Google Slides
- How to Change Slide Dimensions in Google Slides
- How to Embed Video in Powerpoint 2013
- How to Remove Text Box in Powerpoint 2016
- How to Make a Square Picture a Circle in Powerpoint 2013
- How to Change Slide Orientation in Powerpoint 2013
- How to – Powerpoint Vertical Slide Setting in Powerpoint for Office 365
- How to Change the Default Save Location in Powerpoint 2010
- How to Hide a Slide in Powerpoint 2013
- How to Make a Picture Transparent in Powerpoint 2013
- How to Add a Formatted Slide to Your Slideshow in Powerpoint 2013
- How to Duplicate a Slide in Powerpoint 2016
- How to Number Slides in Google Slides
- How to Delete Slide Numbers in Powerpoint 2013
- How to Delete a Slide in Powerpoint 2013
- How to End With the Last Slide Instead of a Black Screen in Powerpoint 2013
- How to Add a Comment to a Slideshow in Powerpoint 2013
- How to Flip a Picture in Powerpoint 2013
Critical PowerPoint Shortcuts – Claim Your FREE Training Module and Get Your Time Back!
How to Present a PowerPoint Slideshow (w/ Shortcuts)
- PowerPoint Tutorials
- Shortcuts & Hacks
- May 11, 2019
There are a variety of ways to start a PowerPoint presention, depending on:
- Where you start your presentation (from beginning or from current)
- Which PowerPoint view you prefer to present in (Slide Show view or Presenter view)
- How comfortable you are with keyboard shortcuts
Why would Microsoft include so many ways to present a presentation? My guess is that everyone learns PowerPoint differently, and has personal presentation styles. The more options you have, the easier your life will be as there will always be a way to start your presentation the way you want to (or jump back into it when you need to).
See all the options below and find the method that works best for you and let the slide show begin !
NOTE: If you are running two presentations side-by-side, each presentation needs to be started as it’s own slide show. To see how to set up two PowerPoint presentations to run side-by-side like this before you start your slide show, read my guide here .
Table of Contents
Start slide show from beginning.

To start a slideshow from the beginning of your presentation using the ribbon, simply.
- Navigate to the Slide Show tab
- Select From Beginning
Selecting From Beginning starts your presentation from the very first non-hidden slide in your presentation, regardless of which slide you are currently inside of your deck.

You can also start your slide from the beginning of your presentation by hitting the Slideshow From Beginning keyboard shortcut, F5 .
Regardless of which method you use, this is the classic way to start your presentation in full screen from your first title slide (regardless of where you are in your slide deck).
Let the slide show begin!
NOTE: To expand your knowledge and learn how to use PowerPoint’s FREE and HIDDEN built-in laser pointer to point things out during your presentation, read my guide here .
Take your PPT skills to the next level
Start slide show from current.

To begin your slide show from the slide you are currently on using the ribbon, simply
- Navigate to the Slide Show tab
- Select From Current Slide
Selecting From Current Slide starts your slide show from whatever slide you are currently on, even if the slide is hidden.

You can also start your slide from the current slide you are on by hitting the Shift+F5 keyboard shortcut.
Because it’s often easiest to catch errors when building your slides in this full screen mode, I highly recommend learning the Shift+F5 shortcut and using it frequently as you build your slides to spot them for errors.

If you don’t want to bother learning the From Current Slide shortcut, you can also start your slideshow by clicking the Slide Show icon at the bottom of your screen.
This is a fantastic way to spot check your slides as you are building them. On top of that, it’s a fast and uncomplicated way to re-start your presentation from where you left off after demoing something on screen.
Start a mini-slide show in PowerPoint
You can also use the following hidden PowerPoint shortcut to run a mini slide show over the top of your current deck.

To run a mini slide show, simply:
- Hold down the Alt key on your keyboard
- With your mouse, click the Slide Show icon
Doing so starts a small slide show of your presentation that you can see below, from the current slide you are on.

Presenter View
The Presenter View is an alternate way to run your presentation in PowerPoint. In this view, your slides are projected on screen, and the details of your presentation are displayed on your computer as pictured below.

The presenter view includes your next (non-hidden) slides that is coming up, your current slide projected on screen, how long you’ve been talking and your speaker notes.

To launch the Presenter View from the beginning of your presentation using your Ribbon, simply:
- Navigate to the Slide Show tab
- Hold down the Alt key on your keyboard
- Click From Beginning
Holding down the Alt key and clicking From Beginning , the Presenter View will launch from the very first (non-hidden) slide in your presentation.

You can also launch the presenter view from the beginning of your presentation at any time by clicking Alt + F5 on your keyboard.
Start Presenter View in PowerPoint From Current Slide

Did you know that you can access different views in PowerPoint by adding keys as you click commands in the PowerPoint ribbon?
To start the Presenter view from your current slide using your Ribbon, simply:
- Hold down the Alt key on your keyboard
- Click From Current Slide
Holding the Alt key and clicking From Current Slide launches the Presenter View from your current slide. So, this is another way you can quickly practice your presentation, see your speaker notes and see what’s coming up next.
You can also launch the Presenter View from the beginning of your presentation at any time by hitting Alt+F5 on your keyboard.
Showing and Hiding Presenter View
Regardless of which view you start your PowerPoint slide show; you can switch between the two different slide show views without exiting presentation.

To switch between the two slideshow views (while giving your presentation), simply:
- Right-click your slide in whichever presentation view you are currently in
- Select either Show Presenter View or Hide Presenter View
When would you use a feature like this during a presentation? One example is if you want to view your notes without leaving the slide show mode.
NOTE: The letter r for both Show Presenter View and Hide Presenter View is underlined. This means that it is a keyboard shortcut. So, if you want to quickly flip between these two presentation views, you can simply right-click your slide and hit the letter r on your keyboard. Doing so automatically switches the view you are in.
Controlling how your presentation runs
Another way to control how your presentation runs (including the default laser pointer and pen color), is the Set Up Slide Show dialog box.

To open the Set Up Slide Show dialog box, simply:
- Select the Set Up Slide Show command
Doing so, opens all your PowerPoint slide show settings and options as pictured below.
Inside the slide show settings dialog box, you can select:
- How your presentation runs (full screen, window or in kiosk mode).
- Your default pen and laser pointer color options ( see our laser pointer article here ).
- Which slide you want start from, or which slides you want to show. You can also setup a custom show here.
- How your slides progress (manually or using slide timings).
- Which of your computer monitors (or screens) your slide show runs on.
The Set Up Slide Show dialog box is also the secret to running multiple presentations at the same time in PowerPoint. To expand your knowledge and learn how to set this up, read our guide here .
Setup Slide Show SECRET Shortcut

To use the SECRET shortcut to open the Set Up Slide Show dialog box, simply:
- Hold down the Shift key on your keyboard
- With your mouse, click the Reading View icon at the bottom of your screen
This is useful when you need to quickly cycle through lots of PowerPoint presentations and change how those presentations run. Instead of wasting time clicking through the Ribbon, simply hold the Shift key and click the Reading View icon. This is also a friendly conversation starter with a fellow PowerPoint enthusiast at Happy Hour.
NOTE: The color of your Reading View icon might be different than in the picture above, as it is dependent on the Office Theme you selected for PowerPoint.
How to exit a PowerPoint presentation early?

Regardless of how you start your full screen presentation, you can end your presentation at any time by hitting the Esc key on your keyboard.
Hitting Esc immediately takes you out of the PowerPoint presentation mode and back to the normal editing view of your slides, on whatever slide you were last presenting.
Here is how you can use a combination of all the different keyboard shortcuts to spot check and practice your presentation in full screen before you finalize your presentation.
- Hit F5 on your keyboard to start your presentation in full screen from the very first slide in your presentation. You can then use your arrow keys to advance, spot checking your slides for errors.
- When you find an error, simply hit Esc key to return to the normal PowerPoint editing view to fix your slide.
- When you are done, hit Shift + F5 to return the full screen presentation mode from the slide you just updated. You can then continue spot checking your presentation (without having to start over from the beginning).
In this way you can quickly work your way through your slides and practice your presentation, fixing and adjusting your content as you go.
Understanding how to run your presentations is CRITICAL to the success of your presentation. Not only in presenting them live, but also in knowing how to spot check your slides as you build them.
I personally find it easiest to spot check your slides and quickly fix errors by running your presentation in slide show mode (or full screen). The last place you want to discover an error is during your presentation.
Using the commands and shortcuts above, you can quickly start, exit and step back into your slide show. Once you have these commands and features down, you will also look like a whiz during your presentations.
If you enjoyed the depth of this article, you will love our other PowerPoint training courses and free resources. To learn more, visit us here .
🔒 Unlock the PowerPoint Shortcuts Trusted by Industry Leaders KKR, American Express, HSBC, and More!
Join over 114,880 professionals from diverse fields including consulting, investment banking, advertising, marketing, sales, and business development who have supercharged their PowerPoint game with our proven methods.
✅ Customize compelling presentations effortlessly.
✅ Master time-saving techniques for faster deck creation.
✅ Boost your career prospects with top-notch PowerPoint skills.
Get FREE access to the Critical PowerPoint Shortcuts module of our premium training course by entering your name and email below.
DISCLAIMER: PC Users Only!
We respect your privacy and will keep your info safe and confidential.
Related Articles
About the author.

Popular Tutorials
- How to Strikethrough Text (l̶i̶k̶e̶ ̶t̶h̶i̶s̶) in Word, Excel & PowerPoint
- How to Make Animated Fireworks in PowerPoint (Step-by-Step)
- Strikethrough Shortcut (l̶i̶k̶e̶ ̶t̶h̶i̶s̶) for Word, Excel & PowerPoint
- How to Create a Flash Card Memory Game in PowerPoint (Like Jeopardy)
- Keyboard Shortcuts Not Working: Solved
PowerPoint Tutorial Categories
- Strategies & Opinions
- Presentation Design
- Pictures, Icons, Videos, Etc.
- New Features
- Miscellaneous
- Charts & Data Viz
We help busy professionals save hours and gain peace of mind, with corporate workshops, self-paced courses and tutorials for PowerPoint and Word.
Work With Us
- Corporate Training
- Presentation & Template Design
- Courses & Downloads
- PowerPoint Articles
- Word Articles
- Productivity Resources
Find a Tutorial
- Free Training
- For Businesses
We help busy office workers save hours and gain peace of mind, with tips, training and tutorials for Microsoft PowerPoint and Word.
Master Critical PowerPoint Shortcuts – Secure Your FREE Training Module and Save Valuable Time!
⌛ Master time-saving expert techniques.
🔥 Create powerful presentations.
🚀 Propel your career to new heights.
We value your privacy – we keep your info safe.
Discover PowerPoint Hacks Loved by Industry Giants - KKR, AmEx, HSBC!
Over 114,880 professionals in finance, marketing and sales have revolutionized their PPT skills with our proven methods.
Gain FREE access to a full module of our premium PowerPoint training program – Get started today!
We hate spam too and promise to keep your information safe.
You are currently viewing a placeholder content from Facebook . To access the actual content, click the button below. Please note that doing so will share data with third-party providers.
- DynamicPowerPoint.com
- SignageTube.com
- SplitFlapTV.com

The PowerPoint Selection Pane
Sep 19, 2020 | DataPoint , DataPoint Automation , FAQ
There is a tool or pane in PowerPoint that everybody should know about and use, but in practice it turns out that not many are aware of this pane, or do not use it at all: the PowerPoint Selection Pane. And we all have been in a situation where you could use this selection pane. You probably have been cursing a lot when you couldn’t select that single shape you needed to edit. It was always selecting that other shapes.
Now, I gave away for what the selection pane is used. But you can do much more with the selection pane!
How to Open the PowerPoint Selection Pane?
There are a few different ways to open the selection pane. First of all, from the Home tab in PowerPoint with no shape selected, click Select , Selection Pane … from the Editing group.

At the top of the selection pane there are 4 buttons. First one Show All is to show all hidden shapes at once. Hide All will hide all shapes of this slide. We will come back to the 2 other icons in the next paragraph.
Change the Order of Shapes

Renaming Shapes

But they don’t say or mean much. You will see Group 27 and Rectangle 46, but you have no clue of which shapes they are.
The Selection Pane has to only option in PowerPoint to rename your shapes. When you give a decent name like Title, Pricing, Group with countries, Featured Image etc, then it is much more pleasant and productive to work with animations and use shapes here on the selection pane. You can directly select the shape that you wanted to edit, without mistake.
To edit the name of a shape, click the name of the shape at the Selection Pane. Click on it again to go into edit mode. Now you can change to name that was automatically given to the shape and hit Enter to save, or click another shape to commit the changes.
Grouping Shapes
At the Selection Pane, you can CTRL + click any shape to set up a group with multiple shapes. Once you are done with multi-selecting the shapes that you want, then go to the Shape Format tab and choose Group , Group at the Arrange section.

Floating Selection Pane
Not many people do this, but you can make a floating pane out of any pane in PowerPoint. Hover at the top of the pane till you see your mouse change into a pointer that points to the 4 directions. Then left click there, and drag the pane to any position that you want. If you have a dual monitor system, you can perfectly drag the pane to your second monitor.

Dynamic Text Boxes in PowerPoint
Data Scrolling or Virtual Slides in PowerPoint
Snapshot Presentations
Try DataPoint
No More Copy & Paste
Automated powerpoint updates.

Does it matter what we name the textboxes?? If I name it “Risk Management” will the screen reader recognize it as text to read? Or is it like tagging a PDF where things need to be named Text, Title, Header,…

It does not matter at all when viewing the slideshow. It is only handy when you name your shapes and when you use the selection pane. There are 3 advantages when using the selection pane: 1) you can easily select the shape that you want to edit (sometimes it is hard to select just that one shape), 2) you can click on the eye icon to hide/show the shape, and 3) you can change the z-order of the shapes very quickly.

I’ve just started using the selection pane and it is GREAT. But… is there any way of printing off the shape list in the selection pane? I need the “word” information as well as the shapes to write into a word doc, but maybe I will have to do that by hand?
Nice to read. This can only be done by using some little coding. The normal desktop application will not do this for you.
Submit a Comment
Your email address will not be published. Required fields are marked *
Pin It on Pinterest
- StumbleUpon
- Print Friendly
How to Make an Interactive PowerPoint Presentation: An Expert Guide (Free Downloadable Playbook)

Zhun Yee Chew

Are your PowerPoint presentations lacking impact and failing to engage your audience? You’re not alone. I experienced that before. I used to spend hours carefully crafting the perfect PowerPoint presentations only to be met with disinterested faces.
In a world where attention spans are getting shorter, traditional PowerPoint presentations often struggle to hold the interest of the audience. So here’s the hard truth: unless you adapt and embrace interactivity in your PowerPoint presentations, your valuable hard work and content run the risk of getting lost in presentations.
Fret not, as in this comprehensive guide, we will share with you expert tips on how to make an interactive PowerPoint presentation through interactive animations, transitions, hyperlinks, quizzes, games, and many more.
And perhaps the sweetest part of the deal is that you will also have access to a downloadable playbook of 60+ pages with a wealth of tutorials, templates, cheat sheets, resources and tools to elevate your PowerPoint skills from average to extraordinary through interactive PowerPoint presentations.
Are you prepared to impress those who once found your presentation dull? If your answer is a resounding ‘yes,’ then let’s begin.
What is an Interactive Presentation?
What is an interactive powerpoint presentation.
Interactive PowerPoint presentations are simply PowerPoint presentations that are made interactive to convey information in a more dynamic and engaging manner.
Creating an interactive PowerPoint presentation involves deciding if you want to make your slide content interactive or if you want your audience to interact with your slides.
Interactive PowerPoint presentations can generally be divided into two main dimensions: interaction with slide content through interactive elements and fostering interaction with the audience.

Interaction with Slide Content:
In the first dimension, PowerPoint presentations are made interactive through enhancing the slides content with interactive elements, usually native to PowerPoint.
We will cover interactive elements including:
- Transitions
- Interactive data visualization
- Annotations.
They function to enhance slide interactivity through adding movement to static objects, enabling non-linear slides navigation, as well as adding a dynamic touch to data and information presentation.
Audience Interaction:
In the second dimension, PowerPoint presentations are made interactive through interaction between the presenter and the audience, usually with the help of PowerPoint add-in tools. We will cover:
- Assessments
- Brainstorming
- Collaborative multimedia uploading
Once you have decided which strategy you would like to use, you can then follow these step-by-step guide and the following expert tips to turn your PowerPoint slides into an interactive experience!
Benefits of an Interactive Presentation
The fact that you are still reading this suggests that you don’t need further convincing on the benefits of interactive PowerPoint presentations.
However, if you do, here are some quick statistics:
68% of individuals hold the belief that interactive presentations have a greater potential for being remembered. Webinar Care
This means that a simple action of making your PowerPoint slides interactive has a profound impact on how your presentation is received by the audience. From our years of experience creating interactive PowerPoint presentations, they generally:
- Increases engagement , motivation and knowledge retention .
- Result in better impression and more impactful messaging being conveyed.
- Allow presenters to better tailor their content or offerings to the audience or clients because they can gather real-time feedback .
- Open up room for creative storytelling and showcases.
Interactive Puzzle PowerPoint Templates
Master the tricks to turn your PowerPoint into an interactive experience today!
Expert Tips on How to Make an Interactive PowerPoint Presentation – Before Presenting
1. add animations, but use them judiciously.
The first and most straightforward way of making your PowerPoint presentations interactive is through adding animations to your slides. However, so many people use PowerPoint animations the wrong way. PowerPoint animations are more than just making bullet points or images appear or fly in during your presentation.
Remember, using animations excessively in your PowerPoint presentation will only reduce the appeal and professionalism of your slides. The key is to use them judiciously and purposefully. Before you hit the “Animations” tab, ask yourself, “Does this animation enhance the message I want to convey to my audience?”
2. Add 3D PowerPoint Animations Using PowerPoint Native 3D Stock Elements
Did you know that PowerPoint has free animated 3D elements you can use? We recommend you to try them up to instantly upgrade your presentation from ordinary to extraordinary.
❓ How? Simply go to Insert > 3D models > stock 3D models > animated models. And you will find a wide range of free 3D models ranging from food and animals to plants and characters, and many more. You can also select different animation scenes by heading to the Animations tab.
3. Add Animations With Triggers for Visual Excitement
You can take your PowerPoint animations up a notch by incorporating combining animations with triggers to create interactive pop-ups with extra information . These on-click pop-ups are valuable when presenting a map or when you want to explore specific aspects of an object or topic in more detail. You can also use these pop-ups as markers to alert the audience to exciting elements within different parts of the slide, as such:
❓How? To create on-click pop-ups in your PowerPoint slides, first add shapes that will become clickable buttons, one to “open” the pop-up and the other to “close” the pop-up. Then, add text boxes with extra information you want to show, as well as entrance and exit animations. Combine the animations with “triggers” to activate the animations when the open or close buttons are clicked on.
For a more detailed tutorial on this pop-up animation, download our Interactive PowerPoint Playbook below. 👇
4. add non-linear slide transition.
A quick way to add interactivity to your PowerPoint slides is by using PowerPoint transitions. The first we want to discuss is PowerPoint Zoom. PowerPoint Zoom enables you to zoom in and out of and navigate to specific sections or slides on click, anytime during your presentation.
To access the PowerPoint Zoom feature : click on Insert in the PowerPoint ribbon > Zoom > then choose Slide , Section , or Summary Zoom . Each of these PowerPoint Zoom option serves slightly different functions:
- Slide Zoom: zooms into specific slides
- Section zoom: zooms into specific sections
- Summary Zoom: creates a summary slide for the different slides or sections in your PowerPoint presentation for easy navigation.

❓ How? To set up PowerPoint slide zoom , select the starting slide where you wish to implement the Zoom effect. Next, click Insert > Zoom > Slide Zoom . Here, you can pick the specific slide or slides you want to zoom in on. Click the Insert button, and thumbnails of the chosen slides will be added to your current slide.
Alternatively, for a more manual setup process, you can also set up a navigation menu at the beginning of your presentation that allows the audience to jump to different sections or slides using hyperlinks. Read more in the Hyperlinks section below.
5. Add PowerPoint Morph
Like PowerPoint Zoom, PowerPoint Morph empowers presenters to create dynamic transitions that elevate the visual storytelling in their presentations. But PowerPoint Morph brings storytelling to a whole new level and adds a layer of intrigue to your slides by simulating object transitions or evolution across slides. It functions similarly to animations but offers a smoother and more organic visual experience, without the need for complex setup steps.
Personally, we think the outcomes generated by PowerPoint Morph are more professional and polished-looking as compared to traditional animations. And if you are looking for a more advanced-looking presentation, try this 3D morph animation In PowerPoint .
We’d also like to share with you the numerous applications of PowerPoint Morph contributed by our colleagues and PowerPoint professionals at ClassPoint:
- Moving background
- Rotating wheel
- Rotating cogs
- Photo gallery
- Slide Zoom with Morph
- Creative reveal
- Parallax effect
- Continuous slide transition
- Phone frame
- Movie frame
Gain access to free templates for all these PowerPoint Morph applications and effects by downloading our Interactive PowerPoint Playbook. 👇
6. add hyperlinks – they can link to so many more places than just websites.
Much like PowerPoint Zoom, hyperlinks enable presenters to create interactive menus and navigation structures, allowing audiences to jump to specific slides or sections effortlessly. However, while PowerPoint Zoom primarily focuses on creating a visual and interactive overview of content within a single presentation, hyperlinks extend this capability to connect with external resources, web content, or even additional PowerPoint files.
There are a few ways you could add hyperlinks to your PowerPoint presentation to transform it into an interactive experience effortlessly:

4 Ways You Can Add Hyperlinks to PowerPoint:
- Slide Transition : You can navigate to specific slides in a non-linear manner by simply inserting a hyperlink into your current slide. Head over to Insert > Link > This Document and select the slide you want to link to. You can apply hyperlinks to text, shapes, or pictures.

- Interactive Navigation Menu : Adding an interactive navigation menu at the beginning of your presentation allows clear navigation between different slides and sections in your presentation. Head over to Insert > Link > This Document and select the slides you want to link to.

- Action Buttons : With hyperlinks, you can also create Action Buttons in your PowerPoint presentations to make your PowerPoint slides behave like interactive web pages, allowing users to navigate, explore, and engage with the content in a dynamic and user-friendly manner. Head over to Insert > Action Buttons and choose from the selection.

- Embedded Content : You can also hyperlink your PowerPoint slides to embedded content like PDFs, spreadsheets, and even web pages. Simply click Insert > Object and select the file you would like to embed in your PowerPoint slides. This way, you can remove the hassle of toggling between various files or windows during your presentation.

Expert Tips on How to Make an Interactive PowerPoint Presentation – When Presenting
1. turn your powerpoint slides into interactive quizzes.
The traditional way to add interactive quizzes to PowerPoint is through an unfavorable process of combining complex animations with triggers and hyperlinks. Let’s be honest, it takes an eternity! Even though PowerPoint offers an extensive range of presentation tools, it does not have audience interactivity built at its core.
The good news is, audience interactivity can actually be effortlessly achieved with the various PowerPoint add-ins as listed below:
We will get to polls and games in a bit. For now, let’s show you how you can turn your PowerPoint slides into an interactive quiz in a just a few clicks with PowerPoint add-ins like ClassPoint , which offers a wide range of interactive quizzes from Short Answer and Word Cloud , to Multiple Choice questions.
How to Create An Interactive Quiz in PowerPoint In A Few Clicks
Once you have downloaded ClassPoint, you will have a suite of additional interactive quiz features added to your PowerPoint ribbon.

To turn your PowerPoint slide content into interactive quizzes, simply click on any of the interactive quiz features and add them to your slide. Enter PowerPoint Slideshow mode and you can start the quiz immediately.
2. Run Gradable Assessments inside PowerPoint
With the versatile PowerPoint add-in, ClassPoint , you can also create assessments and collect real-time responses right inside PowerPoint. This is wonderful news for teachers! All you have to do is set up interactive Multiple Choice questions and enable Quiz Mode .

ClassPoint’s Quiz Mode introduces an automatic grading feature to your Multiple Choice questions within PowerPoint presentations created with ClassPoint. This feature not only automates the grading process but also includes automatic star ratings, the option to select difficulty levels, and provides a quiz summary along with an exportable quiz report, making it the perfect tool for classroom formative assessments in PowerPoint!
3. Incorporate Annotations During Slideshow
Another unique way to interact with your PowerPoint slides is through the use of annotations. With annotations, you as the presenter can interact with your slides to draw your audience’s attention to specific details, highlight key points, and tell a more coherent story.
There are 3 ways you could use annotations in PowerPoint:
- PowerPoint Draw Tab: To utilize the PowerPoint Draw Tab, click on the “Draw” tab in your PowerPoint ribbon and begin annotating anywhere on your slides using built-in features like the pen, highlighter, and Ink to Shape. However, please note that PowerPoint Draw only allows annotation in Edit mode.

- PowerPoint Pen Tools: Another option for native PowerPoint annotation tools that permit annotation during slideshow mode can be found by clicking the pencil icon located in the bottom right-hand corner of your screen during a presentation. You can use the pen, highlighter, or laser tools to annotate any part of your slides during the presentation.

- ClassPoint Toolbar: The ClassPoint toolbar serves as an enhanced, free alternative to PowerPoint’s existing pen tools. It offers a broader range of additional annotation features, including text boxes, shapes, spotlight effects, fully customizable pens and highlighters, and more. This enables you to transform your PowerPoint slides into a creative canvas that will captivate your audience throughout your presentation.
4. Run Ice Breakers and Brainstorming Sessions in PowerPoint
The uses of interactive PowerPoint add-ins like ClassPoint are not only limited to teaching and learning. Give your PowerPoint meetings and presentations a strong start with a collaborative and dynamic brainstorming experience.
You can enhance your PowerPoint presentations and turn them into an interactive brainstorming experience by incorporating Word Cloud in PowerPoint, inviting participants to instantly contribute ideas, keywords, or concepts. This allows everyone to dynamically visualize emerging trends and interesting ideas.

❓ How? To start a brainstorming session in PowerPoint, click on the “Word Cloud” button in your PowerPoint ribbon once you have downloaded ClassPoint to add the “Word Cloud” feature in your PowerPoint slides. Then enter PowerPoint slideshow mode to start brainstorming!
5. Add Draggable Slide Objects (And Why It’s Better than Animations!)
Similar to animations, draggable objects allow you to interact with your slide objects freely during slideshow mode, except than you can do so with full control of where you want the slide elements to go!
This dynamic presentation feature adds an element of visual interest that captures your audience’s attention and can be a valuable tool for explaining complex ideas. Moreover, it has the potential to serve various purposes, such as revealing hidden information or acting as a movable marker to indicate your position on the slide content. You can also use it for group drag-and-drop activities, such as matching, categorizing, sorting, and more. You can either perform these actions yourself to provide a visual explanation or engage your audience by letting them instruct the movement of images and text on the slide.
❓ How? Draggable objects is a unique tool that is possible inside PowerPoint with the use of the add-in ClassPoint. Download ClassPoint, free PowerPoint add-in, the select any shape, image, illustration, or text on your slide to become draggable by clicking on “Draggable Objects” in your PowerPoint ribbon, and toggling “Drag enabled” on the side panel.

In slideshow mode, click on the draggable objects hand from the ClassPoint toolbar at the bottom of your screen to start dragging your slide objects around!
6. Create Playable Games In PowerPoint (Without Animations or Hyperlinks)
Much like interactive quizzes, PowerPoint games add a layer of interactivity and fun to PowerPoint presentations. However, what sets PowerPoint games apart is their ability to introduce competition through gamification.
Here are 3 ways you can instantly gamify your PowerPoint slides with gamification elements :
- Set Up a Point and Reward System : Define how your participants can earn stars and points, and award stars to them when they have accomplished a goal during your presentation.
- Add Levels and Badges to PowerPoint : Every game benefits from having levels and badges, and your PowerPoint game is no exception. You can create a simple game within PowerPoint by incorporating questions into your slides and defining the points and scores needed to progress to higher levels. When it comes to badges, you have the creative freedom to tailor them to your audience. For example, in an educational setting, badges can be skill-focused, while in a social gathering, they can take the form of fantasy characters that participants aspire to collect
- Add a Leaderboard to PowerPoint : Leaderboards are essential to keep track of scores or points during a PowerPoint game. You can of course create a manual leaderboard using PowerPoint’s tables and hyperlinks, but an easier and more straightforward way of implementing a leaderboard in your PowerPoint is using add-ins like ClassPoint and Vevox .
With these fundamentals of gamification in place, you are now ready to create fun and exhilarating games in PowerPoint.
Here is a full walk-through on how you can create a PowerPoint game in a few simple steps.
If you are an educator, this free trivia PowerPoint template and these 5 interactive PowerPoint game templates tailored for the classroom will be useful for you.
Expert Tips on How to Make an Interactive PowerPoint Presentation – After Presenting
1. run real-time polls in powerpoint.
Think of a memorable presentation you have attended? Did it use live polls? We bet it did! Live polling are especially helpful after a PowerPoint presentation to gather feedback for future improvement.
Traditional poll tools require presenters to switch between tabs during presentation. Thanks to PowerPoint add-ins such as ClassPoint , Mentimeter and Poll Everywhere , this is no longer the case. And by eliminating the need to switch between different applications or tabs, the presentation experience becomes more fluid and engaging.
2. From Static to Interactive Data Visualisation
Incorporating interactivity through data visualization after a presentation concludes is a potent strategy for enhancing audience engagement and comprehension. Once the primary content delivery is complete, you can transition into a dynamic display of data or feedback you have gathered from your audience using interactive charts, graphs, or infographics.
This approach empowers your audience to explore the information at their own pace, dig deeper into specific data points, and ensure a two-way communication between the presenter and the audience. Whether it’s zooming in on specific trends, toggling between different data sets, or going through feedback, interactive data visualization encourages active participation and a deeper connection with the presented information.
We recommend the following 2 ways to display data into your presentation:
- Insert tables, charts and graphs, and add a touch of interactivity through animations.
Below is a list of 10 PowerPoint animations most suitable for different kinds of graphs and charts:
- Embed a website with data you want to go over. I’m not talking about a link that leaves PowerPoint for your default browser, but an actual embedded browser that loads your websites without leaving PowerPoint! Plus you can insert the page as a picture into your slide and start annotating on it!
Now that you have a collection of strategies and tips at your disposal, you are better prepared to leave your old and dusty PowerPoint toolkit behind and embrace these refreshing ideas. Whether your ultimate aim is to create a captivating classroom experience, deliver a memorable business pitch, or simply wow your friends and peers during PowerPoint nights , don’t forget to:
- Add animations, but use them sparingly.
- Make use of non-linear transitions and storytelling.
- Turn simple transitions into stunning visual experience with PowerPoint Morph.
- Make creative use of polls, quizzes and games.
- Make your presentation human with Bitmoji.
- Build anticipation with interactive presentation tools like annotations and drag and drop.
- Try out these 160 fun PowerPoint ideas for your next presentation!
To read more about Interactive PowerPoint Presentations, you can download our Interactive PowerPoint Playbook, which includes comprehensive guides, tutorials on various interactive PowerPoint presentation methods, cheat sheets, and a wide range of resources for mastering the art of creating interactive PowerPoint presentations.
About Zhun Yee Chew
Try classpoint for free.
All-in-one teaching and student engagement in PowerPoint.
Supercharge your PowerPoint. Start today.
500,000+ people like you use ClassPoint to boost student engagement in PowerPoint presentations.
- Interactive Display
- Accessories
- myViewBoard
- Multi-touch Series
- Professional - VP Series
- Business - VG Series
- Home and Office - VA Series
- USB-C Series
- Home Entertainment
- Sports Viewing
- Installation
- Presentation Displays
- Direct View LED Display
- Pen Display
- ViewSonic Education Solutions
- Touch Screen Solutions
- ViewSonic Library & Blog
- myViewBoard Resources
- Case Studies
- Solution Briefs
- White Papers
- Press Center
- Knowledge Base
- Product Warranty
- 繁體中文 ( Chinese (Traditional) )
- Türkçe ( Turkish )
Business | Jul 31 2023
How to Choose a Presentation Display for Your Meeting Spaces
Choosing the best presentation display for your business’s meeting spaces can be overwhelming. With so many different options ranging from projectors all the way to 163” video wall displays, finding the best solution can take time.
This is why we’ve created this comprehensive guide to all types of presentation displays commonly used for meeting spaces in business settings. If you are ready for a great investment in your business, you might want to read our complete strategies for business solutions .
Modern meeting spaces are becoming much more than old-fashioned meeting rooms or conference rooms. They have become areas for teamwork, brainstorming, active collaboration, and other problem-solving activities. And thanks to evolving technology, this is all possible. With a variety of all-in-one solutions that fit your company’s needs, it’s possible to make an amazing investment for you and your team. It can be difficult to know where to start, however, which is why we have produced this guide.
Using presentation display systems such as projectors, wireless presentation displays, and interactive flat-panel displays are the best solutions to consider if you want to create a more collaborative and engaging meeting space.
Learning about the different usages for different types of displays, their pros, and their cons, will help you make an informed investment for your business.
Interactive Flat-Panel Displays (IFPD) for Collaborative and Huddle Meeting Spaces
Interactive flat-panel displays are large-format touchscreens displays. They are like wireless presentation displays but offer built-in software for high levels of collaboration and brainstorming. The advanced touchscreen interactivity is perfect for all types of meeting spaces.
Using interactive flat-panel displays creates more collaborative workspaces with improved convenience and higher-performing productivity. They are even great for huddle spaces. However, these displays can be more difficult to operate which might present a learning curve for those who are not as tech-savvy. Not to mention that some boards do not come with installed software, causing incompatibility issues later.
Interactive flat-panel displays (IFPDs) are perfect for meeting spaces of various sizes looking to make the upgrade. IFPDs are for those who want to connect not only in the office but also with remote coworkers. Thanks to the technology that allows for writing, editing, and other collaborative features, you can make any meeting more engaging and productive.
Collaborative workspaces are becoming more and more popular among meeting spaces and business organizations. They allow for brainstorming and idea creation. These devices also secure a smooth discussion without the hassle of finding previous notes or sharing files on the device itself.
ViewSonic’s interactive flat-panel displays, called ViewBoards, are perfect for those wanting to make the switch to IFPDs. And for any business use, we recommend our flagship ViewBoard: the IFP8670 .
For additional insights, you might want to discover IT World Canada’s rundown of the features offered on the ViewBoards we offer here at ViewSonic.
Huddle room solutions are becoming increasingly needed, too. They are great for building teamwork and bringing coworkers together for an effortless organizational spirit. But it can be difficult to keep record all your information easily. IFPDs still assure flexibility while providing secure ways of teamwork in a less formal environment.
If you are interested in working with your team on multiple devices, we recommend the IFP5550-3 . And if you want to scale down your collaborative display, the VBH100 is great for easy sharing among huddle rooms to get started.
High-performance is important for any collaborative space. Nobody wants to write on a board that lags or spend time trying to remember the correct word spelling. With a high-performing IFPD, you can be sure that regardless of usage, your board will retain clarity and prove its durability.
If you need a reliable, high-performing 4k touchscreen, explore IFP9850-4 bundle to solve the problem.

Convenience is one of the hidden benefits of installing an IFPD. Outside of saving all work or notes done on the board, many of them use fewer cables for a neater appearance. You can simply walk into a room, plug in the device, and begin sharing with your team.
Even better, the ViewBoards use a single USB Type-C cable, which makes sharing even quicker. With quick 60W charging and touch pass-through, they greatly leverage the meeting time.
Factors to Consider
Learning curves can be difficult for some users. IFPDs might seem daunting, especially if you purchase the wrong one. They may not always be intuitive for the user and may even have functionalities you’ll never use. Nothing is worse than wasting half of a meeting just trying to turn on the display!
Thankfully, ViewBoards are easy to use and quick to learn. Forbes wrote an interesting article about when designers should choose intuitive vs. learned software systems. Making sure you choose a company that has your best interest in mind is vital.
Troubleshooting is another big challenge for those who may not be as tech-oriented. Some boards may require you to download certain software or use a certain browser, but it uses mysterious codes and keywords you’ve never seen before.
ViewSonic provides a solution for this. From troubleshooting FAQs , online training courses , and contact services , you never have to face another IFPD problem again.

Incompatible software can be a huge issue if you’ve already made your purchase. Every IFPD has different requirements and compatibility specifications. For example, maybe some only connect with laptops while others allow for mobile devices. For complete and easy collaboration, it’s important to double-check specs and installed software.
So, if compatibility and versatile device usage are important for you, don’t worry! All our ViewBoards come with the myViewBoard software preinstalled.
Wireless Presentation Displays (WPDs) for Remote Meeting Spaces
Wireless presentation displays are hardware solutions for integrating multiple other devices into a single wireless system. Oftentimes these WPSs are external boxes that connect multiple devices, but standard wireless presentations have them built-in. This allows for an easy and cableless connection for all devices involved.
These devices pay for themselves with a lower total cost of ownership and allow for smarter and more collaborative meeting spaces. However actual device size and limitations on interactive features are something you should consider when creating the perfect meeting space solution.
Wireless presentation displays are wireless all-in-one presentation displays. These also allow for screen sharing and integrated multimedia display. They also do not require dongles or app installation and provide you with instant casting just by using opening a browser.
These are perfect for meeting spaces with high levels of sharing involved inside or outside. Wireless presentation displays, or WPD, for short, are also great for businesses that have remote participants, and even commercial screens. It is easy to connect single content to all displays for effective multi-group environments.
The total Cost of Ownership (TCO) is lower than that of projectors or the like. TCO refers to hidden costs such as maintenance or replacement parts. Unlike projectors, there is no need to replace lamps or do constant deep cleaning.
Typically for these devices, you install the device then you are good to go.
Smarter meeting spaces are key for efficient business and organization. With options for remote and group sharing, you don’t have to worry about making sure everyone gets the correct information on time. This can allow for better time management which in turn allows for more collaboration on ideas or projects.
Workplace communication can be hard to maintain. However, with WPDs you can easily display things like schedule changes, important information, announcements, and more on a single commercial display. You can also have options for remote control meaning you can update information from anywhere in your business or at home.
Career Addict offers a great list of reasons why you need to start using good workplace communication strategies in your meeting space. If this sounds perfect for your business, we recommend checking out CDE7530 to learn more about its features.

Mobility is one of the main pros of having a WPD. Despite the awesome cordless option, this also means you can easily move these displays to other areas of your business. You can either have them mounted to the wall, placed on a trolley, or have an e-poster system for even more mobility of the display.
If mobility is important for your business, we recommend checking out our wheeled stand for your display monitor.
And if you still aren’t convinced, check out Cision PR Newswire ’s news about our latest technology for large interactive display solution at ISE 2023.
Size may be an issue if you are working with limited space. In this case, you may consider using projectors. While sharing information and remote collaboration are possible with projectors, unfortunately, they are not recommended for brainstorming.
There are no touch-enabled screens or pen features for writing on the screen. If you feel like touch screens and more interactive meetings are needed for your conference room, refer back to our interactive flat panel displays to see if there is a better option for you!

Projectors for Any Meeting Space
Projectors are optical output devices that project an image onto a surface. They can also be used with projector screens for the best image production, offer a great image production, fit both smaller spaces and large spaces, and are sometimes even portable!
Projectors are great solutions to meet the needs of all kinds of businesses. The best business projectors are suited for well-lit, smaller office spaces but have the capacity to even work in large venues. For companies that are starting up, or those who may need a budget-friendly solution, projectors are great. With options from ProAV power for large installations or portable for on-the-go, there is bound to be something for your business.
Price is always one of the most important factors to consider. Projectors are typically cheaper than other types of presentation displays. However, budget-friendly should not mean lower quality and bad functionality.
Standard throw, short throw, and ultra-short throw refer to how far away your projector needs to be to project the optimal picture. The standard throw is perfect for larger areas where space isn’t a concern. This means they are great for presentations that require movement and action. You won’t be cramped to a small section of the room.
Short throw and ultra-short throw projectors are perfect for areas with limited space. These projectors only require a few feet from the wall or screen to be effective. With crystal-clear imaging, you will not feel like you are missing out.
Knowing the difference between standard, short, and ultra-short throw projectors is critical for making sure your projector will be the best solution for your meeting space. Also, if space with solid imaging is a priority in your conference room, we recommend checking out this line of projectors.
High brightness and high resolution give the luxury of a wider choice of environment. Many old-school projectors are difficult to see in dark rooms or when placed directly in window light. Having high brightness and resolution allows for effortless presentations without the hassle of people having to move to better see the screen.
Portable projector features allow you to present in multiple locations. With a lightweight build and plug-and-play USB capability, using portable projectors is perfect for those always on the go or have multiple meeting spaces but not the budget for multiple projectors.
If you need a reliable performance solution for on-the-go, we recommend one of our portable projector .
Projection is not suitable for every environment . While many of our projectors allow for high-brightness and other features to ensure the best presentation, sometimes a room is just simply not suitable due to lighting.
In this case, it is important to make sure your meeting rooms have the right dimensions and suitable lighting environments.
If you feel that lighting may become an issue for your projector, consider purchasing a projector screen . While not always necessary, they can help enhance the image and give a clearer picture.
They are not touch-enabled, and this can hinder types of collaboration. While having solid projection can give your meeting space more structure, not having a touch-enabled display can mean using pens and paper for note-taking or brainstorming.
If you feel that interactive collaboration is a priority during your meetings, consider looking at other products like the IFPDs or even WPDs.

Replacement lamps need to be purchased to maintain your projector. Typically, it is suggested to change lamps every three years depending on your level of usage. This can become a hidden cost and burden for some if you do not do things like letting fans cool down or keeping the ventilation clear of heavy dust.
Direct View LED for Outside the Meeting Space
Videowall displays are often multi-monitor sets that consist of many different parts put together to create one very large screen. Because of this multi-monitor setup, you can often see the bezels between each screen.
Direct View LED displays are some of the most impressive displays offered at ViewSonic. While they are not interactive, they are great for commercial displays as well as for investing in something nice and beautiful for the business. They are also perfect for cost-effective, all-in-one video wall solutions, and large venue solutions.
Even larger vivid and high-quality imaging is possible with the ViewSonic Direct View LED. With an impressive 120% rec., 709 color accuracy, and an ultra-fast 3,840Hz refresh rate, the images produced are lifelike and just stunning.
Seamless integration and automated control are also possible for this device. Compatible with professional AV control systems such as Crestron , Extron , and AMX , it is easy to present any information or image that you want. Having this control makes using the ViewSonic Direct View LED simple and intuitive.

Cost is quite high for these types of devices. Because of this, it may not be possible for every business to have the device. Thankfully, there are plenty of alternatives like projectors, IFPDs, and WPDs.
But, if you can afford it, they are certainly worth the investment. The ViewSonic Direct View LED is certain to wow anyone who walks into your business or meeting space.
Maintenance can be difficult for such a large piece of technology. With so much space to cover and the sheer size of the device can be intimidating for anyone looking to upkeep.
Thankfully, ViewSonic’s Direct View LED has an easy installation with a multi-panel modular design. This means that it only requires two people and takes roughly about 2 hours. With that, it is easy to troubleshoot potentially broken pieces or keep the technology clean.
Limited usability may be a factor to consider if you are working on a budget. Due to their large size, these kinds of devices are best used for commercial display or other display-only alternatives. It is not ideal to use these for highly important information sharing or for collaboration.However, its larger-than-life display capabilities can spice up any presentation used for professional settings and more.
GES has provided 9 ways to make your video walls work if you are still worried that cost may outweigh the potential benefits in your investment.

(NEW) Portable Monitors for One-on-One Meetings
The difference between a portable monitor and a normal monitor typically relates to the size and weight of the monitor. Sometimes it also relates to the features offered on the device. With a portable monitor, you can get all the benefits of a second screen but on the go!
Being creative and productive anywhere, you can also use it for one-on-one meetings. Some portable monitors are touch-enabled too, which can be very helpful to get your point across quickly.
But you should also be aware that some types of portable monitors may experience bad input lag. Not to mention, some of them really aren’t that portable due to their fragile design and heavyweight.
Portable monitors are becoming increasingly more popular among businesses and professional people. Modern meeting spaces are nowhere near what they used to be. Nearly everyone can be included in collaboration now. Thanks to this, businesses are saving a lot of time, and this leaves them with more opportunities for development in other areas.
One byproduct of this is the potential for more one-on-one meetings. With a portable monitor, it does not matter if the meeting was scheduled or not. You can quickly pull out your monitor and allow for quicker setup and easier screen sharing. Rather than just using a single laptop that can be difficult for both parties to see, you can use the portable monitor as a miniature display fit for almost any environment.
Touch-enabled portable monitors are awesome for one-on-one conferences. Being able to interact with notes, edits, and data can help more effectively get your point across. It is basically like having a mini IFPD in the palm of your hand.
Portability is in the name! Having portable options is severely undervalued when it comes to the workplace. Being able to quickly attach and present is important for one-on-one meetings where you may be working on an even stricter time schedule than usual. With impromptu meetings, maintaining professionalism and readiness is key. Plus, so much modern work benefits from a second screen, it’s great to get the extra productivity without being tied to a desk.
Expanding creativity is possible by using a portable monitor. For example, ViewSonic’s portable monitors have an advanced in-cell 10-point capacitive touchscreen. This allows for an ultra-responsive touchscreen experience that reacts to a stylus, tap, pinch, swipe, and scribble. A quick and easy solution for productive brainstorming.
In case you weren’t convinced, here are 7 reasons why you need a portable monitor .

Extra devices to carry can be burdensome. It also means more opportunities to break the device. Some portable monitors are even more fragile than a standard tablet.
However, ViewSonic offers an ultra-lightweight option for those worried about damage. Outside of durability, our portable monitor has a thickness of 6 in. and a weight of less than 2lbs.
Smaller screens can be a deal-breaker for some job fields. Even more so in a one-on-one conference. If both parties cannot see the screen, then you should opt for a bigger touchscreen monitor or a wireless presentation display if interactive features are required.
Input lag can be higher on portable monitors than on standard tablets. Because of this, connectivity between the computer and the portable monitor can be slow and have a low refresh rate. It is also possible that the monitor itself causes lag for your laptop devices as well.
ViewSonic ensures you none of these issues with USB-C Connectivity and the 10-point Touch capacitive. With USB-C connectivity, it is a dual-port that allows for rapid delivery of data, audio, video, and charging all over a single cable. These monitors can also be powered directly from a laptop as well.
If all of these features sound like the perfect solution for you, check out the VG1655 or the TD1655 to learn about all the specs and benefits.

Final thoughts
Picking the perfect presentation display solution for your meeting space has never been easier. With projectors, wireless presentation displays, interactive flat panel displays, large-scale video wall displays, and so much more on the way, there is bound to be something for your office.
If you still aren’t sure of what type of presentation display is the best fit for your company’s meeting space, you can learn more about them here .
RELATED ARTICLES
Entertainment | May 15 2024
Best Projector for Sports: The Buyer’s Guide for Sports Fans
Looking to buy the best projector for sports? Here's everything you need to know to find your perfect match!
Gaming | Mar 14 2024
USB-C Gaming Monitors On-the-Go: A Guide for Mobile Gamers
Mobile gamers can elevate their play with USB-C monitors, offering seamless device connectivity for stunning visuals at home or on-the-go.
Entertainment | Nov 27 2023
Commercial Projectors for Digital Signage: A Buying Guide
Learn the key factors when choosing a commercial projector for digital signage and explore the real-use scenarios across applications.
Technology in the Classroom | Nov 21 2023
Choosing the Best Overhead Classroom Projector: 5 Key Factors to Consider
Discover key factors to look for when purchasing an overhead classroom projector and its versatile application beyond the classroom.
SELECT YOUR REGION
Asia pacific & africa.
How to Fill Screen in PowerPoint: A Step-by-Step Guide
Filling the screen in PowerPoint is a simple task. Open your presentation, go to the “Design” tab, and click on the “Slide Size” button. Choose “Standard” or “Widescreen” and select “Ensure Fit” or “Maximize” to make your content fill the screen.
After completing this action, your PowerPoint slides will occupy the entire screen during a presentation, providing a more professional and engaging experience for your audience.
Introduction
When it comes to presentations, the visual aspect is nearly as crucial as the content itself. A well-designed slide can captivate your audience, keep them engaged, and make your message more memorable. That’s where PowerPoint comes in handy. It’s a powerful tool used by professionals, educators, and students worldwide to create dynamic presentations. However, a common hiccup many encounter is ensuring that the content on their slides fills the screen properly.
This is important because slides that don’t fill the screen can appear unprofessional and can distract the audience from the content. It’s relevant to anyone using PowerPoint to ensure their presentations look polished and professional. Knowing how to adjust the slide size to fill the screen is a simple yet essential skill that can make a significant difference in the presentation’s impact.
Step by Step Tutorial to Fill Screen in PowerPoint
Before diving into the tutorial, it’s crucial to understand what these steps will accomplish. By following the steps below, you will be able to resize your PowerPoint slides so that they fill the entire screen when presented, enhancing the visual appeal and professionalism of your presentation.
Step 1: Open Design Tab
Open your PowerPoint presentation and click on the “Design” tab at the top of the window.
The Design tab houses the tools you need to modify the overall look of your presentation, including the slide size option.
Step 2: Click on Slide Size
In the Design tab, locate and click on the “Slide Size” button, often found on the right side of the ribbon.
This will open a dropdown menu with different size options for your slides.
Step 3: Choose Size
From the dropdown menu, select either “Standard” (4:3) or “Widescreen” (16:9) depending on the aspect ratio you prefer.
The Standard size is ideal for older monitors, while Widescreen fits better on modern, wide displays.
Step 4: Select Option
After choosing the size, you’ll be prompted to select between “Maximize” or “Ensure Fit.”
“Maximize” will increase the size of your slide content to fill the screen, while “Ensure Fit” will make sure all content fits on the slide without being cut off.
Additional Information
While the steps above will help your slides fill the screen, there are a few more things to keep in mind. For instance, always preview your presentation on the actual screen you’ll be using, if possible. This can help you catch any issues with how your slides appear. Keep in mind that images and graphics should be high-resolution to avoid pixelation when enlarged.
Also, when choosing between “Maximize” and “Ensure Fit”, consider the content of your slides. If you have critical information near the edges, “Ensure Fit” might be the safer option to avoid having any content cut off. Additionally, if you’re collaborating with others, ensure everyone is using the same slide size settings to maintain consistency across the presentation.
Remember, the goal is to make your presentation as impactful as possible, so don’t overlook the importance of a well-fitted slide.
- Open Design Tab
- Click on Slide Size
- Choose Size
- Select Option
Frequently Asked Questions
What’s the difference between standard and widescreen in powerpoint.
Standard (4:3) is the traditional aspect ratio for slides, suitable for older monitors and projectors, while Widescreen (16:9) is tailored for modern, wide displays.
Will changing the slide size affect my existing content?
Changing the slide size can reposition or resize content, so you might need to adjust your slides after the change.
Can I customize the slide size beyond the Standard and Widescreen options?
Yes, PowerPoint allows you to input custom dimensions for your slides if the default options don’t meet your needs.
What should I do if my images become pixelated after resizing?
Ensure your images are high-resolution before inserting them into your slides, which can help reduce pixelation when they’re enlarged.
Is it better to use Maximize or Ensure Fit?
It depends on your content. Use Maximize to fill the screen but be wary of content being cut off. Ensure Fit is safer for keeping all content visible.
Filling your PowerPoint slides to fit the screen is more than just a cosmetic adjustment; it’s a crucial step in ensuring your presentation makes the maximum impact. Whether you’re in a boardroom, classroom, or any other setting, the ability to command your audience’s attention through a well-executed, visually engaging presentation is invaluable.
Keep practicing, tweaking, and perfecting your skills in PowerPoint, and you’ll find yourself delivering memorable, professional presentations each time. If you’ve found this guide on how to fill the screen in PowerPoint helpful, consider exploring more advanced features to further enhance your presentations and captivate your audience.

Matthew Burleigh has been writing tech tutorials since 2008. His writing has appeared on dozens of different websites and been read over 50 million times.
After receiving his Bachelor’s and Master’s degrees in Computer Science he spent several years working in IT management for small businesses. However, he now works full time writing content online and creating websites.
His main writing topics include iPhones, Microsoft Office, Google Apps, Android, and Photoshop, but he has also written about many other tech topics as well.
Read his full bio here.
Share this:
Join our free newsletter.
Featured guides and deals
You may opt out at any time. Read our Privacy Policy
Related posts:
- How to Set Time for Slides in Powerpoint
- How to Save Powerpoint as PDF with Notes
- Can I Convert My Powerpoint to Google Slides?
- How to Unhide a Slide in Powerpoint 2013
- How to Add Page Numbers in Powerpoint 2010
- How to Make a Powerpoint Slide Vertical in Powerpoint 2013
- How to Loop a Slideshow on Powerpoint 2013
- How to Delete a Slide in Powerpoint 2010
- How to Hide a Slide in Powerpoint 2010
- How to Change the Font on All Slides in Google Slides
- How to End Powerpoint on Last Slide in Powerpoint 2010
- How to Delete Multiple Slides in Google Slides
- How to Insert Slides from Another Presentation in Powerpoint 2010
- How to Change Hyperlink Color in Powerpoint 2010 (An Easy 5 Step Guide)
- How to Change Line Spacing in Powerpoint for Every Slide at Once
- How to Duplicate a Slide in Powerpoint 2010
- How to Hide Background Graphics in Powerpoint 2013
- How to Show Speaker Notes in Google Slides
- How to Insert Check Mark in Powerpoint for Office 365
- How to Check Word Count on Powerpoint 2010
How to Select Multiple or All Slides in Your PowerPoint Presentation
Musch easier to make big changes
When you’re creating a slideshow in Microsoft PowerPoint, you may want to take an action on more than one slide. We’ll show you how to select all slides in PowerPoint, along with multiple slides, so you can move, delete, or rearrange them easily.
Select All Slides in PowerPoint
You don’t have to select slides one-by-one to perform an action on them all. You can select all slides in your PowerPoint presentation a couple of different ways on Windows and Mac.
In order to select slides, you’ll need to use either Normal or Slide Sorter view. You can choose either option in the View tab.

Select All Slides in Windows
- If you’re using Normal view, make sure that you can see your slide thumbnails on the left. If you only see the word “Thumbnails,” select the arrow above it to expand the selection pane. Then, select a slide.

- In either view, go to the Home tab and the Editing section of the ribbon. Open the Select drop-down menu and pick Select All . Alternatively, use Ctrl + A .

- You should then see all slides in your presentation highlighted which means they’re selected.

Note : If the above action selects elements on a single slide, like text boxes or placeholders, rather than all of the slides in Normal view, be sure to pick a slide in the sidebar before using Select All.
Select All Slides in Mac
- Like on Windows, if you’re using Normal view, you’ll need to display the thumbnails to select slides. If you don’t see the thumbnails, place your cursor on the left side of the PowerPoint window. When you see the arrow , drag right to expand the selection pane.

- In either view, right-click a blank spot between or at the end of the slides. Then, pick Select All in the shortcut menu. Alternatively, use Command + A .

- You should see all of your slides selected including any hidden slides .

Select Multiple Slides in PowerPoint
If you want to perform an action on multiple PowerPoint slides, but not all of them, this is just as easy on both Windows and Mac.
Just like selecting all slides, you’ll need to use Normal or Slide Sorter view to select a group of slides.
Select Multiple Slides in Windows
You can select multiple adjacent or non-adjacent slides using a keyboard shortcut in PowerPoint on Windows.
Select multiple adjacent slides : Choose the first slide, hold the Shift key, and choose the last slide in the group. For example, to select slides one through five, choose slide one, hold Shift , and choose slide five.

Select multiple non-adjacent slides : Choose the first slide, hold the Ctrl key, and then choose each remaining slide. In the screenshot below, you can see we selected slides one, three, and five.

Tip : If you have numerous slides in your presentation and want to select the majority of them, use the steps at the beginning to select all slides. Then, hold Ctrl as you choose the slides you don’t want to deselect them.
Select Multiple Slides in Mac
Like on Windows, you can select multiple adjacent or non-adjacent slides using a keyboard shortcut in PowerPoint on Mac.
Select multiple adjacent slides : Choose the first slide, hold the Shift key, and choose the last slide in the group.

Select multiple non-adjacent slides : Choose the first slide, hold the Command key, and then choose each remaining slide. As you can see below, we selected all odd numbered slides.

Tip : To select many slides, you can use the same Tip as above for Windows. Select all of the slides and then hold Command to deselect each specific slide you don’t want.
For more, look at how to work with the Slide Master in PowerPoint .

Sandy Writtenhouse is a freelance technology writer and former Project, Department, and Program Manager. She turned her education, job experience, and love of technology into a full-time writing career. With all sorts of gadgets in her home and her hands, she seeks to help others make life easier through technology. Read Sandy's Full Bio
Read More Posts:
Leave a Reply
Your email address will not be published. Required fields are marked *

Use the Selection pane to manage objects in documents
You can use the Selection pane to manage objects in your document: re-order them, show or hide them, and group or ungroup them.
Tip: In Word, you may want to set the location of objects within a paragraph. When you move a paragraph, the corresponding anchored image(s) move with the paragraph.
Access the Selection pane
On the Home tab, choose one of the following in the Editing group.

The Selection pane displays the name of each inserted object with the numbered order each was inserted. For objects that overlap, the display shows the top object as the top in the list.
Note: In Word, inline objects are listed in the Selection Pane, but you can't reorder them, hide them, or multi-select them.

Note: After you select an item in the Selection pane, you can select the item again to change the name of the item.
Move objects forward or backward
You can change the list's order of overlapping objects by moving objects forward or backward.
Select one or more items in the Selection pane list. Use Ctrl + Click to multi-select.
Drag the selected object name up or down in the list. You can also use the Bring Forward or Send Backward . buttons in the Selection pane.

Note: For an object that's in a group, you can only move it within the group.
Group or ungroup objects
Use Ctrl + Click to select the items you want to group.

Note: After grouping the objects, you can format them or move or them on the canvas as a single entity. For more information, see Group or ungroup shapes, pictures, or other objects .
Tip: To add an object or objects outside a group, you need to select the group and then select the additional object(s).
Hide or unhide objects
When you hide an object, the object remains in the file, but makes it is not visible on the document.
Important: This feature should be used with caution, because it can be easy to entirely forget about a hidden object.
Select an item in the list of object in the Selection pane.

Tip: To see an object that's under another object, you can hide the object on top temporarily, make the changes you want, and then show the object on top again.
Keyboard shortcuts
Once you've inserted shapes, text boxes, SmartArt graphics, images, or other objects, you can open the Selection pane to manage them all.
Move objects forward or backward
Select one of the objects you want to manage.
On the Shape Format tab, select Selection Pane .

Note: The Selection pane displays the name of each inserted object with the numbered order each was inserted. For objects that overlap, the display shows the top object as the top in the list.
Select an object in the list.
Drag an object up to move it forward or down to move it backward.

Hide or unhide objects
When you hide an object, the object remains in the file, but makes it is not visible on the document.

Group or ungroup objects
Select ⌘ + click to choose multiple objects.

In PowerPoint for the web you can use the Selection pane to show or hide items on the slide or to reorder them.
Select one or more shapes.

Objects are listed in the pane in visual stacking order—top-to-bottom. The most recently inserted object is at the top of the list.

Change the order of the objects
Select one or more items in the list. Use Ctrl + Click to select multiple items.
Drag the selected item up or down or select the Bring Forward or Send Backward arrows.

Note: If an object is in a group, you can only reorder it within the group.
Show or hide Objects
To hide or show an individual object on your slide
Select an item in the list of object in the Selection Pane .

To edit an object that's under another object, hide the object on top temporarily, make the changes you want, and then show the object on top again.
Group objects
After grouping the objects, you can format them or move or them on the canvas as a single entity. For more information, see Group or ungroup shapes, pictures, or other objects .
Note: You can select multiple objects within a group, but you can't select objects within groups together with objects not in groups.
Double-click an item to rename it. In PowerPoint for Microsoft 365, this ability comes in handy for using the Morph transition. See Morph transition: Tips and tricks for details.
By default, the most recently inserted object is at the top of the list in the Selection Pane , and the first object inserted is at the bottom of the list.
You can use these keyboard shortcuts in the Selection pane:
Insert pictures
PowerPoint: Check reading order

Need more help?
Want more options.
Explore subscription benefits, browse training courses, learn how to secure your device, and more.

Microsoft 365 subscription benefits

Microsoft 365 training

Microsoft security

Accessibility center
Communities help you ask and answer questions, give feedback, and hear from experts with rich knowledge.

Ask the Microsoft Community

Microsoft Tech Community

Windows Insiders
Microsoft 365 Insiders
Was this information helpful?
Thank you for your feedback.
IMAGES
VIDEO
COMMENTS
Deliver your presentation on two monitors. On the Slide Show tab, in the Set Up group, click Set Up Slide Show. In the Set Up Show dialog box, choose the options that you want, and then click OK. If you choose Automatic, PowerPoint will display speaker notes on the laptop monitor, if available. Otherwise, PowerPoint will display speaker notes ...
Turn On PowerPoint Presenter View. In PowerPoint for macOS, simply click on Presenter View on the Slide Show tab to kick off the presentation in Presenter view. Turn on Presenter View by clicking on Presenter View on the Slide Show tab. You'll see the Presenter View interface on one screen.
When most presentations were done in meeting rooms, PowerPoint's Presenter View was used to primarily to see your speaking notes while the audience saw just your slide. ... Select the screen for the Slide Show. ... You can tell PowerPoint which screen you want the slide show on so that you can have the Presenter View on the screen that has ...
First, create a new custom slide show and select the slides that you want to display. Then, click Add, enter the name of the presentation and click OK. This new custom presentation will appear on the list. Select it and click Show to begin the presentation. Defining a custom slide show.
If you have the choice under multiple monitors to uncheck Show Presenter View and select the monitor you want it shown on (I only have one monitor, so mine is greyed out in the image). If you do not have a choice for monitor, you will need to drag the window to the monitor you want it showing on. Click OK, then save your presentation. Now when ...
Launch Powerpoint. Click File. Select Options. Choose Advanced. Click Open all documents using this view, then select one. Click OK. Our guide continues below with additional information on changing the display settings for your slide show in the Powerpoint window, including pictures of these steps.
Screen #1: Your laptop. On this screen you should have the PowerPoint window and the Zoom app. This is the screen you will be looking at during the presentation because it will have your notes in Presenter View and you want the Zoom meeting controls here in case you need to access them. Screen #2: External screen
Open the Screen Tools. Select the Pen and Laser Pointer icon in the toolbar and choose the tool. Right-click, move to Pointer Options, and pick the tool. Use the tool keyboard shortcuts: Laser pointer: Ctrl + L. Pen: Ctrl + P. Arrow: Ctrl + A. Eraser: Ctrl + E.
Inside the slide show settings dialog box, you can select: How your presentation runs (full screen, window or in kiosk mode). Your default pen and laser pointer color options (see our laser pointer article here). Which slide you want start from, or which slides you want to show. You can also setup a custom show here.
First of all, from the Home tab in PowerPoint with no shape selected, click Select, Selection Pane … from the Editing group. That opens a new pane at the right of your presentation, like in the image below. A second way to open the Selection Pane is to first select a shape, and then click the Format Shape tab and click the Selection Pane button.
To turn your PowerPoint slide content into interactive quizzes, simply click on any of the interactive quiz features and add them to your slide. Enter PowerPoint Slideshow mode and you can start the quiz immediately. Read here for an in depth tutorial and 50 use cases on creating interactive quizzes in PowerPoint. 2.
Choosing the best presentation display for your business's meeting spaces can be overwhelming. With so many different options ranging from projectors all the way to 163" video wall displays, finding the best solution can take time. This is why we've created this comprehensive guide to all types of presentation displays commonly used for ...
January 9, 2024 by Matthew Burleigh. Filling the screen in PowerPoint is a simple task. Open your presentation, go to the "Design" tab, and click on the "Slide Size" button. Choose "Standard" or "Widescreen" and select "Ensure Fit" or "Maximize" to make your content fill the screen. After completing this action, your ...
Present your slides. If you're already in a Teams meeting, select Share and then under the PowerPoint Live section, choose the PowerPoint file you're wanting to present. If you don't see the file in the list, select Browse OneDrive or Browse my computer. If your presentation is already open in PowerPoint for Windows or Mac, go to the file ...
Select multiple adjacent slides: Choose the first slide, hold the Shift key, and choose the last slide in the group. Select multiple non-adjacent slides: Choose the first slide, hold the Command key, and then choose each remaining slide. As you can see below, we selected all odd numbered slides.
For Word or PowerPoint-choose Select and select Selection Pane orAlt+F10. For Excel-select Find & Select and choose Selection Pane or Alt+F10. The Selection pane displays the name of each inserted object with the numbered order each was inserted. For objects that overlap, the display shows the top object as the top in the list.