Labkafe Blog

Get in Touch

Get A Free Lab Consultation
Sonometer experiment ‒ objective, procedure, and tips | labkafe.

Previously, we have talked about what a sonometer is and why we use it in class 11-12 physics labs all around. Now that you know about the sonometer theory, we will tell you how to do the sonometer experiment today. This is a very important, and sometimes quite difficult experiment for students of classes XI XII of CBSE ICSE IGCSE State Boards. Nevertheless, if you follow the procedure given below and note the insights from our experts, you will be able to do it with good results.

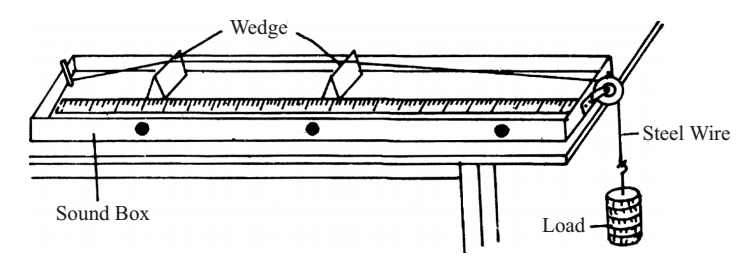
A sonometer is one of the most important lab equipment in most high school level physics labs. It helps the students understand how a stretched wire produces sound, and how exactly that sound can be precisely changed. A sonometer, derived from an ancient instrument called monochord, connects music to mathematics. In real life it is used to tune various musical instruments.
Objectives of the Sonometer Experiment
- Study and understand the relationship between the vibrating frequency and the length of a given wire under constant tension using a monochord sonometer and thereby plot the f vs 1/l graph and study its characteristics.
- Study and understand the relationship between the length of a given wire and the tension applied to it for a constant frequency using a monochord sonometer and thereby plot the l2 vs T graph and study its characteristics.
Explanation : Basically, in the sonometer experiment what we will do is this. First, we will set up the sonometer with the given wire and weights. Then we will try to match the vibrating tones of a tuning fork and the wire, at which point they will resonate together. The best way to do this is to place a piece of paper on the taut wire and see at which length the wire vibrates so much that it throws off the paper.

We would record those data about the length, tension, and frequency ‒ and then we’d proceed with another setting of the same. At the end of the experiment, we will plot all of those data on graph papers so that we can figure out how they are related to each other.
Let’s move forward to the sonometer experiment procedure.
Procedure of the Sonometer Experiment
A. equipment and material.
- A sonometer apparatus of good quality ( you can get one here )
- A given steel of nichrome wire ‒ about 1.5 meter of it. They are generally quite thin, like 0.5 mm. Guitar wires, obviously, produce the best results.
- A weight hanger suitable to hold up to 2 kgs
- A set of weights from 100gm to 1 kg
- A set of tuning forks with known frequencies
- A rubber pad to hit the tuning fork with
- Some pieces of paper

B. Setting up the experiment
A sonometer is basically a long wooden box with a system on top to mount a wire tightly. You will need to set this up at the beginning of the sonometer experiment.
- Place the sonometer box on top of your dry lab workbench in your physics practical class. Place it in a way so that the end with the pulley is flush with the open side of the table, so that something can hang from the pulley.
- Get the wire you have to experiment with and verify that you have enough length of it. You’ll need about one and a half meters of it. The teacher will already know the mass per unit length of the material of the wire, but you may have to figure it out yourself using a scale and a precision balance .
- Attach one end of the wire to the hook at the end of the sonometer apparatus. Make sure it is strongly attached.
- Attach the weight hanger to the other end of the wire.
- Sling the wire over the pulley on the other end of the sonometer. Place a little weight on the weight hanger so that the wire is stretched tightly over the wood box.
- Place the bridges on the sonometer, under the wire, so that they hold up the wire between them and the wire is stretched tightly between them. Pull them apart to the positions farthest from each other (at the end of the scale).
That’s all there is to it ‒ your sonometer is all set up now for work.

C. Step-by-step experiment process
Now that you have your sonometer all set up and ready, you can begin the sonometer experiment. Follow these steps to do it properly.
- Take your notebook and prepare two tables like those given below. You can note all your experiment data here.
- Note: if you are working with a steel wire, we recommend starting with 500 grams. You can increase it to nearly two kilos. But this range would be different for other kinds of wires. Please ask your lab instructor to advise you on the tensile strength of the wire.
- Take a small rectangular piece of paper (about the length of your finger) and fold it to make it an inverted V. Mount it in the middle of the wire so it hangs there loosely.
- Take a tuning fork and note down its frequency.
- Hit the tuning fork with the rubber pad to set it vibrating.
- Touch the handle of the vibrating tuning fork to the sonometer box. The wire will start vibrating in response to the vibrations coming from the tuning fork.
- Chances are, that is not what you’ll get at first. It will take a lot of tries to get the perfect resonance. The nature of the wire also changes the difficulty of the experiment.

- In reality, it’s nigh impossible to get a so-called sweet spot. All you’ll get is a region. So, you will have to take two length readings, l1 and l2 . Take one reading while you are decreasing the gap between the bridges and the wire starts vibrating, and take the other reading while you are increasing the gap and the wire stops vibrating. Then the calculation length l would be the mean of these two measures.
- Note down the positions of the bridges from the scale beside them. Also note the weight.
- Vary the weight and perform the same process again and again, to get some satisfactory results with the same tuning fork.
- Now keep a good amount of weight fixed in the hanger (we recommend 1 kg for a steel wire). With that unchanged, use up all the other tuning forks from the set and do the same process.

Sonometer Experiment Data
To perform this physics class 11 experiment, you will need to record the data in a specific format. Please make the following tables in your notebook and use the data from the experiment above to fill it up.
| Sl. no. | Tuning fork frequency, | Resonating wire length | (in cm-1) | ||
| Increasing length, | Decreasing Length | Mean length =(l1+l2)/2 | |||
| 1. | |||||
| 2. | |||||
| 3. | |||||
| 4. | |||||
| Sl. no. | Load, in Kg | Tension, = in N | Resonating wire length | in cm2 | (in cm2/N) | ||
| Increasing length, | Decreasing Length | Mean length =(l1+l2)/2 | |||||
| 1. | |||||||
| 2. | |||||||
| 3. | |||||||
| 4. | |||||||
You can take as many data rows as you need, not only 4. Now plot the data in the graphs ( f vs 1/l ) and ( l2 vs T ). Both graphs should come out to be almost near straight lines.
We have taken some measurements in our system and the results are as follows:

From the above graphs, you can see that the results come more or less in a straight line. This shows clearly how the length of a vibrating wire, the tension applied to it, and its frequency depend upon each other.

All the equipment you need to perform the sonometer experiment can be found in our CBSE/ICSE/State board lab equipment packages . The physics lab equipment package we have has the sonometer apparatus (teakwood), various kinds of wires, weights, and tuning forks.
It has been a pleasure describing the sonometer theory and practical to you! Please leave your thoughts and suggestions in the comment section given below. Happy learning!
Leave a Reply Cancel reply
Your email address will not be published. Required fields are marked *
Save my name, email, and website in this browser for the next time I comment.
Suggested Reads


+91-8527246961
Attractive Offers
Upto 60% Off
- Bulk Order Enquiry!
Mastering Sound: The Sonometer Experiment Demystified
- May 14, 2024
Introduction to Sound and the Sonometer Experiment
Understanding the principles of vibration, step-by-step guide to building a sonometer, conducting the experiment and analyzing results, real-life applications of the sonometer experiment, troubleshooting common issues, conclusion and further resources.
Welcome to the fascinating world of sound! Have you ever wondered how those beautiful melodies and soothing harmonies come to life? Well, today we’re here to unravel one of the mysteries behind the enchanting power of sound – the Sonometer Experiment. If you’re ready for a journey into the realms of vibration and music, then grab your tools because we’re about to embark on an adventure that will leave you with a newfound appreciation for the art of acoustics. Get ready to master sound like never before as we demystify the Sonometer Experiment! So, let’s tune in and turn up the volume on our knowledge!
Vibration is all around us. We experience it in a variety of forms, from the gentle hum of a fan to the thunderous roar of a crowd. But have you ever wondered what causes these vibrations and how they relate to sound? Understanding the principles of vibration is essential for mastering sound and conducting experiments like the sonometer experiment. At its core, vibration refers to any back-and-forth motion of an object or particle. This motion can be caused by various factors, such as an external force or energy input. When an object vibrates, it creates waves that travel through a medium, such as air or water. These waves are responsible for producing sound. The key principle behind vibration is resonance. Resonance occurs when an object’s natural frequency matches the frequency of an external force acting upon it. This synchronization leads to amplified vibrations and can result in increased volume and intensity of sound. To understand this concept better, imagine pushing someone on a swing at just the right moment with just enough force – they’ll go higher with each push! The same idea applies to sound vibrations created by musical instruments or even our vocal cords. By studying and manipulating vibrations using tools like sonometers, scientists and musicians alike can unlock incredible insights into how sounds are produced and heard. So next time you tap your fingers on a table or pluck a guitar string, remember that you’re engaging in the fascinating world of vibrating objects creating beautiful music!
Mastering sound and understanding the principles of vibration is a fascinating journey that can be explored through experiments like the sonometer experiment. By delving into the world of sound waves and vibrations, we gain insights into how they are produced, propagated, and perceived. The sonometer experiment offers a hands-on approach to learning about sound and vibration. Through this experiment, we can investigate the relationship between tension, length, mass per unit length, frequency, and pitch in a stringed instrument. We gain an appreciation for the harmonious interplay between these factors that ultimately create beautiful music. By manipulating variables such as tension or length on a sonometer apparatus while plucking its string, we can observe changes in pitch. This empowers us to grasp fundamental concepts such as frequency and wavelength intuitively. It also provides valuable context for understanding various musical instruments’ mechanisms by highlighting their reliance on specific combinations of tension and lengths. Moreover, studying the principles of vibration allows us to comprehend more than just music production; it extends into fields like engineering and acoustics too. From analyzing vibrations in buildings to designing efficient machinery or even exploring seismic activity patterns – understanding how vibrations work opens up new possibilities across many disciplines. So whether you’re an aspiring musician or simply curious about how sound works on a deeper level – consider embarking on your own exploration of sound using experiments like the sonometer experiment. Unraveling the secrets behind what makes our favorite tunes so captivating might just inspire you to delve further into this captivating realm! With practice comes mastery – embrace experimentation with open curiosity! The world of sound awaits your discovery!
Are you ready to dive into the fascinating world of sound? Building your own sonometer is an exciting way to explore the principles of vibration and gain a deeper understanding of this fundamental aspect of our lives. So, let’s get started! First, gather all the necessary materials for your project: a wooden baseboard, two movable bridges, strings (preferably made from steel), small weights or masses, and a resonator box. Make sure everything is in good condition and properly measured. Next, secure the two movable bridges onto the baseboard at fixed distances from each other. These will serve as anchor points for your strings. Attach one end of each string to its respective bridge. Leave some slack in the strings so they can vibrate freely. Now comes the fun part! Pluck one string gently with your finger or use a bow to create vibrations. Adjust the tension in each string by adding or removing weights until you achieve desired frequencies. To analyze results accurately, try using different lengths and thicknesses of strings while keeping other variables constant. Record observations meticulously for future reference. Building a sonometer not only helps you grasp complex concepts but also encourages creativity and problem-solving skills. Experimenting with different materials and techniques may lead you to unexpected outcomes – embrace them! So there you have it – a step-by-step guide on building your very own sonometer experiment setup! Enjoy discovering more about sound waves through hands-on exploration with this remarkable instrument.
Once you have successfully built your sonometer, it’s time to dive into the exciting phase of conducting the experiment and analyzing its results. This is where we put our theories to the test and discover how sound vibrations truly work. To begin, carefully pluck one of the strings on your sonometer. As you do so, observe how it vibrates and produces a distinct sound. Pay close attention to its frequency, amplitude, and any variation in pitch that occurs when different lengths of string are used. Next, try adjusting the tension on the string by altering its length or using different weights. Observe how these changes affect both the vibrating pattern and resulting sound produced by the string. This will allow us to understand more about resonance and harmonics. As you gather data from each experiment trial, record your observations accurately for later analysis. Take note of any patterns or trends that emerge as you manipulate variables such as tension or length. Once all experiments have been conducted, it’s time to analyze your findings. Look for relationships between variables and consider their implications in relation to known principles of vibration theory. Remember that experimentation is key – don’t be afraid to repeat trials multiple times to ensure accuracy in your results. The more data points you can collect, the clearer picture you’ll have when analyzing patterns within your experiments. By meticulously conducting experiments with your sonometer while keeping accurate records, you’ll gain a deeper understanding of sound vibrations and their underlying principles. So grab those tuning forks! It’s time for some hands-on science exploration!
Musical Instrument Design: The sonometer experiment helps in understanding how different materials and dimensions affect the pitch and tone produced by musical instruments. By experimenting with different string lengths, tensions, and materials on a sonometer, musicians and instrument makers can fine-tune their designs to achieve desired sounds. 2. Acoustic Engineering: Sonometers are widely used in acoustic engineering to study the properties of various materials for soundproofing purposes. Researchers can use this experiment to analyze how different materials dampen or absorb sound waves, allowing them to design more effective insulation products for buildings or concert halls. 3. Physics Education: The sonometer experiment is commonly used as a teaching tool in physics classrooms to illustrate concepts such as waveforms, frequencies, harmonics, and resonance. Through hands-on experimentation with the sonometer setup, students develop a deeper understanding of these fundamental principles of vibration. 4. Material Testing: Engineers often employ the sonometer experiment to test mechanical properties like elasticity and tensile strength of different materials under tension or stress conditions. This data helps engineers determine optimal material choices for structures subjected to vibrations or forces. 5. Medical Research: In medical research fields such as audiology or speech therapy, the sonometer experiment plays a crucial role in studying vocal cord function and voice disorders. By examining vocal cord vibrations using specialized variations of the sonometer setup, researchers gain insights into diagnosing and treating voice-related ailments. 6. Soundwave Analysis: The data collected from a sonometer experiment can be analyzed using computer software that converts soundwaves into visual representations called spectrograms. These spectrograms help researchers analyze complex sounds like animal vocalizations or environmental noises for ecological studies or noise pollution analysis. The applications mentioned above are just scratching the surface when it comes to real-life uses for the versatile sonometer experiment! Its ability to study vibration phenomena makes it an invaluable tool across multiple scientific disciplines associated with sound and materials.
When conducting the sonometer experiment, it’s not uncommon to run into a few bumps along the way. But fear not, because I’m here to help you troubleshoot and overcome those common issues that may arise! One of the most frequent problems is a lack of sound or weak vibrations coming from the sonometer string. This could be due to improper positioning or tension of the string. Make sure that it is securely attached at both ends and adjust the tension accordingly. Another issue you might encounter is interference from external sources such as background noise or vibrations. To minimize these disturbances, try conducting your experiment in a quiet environment and ensure that your setup is stable on a steady surface. If you’re still facing difficulties, double-check your equipment for any loose connections or damaged components. Sometimes even small issues like a faulty connector can disrupt your results. It’s also important to consider temperature and humidity conditions as they can affect the properties of materials used in constructing your sonometer. Keep these factors in mind when analyzing your data. Remember, troubleshooting requires patience and persistence! Don’t get discouraged if things don’t go smoothly initially – with some adjustments and problem-solving skills, you’ll be able to master this experiment successfully! Now let’s move on to exploring some real-life applications of the sonometer experiment!
Mastering the Sonometer Experiment can be a fascinating journey into the world of sound and vibrations. By understanding the principles of vibration and following a step-by-step guide to building your own sonometer, you can conduct experiments that reveal the fundamental properties of different materials and their impact on sound. Through this experiment, you have learned how changing parameters such as tension, length, or mass affects the pitch produced by a vibrating string. You have discovered how to measure frequency using various techniques like strobe lights or smartphone apps. And most importantly, you have gained valuable hands-on experience in conducting scientific experiments and analyzing data. The knowledge gained from mastering the Sonometer Experiment extends far beyond classroom walls. It has real-life applications in fields such as music, engineering, architecture, and acoustics. Whether you are aspiring to become a musician or an engineer working on designing better instruments or buildings with optimal acoustic properties, understanding sound is essential. If you want to delve deeper into the world of sound experimentation or explore additional resources related to sonometers and acoustics in general, here are some useful references: 1. “Acoustics: An Introduction” by Heinrich Kuttruff 2. “The Physics of Musical Instruments” by Neville H. Fletcher & Thomas D. Rossing 3. Acoustic Society of America (ASA) – official website providing information on conferences, publications, research papers, and other resources related to acoustics. 4. Online tutorials and videos available on platforms like YouTube for visual demonstrations on constructing sonometers or performing related experiments.
Mastering the Sonometer Experiment can open up a world of understanding and appreciation for the principles of sound and vibration. By following the step-by-step guide to building a sonometer, conducting the experiment, and analyzing your results, you’ll gain valuable insights into how different factors affect sound production. Through this hands-on experience, you’ll not only enhance your knowledge but also develop important skills in experimental design, data collection, and analysis. The sonometer experiment is an excellent way to bridge theoretical concepts with practical applications in the field of acoustics. As you delve further into your exploration of sound phenomena through the sonometer experiment, it’s essential to remember that troubleshooting common issues may arise along the way. Whether it’s adjusting tension or identifying sources of unwanted noise, don’t be discouraged by challenges – instead view them as opportunities for growth. To expand your understanding even further beyond this article, there are plenty of additional resources available online. Online communities dedicated to acoustics enthusiasts often provide valuable insights from experts in the field who can offer advice or answer any questions you may have. Additionally, academic journals and books on acoustics can provide more comprehensive information on topics related to sound waves and vibrations. So go ahead – embrace this exciting journey into mastering sound with a hands-on approach using the sonometer experiment! Gain confidence in your ability to understand complex principles through tangible experimentation while developing crucial skills that will serve you well throughout your scientific endeavors. Remember: Sound is all around us; now it’s time for you to unravel its mysteries with the power of the sonometer!
Leave a Reply Cancel reply
Your email address will not be published. Required fields are marked *
Save my name, email, and website in this browser for the next time I comment.

- Crucible Tongs

Username or email address *
Password *
Lost your password? Remember me
No account yet?
- Utility Menu
Harvard Natural Sciences Lecture Demonstrations
1 Oxford St Cambridge MA 02138 Science Center B-08A (617) 495-5824
- Key to Catalog
enter search criteria into the search box
What it shows :.
The effect of length, tension, diameter, and kind of material on the pitch of a vibrating string is demonstrated. One may also show the harmonics of a vibrating string.
How it works :
The sonometer is a long hollow wooden box along the top of which are stretched one or more strings rigidly attached to the box at one end, with provision at the other for changing their tension. If there is just one string, it's known as a monochord. The monochord illustration is from John Tyndall's book entitled Sound , (Appleton, NY, 1867), and the sonometer is from J.A. Zahm's Sound and Music , (McClurg, Chicago, 1900).

These have been used for a long time as demonstration experiments. In fact, the monochord was invented in the 7th century B.C. by Pythagoras. The monochord was modified by the French instrument maker, Albert Marloye, in the mid 1800's and became known as a differential sonometer. Both monochord and sonometer are available for demonstrations. Several experiments are possible.
1) Show that the frequency varies inversely as the length of the vibrating string: The length of each string can be changed by moving a bridge under it. If the string is plucked near one end and stopped at 1/2, 1/3, 1/4, 1/5, etc, of its length, the 2nd, 3rd, 4th, 5th, etc. harmonics will be sounded. If a sharp-edged piece of soft rubber (an eraser) is used to stop the string, it is possible to make 10 or more harmonics audible.
2) Intervals: If you make the string 2/3 of its original length, the pitch rises exactly a perfect fifth, a fraction 3/2 above its original frequency. If you make the length 3/4 as long, the pitch rises a perfect fourth, or a fraction 4/3 above what it was.
3) The frequency varies directly as the square root of the tension: The string passes over a pulley and the tension is provided by hanging a weight from the end of the string ... quadruple the weight to secure twice the frequency.
4) Finally, the frequency varies inversely as the square root of the mass per unit length of the string. We have a small selection of wire sizes to show this.
Setting it up :
It's best to C-clamp the sonometer to the lecture bench or cart so that it doesn't slide around. A violin bow is also available if you wish to play a continuous tone rather than plucking the string.
The ratios 2:1, 3:2, and 4:3 = 2 × 2:3 are considered to be the most consonant musical intervals. For this reason Pythagoras tried to build a musical scale with additional simple ratios. Unhappily, the scheme had serious limitations.
Demo Subjects
Newtonian Mechanics Fluid Mechanics Oscillations and Waves Electricity and Magnetism Light and Optics Quantum Physics and Relativity Thermal Physics Condensed Matter Astronomy and Astrophysics Geophysics Chemical Behavior of Matter Mathematical Topics
Key to Catalog Listings
Size : from small [S] (benchtop) to extra large [XL] (most of the hall) Setup Time : <10 min [t], 10-15 min [t+], >15 min [t++] /span> Rating : from good [★] to wow! [★★★★] or not rated [—]
Complete key to listings
| A Sonometer is a device for demonstrating the relationship between the frequency of the sound produced by a plucked string, and the tension, length and mass per unit length of the string. These relationships are usually called Mersenne's laws after Marin Mersenne (1588-1648), who investigated and codified them. For small amplitude vibration, the frequency is proportional to: a. the square root of the tension of the string, b. the reciprocal of the square root of the linear density of the string, c. the reciprocal of the length of the string. The usual sonometer is horizontal, like the one below at Kenyon College, and the tension is supplied by the weight of the masses hung on the ends of the wires after they pass over the pulleys. This arrangement has the defect that the strings and bridge cannot be seen by the class. The vertical sonometer at DePauw University is upright, and tipped back about 3° from the vertical. |
| The sonometer was invented by the French acoustical apparatus manufacturer, Marloye, ca. 1840. This has two strings, which may be used to illustrate beats if the two strings have almost the same frequency. If one string has twice the frequency of the other, octaves may be demonstrated. It is in the apparatus collection of Kenyon College in Gambier, Ohio. |
A Sonometer is a device which uses the concept of standing waves to measure the mass per unit length or density of a wire. A sonometer is also called a Monochord .
The first reference to a sonometer or monochord was found in the writings of the Sumerian empire . Some believe that Pythagoras reinvented the sonometer in the sixth century BCE. Robert Fludd invented the “Celestial Monochord” in 1618, which could be used as a musical tuner. The motivation for the development of the sonometer since then was to create a musical tuning device.

Sonometer Diagram

Sonometer Construction
As shown in above figure, a monochord mainly consists of three parts:
1. The Wire, Weights and Pulley Apparatus
A wire is stretched along the soundbox, between the hinge A and the pulley D . The wire turns around the pulley to let a weight W hang on the end of the wire.
2. The Soundbox
The soundbox is a cuboidal box made of wood, upon which other parts of the sonometer are built. The function of the sonometer box is to amplify the sound of the tuning fork.
The sonometer box also has a graduated ruler along its length to measure distances on the box.
3. The Knife Edges
The knife edges are made to let the user change the length of the wire responsible for producing standing waves. So, changing the positions of the knife edges changes the wavelength of the standing waves. In the figure, knife edges are denoted by C and B triangles.
Sonometer Working: The Theory of Standing Waves
We can assume that there are two parts of the sonometer wire :
(a) The part of the wire between the knife edges and, (b) The part of the wire other than the part between the knife edges.
Only part (a) is involved in a discussion of standing waves. Part (b) is the other supporting part, attached to the hinge A and weights W.
The waves produced on a stretched string are transverse. Standing waves can be considered as waves with wavelengths such that their antinodes coincide with the knife edges’ placement.
Mathematically this could be represented as:
Where, \(l\) is the length of the wire between the knife edges and \(\lambda\) is the wavelength of the transverse wave.
For \(n = 1\),
\(l = \frac{ \lambda }{ 2 } \Rightarrow \lambda = 2 l\) is called the fundamental mode of vibration .
\(v = \nu \lambda\)
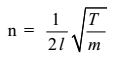
\(v = \sqrt{ \frac{T}{m} }\)
\(v \rightarrow\) Velocity of the transverse wave \(\nu \rightarrow\) Frequency of the transverse wave \(T \rightarrow\) Tension in the wire \(m \rightarrow\) Mass per unit length of the wire
We get for the fundamental mode,
\(\sqrt{ \frac{T}{m} } = \nu \times 2 l\)
\(\nu = \frac{1}{2l} \sqrt{ \frac{T}{m} }\)
Sonometer Experiment
Aim: To find the frequency of the AC mains using a sonometer.
E quipment Required: A sonometer apparatus, weights, step-down transformer, horseshoe magnet, connecting wires and AC mains power supply.
Circuit or Schematic Diagram:

Procedure:
- As shown in the circuit diagram, connect the primary coil terminals of the transformer to AC mains. Similarly, connect the secondary coil terminals to the end of the sonometer wire(one terminal at the hook/hinge; the other at the pulley).
- Place the horseshoe magnet symmetrically in the middle of the two knife edges. Place the magnet T so that the magnet’s magnetic field is perpendicular to the length of the wire.
- Hang a mass M at the end of the wire, and keeping it fixed, adjust the position of the knife edges so that the sound produced from the sonometer box is maximum. This could be confirmed when the paper rider R on the wire falls off. It represents maximum amplitude.
- Measure this length and repeat step 3 for different masses.
- Using a screw gauge, find the diameter and hence the wire’s cross-section area. Using the information about the density of the wire, find the mass per unit length m of the wire.
\(A = \frac{\pi D^2}{4}\)
\(m = \rho A\)
Where, \(A \rightarrow\) Area of cross section \(D \rightarrow\) Diameter \(\rho \rightarrow\) Density of the wire
Observations Table:

Precautions:
- The mass M also contains the mass of the hangers. So make sure to take that into account.
- The wire should be uniform and free of any kinks or bends.
- When measuring the diameter of the wire with the help of a screw gauge, make corrections for the zero error. Take at least three readings and use the average of these readings.
- Make sure that the thickness of the sonometer wire is appropriate for the current passing through it. Use a rheostat if necessary.
We require a magnet which provides a uniform magnetic perpendicular to the length of the wire. A horseshoe magnet is a perfect choice because the magnetic field is constant between the magnet’s arms.
A brass wire is used in the sonometer experiment. A brass wire is non-magnetic. Therefore, it is a natural choice.
Standing waves of Transverse nature are produced in the sonometer wire.
The sonometer box is built to have a broad resonance peak around a few tens of Hertz. So vibrations around a few tens of Hertz are near the resonance peak. The energy transfer is good in this range, and we hear a loud sound due to the resonating air column inside the sonometer box.
About The Author

Prayag Yadav
College of Liberal Arts & Sciences
- Departments & Divisions
- For Students
- For Faculty
- Deans Office
Instructional Resources and Lecture Demonstrations
3d20.10 - sonometer.

No preparation necessary except routine cleaning and maintenance. Piano wire for replacements may be obtained from the Physics Machine Shop. Tighten the wires carefully as too much tension will warp and crack the wooden sound box. This unit should be stored with no tension on the strings so that warping does not occur.
- Wilfried Sommer, Ralf Meier-Boke, and Nicholas Meinzer, "Hydromonochord: Visualizing String Vibration by Water Swirls", TPT, Vol. 48, #6, Sept. 2010, p. 370.
- Paul Gluck, "Plucked String on a Shoestring Budget", TPT, Vol. 47, #1, Jan. 2009, p.13.
- Arnold F. McKinley, "Musical Strings with Physics", TPT, Vol. 45, #1, Jan. 2007, p. 4.
- Edward S. Ginsberg, "Figuring Violin Strings", TPT, Vol. 39, #6, Sept. 2001, p. 325.
- "Figuring Physics", TPT, Vol. 39, #3, Mar. 2001, p. 148.
- G.R. Davies, "A 'Relevant' Demonstration", TPT, Vol. 33, #1, Jan. 1995, p. 58.
- Jack E. Denson, "The Vibrating Wire Revisited", TPT, Vol. 30, #6, Sept. 1992, p. 326.
- Ben Saferstein, "Resurrecting the Pythagorean Monochord", TPT, Vol. 29, #7, July 1991, p. 438.
- Thomas B. Greenslade, Jr., "A Vertical Sonometer", TPT, Vol. 24, #2, Feb. 1986, p. 90.
- R. D. Edge, "The Plucked String", TPT, Vol. 17, #2, Feb. 1979, p. 124.
- Robert Johns, "Musical String Vibrations", TPT, Vol. 15, #3, Mar. 1977, p. 145.
- Yudai Wei, Hao Zhu, Haotian Jiang, Quanxin Luo, Shan Lin, Junqing Li, Yu Zhang, Bibo Zhao, "Playing Melodies on a Single String by Exciting Harmonics Using the Lorentz Force", AJP, Vol. 92, #3, March 2024, p. 176.
- Thomas B. Greenslade, Jr., "Monochord", AJP, Vol. 90, #12, Dec. 2022, p. 947.
- Gabriele U. Varieschi and Christina M. Gower, "Intonation and Compensation of Fretted String Instruments", AJP, Vol. 78, #1, Jan. 2010, p. 47.
- P. M. Vilela, R. A. Moscoso, and D. Thompsom, "What Every Musician Knows about Viscoelastic Behavior", AJP, Vol. 65, #10, Oct. 1997, p. 1000.
- J. Hunt, "A Vertical Sonometer", AJP, Vol. 58, #1, Jan. 1990, p. 93.
- Judith C. Brown, "Rotating Discontinuity of the Bowed String Using Computer Graphics", AJP, Vol. 55, #10, Oct. 1987, p. 898.
- Gerald F. Wheeler and William P. Crummett, "The Vibrating String Controversy", AJP, Vol. 55, #1, Jan. 1987, p. 33.
- E. Brock Dale, "Classroom Demonstration of the Vibration of a Bowed String", AJP, Vol. 44, #11, Nov. 1976, p. 1077.
- Robert E. Kelly, "Temperature Effects on The Musical Pitch of a Stretched String", AJP, Vol. 43, #11, Nov. 1975, p. 996.
- Stephan G. Benka, "Longitudinal Waves in Piano Strings", Physics Today, Vol. 68, #7, July 2015, p. 16.
- John C. Bryner, "Stiff-String Theory: Richard Feynman on Piano Tuning", Physics Today, Vol. 62, #12, Dec. 2009, p. 46.
- Sj- 3, 4, 5: Freier and Anderson, A Demonstration Handbook for Physics.
- W-120: "Melde's String - Sonometer", DICK and RAE Physics Demo Notebook.
- W-410: "Coffee Can Oop-Goopi", DICK and RAE Physics Demo Notebook.
- W-415: "Monochord - Pan Pipes", DICK and RAE Physics Demo Notebook.
- George M. Hopkins, "Conduction of Sound", Experimental Science, p. 124.
- David Kutliroff, "72, Resonance Demonstration with Musical Strings", 101 Classroom Demonstrations and Experiment For Teaching Physics, p. 158.
- Jearl Walker, "3.34, Bowing a Violin", The Flying Circus of Physics Ed. 2, p. 160.
- Gerard L'E Turner, Nineteenth-Century Scientific Instruments, p. 132-133.
- Janice VanCleave, "Bzzzzz", 202 Oozing, Bubbling, Dripping, and Bouncing Experiments, p. 32.
- Janice VanCleave, "String Music", 202 Oozing, Bubbling, Dripping, and Bouncing Experiments, p. 109.
- Janice VanCleave, "Shorter", 202 Oozing, Bubbling, Dripping, and Bouncing Experiments, p. 109.
- Sharon E. Finberg, "Abstract: Student Sonometer", 2005 Apparatus Competition, Salt Lake City, UT.
- Herb Strongin, “Investigating the Sounds of Student-Built Musical Instruments“, Science on a Shoestring, p. 138.
- Joseph Frick, "#146 - The Monochord", Physical Technics: Or, Practical Instructions for Making Experiments in Physics and the Construction of Physical Apparatus with the Most Limited Means", p. 172.
- D. Colson, C. J. Lapp, J. A. Eldridge, "Experiment XXX", 1936 Univ. of Iowa Physics Laboratory Manual, p. 36.
- The Queen Catalogues Vol. II, Catalogue of Physicsal Instruments, No. 4675, p. 48
Disclaimer: These demonstrations are provided only for illustrative use by persons affiliated with The University of Iowa and only under the direction of a trained instructor or physicist. The University of Iowa is not responsible for demonstrations performed by those using their own equipment or who choose to use this reference material for their own purpose. The demonstrations included here are within the public domain and can be found in materials contained in libraries, bookstores, and through electronic sources. Performing all or any portion of any of these demonstrations, with or without revisions not depicted here entails inherent risks. These risks include, without limitation, bodily injury (and possibly death), including risks to health that may be temporary or permanent and that may exacerbate a pre-existing medical condition; and property loss or damage. Anyone performing any part of these demonstrations, even with revisions, knowingly and voluntarily assumes all risks associated with them.
- Trending Categories

- Selected Reading
- UPSC IAS Exams Notes
- Developer's Best Practices
- Questions and Answers
- Effective Resume Writing
- HR Interview Questions
- Computer Glossary
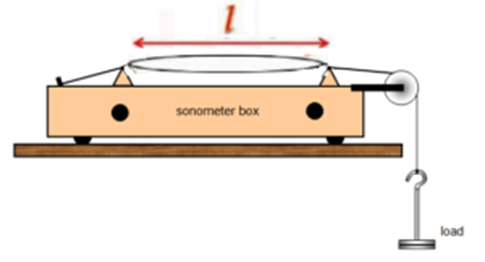
Relationship between frequency and length of wire under constant tension using Sonometer
Introduction.
In the experiment for studying the relationship that exists between length and the tension with respect to the frequency of the sound wave, the device of sonometer is important. It is a device that follows the Law of tension, where it is directly proportional to the frequency associated with the given string. This device is a hollow rectangular box made out of wood and has a length of more than 1 meter. To the end of the sonometer, there lies a hook and on the other side, it has a pulley. This experiment is conducted to verify the Law of tension with the help of the device sonometer.
Aim of the experiment and materials required
The aim of this experiment is to show whether the Law of tension is truly exhibited by the sonometer or not and the relationship that lies between tension and length for the given wire having constant frequencies. However, in conducting this experiment, several materials are required that include the followings, device of sonometer, screw gauge, rubber pad, paper rider, slotted weights of 7 and 1/2 kg, meter scale, hanger 1/2 kg and lastly, a set for 8 tuning forks (Chauhan et al. 2021). This experiment will not only prove the Law of tension but will also help in learning the use of the device sonometer.
Theory and formula
The theory that is applied in this experimentation shows a few conditions, suppose the given string is plucked from its centre, which is stretched and fixed by two pints at each end, then there occurs vibration. This vibration seems to move out in the exact opposite direction along with the given string (Chauhan et al. 2021). This occurs due to the generation and travelling of the transverse wave through the string. For example, if the length of the string is l, and it is stretched with a tension (T) and has a mass (m) per unit length, then the frequency of the vibration is expressed as, $\mathrm{F\: = \:1/2l\sqrt{T/m}}$ . In this expression, F is considered as the constant, and in turn, it states that, m and $\mathrm{\sqrt{T/1}}$ is also constant.

Figure 1: Study of the Relation between the Length of Given Wire and Tension for Constant Frequency Using Sonometer
In conducting this experiment, certain steps are to be followed as follows. The first step states the setting of the sonometer on the tabletop, giving it a weight of 4 kg. The hanger used in this experiment needs to have a maximum weight that is suitable for carrying out the experiment. However, for this experiment, a frictionless pulley is used. Need to move the wooden bridges in order to maximize the length of the given wire. Selections of 256 Hz for forks are set, that is to strike against the rubber pad leading to generating vibrations. Wire AB is vibrated by plucking. Following these procedures, record the changes that are noticed at the time of observation.
Observations, Calculations and Model graph
Observations during this experiment are to be recorded in a tabular format as given below. Need to consider the frequency of the tuning fork F, at constant, which is 256 Hz. Record the tension and the change in length for the given experiment.

Figure 2: Relation between Tension T (N) and Length $\mathrm{l^2 \:(cm^2)}$
In order to calculate, certain things to be considered, one needs to find the length (L) and record the mean length in the column. Identify the $\mathrm{l^2}$ and $\mathrm{l^2/T}$. In the next step, I need to plot T and l2 along the x-axis and y-axis.
| Reading no. | Mass (M) in kg | Tension (T)= Mg in N | $\mathrm{\sqrt{T}}$ | Vibrating length (l) in m | $\mathrm{\sqrt{T/1}}$ |
|---|---|---|---|---|---|
Figure 3: Observation table Variation of resonant length with tension
Precautionary measures and possible sources of error
Certain precautionary measures are to be used, the first is to make use of frictionless pulleys, and the wire needs to be of uniform cross-section. Usage of rubber pad is necessary, for calculations, length can be increased and decreased (Amrita.olabs.edu, 2022). Rigid wire and sharp wooden bridges should not be used. Correct weights should not be used.
In this tutorial, a detailed discussion has been conducted on the experiment that defines the Law of tension. However, this experiment makes use of a sonometer, which is quite important for recoding pf the vibrations that are generated by plucking the middle part of the given string. However, specific procedures are to be maintained with certain precautionary measures, as, if errors lie during the experiment, then readings might not be appropriate.
Q1. What are a sonometer and its usage in daily life?
Ans. Sonometer is a device that is used for defining the intricate relationship that exists between the frequencies for the sound produced by the string at the time of plucking in the experiment. The device sonometer is used for diagnostic purposes, such as to measure density, tension and frequency for vibrations. This device is used in identifying the density of bone and hearing capacity.
Q2. What is the law of tension?
Ans. Law of tension is defined as the prime frequency of vibrations of the respective string that is directly proportional to the square root of tension, when the length of vibration and mass per unit length is considered to be a constant. It is expressed as $\mathrm{v\:\varpropto\:1/l}$, where, l is the length.
Q3. What is defined as the pitch of the sound and what factors affect its pitch?
Ans. Pitch of sound can be defined as the sound sensations that are perceived by the human ear, depending upon the aspects of frequency of vibrations. The factors that are responsible for affecting the pitch of sound includes, tension (T), mass per unit length and lastly, length (L).

- Related Articles
- Relationship between Speed and Frequency of Alternator
- Electric Traction: Calculation of Sag and Tension for Trolley Wire
- Difference between Tension Headache and Cluster Headache
- Difference between Earth Wire and Neutral Wire
- Relationship between AI and Data
- Detergents and Surface Tension
- Difference Between Constant and Control
- Tension Force
- Surface Tension
- Difference between Solid and Stranded Wire
- Difference Between ACH and Wire Transfer
- Explain the relationship between sanitation and disease.
- Relationship between ML and the Scientific Method
- Which has less electrical resistance: a thin wire or a thick wire (of the same length and same material)?
Kickstart Your Career
Get certified by completing the course
Sonometer Experiment
Experiment: To establish graphically the relation between the tension and length of the string of a sonometer resonating with a given tuning fork. Use the graph to determine the mass per unit length of the string.
A stretched string that is set into vibrations produces musical sound. When a string stretched between two points is plucked, several modes of oscillation may be present. However, the simplest mode of vibration with lowest frequency for a given length of a string is called the fundamental mode of vibration and its frequency is given by
f = 1/2L √(F/μ)
Where L is the length of the vibrating segment, F is the tension in string and n is the mass per unit length of the string. For a given frequency and a given string, f and μ are constant,
√F ∝ L (f, μ constant)
This means that the tension (F) applied to the string, varies as the square of the length (L) necessary for resonance.
In this experiment, you will establish the above relation by the use of a sonometer. A sonometer consists essentially of one or two piano wires stretched over a sounding box. The tension is applied by means of a hanger and weights suspended from each wire, by passing the wire over to a pulley and the effective length is regulated by movable bridges.
Material Required
Sonometer, weight hanger and slotted weights (ten ½ kg weights), tuning fork, rubber mallet or block, meter-stick (if sonometer does not have length scale), 2 sheets of cartesian graph paper
How To Perform Experiment
1. Place the sonometer near the end of the laboratory table so that the weight hanger attached to the wire hangs freely.
2. Set the two bridges near the ends of the wire so as to utilize most of the length. Add weights to the -weight hanger. (Caution: Keep your feet clear of the suspended weights in case the wire breaks or comes loose and the weights falls).
3. Fold a small paper strip in V-shape and place it as a rider in the middle of the string.
4. Sound the tuning fork by striking it with a rubber mallet or on a rubber block. Never strike the tuning fork against a hard object (e.g. a table).
This may damage the fork and change its characteristic frequency. Place the base of the vibrating fork on the top of the sonometer and observe the vibrations of the paper rider. Then, vary the vibrating length of the string by sliding its bridge until the string resonates with the vibrating tuning fork. This you ensure by noting that a loud sound is heard and the paper rider flutters vigorously and falls. Measure the vibrating length of the string, that is the length between the two bridges and record this length. Remember that the string vibrates in one segment in fundamental mode of vibration.
5. Change the tension in the wire by adding ½ kg weight to the hanger and repeat procedure 4.
6. Repeat the experiment for 6 or more values of tension.
Science Practicals 11 & 12
Search this blog, class 12 physics practical reading to find the frequency of the a.c. mains with a sonometer., apparatus required.
v= (1/2l) ×√(T/m)
| Setup for finding frequency of A.C. mains by sonometer |
Observation & Calculations

Precautions
Sources of errors, post a comment.
Please do not enter any spam link in the comment box.
Sonometer Experiment
- Post author By Hemant More
- Post date February 4, 2020
- 2 Comments on Sonometer Experiment
Science > Physics > Stationary Waves > Sonometer Experiment
In this article, we shall study construction and working of sonometer, and its use to verify the laws of string.
Laws of Vibrating String:
Law of Length:
If the tension in the string and its mass per unit length of wire remains constant, then the frequency of transverse vibration of a stretched string is inversely proportional to the vibrating length.
Law of Tension:
If the vibrating length and mass per unit length of wire remain constant then, the frequency of transverse vibration of a stretched string is directly proportional to the square root of the tension in the string.
Law of Mass:
If the vibrating length and tension in the string remain constant then, the frequency of transverse vibration of a stretched string is inversely proportional to the square root of its mass per unit length
Construction:
A sonometer consists of a hollow rectangular wooden box to which a uniform wire is attached at one end. The other end of the wire is passed over two horizontal knife edges or bridges and then over a pulley. A weight hanger is suspended from the free end of the wire. By placing different weights in the weight hanger, the tension in the wire can be suitably adjusted.
The points at which the wire rests on the knife edges cannot vibrate at all. Hence, when the wire is set up into vibrations, these two points become nodes and the wire vibrates in the fundamental mode. The frequency of vibration of the wire can be varied by either changing the positions of the knife edges by changing the vibrating length or by placing different weights in the pan by changing the tension.
Use of Sonometer to Determine the Unknown Frequency of a Tuning Fork:
To determine the unknown frequency of a tuning fork, the tension T in the wire is kept constant and the vibrating length between the knife edges is so adjusted, that the fundamental frequency of the wire becomes the same as that of the fork. To test this a small paper rider is placed on the wire midway between the knife edges where an antinode is formed.
The fork is set up into vibration and its stem is placed on the wooden box. The length of the wire is adjusted till it vibrates in unison with the fork. When this happens, the centre of the vibrating wire vibrates with maximum amplitude due to resonance, and the paper rider is thrown off. Then the frequency of the tuning fork which is the same as the fundamental frequency of the wire is given by
Where ‘m’ is the mass per unit length of the wire. The frequency of the fork is determined, knowing l , T, and m.
Use of Sonometer to Verify the Law of Length:
To verify , the given wire (m = constant) is kept under constant tension (T = constant). A set of tuning forks having different frequencies n 1 , n 2 , n 3 , n 4, etc. is taken. The length of the wire, vibrating in unison with each fork, is determined in turn using a paper rider or hearing beats. Let the lengths corresponding to the frequencies be l1, l2, l3, l4, etc.
Then, it is found that, within the limits of experimental error, n 1 l 1 = n 2 l 2 = n 3 l 3 = n 4 l 4 = constant. Thus in general n l = constant or n ∝ 1/ l. If a graph of n against 1/ l is plotted, it comes out as a straight line.
Use of Sonometer to Verify the Law of Tension:
If the vibrating length and mass per unit length of wire remain constant then, the frequency of transverse vibration of a stretched string is directly proportional to the square root of the tension in the string. To verify the law, the vibrating length of the given wire and linear density ‘m’ is constant. A set of tuning forks having different frequencies n 1 , n 2 , n 3 , n 4 etc. is taken.
By adjusting the tension T, each fork is made to vibrate in unison with the fixed length of the wire, one after the other. Let the tensions corresponding to the frequencies n1, n2, n3, n4, etc. be T1, T2, T3, T4, etc. respectively. Then it is found that, within limits of experimental error.
A graph of n² against T comes out as a straight line.
Use of Sonometer to Verify the Law of Mass:
If the vibrating length and tension in the string remain constant then, the frequency of transverse vibration of a stretched string is inversely proportional to the square root of its mass per unit length. This law cannot be verified directly, as either ‘n’ nor ‘m’ can be varied continuously as in the case of l or T. Therefore, this law is verified indirectly as follows. The relation can be written as
Then, to verify the law, we must show that when n and T are kept constant. A number of wires having linear densities m 1 , m 2 , m 3 , m 4, etc. are taken. Each one of them is subjected to the same tension T. Then, using a given tuning fork (n = constant) each wire is made to vibrate in unison with the fork, by adjusting its length. Let l1, l2, l3, l4, etc. be the vibrating length corresponding to linear densities m1, m2, m3, m4, etc. respectively.
Then it is found that, within the limits of experimental error.
Hence the law is indirectly verified.
Previous Topic: Vibrations of String
Next Topic: Melde’s Experiment
- Tags all hamonics , Antinode , Displacement antinode , Displacement node , end correction , Experiment , First overtone , Fundamental frequency , Fundamental mode , harmonic , Law of isochromism , Law of length , Law of mass , Law of tension , Mechanical wave , Node , odd harmonics , overtone , pipe open at both end , pipe open at one end , Pressure antinode , Pressure node , Progressive wave , Reflection of wave , Second harmonic , Second overtone , Sonometer , Stationary wave , Stationary waves , Third harmonic , Vibrating string , Vibration of air column , Wave
2 replies on “Sonometer Experiment”
Excellent explaination it is.
Thank you so much ♥️
Leave a Reply Cancel reply
Your email address will not be published. Required fields are marked *
- Physics Article
- Relationship Between Frequency And Length Of Wire Under Constant Tension Using Sonometer
To Study the Relation between Frequency and Length of a Given Wire under Constant Tension Using Sonometer
To study the relation between the frequency and the length of a given wire under constant tension using a sonometer.
Apparatus/Materials Required
- A set of eight tuning forks
- A sonometer
- Seven ½ kg slotted weights
- Paper rider
- Screw gauge
- Metre-scale
- ½ kg hanger

If the stretched wire vibrates in resonance with the tuning fork with a frequency v, then the string also manifests the same frequency v .
Considering that the string is of length l with diameter D and a density ρ and length l, then the frequency of the string is given by the equation,
From the above equation, we know that
vl = constant
The graph between v and l will be a hyperbola while the graph between v and 1/ l will be a straight line.
The relation between the length ( l ) and tension ( T ) from the above equation, is given as follows:
A graph between T and l 2 will be a straight line
- Place the sonometer on the table as shown in the figure.
- Oil the pulley to make it frictionless
- Put suitable maximum weight to the hanger
- Move the wooden bridge P outward to include the maximum length of wire AB between them.
- Pick the tuning fork of the least frequency from the set. Make it vibrate by striking its prong on a rubber pad. Bring the fork close to the ear.
- Pluck the wire AB from the middle and leave it to vibrate.
- Listen to the sound produced by both the tuning fork and the wire and judge which has less frequency.
- Since the long wire may have less frequency move the bridges inward and check the frequencies again.
- Go on decreasing the length of the wire till the frequency of the wire becomes equal to the frequency of the tuning fork.
- Place an inverted V-shaped paper rider in the middle of the wire AB. Vibrate the tuning fork and touch the lower end of its handle with a sonometer board. The wire AB vibrates due to resonance and the paper rider falls.
- Note the length of the wire AB between the edges of two bridges and record it in the ‘length decreasing’ column.
- Bring the bridges closer and adjust the length of the wire by increasing little by little till the rider falls.
- Note the length of the wire and record it in ‘length increasing column.’
- Take the rest of the five tuning forks, and one by one, in the order of increasing frequency repeat steps 5 to 13.
- Record the observations as given below.
Observations
Constant tension on the wire, T = _____ kg.
| (Hz) |
| ||||
| ) | ) | ||||
Table for frequency and length
Calculations
- Find the mean length l .
- Determine 1/ l
- Plot a graph between v and l , with v along the x-axis and l along the y-axis.

- Now, plot a graph between v and 1/l, with v along the x-axis and 1/l along the y-axis. The graph is a straight line as shown below.

From the graph, it can be concluded that vl = constant and \(\begin{array}{l}v\propto \frac{1}{l}\end{array} \) .
1.What is the principle involved in sonometer?
Answer: Resonance is the principle involved in the sonometer.
2. Which type of waves are produced in the sonometer experiment?
Answer: Transverse waves are produced in the sonometer experiment.
3. What is the relationship between frequency and the length of a given wire under constant tension?
Answer: The relationship between the frequency and the length of a given wire under constant tension is given by the equation
Frequently Asked Questions – FAQs
What is the principle involved in a sonometer, which type of waves are produced in the sonometer experiment, what is the relationship between frequency and the length of a given wire under constant tension, watch the video and learn more about resonance.

Stay tuned with BYJU’S to get the latest notification on CBSE along with CBSE syllabus, sample papers, marking scheme, and more.
|
|
|
|
|
|
|
|
|
|
|
|
|
|

Put your understanding of this concept to test by answering a few MCQs. Click ‘Start Quiz’ to begin!
Select the correct answer and click on the “Finish” button Check your score and answers at the end of the quiz
Visit BYJU’S for all Physics related queries and study materials
Your result is as below
Request OTP on Voice Call
| PHYSICS Related Links | |
Leave a Comment Cancel reply
Your Mobile number and Email id will not be published. Required fields are marked *
Post My Comment
Register with BYJU'S & Download Free PDFs
Register with byju's & watch live videos.
MK-ULTRA: Ottawa, health centre seek to dismiss Montreal brainwashing lawsuit

Glenn Landry holds up a picture of his mother, Catherine Harter, in Montreal, on Sept. 12. Ryan Remiorz/The Canadian Press
Family members of patients allegedly brainwashed decades ago at a Montreal psychiatric hospital are afraid they’re running out of time to get compensation because the federal government and the McGill University Health Centre have filed motions to dismiss their lawsuit.
Glenn Landry’s mother, Catherine Elizabeth Harter, was among the hundreds of people to receive experimental treatments under the MK-ULTRA program, funded by the Canadian government and the CIA between the 1940s and 1960s at Montreal’s Allan Memorial Institute, which was affiliated with McGill University.
Landry was born after his mother’s 1959 stay in the hospital, and had to be raised by a foster family because she couldn’t care for him.
While he says early traumas she experienced before seeking treatment undoubtedly played a role in her mental health issues, he believes the shock treatments and drug therapy she received during her months-long stay under the care of Dr. Donald Ewen Cameron and his colleagues robbed him of a relationship with her.
“She was no longer the person that she would have been, because there was no way that I could ever ask her about any kind of memories,” he said of his mother, who he saw about once a year until her death in the 1980s.
“She spent time with me because I was her son, but there was nothing about herself as a person that I can glean. It was not there.”
Landry represents one of about 60 families participating in a lawsuit against the Canadian government, the McGill University Health Centre and the Royal Victoria Hospital over the MK-ULTRA program. The plaintiffs allege their family members were subjected to psychiatric experimentation that included powerful drugs, repeated audio messages, induced comas and shock treatment that reduced them in some cases to a childlike state.
Lawyer Alan Stein, who represents the group, said he had been hopeful the government and hospitals would agree to start talks around compensation for his clients – many of whom are elderly. Instead, the opposing parties filed motions in Quebec Superior Court last week to dismiss, arguing the lawsuit is “unfounded in law and constitutes an abuse of procedure.”
The government and hospitals argue the claims are prescribed – that they should have been filed years or even decades ago when the facts surrounding the case first came to light.
“In addition to being prescribed, the originating application is an abuse of process in that it seeks to re-litigate determinative questions of fact and law that the courts of Quebec adjudicated over two decades ago,” one of the motions read.
In an email, a spokesperson for Canada’s Department of Justice says the government “acknowledges the hurt and pain inflicted on those impacted by these historical treatments,” but believes the claims are unfounded.
The departmentsaid a 1986 report into Cameron’s work found that the Canadian government did not hold legal liability or moral responsibility for the treatments but nevertheless decided to provide victims with assistance in the 1990s for “humanitarian reasons.” The McGill University Health Centre declined to comment.
Stein, in a phone interview, says the motion to dismiss is a delaying tactic from government lawyers. “They feel that my clients will not proceed further, that they’ll lose confidence and just not agree to continue further with the proceedings,” he said.
He says his clients should still have the right to sue because they didn’t know earlier that it was an option available to them. And while some victims were compensated, the money for the most part did not extend to family members, he added.
The lawsuit is asking for close to $1-million per family, for what Stein calls a “total miscarriage of justice.”
Landry compares the victims’ long legal ordeal to the wait Japanese Canadian survivors of Second World War internment camps faced before receiving justice, and he says MK-ULTRA victims also want an apology.
Because another group of Cameron’s alleged victims, and a different lawyer, had previously filed a class-action request, Stein chose instead to file a direct action, which allows plaintiffs to be mandated by others in similar circumstances to sue on their behalf. Quebec Superior Court set the stage for a trial in 2022 when it rejected an application by the government and the hospitals to partially dismiss the lawsuit, but the process was dragged out by an appeal, which also failed.
The proposed class-action lawsuit representing the other victims had tried to include the United States government as a defendant, but Quebec’s Court of Appeal ruled earlier this year that the U.S. state cannot be sued in Canada for its alleged role in the experiments; the Supreme Court of Canada refused to review the case.
While the two lawsuits are separate, Stein believes a victory by the government and hospitals in his lawsuit would make it very hard for the other effort to move forward since it would likely be targeted with a similar motion.
One of the two named plaintiffs in Stein’s suit has already dropped out. Marilyn Rappaport said in an interview that she withdrew after her husband died. That devastating loss, combined with her ongoing need to support her siblings who were victims of the experiments, made it too hard to contemplate the prospect of reliving her terrible childhood memories in court, she said.
Rappaport says her once beautiful and artistic sister Evelyn has experienced what she describes as a “living death” in the decades since she went to the hospital for treatments including being put to sleep for “months at a time” and subjected to audio messages on repeat. Now in her 80s, her sister is institutionalized and her memory is “totally gone,” Rappaport says.
While she’s no longer part of the lawsuit, Rappaport is still hoping for a victory and upset that the government is still fighting.
“I cannot understand why it’s taking so long,” she said.
Editor’s note: (Sept. 16, 2024): This is a corrected story. A previous version said McGill University filed a motion to dismiss the lawsuit. In fact, it was the McGill University Health Centre.
Report an editorial error
Report a technical issue
Follow related authors and topics
- Legal and Judicial News
- Public Administration and Government
Authors and topics you follow will be added to your personal news feed in Following .
Interact with The Globe
IMAGES
VIDEO
COMMENTS
Objectives of the Sonometer Experiment Study and understand the relationship between the vibrating frequency and the length of a given wire under constant tension using a monochord sonometer and thereby plot the f vs 1/l graph and study its characteristics.
Mastering the Sonometer Experiment can open up a world of understanding and appreciation for the principles of sound and vibration. By following the step-by-step guide to building a sonometer, conducting the experiment, and analyzing your results, you'll gain valuable insights into how different factors affect sound production.
The sonometer also allows us to "drive" the string into vibration (without plucking the string) through the use of a magnetic field. This permits us to test which harmonics can themselves be made to ring within a certain length and type of string.
Perform the above experiment using a permanent horse shoe magnet and passing the alternating current in the sonometer wire. In this case the resonant frequency is equal to the frequency of the alternating current.
Listen for an increase in the volume of the sound from the sonometer and/or an increase in the size of the detector signal on the oscilloscope. Frequencies that result in the maximum string vibration are resonant frequencies.
The sonometer is a long hollow wooden box along the top of which are stretched one or more strings rigidly attached to the box at one end, with provision at the other for changing their tension. If there is just one string, it's known as a monochord. The monochord illustration is from John Tyndall's book entitled Sound, (Appleton, NY, 1867 ...
Procedure of Sonometer Experiment - Place the sonometer on the table. Stretch the wire by placing a suitable load on the weight hanger. Move the wooden bridges outward, so that the length of wire between the bridges is maximum.
Learn how to use a sonometer to study the relation between sound frequency and string properties. Explore the diagram, construction, working and uses of sonometer.
1 Introduction The experiment uses a PASCO Sonometer to measure how normal mode frequencies of metal wires xed at both ends vary with length, mode number, tension, and mass per unit length of the wires. A sonometer (or monochord) is a device that holds a single wire under a desired tension and can detect the normal mode vibrations of a wire.
Sonometer. A Sonometer is a device for demonstrating the relationship between the frequency of the sound produced by a plucked string, and the tension, length and mass per unit length of the string. These relationships are usually called Mersenne's laws after Marin Mersenne (1588-1648), who investigated and codified them.
A Sonometer is a device which uses the concept of standing waves to measure the mass per unit length or density of a wire.
Equipment: Sonometer, Picks & bridges, Violin bow and Acc. Procedure: No preparation necessary except routine cleaning and maintenance. Piano wire for replacements may be obtained from the Physics Machine Shop. Tighten the wires carefully as too much tension will warp and crack the wooden sound box.
Every object has a natural frequency of vibration. If kinetic energy is applied to an object at a rate that matches its natural frequency, resonance occurs and the object vibrates. In this experiment a small current, produced by a signal generator, causes
Introduction In the experiment for studying the relationship that exists between length and the tension with respect to the frequency of the sound wave, the device of sonometer is important. It is a device that follows the Law of tension, where it is directly proportional to the frequency associated with the given string. This device is a hollow rectangular box made out of wood and has a ...
Sonometer Experiment Experiment: To establish graphically the relation between the tension and length of the string of a sonometer resonating with a given tuning fork. Use the graph to determine the mass per unit length of the string.
1. Set up the apparatus as shown in Fig. Setup for finding frequency of A.C. mains by sonometer. 2. Place the horse - shoe magnet in the middle of the wedges. [In the labs, where electromagnet is used instead of a horse-shoe magnet, the electromagnet should be adjusted a little above the sonometer wire so that one of its poles lies close to the ...
The fork is excited and placed on the sonometer box and the length of the vibrating segment of the string between the two bridges is found using paper rider test (as above). Using the same tuning fork, and using the same wire the experiment is repeated by changing the tension T (changing the mass attached to the string) and
Sonometer is a device used to show the relationship between the tension in a string & frequency of the vibration of the same string. Know formula, working, uses
Determine the frequency of AC mains with the help of a sonometer. We have provided an in-depth explanation of the experiment. Also given here are frequently asked viva questions.
Science > Physics > Stationary Waves > Sonometer Experiment In this article, we shall study construction and working of sonometer, and its use to verify the laws of string.
Viva Voce 1.What is the principle involved in sonometer? Answer: Resonance is the principle involved in the sonometer. 2. Which type of waves are produced in the sonometer experiment? Answer: Transverse waves are produced in the sonometer experiment. 3. What is the relationship between frequency and the length of a given wire under constant ...
The plaintiffs allege their family members were subjected to psychiatric experimentation that reduced them in some cases to a childlike state