- Earth Science
- Physics & Engineering
- Science Kits
- Microscopes
- Science Curriculum and Kits
- About Home Science Tools
Science Projects > Chemistry Projects > Splitting Water: Electrolysis Experiments + Video

Splitting Water: Electrolysis Experiments + Video
Electrolysis is the process by which an electric current is passed through a substance to affect a chemical change. The chemical change occurs when the substance loses electrons (oxidation) or gains them (reduction). In the two experiments listed below, the first reactive substance is water and the second one is a copper sulfate solution.
Electrolysis is used to remove hair, split compounds, and in the manufacturing process to decorate, strengthen, and make metal surfaces more resistant to rust.
>>Watch this video to see the electroplating of a copper key>>
An Electrolysis of Water Experiment and an Electroplating Experiment
Electrolysis: splitting water.
For this experiment, you can gather your own supplies or buy a complete water electrolysis kit .
Adult supervision required.
What You Need:
- 6-volt or 9-volt battery
- Two alligator clip leads or insulated wire
- Beaker or glass
- Piece of thin cardboard or card stock
- Two #2 pencils
What You Do:
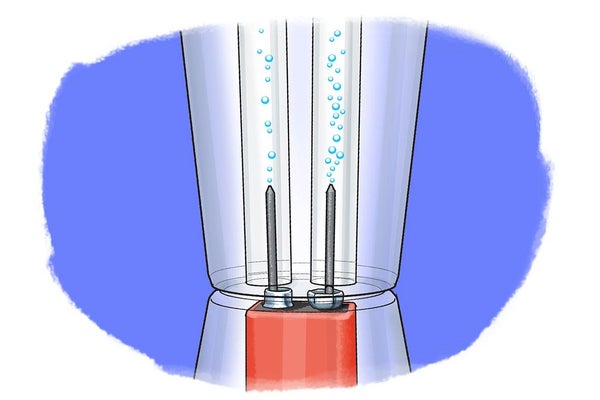
1. Fill the beaker or glass with warm water.
2. Carefully remove the erasers and metal sleeves so you can sharpen both ends of each pencil. These pencils are your electrodes . The graphite in them will conduct electricity, but won’t dissolve into the water.
3. Cut a piece of the cardboard to fit over the beaker, then punch two holes in the center of the cardboard about an inch apart. Push the pencils through the holes and set them in the glass. They should extend into the water, but not touch the bottom of the glass. The cardboard will hold them in place.
4. Connect each pencil to the battery with an alligator clip lead attached to the exposed graphite (pencil lead). If you don’t have alligator clip leads, use two lengths of wire and strip an inch of insulation off each end. Wrap the wire around the graphite of each pencil and connect the wires to the battery. You may need to use tape to hold the wires in place.

What Happened:
As soon as you connect the wires to the battery, you will see bubbles appearing around each of the pencil tips in the water and floating upward. Those bubbles are the components of water—hydrogen and oxygen gas—that have been split apart by the electricity as it travels through the water from one pencil to the other. The pencil attached to the negative terminal of the battery collects hydrogen gas while the one connected to the positive terminal collects oxygen. Does one pencil collect more bubbles than the other? Which one? Why do you think this is?
(Hint: Water’s chemical name is H 2 O because it has two hydrogen atoms to every one oxygen atom .)
Further experimenting:
- Try adding an electrolyte to the water in the beaker. Water doesn’t conduct electricity that well by itself, but any electrolysis of water experiment could be accelerated by adding table salt to the water. When this is done, you should see a change in how quickly the bubbles form.
Safety Note : using salt may produce small amounts of chlorine gas, similar to the amount present when using bleach.
- Try different types of batteries. Can you make electrolysis happen with a 1.5-volt battery? What about if you add an electrolyte?
- With some real electrolysis equipment you can collect the two gases in test tubes to measure the different amounts produced and test their different reactions to a flame.
- For electrolysis to work as true renewable energy, you need to use a clean energy source to run the reaction. Do this electrolysis experiment again using solar cells instead of a battery.
Electroplating: Copper-Plated Key

Adult supervision and chemical safety equipment required.
>> Watch our project video to see this project in action!
- 1.5-volt D battery with battery holder
- Copper sulfate
- Copper electrode (or coil of copper wire)
- Safety equipment
1. Prepare the key for copper-plating by cleaning it with toothpaste or soap and water. Dry it off on a paper towel.
2. Stir copper sulfate into some hot water in a beaker until no more will dissolve. Your solution should be dark blue. Let it cool.
3. Use one alligator clip to attach the copper electrode to the positive terminal of the battery (this is now the anode ) and the other to attach the key to the negative terminal (now called the cathode ).
4. Partially suspend the key in the solution by wrapping the wire lead loosely around a pencil and placing the pencil across the mouth of the beaker. The alligator clip should not touch the solution.
5. Place the copper strip into the solution, making sure it doesn’t touch the key and the solution level is below the alligator clip. An electrical circuit has now formed and current is flowing.
6. Leave the circuit running for 20-30 minutes, or until you are happy with the amount of copper on the key.
The copper sulfate solution is an electrolyte that conducts electricity from one electrode to the other. When the current is flowing, oxidation (loss of electrons) happens at the copper anode, adding copper ions to the solution. Those ions travel on the electric current to the cathode, where reduction (gain of electrons) happens, plating the copper ions onto the key. There were already copper ions present in the copper sulfate solution before you started, but the oxidation reaction at the anode kept replacing them in the solution as they were plated onto the key, keeping the reaction going.
This project has many variables, including the cleanness and smoothness of the key, the strength of the copper sulfate solution, and the strength of the current. If a black soot-like substance starts forming on the key, your solution is not strong enough for the current. Take the electrodes out and add more copper sulfate. When you put them back in, make sure the anode and cathode are as far apart as possible.
There are lots of projects you can do with electroplating! One fun idea is to use a flat piece of brass as your cathode and draw a design on it with an oil-based marker. The copper will not bond where the marker is. After you’re done plating it, you can use acetone (or nail-polish remover) to wipe off the marker, leaving a design of the brass showing through the copper. You can use a little metal polish to make the copper shiny, if you want.
You may want to try this simple copper-plating experiment that doesn’t use electrolysis and requires only household materials.
Renewable Energy Projects:
- Pinwheel Wind Turbine
- Make a Water Wheel
- Build a Solar Oven
- Design & Build a Solar Car
Welcome! Read other Chemistry articles or explore the rest of the Resource Center, which consists of hundreds of free science articles!
Shop for Chemistry Supplies!
Home Science tools offers a wide variety of Chemistry products and kits. Find affordable beakers, test tubes, chemicals, kits, and everything else you need for lab experiments.
Related Articles

Thanksgiving Science Projects eBook
Fun & Easy Science Activities Your Kids Will Love!

How to Plan a Science Fair Event (at your co-op)
There is something about a science fair that brings everyone together, making it the perfect event to host at your homeschool co-op.

10 Science Experiments You Want To Do This Year
Science experiments are one of the most exciting things you can do in your homeschool or classroom! We've put together some thrilling - yet easy - science experiments for you and your kids to do this year. Please remember to keep safety first and protect...

Modeling Ecosystem Food Webs with Owl Pellet Dissection
Grade Range: Adaptable for Grades 3 - 8. Overview: Learn about food webs by dissecting owl pellets. What You Need: Owl Pellet Dissection Kit Activity Objective: Draw and understand a food web based on what is observed in an owl pellet. Safety...

Leaf Chromatography Experiment
To get started with this leaf chromatography experiment, let's first start with the basics of how leaves get their colors. Leaves contain different pigments, which give them their color. Green chlorophyll is the most common type of pigment, but there are also...
JOIN OUR COMMUNITY
Get project ideas and special offers delivered to your inbox.
Choose an Account to Log In

Notifications
Science project, electrolysis of water experiment.

Energy is stored in the bonds of molecules. When these bonds split apart, the energy released can be used to do work. Breaking apart liquid water molecules into hydrogen and oxygen gas creates an enormous amount of energy, which can be turned into useful electricity to power our homes and cars.
To break these bonds, some amount of energy is required to get the atoms in water molecules active enough to break apart from each other. At home, we can supply this energy with a battery. All batteries have two terminals , or ends: a positive terminal and a negative terminal. The water then connects these terminals, so energy can flow between them. As the electricity passes through the water, it splits the water!
Pure water itself is not a good conductor of electricity, so for this experiment baking soda will be added to make the solution an electrolyte. An electrolyte is a part of a solution that can be broken up by electrolysis. Electro refers to energy and electricity and - lysis refers to splitting apart. Electrolytes are important both in batteries and in our bodies!
During the electrolysis of water, which electrolyte conducts electricity the best?

- Distilled water
- 2 silver-colored thumb tacks
- Small, clear plastic container (a plastic to-go sauce container from a restaurant would work great)
- 2 test tubes
- Baking soda
- Dishwashing detergent
- Insert the thumb tacks into the bottom of the plastic container so that the points push up into the container. Space them so that they’re the same distance apart as the two terminals of the 9V battery. Be careful not to prick yourself!
- Place the plastic container with the thumb tacks over the terminals of the battery. If the cup is too large to balance on the battery, find something to stack it on: between two books, a stack of post-its, etc.
- Slowly fill the container with distilled water. If the tacks move, go ahead and use this opportunity to fix them before you proceed. Will distilled water conduct electricity on its own? Try it!
- Add a pinch of baking soda.
- Hold two test tubes above each push pin to collect the gas being formed. Record your observations. What happens? Does one tube have more gas than the other? What gases do you think are forming?
- Distilled water and lemon juice
- Distilled water and table salt
- Distilled water and dish detergent
- Distilled water (no additive)
- Tap water (Does tap water work? If so, why?)
Distilled water will not conduct current, while tap water will conduct a small current. The solution with baking soda will facilitate a good amount of electrolysis. The solution with table salt will facilitate electrolysis the best.
Baking soda, known by chemists as sodium bicarbonate (NaHCO3), isn’t an electrolyte on its own. Remember—it needs to be in a solution! When dissolved in water, it lets current flow through the water between the terminals of the battery. In the water-baking soda solution, the gases that are produced are hydrogen (H 2 ), oxygen (O 2 ) and carbon dioxide (CO 2 ).
Table salt, or sodium chloride (NaCl), is also a good additive to form electrolytes. In water, salt actually splits into Na + and Cl - ions, which are very good at carrying current , or the flow of electric charges. In the water-salt solution, the gases that are produced are hydrogen, oxygen and chlorine gas (Cl 2 )—you don’t want to inhale this stuff!
Lemon juice is a decent electrolyte because it is an acid. The acid dissociates in water and the current will be carried by the ions. Distilled water on its own will not carry any current. However, tap water is often able to conduct current because of minerals and impurities (Don’t worry! These things are not bad for you!).
Different amounts of gas are produced from each reaction because each reaction will carry a different amount of current. The amount of gas produced is directly proportional to the current that flows in the system.
Related learning resources
Add to collection, create new collection, new collection, new collection>, sign up to start collecting.
Bookmark this to easily find it later. Then send your curated collection to your children, or put together your own custom lesson plan.
- PRO Courses Guides New Tech Help Pro Expert Videos About wikiHow Pro Upgrade Sign In
- EDIT Edit this Article
- EXPLORE Tech Help Pro About Us Random Article Quizzes Request a New Article Community Dashboard This Or That Game Happiness Hub Popular Categories Arts and Entertainment Artwork Books Movies Computers and Electronics Computers Phone Skills Technology Hacks Health Men's Health Mental Health Women's Health Relationships Dating Love Relationship Issues Hobbies and Crafts Crafts Drawing Games Education & Communication Communication Skills Personal Development Studying Personal Care and Style Fashion Hair Care Personal Hygiene Youth Personal Care School Stuff Dating All Categories Arts and Entertainment Finance and Business Home and Garden Relationship Quizzes Cars & Other Vehicles Food and Entertaining Personal Care and Style Sports and Fitness Computers and Electronics Health Pets and Animals Travel Education & Communication Hobbies and Crafts Philosophy and Religion Work World Family Life Holidays and Traditions Relationships Youth
- Browse Articles
- Learn Something New
- Quizzes Hot
- Happiness Hub
- This Or That Game
- Train Your Brain
- Explore More
- Support wikiHow
- About wikiHow
- Log in / Sign up
- Education and Communications
- Making Chemicals
How to Make Oxygen and Hydrogen from Water Using Electrolysis
Last Updated: August 31, 2024 Fact Checked
This article was co-authored by Bess Ruff, MA . Bess Ruff is a Geography PhD student at Florida State University. She received her MA in Environmental Science and Management from the University of California, Santa Barbara in 2016. She has conducted survey work for marine spatial planning projects in the Caribbean and provided research support as a graduate fellow for the Sustainable Fisheries Group. This article has been fact-checked, ensuring the accuracy of any cited facts and confirming the authority of its sources. This article has been viewed 551,081 times.
The process of splitting water (H 2 O) into its atomic components (hydrogen and oxygen) using electricity is known as electrolysis. This experiment has significant implications in terms of what these 2 gases can be used for in their own right, with hydrogen being one of the cleanest sources of energy we have access to. Although it may sound complicated, it's actually easier than you think if you have the right equipment, the right knowledge, and a little bit of know-how.
Setting up the Equipment

- You can use either water from out of the tap or bottled water, it doesn't matter which.
- Warmer water has a lower viscosity and allows ions that conduct electricity to move more freely.

- Sodium chloride (which is table salt) is an electrolyte which helps aid the conductivity of the water, as water by itself isn’t particularly conductive.
- By making the water more conductive, the current from the battery flows through more easily which results in the water being split into hydrogen and oxygen more effectively.
- You can also using baking soda (NaHCO3) instead of table salt. This will not produce chlorine gas.

- These graphite shafts that are encased within the pencil are your electrodes and will conduct the electricity that comes from the battery.
- The graphite works really well as it doesn’t dissolve or get damaged in the water while you conduct the experiment.
- To increase the rate of electrolysis, make the graphite rough with the help of a blade or sandpaper.
- Consider using bare pencil leads from mechanical pencils to vastly increase the surface area. But handle them carefully as they are brittle.

- The purpose of the cardboard is to suspend the pencil graphite in the water without allowing it to touch the walls of the glass.
- Because cardboard has no metallic properties to it, it can sit on top of your glass without affecting the outcome of the experiment.

Conducting Your Experiment

- Use a 6-volt battery but if you cannot find one, use a 9-volt battery.
- You can find this size of battery at pretty much any convenience store or supermarket.

- Doing this completes the connection to the battery and allows the current to be transferred from the battery all the way through into the water.

- For this experiment to work, the graphite of the pencils needs to not be touching the side of the glass so just double check that here and adjust the pencils if need be.

- Once you connect the alligator clips to the battery and graphite, the current begins to flow immediately.
- There will be more bubbles coming from the hydrogen pencil because there is twice as much hydrogen as oxygen in each water molecule.
- ↑ https://www.education.com/science-fair/article/water-electrolysis/
- ↑ https://www.energy.gov/sites/prod/files/2014/06/f16/solar_electrolysisofwater.pdf
- ↑ https://thebestscienceproject.com/water-electrolysis-experiment/
- ↑ https://orbitingfrog.com/2014/11/02/electrolysis-of-water-with-pencils-and-a-9v-battery/
- ↑ https://www.scienceprojectideas.org/electrolysis-of-water-experiment.htm
Community Q&A

- If you can’t find graphite pencils, you can use little pieces of wire instead and just wrap them around the battery on one end, and leave the other end in the water. This has the same effect as the pencils. Thanks Helpful 4 Not Helpful 2
- Try using a different sized battery. This will affect the size of the current that goes through the water which will, in turn, affect the speed at which the water molecules get split. Thanks Helpful 4 Not Helpful 4

- Once you add an electrolyte like salt to increase the conductivity, just be aware that there is a small amount of chlorine by-product that gets created. This isn’t enough to be dangerous, but you may notice a subtle smell of chlorine. Thanks Helpful 9 Not Helpful 1
- Do this experiment under the supervision of an adult as you are working with electricity and gases which, although unlikely, do have the potential to be harmful. Thanks Helpful 8 Not Helpful 2
Things You’ll Need
- 2 #2 pencils
- 1 6 or 9-volt battery
- 350 millilitres (12 fl oz) glass
- 2 alligator clips
- Pencil sharpener
You Might Also Like

About This Article

- Send fan mail to authors
Reader Success Stories
Dec 5, 2023
Did this article help you?

Featured Articles

Trending Articles

Splitting Water
An electrolyzing science project from Science Buddies
By Science Buddies
Did you know that you can split water into its two component elements--with just a few household materials? See what your water is really made of in this molecule-busting activity. All it takes is a little bit of juice!
George Retseck
Key concepts Water Chemistry Electricity Molecules
Introduction You use it every day and cannot survive without it—no it is not the Internet, but water! It is one of the most essential compounds in the world and has become an increasingly important issue everywhere. You probably have heard that in many places droughts or water pollution limits clean drinking water supplies, and those supplies keep shrinking. When considering this, have you ever wondered why we do not just make our own water? What water is actually made of? In this science activity you will use energy in the form of electricity to split water into its individual components; so gather all the materials and get ready to find out what they are—and separate them yourself!
Background To find out what water is made of, it helps to look at its chemical formula, which is H2O. This basically tells us that the water molecule is composed of two elements: hydrogen and oxygen or, more precisely, two hydrogen atoms (H2) and one oxygen atom (O). Hydrogen and oxygen are gases at room temperature. So, does this mean that we can just combine both gases and then we get water? It is not quite as simple as that. What is missing in the equation is the energy component of the chemical reaction. Making water from its elements produces a large amount of energy. Chemical reactions that produce energy are also called exothermic reactions. In the case of hydrogen and oxygen the released energy is so high that it is almost impossible to control, and most of the time it leads to an explosion. Luckily, this reaction does not occur spontaneously and only happens when you ignite the gas mixture with a lighter.
On supporting science journalism
If you're enjoying this article, consider supporting our award-winning journalism by subscribing . By purchasing a subscription you are helping to ensure the future of impactful stories about the discoveries and ideas shaping our world today.
If making water from its elements is so dangerous, what about the reverse reaction? Splitting water into its two components is much easier to do and is called water electrolysis. Making hydrogen or oxygen this way seems simple. But as you probably suspected, this reverse reaction needs an energy input, which is why it is also called an endothermic reaction. In water electrolysis, the source of energy used for the reaction to occur is electricity. An easy way to generate electricity is with a battery. Because pure water is not good at conducting electricity, however, electrolysis requires the addition of an electrolyte , such as salt or acid. The electrolyte dissolves in water and separates into ions (electrically charged particles) that move through the solutions and are able to conduct electricity this way. To add electricity to the solution, you also need two electrical conductors that make contact with the water. These are called electrodes and are mostly metals or other conductive materials. When electrical current is applied to the electrodes, the ions (electrically charged atoms) in the electrolyte—including the positively charged protons (H + ) and negatively charged hydroxyl ions (OH - ) that result from the self-ionization of water—start moving toward the electrode with the opposite charge where either hydrogen or oxygen is produced. You can see this for yourself in this activity and even capture both gases!
Waterproof work area
Adult helper
Mechanical pencil graphite (thick enough that it does not break)—or a wooden pencil and a knife with which to have your adult helper extract the graphite
Play-Doh or other clay
Two or three disposable plastic cups (Clear plastic 18-ounce cups work best.)
Permanent marker
Two metal thumbtacks
Distilled water
Baking soda
Nine-volt battery
Two transparent straws (jumbo size)
Medical dropper
Paper towels
pH test strips (optional)
Table salt (sodium chloride—NaCl) (optional)
Preparation
Your work area should be waterproof; water spills might happen during the activity.
Collect your sturdy mechanical pencil graphite. Make sure you have two pieces of about 2.5 centimeters (one inch) in length. If you choose to use a wooden pencil, have an adult take the knife and extract the graphite lead from the pencil. (For this you should also get two pieces of about 2.5 centimeters in length). These will be your graphite electrodes.
With the scissors, carefully cut (or have an adult cut) around the open end of one plastic cup so it is the height of the nine-volt battery. In the bottom of the cup cut a hole so that the tip of the battery (with the two poles) can fit through.
Take the other cup and hold the bottom of that cup on top of the nine-volt battery. With the permanent marker, on the inside of the cup draw two dots on the bottom where the cup touches the two poles of the battery.
Take the cup away from the battery, and with a thumbtack, punch one hole through each of the points in the plastic cup bottom that you marked.
Carefully insert the two graphite (pencil core) pins through the two holes, one each. You might need to make the holes a little bit bigger so they fit.
Use the glue to make a seal around the graphite pins on the outside of the cup and let it dry. This should prevent water from leaking through. Make sure the graphite pins are not all covered in glue, otherwise they will not make contact to the battery anymore.
Place the cut cup, open-side down, over the battery. The cup bottom and the battery should fit together, creating one level surface on which you can place the other cup.
Put the cup with the graphite pins on the upside-down, cut cup, on top of the battery. It should sit there firmly and each of the graphite pins should contact one of the battery poles.
Seal one end of both jumbo drinking straws with Play-Doh or clay.
Take the cup with the graphite pins and pour approximately 300 milliliters of distilled water into the cup, away from the battery. Make sure that it is not leaking. If it is, you might need to add a bit more glue to make a tight seal. Note: You want to avoid touching the water or the electrodes once the cup is placed on top of the battery as you might feel the electricity tingling your fingers.
As you did previously, place it on the upside-down, cut cup, on top of the battery so that each of the graphite pins contacts one of the battery poles. You might need to press it down a little to make a good connection. Observe the two graphite electrodes. What do you see? Is anything happening at the electrodes?
Remove the cup filled with distilled water from the battery. Fill one teaspoon with baking soda and stir it into the distilled water until everything is dissolved. What do you think the baking soda will change? What function does it have?
Now put the cup back on top of the battery and connect the graphite electrodes with the battery poles. What do you observe now? Does anything happen at the graphite pins? What do you think the reaction's products are? Compare the reactions that happen at each of the graphite electrodes. Can you see a difference between both sides? Is there one graphite electrode at which the reaction is more pronounced? Which pole of the battery is this graphite pin connected to, the positive or negative?
Put your nose inside the cup and smell the reaction products. Is there any smell? If so, how does it smell?
Remove the cup from the battery again. With the medicine dropper, fill both plugged-up jumbo straws with the baking soda solution from inside the cup that has the graphite pins. Once they are full, close each with one of your fingers and turn them upside down. Submerge them into the cup with the baking soda solution and carefully place them on top of the graphite pins (one straw on each) so that the straws stay completely filled with baking soda solution. If the straws do not stay upright, you can lean them against the side of the cup. What do you think will happen with the straws?
Once the straws are placed on top of the graphite pins, put the cup back on top of the battery. Leave it there for 10 minutes and press the cup down a little to make sure that the electrodes stay connected and the electrode reactions are happening continuously throughout that time. Observe the jumbo straws that you put on top of the graphite pins. What is happening to the water that you put in there? Do you notice a difference between the two water levels in both straws? Which one is higher, which is lower; to what battery poles are each of them connected?
After the 10 minutes are over, mark the water level in each of the straws with the permanent marker. How much more water was displaced by the reaction products on the negative pole compared with the positive pole? Is it the same, double or triple?
Extra: If you have any pH strips that can measure the acidity or basicity of solutions, use them to measure the pH in each of the jumbo straws once the water level decreases by about 50 percent. Carefully remove the jumbo straws from the electrodes and immediately seal each one with a finger once you lift it off the electrodes. Making sure you do not lose the water that is inside, dip a pH test strip inside. What color does the test strip show and what pH does this represent? Is there a difference between the solutions in the two straws? How do they differ, and why do you think this is the case?
Extra: Repeat the experiment, but instead of adding baking soda to the distilled water, add a teaspoon of table salt (sodium chloride, or NaCl) and let the electrolysis run for five minutes. Do the electrode reactions change? What about the smell of the reaction products; can you make out a certain smell this time? Why do you think this is?
Extra: Exchange the graphite electrodes with metal thumbtacks. You might need to use a fresh cup for this. Push the thumbtacks into the bottom of the cup so that they do not touch each other but so that each one touches one of the battery poles once you place the cup on top of the battery. With the thumbtacks no glue seal is needed. Repeat the original procedure but this time add one teaspoon of table salt to the distilled water. Observe the electrode reactions. What happens this time? Look closely at the pin that is connected to the positive battery pole. Can you see other reaction products besides gas? What do you think happened? How do the metal thumbtacks look after you take them out again?
Observations and results Were you able to split the water into hydrogen and oxygen gas? Did you see a lot of bubbles being produced at both of the graphite pins? Initially, when you put the cup with distilled water on top of the battery, you probably did not see much happening at the graphite electrodes. This is because distilled water does not conduct electricity very well, therefore no or only minor electrode reactions are possible. If you add electrolytes such as baking soda, however, the added ions can conduct electricity and you should have seen gas bubbles emerging at both of the graphite pins. On one side, at the positive pole, oxygen develops whereas at the negative pole, hydrogen is produced.
When you looked closely, you might have observed that on the graphite electrode connected to the negative pole of the battery more gas was formed than on the other side. Collecting the two gases with the jumbo straws probably demonstrated this even better. After 10 minutes the water level at the negative pole should have been about half that of the positive side, meaning that you collected about double the amount of hydrogen gas compared with oxygen. The difference is due to the fact that one water molecule has two hydrogen atoms to one oxygen atom, as explained above. This means it takes two water molecules (2 H2O) to make one oxygen molecule (O2). At the same time, however, two molecules of water (2 H2O) can make two molecules of hydrogen (2 H2). Whereas hydrogen and oxygen are formed at the electrodes, the leftover reaction products from water are protons (H + on the side of oxygen) and hydroxyl ions (OH - on the side of hydrogen). You can visualize this by putting a pH strip into the solutions in the jumbo straws above each electrode. The solution in the straw that was put on top of the negative battery pole electrode should show a basic pH (7 or greater) whereas the other one should be acidic (pH less than 7).
Other electrode reactions can happen, too, if there are ions in the solution that compete with the hydrogen or oxygen production. You might have observed once you added salt (sodium chloride) to your electrolyte, it started smelling like at a swimming pool. Instead of oxygen, chlorine is produced at the positive battery pole, which is also used for disinfection of swimming pool water. If you used metal thumbtacks as electrodes instead of graphite pins, the metal (usually steel or brass) will dissolve, or corrode, at the positive battery pole and instead of (or in addition to) gas production, you should see that the metal thumbtack turns reddish brown. This demonstrates that electrolysis is not only a technique for splitting water into its components but can also drive other reactions that otherwise would not occur spontaneously.
Cleanup Clean up any spills with a towel. Pour the water with the electrolyte (baking soda or salt) down the drain. Remove the electrodes (graphite pins or metal thumbtacks) from the cups and put them into the trash. Throw the plastic cups and the sealed jumbo straws into the trash. You can reuse the nine-volt battery.
More to explore Why Can't We Manufacture Water? , from How Stuff Works The Chemistry of Water , from Jill Granger Electrolysis of Water—Hydrogen and Oxygen from Water , from Alternate Learning Fuel Cells—Fueling the Future!, from Science Buddies Science Activity for All Ages!, from Science Buddies
This activity brought to you in partnership with Science Buddies

Electrolysis of Water
What happens when an electric current is passed through water?

The main aim of this experiment is to study the ‘electrolysis of water’.
Let us understand first what is the electrolysis of water. Electrolysis of water is the process of decomposing water into hydrogen and oxygen gas by passing electricity through its aqueous solution (water).
2 H 2 O (l) + electrical energy ? 2 H 2 (g) + O 2 (g)
To perform this experiment, we require apparatus and materials such as two beakers, glass rod, spatula, test tubes, Sodium sulfate, Universal indicator solution, Distilled water, two Graphite electrodes, three conducting wires, 3 V battery and a Plug key.
Electrolysis of Water — Procedure
To study the electrolysis of water, we have to follow the following procedure:
- To 40 mL water, add a few spatulae full of sodium sulfate and stir well to prepare its concentrated solution.
- Add the universal indicator solution dropwise till the colour of the solution becomes dark green.
- Fill two test tubes with the dark green solution to their full capacity.
- In a beaker, place the conducting wires and fix the two graphite electrodes to the conducting wires.
- Fill the beaker with the remaining coloured solution (green-coloured).
- Lower the two test tubes filled with the coloured solution over the two graphite electrodes carefully.
- Connect a 3 V battery and the plug key to the two electrodes with connecting wires. Keep the key open.
- Now, close the key and observe the two electrodes carefully.
- Notice the bubbles forming at the two electrodes.
- Notice the colour change in the two test tubes.
In this experiment, we conclude that:
In water electrolysis, oxygen gas is liberated at the anode and hydrogen gas is liberated at the cathode. During the process, hydrogen and oxygen gasses are liberated in the ratio of 2:1.
FAQs on Electrolysis of Water
Q.1: how would you show that the gas obtained at the cathode during electrolysis of water is hydrogen and that obtained at the anode is oxygen.
Ans: When we bring the burning splint near the electrode, which makes a pop sound, the gas liberated is hydrogen. When we bring the glowing splint near the electrode and it reignites, then the gas is oxygen. From this, we can prove that the gas liberated at the cathode is hydrogen, and that of the anode is oxygen.
Q.2: What happens during the electrolysis of water?
Ans: During the electrolysis of water, decomposition of water into oxygen gas and hydrogen gas occurs. This happens by passing an electric current through the solution. Hydrogen gas is produced at the cathode, whereas oxygen gas is produced at the anode.
Q.3: Why is electrolysis of water carried out in an acidic medium but not in pure water?
Ans: Pure water cannot conduct electricity. It is almost non-electrolyte. When we add a small amount of acid to water, it dissociates into hydrogen and hydroxide ions and increases the concentration of H+ ions. Therefore, electrolysis is carried out in acidified water but not in pure water.
Q.4: Which type of chemical reaction is the electrolysis of water?
Ans: Electrolysis is an example of a decomposition reaction. It is because water splits into its constituent elements, hydrogen and oxygen, under the effect of an electric current.
Q.5: Which electrodes are used in the electrolysis of water?
Ans: Platinum electrodes are used in the electrolysis of water.

Experiments Related to this Topic
Esterification reaction, how can we prepare soap in the lab, comparing the foaming capacity of soap samples, effect of mass on period of a simple pendulum, effect of amplitude on period of a simple pendulum, cleaning capacity of soap, oxidation reaction of alcohol with alkaline kmno4, study reaction of zinc with sulphuric acid, complete combustion of alcohol, phototropism and geotropism.
39 Insightful Publications

Embibe Is A Global Innovator

Innovator Of The Year Education Forever
Interpretable And Explainable AI

Revolutionizing Education Forever

Best AI Platform For Education

Enabling Teachers Everywhere

Decoding Performance

Leading AI Powered Learning Solution Provider

Auto Generation Of Tests

Disrupting Education In India

Problem Sequencing Using DKT

Help Students Ace India's Toughest Exams

Best Education AI Platform

Unlocking AI Through Saas

Fixing Student’s Behaviour With Data Analytics

Leveraging Intelligence To Deliver Results

Brave New World Of Applied AI

You Can Score Higher

Harnessing AI In Education

Personalized Ed-tech With AI

Exciting AI Platform, Personalizing Education
Disruptor Award For Maximum Business Impact

Top 20 AI Influencers In India

Proud Owner Of 9 Patents
Trending Searches
Previous Year Question Papers
Sample papers.
Electrolysis and Flaming Water Experiments
We're going to use water to make a fire. wait, what traveling science show presenter kaitlin shows us one of her favorite experiments. don't try this at home..
You will find out that water is made up of hydrogen and oxygen atoms, and that we can split the atoms in a water molecule apart using electricity. This process of using electricity to drive a chemical reaction, like splitting water molecules apart, is known as "electrolysis."
Related Topics: electrolysis, chemistry, water
- Buy Tickets
- TFI Transformation
- Accessibility
- Frequently Asked Questions
- Itineraries
- Daily Schedule
- Getting Here
- Where to Eat & Stay
- All Exhibits & Experiences
- The Art of the Brick
- Wondrous Space
- Science After Hours
- Heritage Days
- Franklin Fright
- Events Calendar
- Staff Scientists
- Benjamin Franklin Resources
- Scientific Journals of The Franklin Institute
- Professional Development
- The Current: Blog
- About Awards
- Ceremony & Dinner
- Sponsorship
- The Class of 2024
- Call for Nominations
- Committee on Science & The Arts
- Next Generation Science Standards
- Title I Schools
- Neuroscience & Society Curriculum
- STEM Scholars
- GSK Science in the Summer™
- Missions2Mars Program
- Children's Vaccine Education Program
- Franklin @ Home
- The Curious Cosmos with Derrick Pitts Podcast
- So Curious! Podcast
- A Practical Guide to the Cosmos
- Archives & Oddities
- Ingenious: The Evolution of Innovation
- The Road to 2050
- Science Stories
- Spark of Science
- That's B.S. (Bad Science)
- Group Visits
- Plan an Event
Chemistry Learner
It's all about chemistry.
- Chemical Bonds
- Chemical Reactions
- Materials Chemistry
- Organic Chemistry
- Periodic Trends
- Periodic Table Groups
- How to Read Periodic Table
- Naming Covalent Compounds Worksheets
- Net Ionic Equation Worksheets
- Types of Chemical Reactions Worksheets
- Word Equations Worksheets
- Valence Electrons Worksheets
- Graphing Periodic Trends Worksheets
- Periodic Trends Ionization Energy Worksheets
- Atomic Structure And Isotopes Worksheets
Electrolysis of Water
Alkaline water electrolysis.
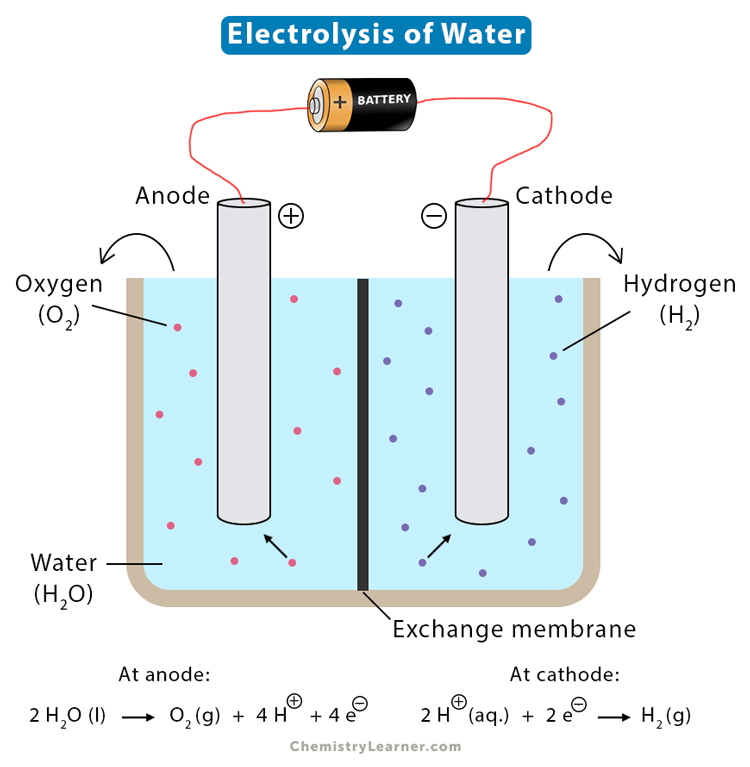
The process of decomposing water (H 2 O) into hydrogen (H + ) and hydroxide (OH – ) ions by passing an electric current through it is called electrolysis. The ions move to the opposite electrodes to liberate pure hydrogen (H 2 ) and oxygen (O 2 ) gases. It is a nonspontaneous redox ( oxidation-reduction ) reaction. Since heat in the form of electricity is supplied to the electrolytic cell, it is an endothermic reaction [1-4] .
Pure water does not conduct electricity and requires excess energy to overcome the activation barrier. Therefore, the electrolysis is carried out in the presence of an acid to improve the electrical conductivity by increasing the hydrogen ion (H + ) concentration. Such electrolytes are sulfuric acid (H 2 SO 4 ) and sodium nitrate salt (NaNO 3 ).
Electrolysis occurs in an electrolytic cell consisting of a positively charged anode and a negatively charged cathode, typically made of platinum. The chemical reaction for water electrolysis can be split into two half-reactions occurring at the cathode and anode [1,2] .
A reduction reaction occurs at the cathode when hydrogen ions acquire electrons and are converted into hydrogen gas. The half-reaction is as follows:
2 H + (aq.) + 2 e – → H 2 (g)
An oxidation reaction occurs when water molecules give electrons to the anode and liberate oxygen gas at the anode. The half-reaction is shown below.
2 H 2 O (l) → O 2 (g) + 4 H + (aq.) + 4 e –
The overall chemical reaction is
2 H 2 O (l) + electrical energy → 2 H 2 (g) + O 2 (g)
Thus, the water electrolysis reaction shows the separation of hydrogen and oxygen from water. For two moles of water, two moles of hydrogen and one mole of oxygen are liberated. The number of moles of hydrogen generated is twice the oxygen. Also, charges are transferred between the electrodes and the electrolyte. For every mole of hydrogen, 2 electrons are transferred from the cathode to the electrolyte. For every mole of oxygen, 4 electrons are transferred from the electrolyte to the anode.
The electrolysis of water can also be carried out in an alkali medium. In this case, the half-reactions are as follows [5]:
Cathode (reduction): 2 H 2 O (l) + 2e – → H 2 (g) + 2 OH – (aq.)
Anode (oxidation): 4 OH – (aq.) → O 2 (g) + 2 H 2 O (l) + 4 e –
Combining the two half-reactions yields the water electrolysis equation.
Ans. Yes, electrolysis of saltwater is dangerous. It produces chlorine gas, which is toxic.
Ans. Theoretically, a minimum of 237 kJ of energy is required to disassociate one water molecule.
Ans. The standard potential of a water electrolytic cell is -1.229 V at 25 ˚C and pH = 0.
- Flexbooks.ck12.org
- Chem.libretexts.org
- Chemed.chem.purdue.edu
- Chem.washington.edu
Related Articles

Cyclic Voltammetry

Faraday’s Laws of Electrolysis

Mass Spectrometry

Gravimetric Analysis
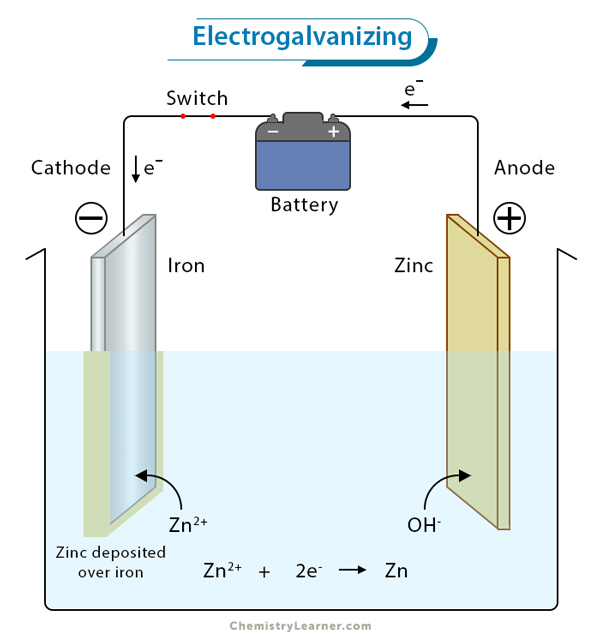
Galvanization
8 responses to “Electrolysis of Water”
Thanks a lot
Why is water electrolysis cell irreversible????
Because the conditions for hydrogen and oxygen to combine and form water are not present in an electrolytic cell.
How many water and electricity required to produce 1kilogram hydrogen and how many times it take?
Approximately 9 kg of pure water and 50 to 55 kilowatt-hours of electricity
Alternative Current Electrolysis Coagulation TDS Removal. Reaction & by product effect ?
I’m 12 years old! this thing is really helpful though
Leave a Reply Cancel reply
Your email address will not be published. Required fields are marked *
Trending Topics
© 2024 ( Chemistry Learner )
IMAGES
VIDEO
COMMENTS
Simple Experiment to Electrolyse Water. Push two metal pins through the bottom of a plastic cup. Fill the cup with salt water and put the pins on a 9-volt battery. One pin will produce hydrogen gas and the other will produce oxygen. Put two test tubes over the pins to see the gases separate. Part 1.
An Electrolysis of Water Experiment and an Electroplating Experiment Electrolysis: Splitting Water. For this experiment, you can gather your own supplies or buy a complete water electrolysis kit. Adult supervision required. What You Need: 6-volt or 9-volt battery; Two alligator clip leads or insulated wire; Beaker or glass; Piece of thin ...
PLEASE SEE THE UPDATED VERSION OF THIS EXPERIMENT WITH SIMPLE EXPLANATIONhttps://www.youtube.com/watch?v=eMT25d1oTOEElectrolysis of water results into Hydrog...
Part 1 - Electrolysis of water In this section, you will use electricity to split apart water molecules! 1. Set up the electrolysis apparatus as shown in the picture. a) Pierce two round holes in the bottom of a plastic cup. (Figure 1a) b) Sharpen two wooden pencils on both ends (after pulling off the eraser). Insert the pencils into the
Electrolysis of Water Experiment. Energy is stored in the bonds of molecules. When these bonds split apart, the energy released can be used to do work. Breaking apart liquid water molecules into hydrogen and oxygen gas creates an enormous amount of energy, which can be turned into useful electricity to power our homes and cars.
1. Connect one end of each alligator clip to the terminals of the battery. The battery is what actually produces the electrical current and so the alligator clips provide the pathway for transporting that current to the water. You need to attach one clip to the positive terminal and one to the negative terminal. [5]
Clean up any water spills with a towel. Pour the water with the electrolyte (baking soda or salt) into the drain. Remove the electrodes (graphite pins or metal thumbtacks) from the cups and put them into the trash. Throw both plastic cups and the sealed jumbo straws into the trash. You can reuse the 9V battery.
In this experiment, electric current moves from the battery through pencils to water and salt. Water is decomposed into oxygen and hydrogen gas as it is made...
Fill the bottom half of the cut water bottle approximately half full of water. Add about a teaspoon of Epsom salt. Swirl to stir until most of the salt dissolves. Pour the Epsom salt solution into the top half of the bottle (hold so the lid faces down). Ask a volunteer student to observe the solution, particularly the two points of the metal ...
Welcome to our first episode of The Sci guys. In this episode we will be investigating an experiment involving the electrolysis of water. We will show you ho...
By adding electricity to water and providing a path for the different particles to follow, the water can be separated into hydrogen and oxygen. In this experiment you will be taking a sample of salt water and add a flow of electricity to it (the electrolysis). You will see the hydrogen and oxygen. 2. bubbling up.
Clean up any spills with a towel. Pour the water with the electrolyte (baking soda or salt) down the drain. Remove the electrodes (graphite pins or metal thumbtacks) from the cups and put them ...
Procedure. Fill the large gas jar with 0.1 M sulfuric acid almost to the top. Hang the electrode assembly over the rim. Lower the burettes into the acid with the taps open until the open ends rest on the bottom of the jar. If the acid level does not reach the taps, connect a syringe to the top of the outlet, and transfer the remaining air to ...
Part 1 - Electrolysis of water In this section, you will use electricity to split apart water molecules! 1. Set up the electrolysis apparatus as shown in the picture. a) Pierce two round holes in the bottom of a plastic cup. (Figure 1a) b) Sharpen two wooden pencils on both ends (after pulling off the eraser). Insert the pencils into the
Electrolysis of water is using electricity to split water into oxygen (O. 2) and hydrogen (H. 2) gas by electrolysis. Hydrogen gas released in this way can be used as hydrogen fuel, but must be kept apart from the oxygen as the mixture would be extremely explosive. Separately pressurised into convenient 'tanks' or 'gas bottles', hydrogen can be ...
Electrolysis of water results into Hydrogen and oxygen in ration 2:1 by volume. Hydrogen collects at anode as it undergoes oxidation and oxygen undergoes red...
The main aim of this experiment is to study the 'electrolysis of water'. Let us understand first what is the electrolysis of water. Electrolysis of water is the process of decomposing water into hydrogen and oxygen gas by passing electricity through its aqueous solution (water). 2 H2O (l) + electrical energy ? 2 H2 (g) + O2 (g) To perform this experiment, we require apparatus and materials ...
formation of H-O bonds in water molecules is greater than that required to break bonds in H 2 and O 2 molecules: 2 H 2 + O 2 2 H 2 O + energy Therefore, the separation of water into its elements—the reverse reaction—must be endo-thermic, the quantity of energy equal to the quantity released when water is formed from gaseous H 2 and O 2 ...
You will find out that water is made up of hydrogen and oxygen atoms, and that we can split the atoms in a water molecule apart using electricity. This process of using electricity to drive a chemical reaction, like splitting water molecules apart, is known as "electrolysis." Related Topics: electrolysis, chemistry, water
The process of decomposing water (H 2 O) into hydrogen (H +) and hydroxide (OH -) ions by passing an electric current through it is called electrolysis.The ions move to the opposite electrodes to liberate pure hydrogen (H 2) and oxygen (O 2) gases.It is a nonspontaneous redox (oxidation-reduction) reaction.Since heat in the form of electricity is supplied to the electrolytic cell, it is an ...
Experiment with data for electrolysis of water. A 9V battery is used to decompose water in a 3M NaOH solution. The data shows a smaller volume of gas prod...
Gas bubbles generated by the hydrogen evolution reaction and oxygen evolution reaction during water electrolysis influence the energy conversion efficiency of hydrogen production. Here, we survey what is known about the interaction of gas bubbles and electrode surfaces and the influence of gas evolution on practicable devices used for water electrolysis. We outline the physical processes ...