Your current User-Agent string appears to be from an automated process, if this is incorrect, please click this link:
- How We Watch Everything - Free!
- Hottest Video Game Costumes 4 Halloween

How to Make a Slideshow on PowerPoint
Whether for work or private, use slideshows to get your message across
:max_bytes(150000):strip_icc():format(webp)/ColettaTeske-af57404a91b342578a97252b7dbd720f.jpg "show slide presentation")
- Central Washington University
Before You Begin
- Step-by-Step: Make a Slideshow on PowerPoint
- Play Music During the Slideshow
- Set up the Slideshow
- Add Timings to Each Slide
- Edit Timings on a Slide
- Create a Video Slideshow
- Save a Slideshow to a CD or Other Removeable Media
When you're ready to present your PowerPoint slides to others, look no further than PowerPoint's slideshow feature. Use this tool for all kinds of slides, but those containing photos work best for most viewers.
Instructions in this article apply to PowerPoint for Microsoft 365 , PowerPoint 2019, PowerPoint 2016, PowerPoint 2013, PowerPoint 2010, and PowerPoint for Mac.
Before you create slides for your slideshow presentation, decide how long to make the slideshow, how it should flow, and the pictures you’ll use.
- Length : A slideshow can be as long or as short as you need. The length of the slideshow should be appropriate for the topic and for your audience’s attention span.
- Outline : It’s always smart to start with an outline; it helps you visualize your slideshow. An outline can be as simple as the list of topics you want to cover.
- Pictures : Choose photos that are clear and tell a story.
With PowerPoint's Photo Album , select the pictures and PowerPoint creates the basic slideshow. Fill your slides with informative text and harmonizing background music, then turn your collection of slides into a self-running photo slideshow with music that can play as a video or be stored on a CD.
When you’re ready to make a photo slideshow with music, PowerPoint gets you up and running quickly. To get started, select Insert > Photo Album > New Photo Album .
Here’s how to add and format pictures for the slideshow using the Photo Album:
Add pictures
Select File/Disk and select the images you want in the picture slideshow.
Enhance photos
Place a checkmark next to the picture you want to enhance and change the orientation, contrast, and brightness. You’ll see the changes in the Preview window.
Add text boxes
To add a slide for text, select the image in the album list you want the text to follow and select New Text Box .
Rearrange slides
Place a checkmark next to the picture you want to move and select the Move Up or Move Down arrows.
Choose a picture layout
Select the Picture layout down arrow and choose how you want the pictures to appear in the slideshow.
Frame the pictures
Select the Frame shape down arrow and choose a frame style. You’ll see a preview in the Album Layout area. This option will not be selectable if the picture layout Fit to slide is enabled.
Select Create when you’re finished.
Your photo slideshow is created in a new file. Add text to the slides and change the look of each slide.
How to Play Music During the Slideshow
Play music in the background during your slideshow to offer an audio counterpoint to all the visuals. The background music starts automatically with the slideshow and plays during all the slides.
To add background music to your presentation, select Insert > Audio > Audio on My PC , choose a music file, then select OK .
The audio icon appears in the middle of the current slide. To move it, drag it to a different place on the slide. When the audio icon is selected, the Playback tab appears. Select Play in Background and make changes to the audio file . Here are some suggestions.
- Preview the music : Select Play to hear what the music will sound like during your slideshow.
- Shorten the duration : Select Trim Audio to remove parts of the beginning and end of the music file.
- Adjust the volume : Select Volume to make the background music louder or softer.
How to Set up the Slideshow
Once your slides are finished, it’s time to set up the slideshow. Start by deciding whether to show the slideshow in a window or full screen.
To set up the slideshow, select Slide Show > Set Up Slide Show and choose one of the following:
- Browsed by an individual (window) : Run the slideshow automatically and inside a window. This option works best when you save the slideshow to a CD.
- Browsed at a kiosk (full screen) : Run the slideshow automatically and at full-screen size. This option works best when you convert the slideshow to a video.
Select OK when you’re finished.
How to Add Timings to Each Slide in the Slideshow
Now it’s time to decide how long each slide will appear in the slideshow. To begin, select Slide Show > Rehearse Timings . The slideshow displays in full screen with a Recording toolbar and a timer.
While timing your presentation, use the Recording toolbar to advance through the presentation.
Select Next (arrow pointing to the right) to go to the next slide when the desired timing has been reached.
Select Pause to start and stop the timing.
Select Repeat to restart recording the time for the selected slide.
When you’re finished and have set the time for the last slide, close the Recording toolbar.
Select Yes to keep the recorded slide timings.
How to Edit Timings on a Slide
If you need to increase or decrease the time for your slideshow, change how long slides appear during the slideshow.
To change the timing for a slide:
Select View > Slide Sorter .
Select Transitions .
Select a slide.
In the Advance Slide After text box, enter how long the slide should appear in the slideshow before proceeding to the next slide, then press Enter .
The new timing applies to the slide.
How to Create a PowerPoint Video Slideshow
The easiest way to distribute and play your slideshow is in video format. This way, anyone can view your slideshow no matter what computer or device they use.
To convert a slideshow into a video:
Save the file.
Select File > Export .
Select Create a Video .
To force a smaller file size, select the Full HD drop-down list and choose a lower quality.
Select Create Video .
Select the destination folder and give the video a descriptive file name.
Select Save . It may take a few minutes to process the file and create the video.
How to Save a Slideshow to a CD or Other Removeable Media
To create a presentation that can be watched on any computer and can be stored on a CD or other removable media:
Select Package Presentation for CD > Package for CD .
Type a name for the CD.
Select Copy to Folder or Copy to CD and follow the on-screen directions.
When you’re finished, select Close .
Get the Latest Tech News Delivered Every Day
- Loop a PowerPoint Slide Show
- How to Use Portrait and Landscape Slides in the Same Presentation
- Tips for Memorial PowerPoint Presentations
- How to Insert PDF Files Into PowerPoint Presentations
- How to Do a Voiceover on PowerPoint
- How to Use Speaker Notes in PowerPoint
- How to Hide and Unhide a Slide in PowerPoint
- 10 Best Places for Free PowerPoint Templates
- 9 PowerPoint Presentation Tips for Students
- The 10 Most Common PowerPoint Terms
- How to Make a Shape Transparent in PowerPoint
- How to Draw Freehand in PowerPoint
- Place Text Over Video to Zest up Your PowerPoint Slides
- What Is Microsoft PowerPoint and How Do I Use It?
- Change a PowerPoint Show File to a Work File
- Troubleshooting Audio Problems With PowerPoint
Unsupported browser
This site was designed for modern browsers and tested with Internet Explorer version 10 and later.
It may not look or work correctly on your browser.
- Presentations
How to Present Your Google Slides Slideshow Presentation
It's one thing to create an effective Google Slides presentation. It's another thing to present the slideshow you created.
Before you give your presentation, do some preparation work first.

We'll cover how to present using Google Slides. You'll learn about Google's slideshow presenter (also called Presenter view). We'll also provide important information about how to get your presentation ready to present. You'll learn how to use the Google slideshow auto advance feature. Plus, discover how to use transitions and the Google Slides Speaker Notes tool.
We also have a helpful complement to this tutorial. Download our FREE eBook: The Complete Guide to Making Great Presentations . Grab it now before you read on.

Start With the Right Template
How to present your presentation.
- Learn About Presenter View
- Prepare for Your Presentation
- Make Your Presentation
Top Source for Google Slides Presentation Templates
Grab our presentations free ebook.

In this tutorial, we’ll edit the Yukee Google Slides Presentation Template to show you how to present in Google Slides. Download the template to follow along, or use your own favorite tempalte.
This template is a multipurpose premium template from Envato Elements. It comes with 42 different slides. Plus, there are picture placeholders and icons.
If you find a PowerPoint template you like you can still use it in Google Slides. Here's a tutorial on how to convert a PowerPoint template:

Now let's get into this how to present Google Slides tutorial, first digging into Presenter view:
1. Learn About Presenter View
Presenter View allows you to pause, go to the next slide, and view Google Slides notes without letting the audience know.
Here’s how to access the Google Slides Presenter View .
First, open the Google Slides template that you plan to use. Here's the Google presentation I’ll use as an example in this tutorial:

Click the arrow next to the Slideshow button in the upper right of the screen. When you click on the arrow, you’ll see three options:
- Presenter view
- Start from beginning
- Present on another screen
Choose the Presenter view option from the menu. When you click on this window, a Google Slides Presenter view window appears with the Google presentation in the background. It’ll look like this:

The Google Slides Presenter window allows you to control your Google presentation. Here are the controls from the Speaker Notes tab:
- Next Thumbnail . Click on the Next option to go to the next slide. It appears beneath a thumbnail in the center of the screen.
- Previous Thumbnail . Click on Previous option to go to the previous slide. It appears beneath a thumbnail in the center of the screen.
- Slide List . Click on the down arrow next to the slide you're on to see a list of your slides.
- Timer Pause . The Pause button next to the timer pauses the timer.
- Timer Reset . The Reset button next to the timer resets the timer.
- Zoom In and Zoom Out . Allows you to change the font size of the speaker notes in Google Slides.
- Audience Tools . Where you can interact with the audience. When you click Start New , a link generates. After giving the link to your audience, they can use it to submit questions.
For more information on the Q&A tool, Speaker Notes, and other Google Slides tips, study the following tutorial:

Now that we've shown you how to access Presenter view , let's look at a few tips that'll help you to get ready to make your presentation:
2. Prepare for Your Presentation
Before you give a presentation, examine the following:
- Decide if you want your presentation to advance automatically and loop. (This is good for online presentations).
- Decide what type of transitions you want between your slideshow slides (if any).
- Compose your presentation Google Slide notes and add them to your presentation (for live presentations).
- Plan and practice your presentation.
Let's look at how to do each of these items individually:
Item 1. How to Set Up Auto Advance and Looping
Auto Advance causes your Google Slides presentation to automatically move to the next slide after a set period of time. Looping means that your presentation starts over after the last slide displays.
These features are used with presentations that are published online. This makes sense. Imagine how distracting it would be if your presentation automatically moved to the next slide while you were still speaking about the previous one in a live presentation.
To set up Google Slides Auto Advance feature, open your presentation. Then, select File > Share > Publish to the web menu option. The Publish to the web dialog box displays. On the Publish to the web dialog box, choose the Link or Embed tab from the top of the dialog box.
Here's how the Embed tab looks:

Use the Embed tab to incorporate your Google Slides presentation into a website or even a document. The presentation then becomes part of that website or document.
Here's the Link tab:

When you create a link to a presentation file, the recipient can view your presentation when they click on the link. The link can be shared through email, social media, or other means.
After you update the presentation, the next time someone clicks on the linked presentation they'll see your updates. This feature makes the Link option a good choice for sharing presentations that you expect to change often.
Setting up auto-advance and looping is similar regardless of which tab you choose from the Publish to the web dialog box. Here's how to do it, step by step:
Click the up and down arrows beneath the Auto-advance slides field to display a drop-down menu with predefined times:

Click on the desired time period in the drop-down menu. As you can see, time periods range from every second to every minute. Choose the best time period for your needs. Now you're ready to define what starts the Google slide show.
To start the slideshow automatically as soon as it opens, click the checkbox to the left of the Start slideshow as soon as the player loads.
To make the Google slide show loop (begin again after the last slide), click the checkbox to the left of the Restart the slideshow after the last slide option.
Your screen should now look something like this:

After you've made your selections, the final step is to click the Publish button.
If you're working from the Embed tab, you'll see a link you can use to embed the presentation in a website or document:

If you're working from the Link tab, you'll see a link you can use to share the presentation through email or social media:

Notice that the Publish button now reads Published . This means that your Google Slides presentation is published to the web. But you can still change your mind and unpublish your presentation if necessary.
Select the File > Publish to the web menu option to unpublish your Google Slides presentation. The Publish to the web dialog box displays again:

This time you'll see the Stop publishing button in the lower left corner. Click this button, and any links to the presentation you've shared or any embedded code will no longer work.
Anyone who tries to access the presentation after you unpublish it'll see this error message:

2. How to Set Up Transitions
After you've set up the Google Slides Auto-advance and Looping features, add extra pizzazz to your presentation by using transitions between the slides in your presentation. Transitions are animation effects you can use when your presentation moves from one slide to another. Google Slides offers seven different transition effects.
Define transition effects using the Motion panel that opens when you click the Transition option in the toolbar menu. For a complete tutorial on how to use transitions and other special effects, study this tutorial:
.jpg)
3. How to Set Up Speaker Notes
You'll probably want to use the Google Slides Speaker Notes feature if you give your Google Slides presentation live.
So, what are speaker notes on Google Slides? It’s a feature that allows you to see Google presentation notes that your audience can't see as you're giving your presentation. You can view your Google Slides Speaker notes in Presenter view in Google Slides.
Google Slides Speaker Notes are an excellent way to remind yourself about specific points you want to make during the presentation.
To access the Google Slides Speaker Notes while you're editing your presentation, select the View > Show speaker notes menu option. Speaker notes for the current slide display beneath it:

Click in the Speaker Notes Google Slides area and begin typing to add your own notes to the slide.
Once you're in the Google Slides Presenter view , click the Notes icon to see your Speaker Notes display over the Presenter view in Google Slides. Here's what you'll see as the presenter:

Your audience can't see the presentation notes. Instead, they see your slideshow presentation. Click the ESC on your keyboard to close the Speaker Notes in Google Slides.
4. Plan and Practice Your Google Slides Presentation
Planning and practicing are key elements to successfully presenting a Google Slides presentation. Your presentation won't be as strong if you try to skip these steps. So, don't skimp on putting time into planning and practicing.
The following questions should be part of your presentation planning process—especially if you're going to be giving your presentation live:
- Who is my audience for this presentation?
- What do they already know?
- Where will I give my presentation and what's the facility like?
- How long will I have to make my presentation?
The answers to these and other planning questions determines the nature of your presentation.
Once you've answered your planning questions, it's time to practice your presentation. There's really no substitution for making a trial run of your presentation—more than once if you can.
The more familiar you are with your presentation, the better it'll be.
3. Make Your Presentation
After you've completed all the previous steps to your satisfaction, you're ready to make your presentation.
There are basically three ways you can make your presentation:
- In-person . This is where you present your presentation to a live audience.
- Streaming. Use your Android or IOS device to stream your Google Slides presentation on a monitor .
- Online. You can publish your Google Slides presentation.
Let's focus briefly on how to make an in-person presentation. Giving a presentation in front of a live audience often makes a presenter nervous. In fact, fear of public speaking has consistently ranked as one of the most common fears in many studies.
But you don't have to be afraid of public speaking. There are steps you can take to reduce your fear of public speaking and make the whole experience more comfortable. I've put together the following list of Envato Tuts+ tutorials to help you feel better about giving a live presentation:

If you often use Google Slides, you could benefit from premium templates. There are many benefits of using premium templates. The first benefit is that you save time. You save time because you're starting with a well-made base.
After downloading a template, you only need to add any text or images you want. If you want to customize your presentation, you still can with a good premium template.

To gain access to premium templates , you need to pay a low monthly fee and become an Envato Elements subscriber. After you become a subscriber, you gain access to premium presentation templates, fonts, images, and more.
To learn more about how to get ready to present a great presentation, grab our presentation eBook for FREE: The Complete Guide to Making Great Presentations . It covers the complete presentation process of how to plan, design, and deliver your presentation right.

Get Ready for Your Next Presentation. Download a Premium Google Slides Template Today!
You've just learned about how to give a Google slideshow. You've learned all about Google's slideshow presenter tool, the Presenter view , in Google Slides.
You've also explored other tools like Speaker Notes that can help you during your presentation. You've learned how to set a presentation to auto-advance and loop. Finally, you've also discovered how to publish your presentation online.
You're ready to present your presentation. Why not use a professional presentation template to make sure it looks good?
Whether you're presenting your Google slideshow in-person, streaming it, or publishing it online—use the information in this tutorial to give the best Google Slides presentation you can give.
Editorial Note: This tutorial was last published by Laura Spencer in September of 2017. It's been completely updated for accuracy and relevancy by Sarah Joy.

- PRO Courses Guides New Tech Help Pro Expert Videos About wikiHow Pro Upgrade Sign In
- EDIT Edit this Article
- EXPLORE Tech Help Pro About Us Random Article Quizzes Request a New Article Community Dashboard This Or That Game Happiness Hub Popular Categories Arts and Entertainment Artwork Books Movies Computers and Electronics Computers Phone Skills Technology Hacks Health Men's Health Mental Health Women's Health Relationships Dating Love Relationship Issues Hobbies and Crafts Crafts Drawing Games Education & Communication Communication Skills Personal Development Studying Personal Care and Style Fashion Hair Care Personal Hygiene Youth Personal Care School Stuff Dating All Categories Arts and Entertainment Finance and Business Home and Garden Relationship Quizzes Cars & Other Vehicles Food and Entertaining Personal Care and Style Sports and Fitness Computers and Electronics Health Pets and Animals Travel Education & Communication Hobbies and Crafts Philosophy and Religion Work World Family Life Holidays and Traditions Relationships Youth
- Browse Articles
- Learn Something New
- Quizzes Hot
- Happiness Hub
- This Or That Game
- Train Your Brain
- Explore More
- Support wikiHow
- About wikiHow
- Log in / Sign up
- Computers and Electronics
- Website Application Instructions
- Google Applications
How to Create a Presentation Using Google Slides
Last Updated: November 30, 2023
wikiHow is a “wiki,” similar to Wikipedia, which means that many of our articles are co-written by multiple authors. To create this article, 17 people, some anonymous, worked to edit and improve it over time. This article has been viewed 249,833 times. Learn more...
This tutorial will show you how to make a PowerPoint-like presentation using Google Slides. Presentations can be used for school, business, and so much more.

- You can also just type in https://slides.google.com , log in if you haven't already, and will be taken to the Slides page.
- If you don't have a Google account, learn to create one now!

- For more options, hover over the arrow on the right edge of the Google Slides option, where a smaller drop-down menu will appear. From here you can select to create a presentation from a template or a blank slide.

- Be sure to add a title and subtitle by clicking where you are prompted to add text.

- You can also change a pre-existing slide's layout by clicking the layout option on the upper editing bar.

- As you add animations to each element by clicking the blue "+ Select an object to animate", they will begin to pile up. Click on each one to edit it.
- Change the transition from slide to slide by clicking the default "Slide: No transition" at the top of the sidebar. You can choose whether to apply to all slides or just one.
- Preview your animations by clicking Play at the bottom of the sidebar.
- Remove an animation by clicking the small x on its rectangle, and drag each animation up or down to change the order.

Community Q&A
wikiHow Video: How to Create a Presentation Using Google Slides
- If you have a pop-up blocker, make sure to disable it so Slides can work properly. Thanks Helpful 0 Not Helpful 0
- Hover over each tool to see its keyboard shortcut and function. Thanks Helpful 0 Not Helpful 0
- Remember, these are the basic functions- Google Slides contains many more tools that you can work with as you explore the creator. Thanks Helpful 0 Not Helpful 0

You Might Also Like

About This Article
To create a new Google Slides presentation, open a web browser and go to Slides.Google.com. If you want to start from a template, you can choose one from the template gallery. Otherwise, click "Blank" to create a new blank presentation. Your blank presentation starts with a single simple slide with space to enter a title and subtitle. You can personalize this slide, as well as other slides you add, by editing the placeholder text, as well as choosing a slide theme from the panel to the right. To insert another slide, click the "Insert" menu and select "New Slide," or press "Control M" for a quick keyboard shortcut. You'll also find other things you can add to your slide on the Insert menu, including the option to add an image, a text box for typing, videos, shapes, charts, and other features. After adding a new slide, click the "Layout" menu to choose a slide layout—you can give each slide its own layout or reuse the same layout as much as necessary. Edit the placeholder text, and then insert objects from the Insert menu. To move an object, click the arrow in the toolbar, hover the mouse cursor around the object's border line until it turns to a 4-point arrow, and then click and drag it. Each slide you add will have a thumbnail in the left panel—click a slide's thumbnail to open that slide for editing. To see your presentation as a viewer would, click your first slide in the left panel, and then click "Present" at the top corner. Click the Escape key to go back to editing. Google Slides also has some built-in effects you can access from the "Transition" menu—here you can animate a slide's transition into the next slide, as well as animate individual objects. To apply an effect, background, theme, layout, or any other setting to more than one slide at once, select the slides in the left panel by holding down the Control key as you click each thumbnail. Your presentation will automatically save to your Google Drive as you work—type a name for the presentation in the top-left corner so you can easily find the file when you need it. Did this summary help you? Yes No
- Send fan mail to authors
Is this article up to date?

Featured Articles

Trending Articles

Watch Articles

- Terms of Use
- Privacy Policy
- Do Not Sell or Share My Info
- Not Selling Info
wikiHow Tech Help Pro:
Level up your tech skills and stay ahead of the curve
Top searches
Trending searches

fall background
24 templates

fall pumpkin
67 templates

rosh hashanah
38 templates

breast cancer
12 templates

9 templates

cute halloween
16 templates
Create engaging presentations, faster
Free templates for google slides, powerpoint and canva, or kick off your next project with ai presentation maker.
Join the Slidesgo Teacher Community for exclusive tips and the latest EdTech news! Join the Teacher Community for tips and EdTech news!

Inside Out Disney
11 templates

256 templates

Slidesclass
413 templates

Editor’s Choice
3704 templates

9570 templates

3191 templates

Presentation Maker
1891 templates

105 templates

1254 templates

Social Media
702 templates

Coloring Page
352 templates
Latest themes

It seems that you like this template!
Premium template.
Unlock this template and gain unlimited access

Register for free and start downloading now
Halloween fantasy story book.
Download the Halloween Fantasy Story Book presentation for PowerPoint or Google Slides. The magic of storytelling takes a new form in this enrapturing storybook. Every bedtime, playtime, or fun classroom activity can be transformed into an enchanting journey into the realms of imagination. Match these slides to your words to...

Poems Story Book
Download the Poems Story Book presentation for PowerPoint or Google Slides. The magic of storytelling takes a new form in this enrapturing storybook. Every bedtime, playtime, or fun classroom activity can be transformed into an enchanting journey into the realms of imagination. Match these slides to your words to stir...

Creative Leafy Backgrounds Minitheme
Download the Creative Leafy Backgrounds Minitheme presentation for PowerPoint or Google Slides and start impressing your audience with a creative and original design. Slidesgo templates like this one here offer the possibility to convey a concept, idea or topic in a clear, concise and visual way, by using different graphic...

Funny Looking Cartoon Characters Minitheme
Download the Funny Looking Cartoon Characters Minitheme presentation for PowerPoint or Google Slides and start impressing your audience with a creative and original design. Slidesgo templates like this one here offer the possibility to convey a concept, idea or topic in a clear, concise and visual way, by using different...

Casual & Vintage Watercolor Collage Minitheme
Download the Casual & Vintage Watercolor Collage Minitheme presentation for PowerPoint or Google Slides and start impressing your audience with a creative and original design. Slidesgo templates like this one here offer the possibility to convey a concept, idea or topic in a clear, concise and visual way, by using...

Modern Doodle Minitheme
Download the Modern Doodle Minitheme presentation for PowerPoint or Google Slides and start impressing your audience with a creative and original design. Slidesgo templates like this one here offer the possibility to convey a concept, idea or topic in a clear, concise and visual way, by using different graphic resources....
Popular themes

Steps for Studying a Text
Reading a book is good practice. Books are a source of knowledge! However, the complexity of the text you're reading affects the time you'll spend understanding it and memorizing it. That can be a problem when studying, so here's a template with some tips on how to face difficult texts...

Fall Background
Download the Fall Background presentation for PowerPoint or Google Slides and start impressing your audience with a creative and original design. Slidesgo templates like this one here offer the possibility to convey a concept, idea or topic in a clear, concise and visual way, by using different graphic resources. You...

Halloween Pattern Social Media
A lot of people are looking forward to celebrating Halloween. Let’s seize the opportunity to present a strategy for social media by using this new template. As its name suggests, it features patterns inspired by this famous festivity, and it’s design is quite cool indeed. Did we say it has...

Minimalist Business Slides
Minimalism is an art style that frees the canvas and that lets the content stand out for itself. It’s a way of conveying modernism, simplicity and elegance and can be your best ally in your next presentation. With this new design from Slidesgo, your business presentations will be as professional...

Reconstruction Era and the Gilded Age - History - 11th Grade
In the United States, the Reconstruction Era followed the Civil War and sought to unite the nation and grant civil rights. The Gilded Age brought industrial growth, but also inequality and corruption. Both eras shared the struggle for civil rights and equity. So these are two periods loaded with historical...

Watercolor Pumpkins
Download the Watercolor Pumpkins presentation for PowerPoint or Google Slides and start impressing your audience with a creative and original design. Slidesgo templates like this one here offer the possibility to convey a concept, idea or topic in a clear, concise and visual way, by using different graphic resources. You...
Infographics

Fresh Lemon Pattern Newsletter Infographics
Download the Fresh Lemon Pattern Newsletter Infographics template for PowerPoint or Google Slides and discover the power of infographics. An infographic resource gives you the ability to showcase your content in a more visual way, which will make it easier for your audience to understand your topic. Slidesgo infographics like...

College Lessons with Cycle Diagrams
Download the College Lessons with Cycle Diagrams presentation for PowerPoint or Google Slides. As university curricula increasingly incorporate digital tools and platforms, this template has been designed to integrate with presentation software, online learning management systems, or referencing software, enhancing the overall efficiency and effectiveness of student work. Edit this...

Storytelling in the Classroom Infographics
Download the Storytelling in the Classroom Infographics template for PowerPoint or Google Slides and discover the power of infographics. An infographic resource gives you the ability to showcase your content in a more visual way, which will make it easier for your audience to understand your topic. Slidesgo infographics like...
Education presentation templates

933 templates

593 templates

125 templates

821 templates

1060 templates
3721 templates

Thesis Defense
1018 templates

Teacher Toolkit
122 templates

426 templates

855 templates

59 templates
Editable in Canva

Premature Newborn Care Breakthrough
Download the Premature Newborn Care Breakthrough presentation for PowerPoint or Google Slides.Treating diseases involves a lot of prior research and clinical trials. But whenever there’s a new discovery, a revolutionary finding that opens the door to new treatments, vaccines or ways to prevent illnesses, it’s great news. Should there be...
What's new on Slidesgo
See the latest website updates, new features and tools and make the most of your Slidesgo experience.
Make presentations with AI

Top 8 About me presentation templates for going back to school

Make school fun from day one with Disney and Pixar templates
Browse by tags.
- Kids 2241 templates
- Food 963 templates
- Technology 1083 templates
- Travel 437 templates
- Animal 1150 templates
- Art 855 templates
- Health 3823 templates
- History 1443 templates
- Environment 535 templates
- Galaxy 194 templates
- Fashion 248 templates
- Biology 519 templates
- Summer 251 templates
- Architecture 157 templates
- Music 426 templates
- Research 1667 templates
- Culture 2105 templates
- Background 10189 templates
- Back to School 209 templates
- Coloring Page 352 templates
What do our users say about us?

I just wanted to thank you! I learned more about slides in one day of quarantine than in my whole life
Gabriela Miranda

Your slides are so unique and gorgeous! They really help me with PowerPoint presentations for school and now even my mom uses them for work
Marie Dupuis

I would like to thank to you for these amazing templates. I have never seen such service, especially free! They are very useful for my presentation.
Ali Serdar Çelikezen

Thank you Slidesgo for creating amazing templates for us. It's made my presentation become much better.
Thiên Trang Nguyễn
Create your presentation Create personalized presentation content
Writing tone, number of slides, register for free and start editing online.
- Help Center
- Google Docs Editors
- Privacy Policy
- Terms of Service
- Submit feedback
- Present or print slides
Present slides
Want advanced Google Workspace features for your business?
Try Google Workspace today!
You can present Google Slides so they show on a full screen.
View a presentation
To present a full-screen presentation in Google Slides:
- Open a presentation in Google Slides .
- From the current slide, the presentation will become full screen. To change slides, use the arrow keys on your keyboard or click the arrows at the bottom of the presentation.
- To exit full-screen, press the Esc key.
Present with notes, auto-advance slides & more
View a presentation with speaker notes.
- Click Presenter view .
- Click Speaker notes .
Advance slides automatically
- You present your presentation.
- Someone clicks on a link to your published presentation.
- Someone views your published presentation that's embedded in a website.
Advance slides automatically while you present
- Open a presentation in Google Slides.
- Choose how quickly to advance your slides.
Advance slides automatically for a published presentation
- If you use Google Slides through work or school, you can only share the link with people within your organization.
- After you publish your presentation, anyone with the link will be able to see your presentation.
- Choose Link or Embed .
- Under "Auto-advance slides," choose how much time you want to add between slides.
Stop publishing
Present with other monitors.
- To present with other monitors, you must use a computer with a Google Chrome browser and have at least one extra monitor attached.
- Presentation display options are cleared when the presentation is reloaded.
- On your computer, open a presentation in Google Slides .
- If you deny Google Chrome permissions, click Learn more .
- You can select from "Presenter view," "Present from beginning," and "Full screen."
- You can’t use the "Presenter view" and "Full screen" at the same time with one monitor.
- When you deselect "Full screen," you can only present to your current monitor.
- To begin your presentation, select Start slideshow .
Highlight & annotate as you present
When you present, you can use a pen tool to draw or make annotations. Annotations stay during your presentation, but disappear after you end your slideshow.
Use the pen tool during a slideshow
- On your browser, open a presentation in Google Slides .
- To draw or annotate, click and drag on your slide.
Other actions while presenting
When you present, you can choose more options from the toolbar at the bottom of the presentation window:
- Select slides to present from a list
- Open "Presenter" view
- Turn on laser pointer
- Print the presentation
- Download the presentation in PDF or PPTX format
PC keyboard shortcuts
| Stop presenting | |
| Next | → |
| Previous | ← |
| Go to specific slide (7 followed by Enter goes to slide 7) | |
| First slide | |
| Last slide | |
| Open speaker notes | |
| Open audience tools | |
| Toggle laser pointer | |
| Toggle captions (English only) | |
| Toggle full screen | |
| Show a blank black slide | b |
| Return to the presentation from a blank black slide | Press any key |
| Show a blank white slide | |
| Return to the presentation from a blank white slide | Press any key |
Mac keyboard shortcuts
| Stop presenting | |
| Next | → |
| Previous | ← |
| Go to specific slide (7 followed by Enter goes to slide 7) | |
| First slide | |
| Last slide | |
| Open speaker notes | |
| Open audience tools | |
| Toggle laser pointer | |
| Toggle captions (English only) | |
| Toggle full screen | |
| Show a blank black slide | b |
| Return to the presentation from a blank black slide | Press any key |
| Show a blank white slide | |
| Return to the presentation from a blank white slide | Press any key |
Chrome keyboard shortcuts
Need more help, try these next steps:.
Using Google products, like Google Docs, at work or school? Try powerful tips, tutorials, and templates. Learn to work on Office files without installing Office, create dynamic project plans and team calendars, auto-organize your inbox, and more.
Critical PowerPoint Shortcuts – Claim Your FREE Training Module and Get Your Time Back!
How to Present a PowerPoint Slideshow (w/ Shortcuts)
- PowerPoint Tutorials
- Shortcuts & Hacks
- May 11, 2019
There are a variety of ways to start a PowerPoint presention, depending on:
- Where you start your presentation (from beginning or from current)
- Which PowerPoint view you prefer to present in (Slide Show view or Presenter view)
- How comfortable you are with keyboard shortcuts
Why would Microsoft include so many ways to present a presentation? My guess is that everyone learns PowerPoint differently, and has personal presentation styles. The more options you have, the easier your life will be as there will always be a way to start your presentation the way you want to (or jump back into it when you need to).
See all the options below and find the method that works best for you and let the slide show begin !
NOTE: If you are running two presentations side-by-side, each presentation needs to be started as it’s own slide show. To see how to set up two PowerPoint presentations to run side-by-side like this before you start your slide show, read my guide here .
Table of Contents
Start slide show from beginning.

To start a slideshow from the beginning of your presentation using the ribbon, simply.
- Navigate to the Slide Show tab
- Select From Beginning
Selecting From Beginning starts your presentation from the very first non-hidden slide in your presentation, regardless of which slide you are currently inside of your deck.

You can also start your slide from the beginning of your presentation by hitting the Slideshow From Beginning keyboard shortcut, F5 .
Regardless of which method you use, this is the classic way to start your presentation in full screen from your first title slide (regardless of where you are in your slide deck).
Let the slide show begin!
NOTE: To expand your knowledge and learn how to use PowerPoint’s FREE and HIDDEN built-in laser pointer to point things out during your presentation, read my guide here .
Take your PPT skills to the next level
Start slide show from current.

To begin your slide show from the slide you are currently on using the ribbon, simply
- Navigate to the Slide Show tab
- Select From Current Slide
Selecting From Current Slide starts your slide show from whatever slide you are currently on, even if the slide is hidden.
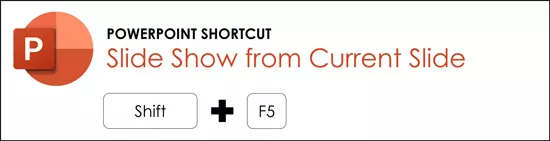
You can also start your slide from the current slide you are on by hitting the Shift+F5 keyboard shortcut.
Because it’s often easiest to catch errors when building your slides in this full screen mode, I highly recommend learning the Shift+F5 shortcut and using it frequently as you build your slides to spot them for errors.
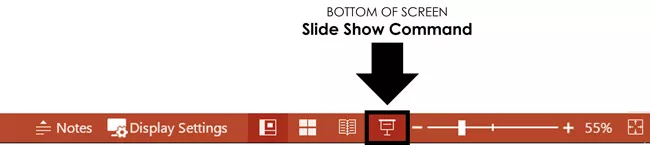
If you don’t want to bother learning the From Current Slide shortcut, you can also start your slideshow by clicking the Slide Show icon at the bottom of your screen.
This is a fantastic way to spot check your slides as you are building them. On top of that, it’s a fast and uncomplicated way to re-start your presentation from where you left off after demoing something on screen.
Start a mini-slide show in PowerPoint
You can also use the following hidden PowerPoint shortcut to run a mini slide show over the top of your current deck.

To run a mini slide show, simply:
- Hold down the Alt key on your keyboard
- With your mouse, click the Slide Show icon
Doing so starts a small slide show of your presentation that you can see below, from the current slide you are on.

Presenter View
The Presenter View is an alternate way to run your presentation in PowerPoint. In this view, your slides are projected on screen, and the details of your presentation are displayed on your computer as pictured below.

The presenter view includes your next (non-hidden) slides that is coming up, your current slide projected on screen, how long you’ve been talking and your speaker notes.

To launch the Presenter View from the beginning of your presentation using your Ribbon, simply:
- Navigate to the Slide Show tab
- Hold down the Alt key on your keyboard
- Click From Beginning
Holding down the Alt key and clicking From Beginning , the Presenter View will launch from the very first (non-hidden) slide in your presentation.

You can also launch the presenter view from the beginning of your presentation at any time by clicking Alt + F5 on your keyboard.
Start Presenter View in PowerPoint From Current Slide

Did you know that you can access different views in PowerPoint by adding keys as you click commands in the PowerPoint ribbon?
To start the Presenter view from your current slide using your Ribbon, simply:
- Hold down the Alt key on your keyboard
- Click From Current Slide
Holding the Alt key and clicking From Current Slide launches the Presenter View from your current slide. So, this is another way you can quickly practice your presentation, see your speaker notes and see what’s coming up next.
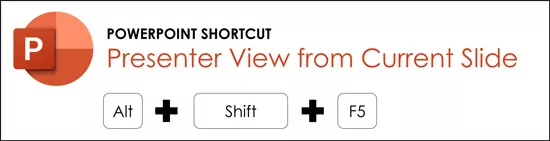
You can also launch the Presenter View from the beginning of your presentation at any time by hitting Alt+F5 on your keyboard.
Showing and Hiding Presenter View
Regardless of which view you start your PowerPoint slide show; you can switch between the two different slide show views without exiting presentation.

To switch between the two slideshow views (while giving your presentation), simply:
- Right-click your slide in whichever presentation view you are currently in
- Select either Show Presenter View or Hide Presenter View
When would you use a feature like this during a presentation? One example is if you want to view your notes without leaving the slide show mode.
NOTE: The letter r for both Show Presenter View and Hide Presenter View is underlined. This means that it is a keyboard shortcut. So, if you want to quickly flip between these two presentation views, you can simply right-click your slide and hit the letter r on your keyboard. Doing so automatically switches the view you are in.
Controlling how your presentation runs
Another way to control how your presentation runs (including the default laser pointer and pen color), is the Set Up Slide Show dialog box.

To open the Set Up Slide Show dialog box, simply:
- Select the Set Up Slide Show command
Doing so, opens all your PowerPoint slide show settings and options as pictured below.
Inside the slide show settings dialog box, you can select:
- How your presentation runs (full screen, window or in kiosk mode).
- Your default pen and laser pointer color options ( see our laser pointer article here ).
- Which slide you want start from, or which slides you want to show. You can also setup a custom show here.
- How your slides progress (manually or using slide timings).
- Which of your computer monitors (or screens) your slide show runs on.
The Set Up Slide Show dialog box is also the secret to running multiple presentations at the same time in PowerPoint. To expand your knowledge and learn how to set this up, read our guide here .
Setup Slide Show SECRET Shortcut

To use the SECRET shortcut to open the Set Up Slide Show dialog box, simply:
- Hold down the Shift key on your keyboard
- With your mouse, click the Reading View icon at the bottom of your screen
This is useful when you need to quickly cycle through lots of PowerPoint presentations and change how those presentations run. Instead of wasting time clicking through the Ribbon, simply hold the Shift key and click the Reading View icon. This is also a friendly conversation starter with a fellow PowerPoint enthusiast at Happy Hour.
NOTE: The color of your Reading View icon might be different than in the picture above, as it is dependent on the Office Theme you selected for PowerPoint.
How to exit a PowerPoint presentation early?

Regardless of how you start your full screen presentation, you can end your presentation at any time by hitting the Esc key on your keyboard.
Hitting Esc immediately takes you out of the PowerPoint presentation mode and back to the normal editing view of your slides, on whatever slide you were last presenting.
Here is how you can use a combination of all the different keyboard shortcuts to spot check and practice your presentation in full screen before you finalize your presentation.
- Hit F5 on your keyboard to start your presentation in full screen from the very first slide in your presentation. You can then use your arrow keys to advance, spot checking your slides for errors.
- When you find an error, simply hit Esc key to return to the normal PowerPoint editing view to fix your slide.
- When you are done, hit Shift + F5 to return the full screen presentation mode from the slide you just updated. You can then continue spot checking your presentation (without having to start over from the beginning).
In this way you can quickly work your way through your slides and practice your presentation, fixing and adjusting your content as you go.
Understanding how to run your presentations is CRITICAL to the success of your presentation. Not only in presenting them live, but also in knowing how to spot check your slides as you build them.
I personally find it easiest to spot check your slides and quickly fix errors by running your presentation in slide show mode (or full screen). The last place you want to discover an error is during your presentation.
Using the commands and shortcuts above, you can quickly start, exit and step back into your slide show. Once you have these commands and features down, you will also look like a whiz during your presentations.
If you enjoyed the depth of this article, you will love our other PowerPoint training courses and free resources. To learn more, visit us here .
🔒 Unlock the PowerPoint Shortcuts Trusted by Industry Leaders KKR, American Express, HSBC, and More!
Join over 114,880 professionals from diverse fields including consulting, investment banking, advertising, marketing, sales, and business development who have supercharged their PowerPoint game with our proven methods.
✅ Customize compelling presentations effortlessly.
✅ Master time-saving techniques for faster deck creation.
✅ Boost your career prospects with top-notch PowerPoint skills.
Get FREE access to the Critical PowerPoint Shortcuts module of our premium training course by entering your name and email below.
DISCLAIMER: PC Users Only!
We respect your privacy and will keep your info safe and confidential.
Related Articles
About the author.

Popular Tutorials
- How to Strikethrough Text (l̶i̶k̶e̶ ̶t̶h̶i̶s̶) in Word, Excel & PowerPoint
- How to Make Animated Fireworks in PowerPoint (Step-by-Step)
- Strikethrough Shortcut (l̶i̶k̶e̶ ̶t̶h̶i̶s̶) for Word, Excel & PowerPoint
- How to Create a Flash Card Memory Game in PowerPoint (Like Jeopardy)
- Keyboard Shortcuts Not Working: Solved
PowerPoint Tutorial Categories
- Strategies & Opinions
- Presentation Design
- Pictures, Icons, Videos, Etc.
- New Features
- Miscellaneous
- Charts & Data Viz
We help busy professionals save hours and gain peace of mind, with corporate workshops, self-paced courses and tutorials for PowerPoint and Word.
Work With Us
- Corporate Training
- Presentation & Template Design
- Courses & Downloads
- PowerPoint Articles
- Word Articles
- Productivity Resources
Find a Tutorial
- Free Training
- For Businesses
We help busy office workers save hours and gain peace of mind, with tips, training and tutorials for Microsoft PowerPoint and Word.
Master Critical PowerPoint Shortcuts – Secure Your FREE Training Module and Save Valuable Time!
⌛ Master time-saving expert techniques.
🔥 Create powerful presentations.
🚀 Propel your career to new heights.
We value your privacy – we keep your info safe.
Discover PowerPoint Hacks Loved by Industry Giants - KKR, AmEx, HSBC!
Over 114,880 professionals in finance, marketing and sales have revolutionized their PPT skills with our proven methods.
Gain FREE access to a full module of our premium PowerPoint training program – Get started today!
We hate spam too and promise to keep your information safe.
You are currently viewing a placeholder content from Facebook . To access the actual content, click the button below. Please note that doing so will share data with third-party providers.

- Get started with computers
- Learn Microsoft Office
- Apply for a job
- Improve my work skills
- Design nice-looking docs
- Getting Started
- Smartphones & Tablets
- Typing Tutorial
- Online Learning
- Basic Internet Skills
- Online Safety
- Social Media
- Zoom Basics
- Google Docs
- Google Sheets
- Career Planning
- Resume Writing
- Cover Letters
- Job Search and Networking
- Business Communication
- Entrepreneurship 101
- Careers without College
- Job Hunt for Today
- 3D Printing
- Freelancing 101
- Personal Finance
- Sharing Economy
- Decision-Making
- Graphic Design
- Photography
- Image Editing
- Learning WordPress
- Language Learning
- Critical Thinking
- For Educators
- Translations
- Staff Picks
- English expand_more expand_less
PowerPoint - Presenting Your Slide Show
Powerpoint -, presenting your slide show, powerpoint presenting your slide show.

PowerPoint: Presenting Your Slide Show
Lesson 12: presenting your slide show.
/en/powerpoint/printing/content/
Introduction
Once your slide show is complete, you'll need to learn how to present it to an audience. PowerPoint offers several tools and features to help make your presentation smooth, engaging, and professional.
Optional: Download our practice presentation .
Watch the video below to learn more about presenting your slide show.
Presenting a slide show
Before presenting your slide show, you'll need to think about the type of equipment that will be available for your presentation. Many presenters use projectors during presentations, so you might want to consider using one as well. This allows you to control and preview slides on one monitor while presenting them to an audience on another screen.
To start a slide show:
There are several ways you can begin your presentation:

To advance and reverse slides:
You can advance to the next slide by clicking your mouse or pressing the spacebar on your keyboard. You can also use the arrow keys on your keyboard to move forward or backward through the presentation.
You can also hover your mouse over the bottom-left and click the arrows to move forward or backward.

To stop a slide show:
You can exit presentation mode by pressing the Esc key on your keyboard. You can also click the Slide Show Options button in the bottom-left and select End Show .

The presentation will also end after the last slide . You can click the mouse or press the spacebar to return to Normal view.

Presentation tools and features
PowerPoint provides convenient tools you can use while presenting your slide show. For example, you can change your mouse pointer to a pen or highlighter to draw attention to items in your slides. In addition, you can jump around to slides in your presentation or access other programs from your taskbar if needed.
To show the taskbar:
Sometimes you may need to access the Internet or other files and programs on your computer during your presentation. PowerPoint allows you to access your taskbar without ending the presentation.
- Locate and select the Slide Options button in the bottom-left corner.

Slide options
You can also access any of the menu items above by right-clicking anywhere on the screen during your slide show.

To skip to a nonadjacent slide:
You can jump to slides out of order if needed.

- The selected slide will appear.
To access drawing tools:
Your mouse pointer can act as pen or highlighter to draw attention to items in your slides.
- Locate and select the Pen Tools button in the bottom-left corner.

You can also use the laser pointer feature to draw attention to certain parts of your slide. Unlike the pen and highlighter, the laser pointer will not leave markings on your slides. To use the laser pointer, select it from Pen Tools, or press and hold the Ctrl key and the left mouse button.

To erase ink markings:

When you end a slide show, you'll also have the option to Keep or Discard any ink annotations made during your presentation. If you keep ink markings, they'll appear as objects on your slides in Normal view.

Presenter view
If you're presenting your slide show with a second display—like a projector—you can use Presenter view . Presenter view gives you access to a special set of controls on your screen that the audience won't see, allowing you to easily reference slide notes , preview the upcoming slide , and much more.
To access Presenter view:
Start your slide show as you normally would, then click the Slide Options button and select Presenter View . You can also press Alt+F5 on your keyboard to start the slide show in Presenter view.

Click the buttons in the interactive below to learn more about using Presenter view.

End Slide Show
Click here to end the presentation.
Display Settings
From here, you can customize your d isplay settings , including the option to duplicate—or mirror—the slide show on two screens and swap the monitors if Presenter view is appearing on the wrong screen.
Show Taskbar
Click here to show the taskbar and access other programs without closing the presentation.
Here, you can see how long you've been giving the presentation. You can also pause and restart the timer if necessary.
Current Slide
This is the current slide being shown to the audience.
Slide Options
Here, you can access the same slide options you would find in normal presentation mode, including the Pen Tools and See All Slides buttons.
Advance and Reverse Slides
Use the arrows to move forward and backward through your presentation.
Here, you'll see any speaker notes for the current slide. You can use the Increase and Decrease buttons below to make the notes larger or smaller.
Here, you can preview the next slide that will appear in the presentation.
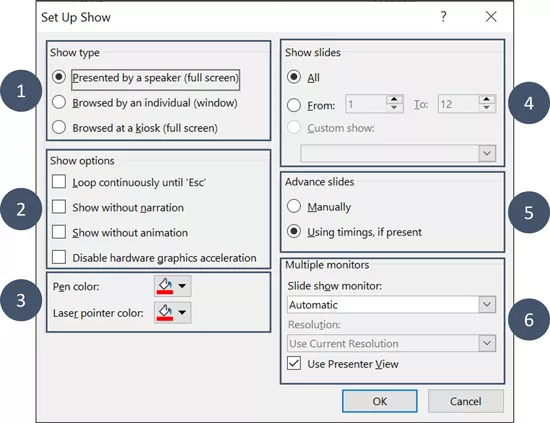
Slide show setup options
PowerPoint has various options for setting up and playing a slide show. For example, you can set up an unattended presentation that can be displayed at a kiosk and make your slide show repeat with continuous looping.
To access slide show setup options:

- The Set Up Show dialog box will appear. From here, you can select the desired options for your presentation.
Click the buttons in the interactive below to learn about various options for setting up and playing a slide show.

Here, you can choose a show type .
Show Options
Here, you choose playback settings and disable certain features if desired.
Show Slides
Here, you can choose which slides you want to show during the presentation. All is selected by default, but you can choose to show only certain slides or use any custom shows you have created from your original presentation.
Advance Slides
If you have set timings in your slide show, they will play automatically. However, if you want to disable the timings and control the slides yourself, select Manually .
Multiple Monitors
If you have more than one monitor, you can choose which one to display the slide show on. It's usually best to leave this setting on Automatic .
To advance slides automatically, you'll need to customize the slide timing on the Transitions tab. Review our lesson on Applying Transitions to learn how.

- Open our practice presentation .
- In the Set Up Slide Show options, change the pen color to purple.
- Start your slideshow, then access Presenter view .
- Advance to slide 8.
- Use the pen tool to circle the fundraising amounts for the 2015-2016 school year. These are the amounts over the green bars.

/en/powerpoint/lists/content/
How-To Geek
How to autoplay and loop a google slides presentation.

Your changes have been saved
Email is sent
Email has already been sent
Please verify your email address.
You’ve reached your account maximum for followed topics.
Quick Links
Set up autoplay and loop when presenting, set up autoplay and loop when publishing to the web.
If you don't want to worry about clicking through your slideshow, you can set up Google Slides to play your presentation automatically. Plus, you can have the slideshow loop, so it starts over at the beginning when it ends.
You might be playing your slideshow at a kiosk, during a conference, or publishing it to the web. These are the ideal times to use AutoPlay and Loop in Google Slides . You can automatically present the show and choose the timing between slides. Then, restart the presentation at the beginning each time it ends.
If you plan to start the slideshow and then let it play, you can set up AutoPlay and Loop , or simply one or the other.
Related: How to Loop a PowerPoint Presentation
Start the presentation by clicking "Slideshow" at the top of Google Slides. You can also use the arrow to pick either "Presenter View" or "Start From Beginning" per your preference.

When the slideshow opens, display the Presenter Toolbar by hovering your cursor over the bottom left corner of the presentation.

Click the three dots on the right of the Presenter Toolbar, then move to AutoPlay. You'll see a pop-out menu that lets you select the advance timing for the slides. You can pick from every second up to every minute.
If you also want to loop the slideshow, select "Loop" at the bottom of the pop-out menu.

When you finish, click "Play" to automatically play your presentation.

To stop the slideshow, simply click on a slide. You can then resume AutoPlay from the Presenter Toolbar by selecting "Play" again.
Maybe you plan to publish your slideshow to the web or embed it on a website rather than play it locally. You can set up AutoPlay and Loop as part of the publish settings.
Related: How to Share a Google Docs, Sheets, or Slides File as a Web Page
Go to File > Publish to the Web in the menu.

Choose either "Link" or "Embed" per your intent. Then use the Auto-Advance Slides drop-down box to choose the timing for the slides. Here again, you can pick from every second up to every minute.

To loop the slideshow, check the box for Restart the Slideshow After the Last Slide.
You can then mark the checkbox for Start Slideshow as Soon as the Player loads if you like, so that the viewer doesn't have to take any action to begin the presentation.

When you finish, click "Publish" and confirm to obtain the link or embed code for the slideshow.
To share a Google Slides presentation that doesn't require you to walk viewers through it, remember these steps to automatically play and loop the slideshow.
- Google Slides

Hide or show a slide
If there is a slide that should be included in the presentation file, but you don't want it to appear in the slide show, you can hide the slide.
A hidden slide remains in the file; it is merely hidden when you run Slide Show view. You can switch between the Hide Slide and Unhide Slide options for any slide in the presentation.
While editing slides in Normal view, in the navigation pane on the left, you can hide or unhide a slide, as described below. In Slide Sorter view, you can use the same method to hide or unhide a slide. And while you're presenting to an audience, you can unhide a slide, as described below.
Hide a slide
In the left navigation pane, select the thumbnail image of the slide you want to hide.

Unhide a slide
In the left navigation pane, select the hidden slide you want to unhide.
Right-click the slide, then select Unhide Slide .
Show a hidden slide during a presentation
If you're in Slide Show view and you decide that you want to show a hidden slide, you can do so:
Right-click the current slide and select See All Slides .
The screen switches to a thumbnail list of all the slides in the presentation.
Select the hidden slide you want to show.
The selected slide is shown full-screen and the slide show resumes.
If you are using presenter view, your audience won't see the steps you take to select the slide. They will simply see the slide you select in step 2.
Right-click the slide, and then click Unhide Slide .

In the left navigation pane, select the slide you want to hide.

Control-click the slide, then select Unhide Slide .
Do one of the following:
If you're presenting with the full screen slide show on all monitors, go to the slide that appears before the hidden slide, and then press H.
If you're using Presenter view, move the pointer to the bottom of the screen to access the slide navigation pane, and then click the hidden slide.
Why hide slides?
Hiding slides is particularly useful when you have added slides to a presentation that provide different levels of detail on the subject matter, perhaps for different audiences. You can mark these slides as hidden so that they are not displayed in your main slide show, but you can still access them if you need to.
For example, a member of your audience might ask you to explain an item in more detail. In that case, you can reveal the hidden slides that contain those details. However, if time is short and the audience is comprehending the concepts that you are delivering, you may want to keep the slides with the supplementary information hidden so that you can continue your presentation without visibly skipping over slides.
Create and present a custom show

Need more help?
Want more options.
Explore subscription benefits, browse training courses, learn how to secure your device, and more.

Microsoft 365 subscription benefits

Microsoft 365 training

Microsoft security

Accessibility center
Communities help you ask and answer questions, give feedback, and hear from experts with rich knowledge.

Ask the Microsoft Community

Microsoft Tech Community

Windows Insiders
Microsoft 365 Insiders
Was this information helpful?
Thank you for your feedback.
Presentation
How Many Slides in a 20-Minute Presentation?

Table of Contents
Determining the ideal number of slides for a 20-minute presentation can be a challenge. It’s important to strike a balance between providing enough information and keeping your audience engaged.
While there is no one-size-fits-all answer, this blog post will explore some factors to consider when structuring your presentation. By understanding these factors, you can create a presentation that effectively conveys your message within the allotted time.
10 Slides in 20-Minute Presentaion
A popular guideline for 20-minute presentations is the 10/20/30 rule, introduced by Guy Kawasaki.
This rule suggests using 10 slides for your presentation, keeping it concise and focused. It also recommends a 20-minute time limit and a minimum font size of 30 points for easy readability.
This approach can be especially helpful for beginners or those who are less experienced in public speaking. While it’s a useful guideline, it’s important to remember that it’s not a strict rule and can be adjusted to fit your specific needs.
Strategies to Choose the Number of Slides for Your Presentation
1. prioritize quality over quantity.
While it’s tempting to include a lot of detailed information in your presentation, too much can overwhelm your audience. Focus on your important points and avoid getting lost in too many details.
Remember, your slides should support your presentation, not replace it. If your slides are packed with text and data, your audience might end up reading instead of listening to you, which can make the presentation less engaging.
A well-designed slide should highlight the main ideas or complement them with visual or audio elements. Keep your slides clear, brief, and to the point, allowing the audience to focus on what you’re saying.
2. Portion Out Your Information
Think of your presentation like serving a good meal. Instead of delivering all the information at once, break it down into smaller, categorized portions.
This approach makes it easier for your audience to absorb and retain the information. If you have several important points, don’t cram them all onto one slide. Spread them out over multiple slides to emphasize each point individually and keep your audience’s attention focused.
For instance, if you’re discussing different products, dedicate a separate slide to each product rather than listing them all on one slide. This not only increases the number of slides but also enhances the impact of your message by giving each product the attention it deserves.
3. Balance Necessity and Simplicity
Efficiency is important when deciding how many slides to include. Your slides should enhance your presentation by providing visual support, guidelines, or additional information. However, avoid cluttering your slides with unnecessary text or images that don’t add value to your presentation.
Always consider the purpose of each slide element, like pictures or graphics, and eliminate anything that doesn’t serve a clear purpose. While some content might be fun or interesting, it’s important to assess whether it truly contributes to your message.
Also, remember that the more slides you have, the more structured your presentation becomes. This can be helpful if you’re nervous and need a clear guide, but if you prefer to speak more freely, fewer slides might give you the flexibility you need.
4. Make Practicing a Priority
Just like we encourage kids to practice what they’re unsure about, we should do the same for ourselves. A good way to see if your presentation flows well is to rehearse it at least once beforehand.
Practicing in front of friends or family can give you helpful feedback, but even practicing alone in front of a mirror or an imaginary audience can work. You’ll quickly notice where you might need adjustments, whether you have enough time, and if the slides fit well with your talk.
If your practice run finishes faster than expected, you can add more information and slides. On the other hand, if you struggle to stay within the allotted time and end up skipping slides or rushing through them, it’s time to make some cuts.
The pace at which you speak is important too. If you speak quickly, you might cover many slides in a short time. If you speak slowly, you’ll get through fewer slides. Ideally, your speaking pace should be comfortable for your audience and allow them to follow along easily. This also takes practice, but the goal is to present your slides at a pace that feels natural to you.
5. Consider the Variables
There’s no one-size-fits-all solution for the perfect presentation because many factors can influence it. The topic, audience, and location all play a role in determining how many slides you should use and how they should be structured.
6. Trust Your Own Judgment
There’s a lot of advice out there on how many slides are right for a presentation, but remember that these opinions don’t take your specific presentation style and topic into account. Recommendations vary widely, with some experts suggesting 40 slides for a 20-minute presentation and others recommending just two.
Ultimately, you’re the best judge of how many slides you need. This also applies to how much time you spend on each slide. Some slides might require more time, while others need only a few seconds. It all depends on the content and structure of each slide. It’s perfectly fine to spend several minutes on one slide and only a few seconds on another.
Closing Thoughts
In the end, the right number of slides for your 20-minute presentation depends on your content, style, and audience. Trust your instincts, keep your message clear, and remember that quality always outweighs quantity. With thoughtful preparation, you can deliver a presentation that resonates and engages.
Related Posts

How Many Slides for a 60 Minute Presentation?
In this blog post, we will discuss some factors to consider when deciding how many slides to include in your 60-minute presentation.

How Many Slides for a 15-Minute Presentation?
Ever faced a blank presentation template and wondered how many slides to include? You’re not the only one. The perfect number of slides for a 15-minute presentation can be a puzzle for many presenters.

How Many Slides for a 5-minute Presentation?
Delivering a 40 to 60-minute speech doesn’t guarantee success. Shorter presentations can make large events more impactful. One main benefit is that multiple speakers can share their insights. However, many presenters find it challenging to keep it brief, often trying to cover too much, which can lead to going over time or rushing through their […]
Save Time and Effortlessly Create Presentations with SlidesAI

COMMENTS
Bring your presentations to life in Google Slides with enhancements like videos, animations, smooth transitions, and more. Get started with templates Choose from an array of high-quality pre-designed templates with different layouts, images, colors, and fonts.
Six steps for creating a slide show. 1. Plan your slide show. Before getting too deep into your slide show project, it's a good idea to select and save the photos and videos you want to use. This helps you create a slide show more efficiently and purposefully, ensuring a better outcome. 4.
Start with Microsoft Copilot. Generate a presentation outline instantly with Microsoft Copilot for Microsoft 365. Expand your ideas. Ask for more information or a new slide on your topic directly through Copilot in PowerPoint. Use a free template. Choose from thousands of customizable templates to kickstart your slideshow.
Email or phone. Forgot email? Not your computer? Use a private browsing window to sign in. Learn more about using Guest mode. Access Google Slides with a personal Google account or Google Workspace account (for business use).
Start by deciding whether to show the slideshow in a window or full screen. To set up the slideshow, select Slide Show > Set Up Slide Show and choose one of the following: Browsed by an individual (window): Run the slideshow automatically and inside a window. This option works best when you save the slideshow to a CD.
To set up Google Slides Auto Advance feature, open your presentation. Then, select File > Share > Publish to the web menu option. The Publish to the web dialog box displays. On the Publish to the web dialog box, choose the Link or Embed tab from the top of the dialog box. Here's how the Embed tab looks:
In this video, you'll learn the basics of presenting your slide show in PowerPoint 2019, PowerPoint 2016, and Office 365. Visit https://edu.gcfglobal.org/en/...
Select the slide that you want to start the slide show from. On the Slide Show tab, click Play. On the Slide Show tab, click the arrow next to the Custom Show button, and then click Custom Slide Show on the menu. In the Custom Shows screen, click the custom slide show you want to present. Note: If no custom shows are listed, click Edit Custom ...
This Google Slides tutorial for beginners is a complete crash course, taking you by the hand and showing you step by step how to make some amazing and mesmer...
1) Go to drive.google.com and log in. 2) Click the blue "New" button toward the top left corner of the page. 3) Select "Google Slides" next to the orange icon on the drop-down menu. 4) Drive will open your new presentation. Just start editing! Not Helpful 15 Helpful 18. See more answers.
Rename your presentation—Click Untitled presentation and enter a new name.. Add images—Click Insert Image to add images from your computer, the web, Google Drive, and more. You can also move, delete, or resize images. Add text—Click Insert Text box to add new text boxes. Then, click a text box to enter text. You can move, delete, or re-size text boxes.
Modern Doodle Minitheme. Download the Modern Doodle Minitheme presentation for PowerPoint or Google Slides and start impressing your audience with a creative and original design. Slidesgo templates like this one here offer the possibility to convey a concept, idea or topic in a clear, concise and visual way, by using different graphic resources....
To play a slideshow in PowerPoint's desktop app, all you have to do is click an option or press a shortcut on your keyboard. Start the process by opening your presentation with PowerPoint. Then, in the app's ribbon at the top, select the "Slide Show" tab. In the "Slide Show" tab, from the "Start Slide Show" section, choose "From Beginning" (or ...
Use the pen tool during a slideshow. On your browser, open a presentation in Google Slides. At the top right corner, click Slideshow . At the bottom left, click Options Enable pen tool. To draw or annotate, click and drag on your slide. Optional: To change the pen color, at the bottom, click Pen tool Select a color.
Click From Beginning. Holding down the Alt key and clicking From Beginning, the Presenter View will launch from the very first (non-hidden) slide in your presentation. You can also launch the presenter view from the beginning of your presentation at any time by clicking Alt + F5 on your keyboard.
Slide show setup options. PowerPoint has various options for setting up and playing a slide show. For example, you can set up an unattended presentation that can be displayed at a kiosk and make your slide show repeat with continuous looping. To access slide show setup options: Select the Slide Show tab, then click the Set Up Slide Show command.
Start presenting. On the Slide Show tab, in the Start Slide Show group, select From Beginning. Now, if you are working with PowerPoint on a single monitor and you want to display Presenter view, in Slide Show view, on the control bar at the bottom left, select , and then Show Presenter View.
You can pick from every second up to every minute. If you also want to loop the slideshow, select "Loop" at the bottom of the pop-out menu. When you finish, click "Play" to automatically play your presentation. To stop the slideshow, simply click on a slide. You can then resume AutoPlay from the Presenter Toolbar by selecting "Play" again.
Right-click the current slide and select See All Slides. The screen switches to a thumbnail list of all the slides in the presentation. Select the hidden slide you want to show. The selected slide is shown full-screen and the slide show resumes. If you are using presenter view, your audience won't see the steps you take to select the slide.
How Many Slides in a 20-Minute Presentation? 10 Slides in 20-Minute Presentaion. A popular guideline for 20-minute presentations is the 10/20/30 rule, introduced by Guy Kawasaki. This rule suggests using 10 slides for your presentation, keeping it concise and focused. It also recommends a 20-minute time limit and a minimum font size of 30 ...