More From Forbes
3 easy steps to a great 20 minute presentation.
- Share to Facebook
- Share to Twitter
- Share to Linkedin
Don’t get me wrong. Although twenty minutes is a perfect amount of time for a presentation, it takes work to make it effective. You need to draft a narrative, carefully edit and refine the content, and develop compelling visuals. Let me take you through a 3-step process that will help you create your next pitch or presentation when you’re given a relatively short amount of time.
1. Develop sound bites . Before you even open PowerPoint (or Apple Keynote) craft the key messages that you want your audience to remember. During our presentations at LeWeb, artists with a firm called Livesketching.com were creating one-page visual representations of the presentations. Looking at the one they created from my talk as well as some of the others, I noticed that the sketch artists were listening for key phrases as well as lists. Bill Gross, the CEO of technology incubator Idealab, delivered a presentation with 12 entrepreneurial lessons from the last twenty years. The sketch artists highlighted each of the key lessons (all of the sketches can be seen here http://www.slideshare.net/LeWeb/leweb2011). Lists are catchy and make the content easier to absorb. People like lists. Use them.
2. Storyboard the content. Speaking of sketch artists, it helps to think like an artist when preparing a presentation. Before you open PowerPoint, head to a white board or take out good old-fashioned pen and paper and start sketching. Think about how you will visualize each of the key points and supporting messages. What pictures will you use? Are there abstract images that will reinforce your content? Remember that people process information more effectively when the content is delivered as words and pictures rather than words alone.
3. Practice the presentation. Nobody expects you to read extensively from notes for a 20 or 25-minute presentation. In fact they expect that you have the content down cold. I’m glad I did. When I went on stage I could see my slides in the monitor in front of me, but not my presenter notes. As it turns out I didn’t need them because I had practiced the presentation many times out loud. Most people save their practice time until the night before a presentation and it shows.
A 20-minute presentation is ideal for new product launches, investor pitches, employee updates, sales meetings, etc. Take the opportunity to craft, design and deliver a presentation your audience will remember.
Carmine Gallo is the communications coach for the world’s most admired brands. He is a popular keynote speaker and author of several books including the international bestsellers, The Presentation Secrets of Steve Jobs and The Innovation Secrets of Steve Jobs . His new book, The Power of Foursquare , reveals how businesses can use mobile social media to attract, reward, and engage customers in ways that were never possible. Follow him on Twitter: carminegallo

- Editorial Standards
- Reprints & Permissions

Breathtaking 20 Minute Presentations: Write, Design & Deliver
Hrideep barot.
- Presentation

20 Minute Presentations can change the world, not exaggerating. You have your big idea, the game changing message. All you have to do now is convince and win over your audience. It’s crucial for your presentation to be air tight. You need to REALLY grasp your audience. You cannot afford a single member zoning out when you convey this revolutionary idea. You CANNOT enlist yourself with the crappy presenters of the world. What would you then do?
Read along to learn how to write, design and deliver breath-taking 20 minute presentations!
How many words/slides makes a 20 Minute Presentation?
A 20 Minute Presentation makes up approximately 2,600 words. In order to keep your content clean and concise, you can estimate up to 10 slides including the title slide. This means each slide gets 2 minutes devoted to it, which is more than enough to make a point. You can play around with the number of slides as long as you finish your presentation within the time constraints.
Writing 20 Minute Presentations
Writing a presentation is an art. You can’t just read it, you need to communicate it. You aren’t just presenting information, you’re crafting an experience. And the best way to provide your audience with an experience is to tell a story. You know what they say: facts bore but stories sell. The most impactful presentations are in fact stories. Before you actually start writing your idea, let’s look at a few guidelines you need to keep in mind in the prewriting stage.
Simplify Your Goal
At this stage, I assume you already have your big idea in mind. Even if it’s not too organised, you vaguely know what you’re trying to convey. All you have to do is define your goal. The best way to do it is to simplify your idea into one sentence.
Albert Einstein once said, “If you can’t explain it to a six year old, you don’t understand it yourself.” Simplification of your big idea is one way you can know whether you have understood the concept. When you’re clear about the goal or the agenda of your presentation, it takes a smoother flow.
For example, let’s say your vague revolutionary idea is to create sleeves for dresses that can be detached. One plain black dress can have a variety of four sleeves that can be attached to it. Whether it’s a dinner party or a business meeting; one black dress can strike a different vibe to match any occasion. These sleeves could be puffy, netted, long sleeves and even beaded accessories to your shoulders. Your company can also branch out into manufacturing broaches to accessorise your dress.
If I were to boil this entire idea down to one sentence, my goal would be to produce detachable accessories for your garments so that one piece of clothing can serve many looks and suit multiple occasions. Likewise, what is your goal? What are you trying to sell? What is the bare minimum form of message that you want to communicate through this presentation?

Defining your Success
The defining factor of success in your presentation is what you want your outcome to be. Tailoring your presentation has a different formula depending on what your goal outcome is. Do you want to motivate your audience? Do you want to pitch your idea to investors? Do you want to prove yourself right? When you have decided the metrics of your success, you can start by weaving together a tapestry of content that will help you hit the goal.
In the previous example, your definition of success is that you convinced your investors that your idea has potential in the market. You have foreseen the concept of detachable clothing as the next big thing of the fashion industry. You have gotten shark investors on board and it is time to put this groundbreaking idea into effect. Learn how to Prepare for a TED-Style Talk with us!
Knowing your Audience
You cannot communicate with your audience if you don’t know who your audience is. Knowing your audience doesn’t mean knowing them inside-out personally. Just keep in mind what kind of things as a group of people would they find interesting.
For example, World War 2 is a rather heavy topic to explain. It carried on for years with multiple causes, events and consequences. A YouTube Channel called Oversimplified decided to break it down into a very simple humorous story for its audience.
The creator understood their audience. World Wars are essential chapters in all our history books. They’re gruesome, complicated, and theoretical. But everybody is expected to know what they are because they have majorly contributed to the shape of their current reality. The creator therefore decided to narrate it in layman’s language (the goal). The presentation reached a wide audience and the understanding was made easier with the excellent humorous storytelling (the success). It has so far received 72 million views making it appealing and helpful for a significant fraction of the world’s population.
The Narrative
Nobody wants to hear a long academic paper being read out without any gripping element. Nobody is interested in the complexity of your presentation. Simplifying your presentation doesn’t only mean presenting cold, hard facts. It means tapping into the emotional bucket and focusing only on your goal.
Everybody loves a good story. Whether it is how you defeated all odds of a poverty-stricken childhood and emerged a superstar, or how you came up with a company called Apple. Allow your presentation to connect with your audience emotionally. Flatter them, humour them, inspire them and stimulate them mentally. Check out our guide on how you can become a better storyteller!
Ruthless Editing
“Our life is frittered away by detail. Simplify, simplify, simplify!” -Sir Henry David Thoreau
Think about your audience. Think about all the information that they have to grasp. You can’t use “The architecture has been ignited with flames” when you mean “The building is on fire.” It’s a writer’s power to write intelligent literature. But it’s also a writer’s responsibility to make it understandable for their readers.
The written word is not the same as the spoken word. While converting your writing into a presentation, you need to be a ruthless editor. Here’s the rule book of a ruthless editor:
- Your goal is clarity, simplicity and elegance.
- Use short sentences.
- Get rid of normatives.
- Never use “emolument” when you mean “tip”
- No passive voice.
- Don’t lose the essence of your story.
- Scrap all unnecessary words and phrases.
- Building a narrative and beating around the bush are two very different things.
- Prepare a bare minimum account. The bare minimum account is the information that you absolutely cannot afford to cut out under any circumstances.
- Use bullets whenever you can.
- Share a handout with further details if you need to.
- One liners are your best friends.
- Base your content on visuals. A single picture speaks a thousand words.
- Write conversational lines. Interact with your audience.
- Segregate your information using “Hell yes!” or “No.” Do you need it? If the answer is “Maybe” or a hesitant yes, then remove it. You’re either absolutely sure or you’re not.
The Rule of Thumb
The most unfortunate conference incidents would be when the first speaker talks for 30 long minutes but the second speaker can only speak for 2 minutes because the time is up. As a speaker, never ever ever let that happen. It is your responsibility to wrap up your presentation within the given time.
20 minute presentations are 9-10 pagels long. A pagel is one side of a paper. This is a regular letter sized paper with regular margins and double spacing. It adds up to around 2600 words.
When you write your presentation, try not exceeding 2000 words just in case you need time for a question-answer round. The corporate world also has a popular 10-20-30 rule. It’s not hard and fast to apply it. The creative freedom is all yours! However, if you’re looking for a guideline: here you go.
The 10-20-30 Rule
The 10-20-30 Rule means: 10 Presentation Slides that run for 20 minutes and have font size no less than 30 points. According to this calculation, you can have 2 minutes to each slide.
Guy Kawasaki introduced and proved this formula as most effective for an average presenter. The logic behind this is that an average audience cannot gauge more than 10 slides worth of ideas and information in one go. Limiting yourself to 10 slides will also motivate you to keep your information compact. When your font size can’t be less than 30, you have to pick and choose your words wisely too. A brief explanation of these ideas will then add up to 20 minutes.
Drawing an idea inside a box with instructions is easier than having a blank space staring at you. Some artists may find solace in being in control of their structure. But there’s nothing wrong with borrowing Kawasaki’s structure.
Organising the Content
After you have filtered out all your content, it’s time to organise. You can organise it in so many ways! The best organisation comes from adding visual elements. You must remember: show, don’t tell. Let’s look at some examples of organising chunks of content.
Raw Information: From the area’s lowest point on the Karakash River at about 14,000 feet (4,300 m) to the glaciated peaks up to 22,500 feet (6,900 m) above sea level, Aksai Chin is a desolate, largely uninhabited area. It covers an area of about 37,244 square kilometres (14,380 sq mi).
Organised Information:

( Source )
The organised information in the above example is much more systematic than the first paragraph. You can employ so many such tools to present chunks of data methodically. You can use:
Anything that suits your content best. Remember, the content on your presentation slides is merely a reference piece. Your audience is there to listen to you. If they wanted to read the powerpoint presentation, you could have just emailed it to them.
Designing 20 Minute Presentations
The modern day presentations take away the burden of vividly descriptive words to communicate. They have equipped you, or rather blessed you with the feature of visual storytelling. You can now only tell but also show your big idea. The new powerful visual storytelling tool has impacted the way you can write your presentation. You have so many possibilities now!
The human eye is always attracted to aesthetically pleasing visuals. Despite this inbuilt urge to look for patterns, alignment, symmetry and beauty, very few can actually produce it. It is a TASK for a non-designer to make sure their presentations are visually engaging. While you can hire a professional to help you with design, here are some basic rules of designing presentations.

Why your Presentations Look Crappy
Microsoft’s PowerPoint Presentation and MacBook’s KeyNote templates are overrated. There you go, I said it. Every newbie will pick out the default, pre-made themes and call it a day. Which is perhaps why their presentations look boring. They have not put in the effort!
What makes a theme? Even when you notice the pre-cooked themes for you, the one thing they have in common is their similarity. Each theme has a common colour palette, font family and elements. This means, you can design your OWN theme too!
Don’t worry if you feel you lack the aesthetic sense to pick it all out on your own. Here’s a step by step tutorial on how to design your theme.
Colour Palette
You can look for colour palettes on websites like Color Hunt or Coolors . You will find a variety of colour palettes. Browse through them with leisure and decide on one. Picking the all-time-favourites will never go wrong.
Now that you have a colour palette, pick out fonts. While typography is a whole subject on its own, Canva provides an insight on How to Put the Best Fonts Together. You can skim through and understand as much as you can. It’s essential to not use more than 2 fonts in your presentation. Trust me, the more is not the merrier this time.
Elements refer to objects or highlights to your presentation slides. Elements are a highly design-centred concept but generic ones won’t go wrong. You can have binding elements like:
- Writing all your titles in a white box with a black borders.
- Adding labels and stickers at the bottom.
- Writing page numbers in a star.
- Doodle PNG’s.
- Colourful bands at the bottom.
- Same borders on all slides.
There are so many possibilities! Go through Pinterest to find ideas. You can even ditch the element part and just play around with colours. If you’re not in the mood of designing from scratch, you can pick templates from
- www.slidescarnival.com
- www.24slides.com
- www.slidesgo.com
- www.googleslidestheme.com
- www.slidemembers.com
- www.plantillaspower-point.com

Your Information
You are not giving a document. You are giving a presentation. Do not, I repeat: DO NOT vomit every single bit of your information on your slides. You can ramble all you want while speaking, but the reading material should be bare minimum.
Your audience cannot multitask. They will either listen to you or read your slides. If there’s an entire Wikipedia page copy pasted on your presentation, the audience will definitely roll their eyes and fall asleep. They won’t even bother listening to you. Remember, what you choose to put on the slides also determines whether you have hooked your audience into listening.
If your slides contain three vague yet understandable pointers, the audience can quickly skim over it and then wait for you to elaborate. You have then also caught their interest. On the other hand, if you put everything you’re going to speak on your slides, the audience will just help themselves and ignore you completely.
Tips and Tricks
- Keep One Main Point Per Slide: For example, you’re enlisting the properties of your new automobile. Write your first exotic feature on one slide, then elaborate it in speech. After that move to the next slide to your next feature. Do not use bullets here to write down all your features on the same slide. You will take away the mystery of it.
- Be Same Page With the Audience: As an add on to the previous point, you need to keep the audience on the same page as you. This will let you have command over them. If you have too much content on one page, one portion of the audience will be lingering on the third point and another on the fourth. Whereas, you will still be explaining the first point. This is going to be chaotic and gateways to miscommunication.
- Terms and Conditions Sheet: Remember, you’re not dealing with paralegals who will read the fine text. Even if you are, there’s plenty of important fine print to read for them. Do not make your slides look like a terms and conditions sheet. Be generous with your font size, consider the last possible row. PPT’s are like highway hoardings, and you can’t have small fonts and illegible text on the highway hoardings can you?

Your Visuals
Presentations are multimedia tools. You need not just add text. They are your opportunities to communicate visually. Your visuals begin with a jaw-dropping opening slide. The title of your presentation is what grabs 70% of the audience’s interest. It sets the “first impression” and communicates a lot more than you think. Learn how to Design Strong Opening Slides for your Presentation!
Good images in your presentations take away 50% of the “boring.” Your audience only has to look, saving them a lot of hard work. They add on to your aesthetics too. Although good images are seldom free of cost. Be generous, the photographer has worked hard to make your presentations stunning. You can buy royalty free images on www.istockphoto.com or www.compfight.com .
A good collection of visuals absolutely does not include Microsoft clipart or cheesy corporate stock photos. Avoid using the cliche corporate art style of exaggerated bubbly features and plain solid colours. If you want to connect with your audience, give your presentation a little bit of personality. Your images and visuals hold the power to make your presentations astronomically engaging. Even funny for that matter!
White Space
Maximalism in Powerpoint Presentation is more often than not, a very bad idea. It connects to the point of not adding a disgusting amount of text on your slides. Embrace white space and empty brackets. Even not filling up the entire slide can convey a message.
For example, imagine a presentation slide with a single Apple in the centre and nothing around it. No text, no context, no subtitle- nothing. Wouldn’t it pique your interest? You can be as cryptic as you can with your presentations as long as you’re answering your questions one way or another. To answer your question, that slide would be a funny way to introduce the audience to your presentation “How Apple got its name.”
Jesseedee and Scott Hoag on www.slideshare.com explain the principles of design in a very demonstrative fashion. If you want more tips on Designing a Presentation , Mistakes While Designing a Presentation and Slide Design Made Easy , be sure to check their work out!
Delivering 20 Minute Presentations
ALRIGHT THEN, you have completed the pre-production and production stage of your presentation. Your presentation has been cleverly written. You have also put in long hours to make it look fancy and appealing. It’s now time to tie it all together by crafting a standing ovation worthy performance!
If you were to follow the 10-20-30 rule, each slide could be given a total of 2 minutes. This would never imply speaking so fast, nobody understands a thing you’re saying.
Start your presentation with an introduction. Introduce yourself and your topic. After that you slowly address all the points you had planned in a way that’s connected naturally. It’s one big monologue that sounds like a thought process. The smoother the flow of your content, the better are your engagement chances. You can check out our Ultimate Guide to Opening Remarks.
Rehearsing for a speech can be stressful. The following are a few DO’s and DON’Ts for preparing for your great presentation.
| Make it sound friendly and conversational. | Read out cold and theoretical facts. |
| Set cues in your presentation (in case you forget!) | Memorise your speech or carry reading material. |
| Speak at an understandable pace. | Cross the time limit (please!) |
| Show | Tell |
Rehearsing Your 20 Minute Presentations
You can read our blog post about 13 Tips for Rehearsing a Presentation for a clearer insight into delivery of your presentation.
In short, you can go over the following steps:
- Take presentation notes.
- Understand and accustom yourself to the material.
- Rehearse with your slides alongside.
- Time your presentation.
- Read your material and pointers out loud.
- Rehearse in front of the mirror.
- Record yourself speaking.
- Tape yourself on your phone camera.
- Present before a single person and take their recommendations.
- Present before a group of people.
- Rehearse presentation without your PPT.
- Go to the location where you’ll be presenting.
- Give yourself a PEP talk!
In conclusion,
A 20 minute presentation needs days and days of writing, designing and rehearsal. The more you present, the better you get at presenting. Remember, everything is a learnable skill. Channelise all that you have got into making your 20 minute presentation as revolutionary as possible. Good luck and more power to you!

Enroll in our transformative 1:1 Coaching Program
Schedule a call with our expert communication coach to know if this program would be the right fit for you

How to Brag Like a Pro as a Speaker

Less is More! Tips to Avoid Overwhelming Your Audience

What does it mean to Resonate with the Audience- Agreement, Acceptance, Approval
- [email protected]
- +91 98203 57888
Get our latest tips and tricks in your inbox always
Copyright © 2023 Frantically Speaking All rights reserved
Unsupported browser
This site was designed for modern browsers and tested with Internet Explorer version 10 and later.
It may not look or work correctly on your browser.
- Communication
How Many Slides to Use for a 5, 10, 15+ Minute Presentation?
Presentations—they're a part of life. One of the first things you may wonder about when you're assigned a presentation is how long it needs to be. You may also wonder how many minutes per slide.

Unfortunately, that question doesn't have a simple answer. But in this guide, I'll help you to work out how many slides you need for presentations of different lengths . I'll also include some tips to help you with presentation timing and delivery.
Jump to content in this section:
How Many Slides for a 5-Minute Presentation?
How many slides for a 10-minute presentation, how many slides for a 15-minute presentation, how many slides for a 20-minute presentation, how many slides for a 30-minute presentation, how many slides for a 45-minute presentation, how many slides for a 1-hour presentation, how many powerpoint slides per minute, how to make your presentations better, learn more about presentation preparation, find a template for your next presentation, the top source for premium presentation templates.

Let's start with the answer to a common question: how many slides for a 5-minute presentation?
While 5-minute presentations may not be the norm (let's face it, that's a pretty short presentation slot), sometimes that's all the time you've got. Typically, you might do a 5-minute presentation at a weekly stand-up or similar meeting.
Can a Presentation Be Too Short?
If your presentation lasts less than ten minutes, then it is considered a short presentation. It isn't bad to have a short presentation as long as you're able to deliver the message you're supposed to correctly.
But if you’re unable to deliver your message, then your presentation is too short.
For short presentations, it's best to limit the number of slides. In fact, you probably won't want more than 10 slides. And you could get away with fewer.
Here are five tips to make an effective short presentation:
Only put essential information in your presentation. This means that any unnecessary information should be left out. This means that your slides should be brief and concise.
Context is important, so just because you are taking out unnecessary information doesn’t mean that you should leave out context. You want everyone to be able to understand what you are talking about.
3. Series of Three
Try using the series of three. This helps people remember your topic better. You do this by breaking your topic into three main ideas. This makes your presentation more concise.
4. Use Stories
People relate to stories more than facts. So, try to use stories to get your main point across in a relatable or entertaining way.
5. Bare Minimum
You should keep your presentation minimal. They should look good but also not have a ton of information on them.
For example, if you’re wondering how many slides are in a 5-minute presentation, The answer is you should have only five slides. That’s about one minute per slide. The general rule is 1-2 minutes per slide.
So, if a 5-minute presentation is short and sweet, how many slides do you need for a 10-minute presentation? There are a couple of answers to this question.
One option is to keep the number of slides similar (no more than 10) and spend longer discussing key points.
But another option is to have more slides, ideally no more than 20. Then decide how much time you want to spend on each slide. As before, it's good practice to stick to one main point per slide.
Get more PowerPoint presentation tips in How to Use PowerPoint (Ultimate Tutorial Guide) .
As you start to increase the length of your presentation, the issue of the number of slides becomes less important. So, when thinking about how many slides for a 15-minute presentation, you can include more slides. You could perhaps use as many as 30.
But you don't have to. You can also stick with a smaller number of slides and spend more time talking about key points . In other words, adjust the verbal part of your presentation without changing much else.
If you do decide to go for more slides, you can move beyond the bare-bones approach. That means besides having slides for your main talking points, you can include slides for supporting points, too.

Once your presentation starts getting a bit longer, the question of how many slides you need for a 20-minute presentation gets more complex. Guy Kawasaki believes the ideal presentation has 10 slides, lasts 20 minutes, and has no font smaller than 30 points. That's his 10/20/30 rule.
Here are some tips for a 20-minute presentation:
1. Go Longer
With 20 minutes, you can go longer. Some recommend 20 slides for a 20-minute presentation, with an allocation of a minute of speaking time per slide.
2. Spend Time on Slides
But it's not always necessary to have a set time per slide . Just spend more time on the slides where you've got more to say. With longer presentations, include a brief introduction and conclusion to make your presentation even more polished.
3. Use Charts and Graphs
A 5-minute presentation can have a pretty simple design. As presentations get longer, it's important to think about ways to hold your audience's attention. This is a good time to illustrate key points with graphics, photos, charts, and graphs. They'll give your audience images they'll remember long after you end your presentation.
The same principles apply when considering how many slides for a 30-minute presentation. If you used 30 slides for a 15-minute presentation, you'll likely feel more comfortable with more slides for a longer presentation slot. In that case, add more slides for sub-points.
But if you prefer a minimalist approach, that's OK, too. Stick to the main talking points and spend more time talking about each one. See our public speaking guide for more presentation tips:
.jpg)
Once your presentation slot gets longer, you'll probably want to have a LOT more slides. When planning how many PowerPoint slides for a 45-minute presentation, it's unlikely that you're going to stop at 10 or 15 slides.
As always, well-designed slides will help hold your audience's attention.
So, what about the number of slides for a 1-hour presentation? This is a pretty long presentation slot. There's a good chance your audience's attention will wander. Here are some tips for longer presentations:
1. Make a Choice
As advised for presentations 20 minutes and above, you've got the choice to add more slides for supplementary points. Or you can speak much longer about the key points. And you'll need to keep slide design appealing to give your audience something to focus on.
2. Make it Interactive
There's another option, though. Even if you've got a 1-hour presentation slot, you don't have to fill the whole thing with your own voice. Instead, make it interactive by getting the audience involved throughout. You can also leave plenty of time for a Q&A session at the end.
3. Plan a Break
An hour can be a long time to sit and listen to a person speak. If you're working on a longer presentation, scheduling a break not only gives your audience a chance to stretch and move around. It also gives you a fresh chance to capture their attention when they come back.

Another question people often ask is how many PowerPoint presentation slides per minute you should have for a typical presentation. Again, this question doesn't have a simple answer.
The number of slides you need per minute may depend on your topic. If it's simple, a few slides might do, while a more complex topic might need more slides.
Another factor is your speaking rate. The average person speaks at 150 words per minute . If you speak faster than that, you'll cover more slides in a minute than someone who speaks more slowly.
Match your slides to your material. Even long presentations can hold attention if the topic is interesting enough.
A notable example is Mary Meeker's Internet Trends (Source: TechCrunch ). This runs over 100 slides. It makes good use of graphs and charts. Learn how to do this for your own presentations in our infographics creation guide .

Instead of focusing on how many PowerPoint presentation slides per minute you need, there are other ways to improve your presentation.
For example, focus on what your audience needs . Choose the presentation length that's right for your subject and the occasion. Here are a couple of examples:
An executive presentation is usually short and focused. So, you'll get straight to the point and may only need a few slides.
In contrast, a keynote speech or lecture is usually longer. Spend more time painting a picture or telling a story.
Use templates to give your presentations a harmonious and attractive look without having to do the design work yourself. Human beings are very visual. Attractive slides will subtly enhance the appeal of your presentation.

When designing your slides, avoid walls of text , which are a real turnoff. Keep your slides uncluttered. It'll be easier for the audience to focus on them.
Finally, practice your presentation so you know your speaking rate and get the timing right for moving from slide to slide. This will help you deliver an appealing presentation, no matter how long it is.
If you want to learn more about preparing presentations, check out the articles below:

I've shared some example presentation templates throughout this guide. You can find even more stunning templates for your next presentation in the following presentation template guides:

Make sure your slides pop with an attractive design template. If design isn't your strong point, there's no need to worry. Envato Elements has a great offer you can take advantage of today. Download as many PowerPoint presentation templates for your 5-minute presentation as you want all for one low price.
To find the perfect PowerPoint slide design, select Presentation Templates from the onscreen search box. You'll find thousands of templates. Use the on-site filtering tools to find the perfect one for your next presentation.
Find Presentation Templates

These PowerPoint slide designs are professionally created and well supported to allow you to create virtually any kind of presentation you want.
Plus, Envato Elements now has AI-assisted search . So, you can find the presentation template you need even more quickly.
Download Your Next Presentation Template and Get Started!
We've just discused questions such as how many minutes per slide and how many slides are needed for various timeframes. As we've learned, the number of slides per timeframe can vary per speaker. But it's important to plan your presentation to fit the time allotted.Remember, for a head start on creating the perfect visual identity for your presentation, download unlimited PowerPoint template s from Envato Elements.
Now it's over to you now to get started on creating the perfect slides for your next presentation.
Editorial Note : This tutorial was originally published in February of 2019. It's been completely reviewed for accuracy and relevancy by Sarah Joy .


- Tips & Tricks
- PowerPoint Templates
- Training Programs
- Free E-Courses
20-Minute Beginners Guide to PowerPoint
Get started with PowerPoint for Beginners. Follow this 20-Minute step by step Beginners Guide to PowerPoint and start creating presentations confidently.
Contents of this video tutorial:
00:00 Introduction
00:55 How to open PowerPoint
01:47 How to Use PowerPoint Templates to get started
02:41 How to Open a Blank Presentation
03:07 Pin Program to Taskbar
03:40 How to Save Your PowerPoint Presentation
04:55 Key Terms You Should Know
06:10 Creating slides easily
06:51 Apply professional design to slides quickly
07:35 Finding Design Theme Variants
08:03 Ways to add a new slide
08:24 Find Dropdown Menu with additional options
09:33 Add Presentation Title and content
10:23 Use SmartArt Diagrams to makeover slides quickly
11:15 Apply different slide layouts
11:38 Different Ways to Insert Pictures
12:35 How to Resize Pictures
12:50 How to Add Textboxes
13:12 How to Change Font style and Font size
14:12 Copy and paste elements easily
15:10 Presenting slides with Slideshow
16:15 Navigating in Slideshow mode
17:00 Return to Normal View
17:13 How to Add Animations
18:40 Add Transition across slides
If you are looking for a structured program to get started with PowerPoint, do check our PowerPoint Foundation Course.
The course includes 13.5 Hours of step by step tutorial videos, quizzes to check understanding, short assignments and a certificate of completion.

Hope you found this tutorial useful to refresh your PowerPoint knowledge and get started using PowerPoint more confidently. Do check our other tutorials on this website.
Get 25 Creative PowerPoint Ideas Mini Course & Members-only tips & offers. Sign up for free below:

HUGH CULVER
Author, speaker, coach, 10 easy ways to make any powerpoint presentation awesome.

Updated to Speaking on May 3, 2023.
This post was updated in 2023.
It was 20 minutes before lunch, my client was frantically looking at the clock, and the audience was squirming. We had suffered through endless forgettable PowerPoint slides and were all hoping for a merciful end. That’s when the presenter announced, “I see I’m running out of time, so I’ll just hurry through my last 30 slides.”
We’ve all suffered through slide shows with long lists of unreadable bullets, unnecessary YouTube clips, and overuse of graphics. Instead of holding our attention and making their point even stronger, each slide distracts the audience with more content they don’t need. Bad slides are agnostic. You can use PowerPoint, Keynote, Prezi, Google Slides, or hold up a piece of paper – it’s all a distraction if you don’t do it well.
Done well, a thoughtfully prepared slide deck can be the perfect slide dish for your full meal presentation. Done poorly and your audience will feel like they made one too many trips to the buffet table. This post will help you do it well.
For the first years of my speaking career, I presented with 35mm slides. You know, the photographs framed by cardboard that got jammed in the projector? That was me – hauling out the projector, clicking in the carousel, and praying that tonight it would all work. I soon learned that the more slides I showed the less the audience listened to me. So I cut back on the slides. I also noticed that when I switched to a black screen (see #9) the audience turned all their attention to me. So I practiced fading to black whenever I told a story or had an important point to make.
How I started
When I switched to PowerPoint I suddenly had a candy shop full of treats to sweeten my presentations with. And I started making all the same mistakes again: too many slides, too much content on each slide, and too distracting. After every presentation I always do a quick debrief – what worked, what needs to change? And slowly I developed a checklist for slide presentations.
I have shared with checklist with hundreds of speakers to help put the spotlight on them. Some were designing a new speech, some were preparing for a webinar and others needed slides to back up a video presentation. In every case, this checklist made their presentation better. They sold more products, got more referrals, and, in most cases, spent a lot less time working on their slide deck.

If you’ve ever struggled to create interesting slides or worry your slides are too wordy or you have too many of them, this will help.
Here are my 10 easy ways to make any PowerPoint presentation awesome.
1. Build your slides last
This might be the most important rule on the list. Don’t build your slide deck until you build your presentation.
You could be tempted to start monkeying with slides early in your speech writing process – after all, it’s a fun way to procrastinate from all that hard thinking – don’t. Building your slide deck before you build your presentation is like building a road before you know where it’s going.
Your slides are there to ADD to a well-designed speech, not to replace it.
2. Don’t try to replace you
People come to hear you. If you are launching your service on a webinar, they want to know how this solution has helped you and whether is it right for them. If you are delivering a keynote speech or workshop, they want a glimpse into your solutions that can help move them forward in their work or in life.
Fancy transitions, superfluous video clips, and endless bullet points will get your audience’s attention, but take their attention off of you. Every time you hit the clicker the audience leaves you and goes to the screen.
Your goal for every presentation is to deliver the goods, not the slides.
3. Use a consistent theme
We are easily distracted and confused. That’s why brands always anchor advertising on their unique colors, fonts, slogan, or a jingle. They know that consistency in their brand theme builds recognition and puts more attention on the message. You should do that with your slides.

Start with a simple, white background and san serif fonts.
A consistent, simple theme helps your audience focus on the content of each slide. Watch TED talks that have gone viral to see how simple a slide theme can be, like the ones by Dan Pink The puzzle of motivation (30M views), and Shawn Achor The happy secret to better work (25M views).
4. More images, less text
Want to quickly reenergize a tired slide deck? Make your images larger ( in this post I share where to get free images ) and reduce the text size. Remember, the theme in this post is that you are the presentation, not your slides.

Your brain can process images 60,000 times faster than text. When you use images (and less text) you allow your audience to process the image without distracting them away from your powerful story, or making a critical point. Like subtle mood music in the background of a dramatic movie scene, images can augment and enhance what you are saying without stealing the show.
5. One story per slide
When I started using PowerPoint I would have 60 to 80 slides for a 60-minute speech. It was a lot of work to prepare each deck and when I was deep into the speech I would sometimes forget where I was and have to jump forward a couple of slides.
Then it became 30-35 slides and I could breathe easier, knowing that fewer clicks meant less to worry about. As my confidence grew it became 10-12 slides and each slide became a key part of storytelling or point-making—they had to earn their place.
I might use a slide as a backdrop to a story or for a short list that supports a lesson I’m delivering. Either way, it’s always on ‘story’ per slide. If I don’t need a slide, I fade to black (#9).
But, I always stick to one story per slide.
6. Reveal one bullet at a time
This is an easy one – reveal one bullet at a time. The function of bullets is to reinforce (not replace) what you are delivering. That’s why they need to be short (see the 2/4/8 rule, below). A good bullet point is complete on it’s own, but much better when combined with a live presentation of it. Here’s an example from a list of (very wordy) time management strategies:
- Infrequent visits to your Inbox give you more time for deep work
- time blocking allows you to protect time for important work
- the Pomodoro technique can help you focus with fewer distractions
A better list – like one you might use on a PowerPoint slide – would be:
- visit your Inbox less often
- block time for important work
- the Pomodoro technique helps you focus
To reveal one bullet at a time in PowerPoint, right-click on your text box, select Custom Animation > Add Entrance Effect and then choose the effect you want. In Keynote, click Animate > Build in and choose the effect you want.
7. Leave the fireworks to Disney
It’s great that you know how to turn text into flames and make images spin with the click of your mouse – but leave those fireworks to Disney. Your job is to make your content the star of the show. Every time you haul the audience’s attention away to some animation you lose a truckload of opportunity to help them.

Your slides can still be amazing and helpful, but that should always be secondary to your primary purpose of helping people. Simple transitions, clean, san serif fonts, and large, attractive graphics trump PowerPoint tricks, every time.
8. The 2/4/8 rule
When I am advising other speakers I often don’t know their topic—certainly not as well as they do. So I rely on certain rules I have developed over many years. For slide decks, I use my 2/4/8 rule. Here’s how it goes…
- about every 2 minutes I have a new slide (that’s 30 slides for a 60-minute speech),
- no more than 4 bullets per slide, and
- no more than 8 words per bullet.
Just like any recipe, you can mess with the ingredient a bit. If your content is more technical, you might need more slides. Sometimes I need 5 or 6 bullets. I use the 2/4/8 rule to remind me that slides are there to support what I have to say, not replace me.
9. Fade to black
The last time I was shopping for a car, I noticed the salesperson had a clever technique. While he asked how I liked the car and if I had any questions, he kept his sales offer face-down on the table. Because there were no other distractions, he had my full attention. And when it was time to reveal his offer, it was much more dramatic (so was the price!) Use the same technique with your slides.
When you fade to black you regain your audience’s attention. For example, after I present a solution, I’ll fade to black while I expound on how to apply that solution in my audience’s work/life. When I’m finished, I turn black off and go to the next point. Or if I’m halfway through a story I’ll fade to back before the punchline so I know I have everyone’s attention.
It’s no different than a close-up scene in a movie—the director wants you to focus only on the speaker. Note that if you are shopping for a slide remote, be sure that yours has the black screen feature.
10. When in doubt, delete
This might be the most advice I can leave you with. When in doubt, delete it.
There is a weird attraction to more. Authors add more pages thinking it makes the book more valuable. Sales people who talk too much miss the opportunity to ask for the sale. And presenters add more slides thinking it will make them look better. Wrong.
When you are doing the final edits on your slide deck, the ultimate question you should be asking about each slide is, “Will it make my speech better?” If not, dump it.
Remember, nobody will miss what isn’t there. Also fewer slides allows you more time for side stories, spontaneous thoughts or even time for Q&A.
Remember this…
I’ve said it numerous times in this post, but it’s worth repeating. You are the show, not your slides. More slides means more time your audience is not paying attention to you. Fewer (and better) slides means you have more time to build rapport, share memorable stories, explain your solutions and motivate your audience to action. You are there for a reason. Now go and deliver.
One last thing. Spend the $80 and pack a remote (with spare batteries.) Nothing’s worse than watching a speaker repeatedly lean over, hunt for the right key, and then peck away to advance the slides.
If you enjoyed this article, here is more about presentation skills:
How the experts create world-class PowerPoint Slides (and you can too) PowerPoint Primer – the only 3 slides you’ll ever need How to add video to PowerPoint and Keynote like a pro
Slide by Nathan Anderson on Unsplash
Related Posts

End procrastination. Start taking action.
Get your FREE 30-page guide now.

- My Million-Dollar Lesson About Public Speaking
- Time Management is Broken—Here’s What to do Instead
- The Spiral and the Flywheel
- The magic of boring routines
- How to get started on your goals with small wins
- Goodbye 2023
- BOOK A CALL

How to produce the best presentation in the shortest time possible: 10-step guide

Have you ever been asked to give a presentation and had no idea where to start? It’s easy to waste a lot of time and effort when creating a PowerPoint presentation. Common mistakes include producing far too much content only to cut half of it out later, making your slides too text heavy rather than visual, and losing sight of your key message amongst the waffle!
Follow our 10-step guide to building a killer presentation in the shortest time possible:
- Start by getting crystal clear on your presentation purpose
What is the outcome you want from this talk? What is the best possible reaction or feedback you could get from the audience? Start with this and write it down on paper.
- Find out who’s attending
Ask the event organiser for details of the audience. What are their job titles? How much do they know about the topic? Most importantly, what do they want to get out of your talk?
- Clarify your core message
Now that you’re clear on your presentation’s purpose and audience, what is the key message you want to leave your audience with? Hint: you should be able to say this in 15 words or less, and it should be clear enough for your audience to be able to repeat at the end of your presentation.
- Begin creating your content.
The basic outline of your presentation should look like this:
(i) Tell the audience what you’re going to tell them
(ii) Tell them it
(iii) Tell them what you told them
And the expanded version might look like this:
Opening - Could open with a startling question / statement / story to grab attention…
Introduction - Good morning, my name is X and today I’m going to tell you X….
Body - Point 1 – Support material (Story? Facts?) Point 2 – Support material (Story? Facts?) Point 3 – Support material (Story? Facts?)
Conclusion - To summarise, today I have told you about X….
Call to action - If you’d like to know more, you can contact me at X…
Close - Thank you for listening. I’ll hand you back over to X…
- Calculate how many slides should be in your presentation
The recommended slide use is to speak for 2 minutes per slide, so if you’re giving a 20 minute presentation, aim for around 10 slides. Open up PowerPoint and insert the right number of slides before you begin writing so you can see how big the canvas is.
- Populate your PowerPoint slides, using a font size of no less than 30 pts
When you see how big this looks, it will help you to keep the text on your slides to an absolute minimum! Use simple language and steer clear of jargon. You can use the ‘notes’ section underneath the slide for more extensive notes to help you talk around the slide content.
- Now swap some of the text for visual content to bring your presentation to life
This could be photos, videos, infographics, graphs… anything that presents the information in a visually stimulating way. Believe it or not, our brains process imagery 60,000 times faster than text!
- Incorporate stories, metaphors and anecdotes
Did you know we are 22 times more likely to remember a story than a fact? This is because stories engage the emotional part of our brains. If you want to make a point no one will forget, link it to a story or a metaphor. For example, I once saw a conference speaker open their presentation like this:
“The early bird gets the worm or the second mouse gets the cheese. Which one of these is true when it comes to business?”
- Add in questions.. or at least rhetorical questions
Some audience interaction is a great way to wake people up, especially at the beginning of your presentation. You could ask a poignant question that leads you onto your next slide, or ask for a raise of hands, for example “Does anyone here want to guess what % of people in the UK give money to charity?” “Raise your hands if you’ve spent more than 20 minutes on Facebook today!”
- Practise, practise, practise
Do a dry run with friends, or video record yourself giving the presentation to familiarise yourself with the content and practise the flow. The earlier you do this in the process or building your slides, the more time you will save. Always leave tidying up your slides until the last stage, as the content of your presentation will evolve as you practise it in real time.
The final word? Make sure your PowerPoint slide show supports your talk, not the other way around. Be careful not to just read your slides out. Keep the audience focused on you rather than your PowerPoint by presenting with flair and enthusiasm.
Fancy a practice run-through with us? You can get some expert feedback through private coaching.
This article was written by Carrie Swift, founder of Fearless.
Carrie Swift
Communication Skills Coach, Founder and CEO at Fearless
Latest posts
Winning Negotiation Strategies: Master the Art of Persuasion and Influence
Win-Win Negotiation: Persuasive Techniques for Achieving Mutually Beneficial Outcomes
Critical PowerPoint Shortcuts – Claim Your FREE Training Module and Get Your Time Back!
How to Make a PowerPoint Presentation (Step-by-Step)
- PowerPoint Tutorials
- Presentation Design
- January 22, 2024
In this beginner’s guide, you will learn step-by-step how to make a PowerPoint presentation from scratch.
While PowerPoint is designed to be intuitive and accessible, it can be overwhelming if you’ve never gotten any training on it before. As you progress through this guide, you’ll will learn how to move from blank slides to PowerPoint slides that look like these.

Table of Contents
Additionally, as you create your presentation, you’ll also learn tricks for working more efficiently in PowerPoint, including how to:
- Change the slide order
- Reset your layout
- Change the slide dimensions
- Use PowerPoint Designer
- Format text
- Format objects
- Play a presentation (slide show)
With this knowledge under your belt, you’ll be ready to start creating PowerPoint presentations. Moreover, you’ll have taken your skills from beginner to proficient in no time at all. I will also include links to more advanced PowerPoint topics.
Ready to start learning how to make a PowerPoint presentation?
Take your PPT skills to the next level
Start with a blank presentation.
Note: Before you open PowerPoint and start creating your presentation, make sure you’ve collected your thoughts. If you’re going to make your slides compelling, you need to spend some time brainstorming.
For help with this, see our article with tips for nailing your business presentation here .
The first thing you’ll need to do is to open PowerPoint. When you do, you are shown the Start Menu , with the Home tab open.
This is where you can choose either a blank theme (1) or a pre-built theme (2). You can also choose to open an existing presentation (3).
For now, go ahead and click on the Blank Presentation (1) thumbnail.

Doing so launches a brand new and blank presentation for you to work with. Before you start adding content to your presentation, let’s first familiarize ourselves with the PowerPoint interface.
The PowerPoint interface

Here is how the program is laid out:
- The Application Header
- The Ribbon (including the Ribbon tabs)
- The Quick Access Toolbar (either above or below the Ribbon)
- The Slides Pane (slide thumbnails)
The Slide Area
The notes pane.
- The Status Bar (including the View Buttons)
Each one of these areas has options for viewing certain parts of the PowerPoint environment and formatting your presentation.
Below are the important things to know about certain elements of the PowerPoint interface.
The PowerPoint Ribbon

The Ribbon is contextual. That means that it will adapt to what you’re doing in the program.
For example, the Font, Paragraph and Drawing options are greyed out until you select something that has text in it, as in the example below (A).

Furthermore, if you start manipulating certain objects, the Ribbon will display additional tabs, as seen above (B), with more commands and features to help you work with those objects. The following objects have their own additional tabs in the Ribbon which are hidden until you select them:
- Online Pictures
- Screenshots
- Screen Recording
The Slides Pane

This is where you can preview and rearrange all the slides in your presentation.
Right-clicking on a slide in the pane gives you additional options on the slide level that you won’t find on the Ribbon, such as Duplicate Slide , Delete Slide , and Hide Slide .

In addition, you can add sections to your presentation by right-clicking anywhere in this Pane and selecting Add Section . Sections are extremely helpful in large presentations, as they allow you to organize your slides into chunks that you can then rearrange, print or display differently from other slides.

The Slide Area (A) is where you will build out your slides. Anything within the bounds of this area will be visible when you present or print your presentation.
Anything outside of this area (B) will be hidden from view. This means that you can place things here, such as instructions for each slide, without worrying about them being shown to your audience.

The Notes Pane is the space beneath the Slide Area where you can type in the speaker notes for each slide. It’s designed as a fast way to add and edit your slides’ talking points.
To expand your knowledge and learn more about adding, printing, and exporting your PowerPoint speaker notes, read our guide here .
Your speaker notes are visible when you print your slides using the Notes Pages option and when you use the Presenter View . To expand your knowledge and learn the ins and outs of using the Presenter View , read our guide here .

You can resize the Notes Pane by clicking on its edge and dragging it up or down (A). You can also minimize or reopen it by clicking on the Notes button in the Status Bar (B).
Note: Not all text formatting displays in the Notes Pane, even though it will show up when printing your speaker notes. To learn more about printing PowerPoint with notes, read our guide here .
Now that you have a basic grasp of the PowerPoint interface at your disposal, it’s time to make your presentation.
Adding Content to Your PowerPoint Presentation
Notice that in the Slide Area , there are two rectangles with dotted outlines. These are called Placeholders and they’re set on the template in the Slide Master View .
To expand your knowledge and learn how to create a PowerPoint template of your own (which is no small task), read our guide here .

As the prompt text suggests, you can click into each placeholder and start typing text. These types of placeholder prompts are customizable too. That means that if you are using a company template, it might say something different, but the functionality is the same.

Note: For the purposes of this example, I will create a presentation based on the content in the Starbucks 2018 Global Social Impact Report, which is available to the public on their website.
If you type in more text than there is room for, PowerPoint will automatically reduce its font size. You can stop this behavior by clicking on the Autofit Options icon to the left of the placeholder and selecting Stop Fitting Text to this Placeholder .
Next, you can make formatting adjustments to your text by selecting the commands in the Font area and the Paragraph area of the Home tab of the Ribbon.

The Reset Command: If you make any changes to your title and decide you want to go back to how it was originally, you can use the Reset button up in the Home tab .

Insert More Slides into Your Presentation
Now that you have your title slide filled in, it’s time to add more slides. To do that, simply go up to the Home tab and click on New Slide . This inserts a new slide in your presentation right after the one you were on.

You can alternatively hit Ctrl+M on your keyboard to insert a new blank slide in PowerPoint. To learn more about this shortcut, see my guide on using Ctrl+M in PowerPoint .
Instead of clicking the New Slide command, you can also open the New Slide dropdown to see all the slide layouts in your PowerPoint template. Depending on who created your template, your layouts in this dropdown can be radically different.

If you insert a layout and later want to change it to a different layout, you can use the Layout dropdown instead of the New Slide dropdown.
After inserting a few different slide layouts, your presentation might look like the following picture. Don’t worry that it looks blank, next we will start adding content to your presentation.

If you want to follow along exactly with me, your five slides should be as follows:
- Title Slide
- Title and Content
- Section Header
- Two Content
- Picture with Caption
Adding Content to Your Slides
Now let’s go into each slide and start adding our content. You’ll notice some new types of placeholders.

On slide 2 we have a Content Placeholder , which allows you to add any kind of content. That includes:
- A SmartArt graphic,
- A 3D object,
- A picture from the web,
- Or an icon.
To insert text, simply type it in or hit Ctrl+C to Copy and Ctrl+V to Paste from elsewhere. To insert any of the other objects, click on the appropriate icon and follow the steps to insert it.
For my example, I’ll simply type in some text as you can see in the picture below.

Slides 3 and 4 only have text placeholders, so I’ll go ahead and add in my text into each one.

On slide 5 we have a Picture Placeholder . That means that the only elements that can go into it are:
- A picture from the web

To insert a picture into the picture placeholder, simply:
- Click on the Picture icon
- Find a picture on your computer and select it
- Click on Insert
Alternatively, if you already have a picture open somewhere else, you can select the placeholder and paste in (shortcut: Ctrl+V ) the picture. You can also drag the picture in from a file explorer window.

If you do not like the background of the picture you inserted onto your slide, you can remove the background here in PowerPoint. To see how to do this, read my guide here .
Placeholders aren’t the only way to add content to your slides. At any point, you can use the Insert tab to add elements to your slides.
You can use either the Title Only or the Blank slide layout to create slides for content that’s different. For example, a three-layout content slide, or a single picture divider slide, as shown below.

In the first example above, I’ve inserted 6 text boxes, 3 icons, and 3 circles to create this layout. In the second example, I’ve inserted a full-sized picture and then 2 shapes and 2 text boxes.
The Reset Command: Because these slides are built with shapes and text boxes (and not placeholders), hitting the Reset button up in the Home tab won’t do anything.
That is a good thing if you don’t want your layouts to adjust. However, it does mean that it falls on you to make sure everything is aligned and positioned correctly.
For more on how to add and manipulate the different objects in PowerPoint, check out our step-by-step articles here:
- Using graphics in PowerPoint
- Inserting icons onto slides
- Adding pictures to your PowerPoint
- How to embed a video in PowerPoint
- How to add music to your presentation
Using Designer to generate more layouts ideas
If you have Office 365, your version of PowerPoint comes with a new feature called Designer (or Design Ideas). This is a feature that generates slide layout ideas for you. The coolest thing about this feature is that it uses the content you already have.
To use Designer , simply navigate to the Design tab in your Ribbon, and click on Design Ideas .

NOTE: If the PowerPoint Designer is not working for you (it is grey out), see my troubleshooting guide for Designer .
Change the Overall Design (optional)
When you make a PowerPoint presentation, you’ll want to think about the overall design. Now that you have some content in your presentation, you can use the Design tab to change the look and feel of your slides.
For additional help thinking through the design of your presentation, read my guide here .
A. Picking your PowerPoint slide size
If you have PowerPoint 2013 or later, when you create a blank document in PowerPoint, you automatically start with a widescreen layout with a 16:9 ratio. These dimensions are suitable for most presentations as they match the screens of most computers and projectors.
However, you do have the option to change the dimensions.
For example, your presentation might not be presented, but instead converted into a PDF or printed and distributed. In that case, you can easily switch to the standard dimensions with a 4:3 ratio by selecting from the dropdown (A).
You can also choose a custom slide size or change the slide orientation from landscape to portrait in the Custom Slide Size dialog box (B).

To learn all about the different PowerPoint slide sizes, and some of the issues you will face when changing the slide size of a non-blank presentation, read my guide here .
B. Selecting a PowerPoint theme
The next thing you can do is change the theme of your presentation to a pre-built one. For a detailed explanation of what a PowerPoint theme is, and how to best use it, read my article here .
In the beginning of this tutorial, we started with a blank presentation, which uses the default Office theme as you can see in the picture below.

That gives you the most flexibility because it has a blank background and quite simple layouts that work for most presentations. However, it also means that it’s your responsibility to enhance the design.
If you’re comfortable with this, you can stay with the default theme or create your own custom theme ( read my guide here ). But if you would rather not have to think about design, then you can choose a pre-designed theme.
Microsoft provides 46 other pre-built themes, which include slide layouts, color variants and palettes, and fonts. Each one varies quite significantly, so make sure you look through them carefully.
To select a different theme, go to the Design tab in the Ribbon, and click on the dropdown arrow in the Themes section .

For this tutorial, let’s select the Frame theme and then choose the third Variant in the theme. Doing so changes the layout, colors, and fonts of your presentation.

Note: The theme dropdown area is also where you can import or save custom themes. To see my favorite places to find professional PowerPoint templates and themes (and recommendations for why I like them), read my guide here .
C. How to change a slide background in PowerPoint
The next thing to decide is how you want your background to look for the entire presentation. In the Variants area, you can see four background options.

For this example, we want our presentation to have a dark background, so let’s select Style 3. When you do so, you’ll notice that:
- The background color automatically changes across all slides
- The color of the text on most of the slides automatically changes to white so that it’s visible on the dark background
- The colors of the objects on slides #6 and #7 also adjust, in a way we may not want (we’ll likely have to make some manual adjustments to these slides)

Note: If you want to change the slide background for just that one slide, don’t left-click the style. Instead, right-click it and select Apply to Selected Slides .
After you change the background for your entire presentation, you can easily adjust the background for an individual slide.

Inside the Format Background pane, you can see you have the following options:
- Gradient fill
- Picture or texture fill
- Pattern fill
- Hide background
You can explore these options to find the PowerPoint background that best fits your presentation.
D. How to change your color palette in PowerPoint
Another thing you may want to adjust in your presentation, is the color scheme. In the picture below you can see the Theme Colors we are currently using for this presentation.

Each PowerPoint theme comes with its own color palette. By default, the Office theme includes the Office color palette. This affects the colors you are presented with when you format any element within your presentation (text, shapes, SmartArt, etc.).

The good news is that the colors here are easy to change. To switch color palettes, simply:
- Go to the Design tab in the Ribbon
- In the Variants area, click on the dropdown arrow and select Colors
- Select the color palette (or theme colors) you want
You can choose among the pre-built color palettes from Office, or you can customize them to create your own.
As you build your presentation, make sure you use the colors from your theme to format objects. That way, changing the color palette adjusts all the colors in your presentation automatically.
E. How to change your fonts in PowerPoint
Just as we changed the color palette, you can do the same for the fonts.

Each PowerPoint theme comes with its own font combination. By default, the Office theme includes the Office font pairing. This affects the fonts that are automatically assigned to all text in your presentation.

The good news is that the font pairings are easy to change. To switch your Theme Fonts, simply:
- Go to the Design tab in the Ribbon
- Click on the dropdown arrow in the Variants area
- Select Fonts
- Select the font pairing you want
You can choose among the pre-built fonts from Office, or you can customize them to create your own.
If you are working with PowerPoint presentations on both Mac and PC computers, make sure you choose a safe PowerPoint font. To see a list of the safest PowerPoint fonts, read our guide here .
If you receive a PowerPoint presentation and the wrong fonts were used, you can use the Replace Fonts dialog box to change the fonts across your entire presentation. For details, read our guide here .
Adding Animations & Transitions (optional)
The final step to make a PowerPoint presentation compelling, is to consider using animations and transitions. These are by no means necessary to a good presentation, but they may be helpful in your situation.
A. Adding PowerPoint animations
PowerPoint has an incredibly robust animations engine designed to power your creativity. That being said, it’s also easy to get started with basic animations.
Animations are movements that you can apply to individual objects on your slide.

To add a PowerPoint animation to an element of your slide, simply:
- Select the element
- Go to the Animations tab in the Ribbon
- Click on the dropdown arrow to view your options
- Select the animation you want
You can add animations to multiple objects at one time by selecting them all first and then applying the animation.
B. How to preview a PowerPoint animation

There are three ways to preview a PowerPoint animation:
- Click on the Preview button in the Animations tab
- Click on the little star next to the slide
- Play the slide in Slide Show Mode
To learn other ways to run your slide show, see our guide on presenting a PowerPoint slide show with shortcuts .
To adjust the settings of your animations, explore the options in the Effect Options , Advanced Animation and the Timing areas of the Animation tab .

Note: To see how to make objects appear and disappear in your slides by clicking a button, read our guide here .
C. How to manage your animations in PowerPoint

The best way to manage lots of animations on your slide is with the Animation Pane . To open it, simply:
- Navigate to the Animations tab
- Select the Animation Pane
Inside the Animation Pane, you’ll see all of the different animations that have been applied to objects on your slide, with their numbers marked as pictured above.
Note: To see examples of PowerPoint animations that can use in PowerPoint, see our list of PowerPoint animation tutorials here .
D. How to add transitions to your PowerPoint presentation
PowerPoint has an incredibly robust transition engine so that you can dictate how your slides change from one to the other. It is also extremely easy to add transitions to your slides.
In PowerPoint, transitions are the movements (or effects) you see as you move between two slides.

To add a transition to a PowerPoint slide, simply:
- Select the slide
- Go to the Transitions tab in the Ribbon
- In the Transitions to This Slide area, click on the dropdown arrow to view your options
- Select the transition you want
To adjust the settings of the transition, explore the options in the Timing area of the Transitions tab.
You can also add the same transition to multiple slides. To do that, select them in the Slides Pane and apply the transition.
E. How to preview a transition in PowerPoint

There are three ways to preview your PowerPoint transitions (just like your animations):
- Click on the Preview button in the Transitions tab
- Click on the little star beneath the slide number in the thumbnail view
Note: In 2016, PowerPoint added a cool new transition, called Morph. It operates a bit differently from other transitions. For a detailed tutorial on how to use the cool Morph transition, see our step-by-step article here .
Save Your PowerPoint Presentation
After you’ve built your presentation and made all the adjustments to your slides, you’ll want to save your presentation. YOu can do this several different ways.

To save a PowerPoint presentation using your Ribbon, simply:
- Navigate to the File tab
- Select Save As on the left
- Choose where you want to save your presentation
- Name your presentation and/or adjust your file type settings
- Click Save
You can alternatively use the Ctrl+S keyboard shortcut to save your presentation. I recommend using this shortcut frequently as you build your presentation to make sure you don’t lose any of your work.

This is the standard way to save a presentation. However, there may be a situation where you want to save your presentation as a different file type.
To learn how to save your presentation as a PDF, see our guide on converting PowerPoint to a PDF .
How to save your PowerPoint presentation as a template
Once you’ve created a presentation that you like, you may want to turn it into a template. The easiest – but not technically correct – way, is to simply create a copy of your current presentation and then change the content.
But be careful! A PowerPoint template is a special type of document and it has its own parameters and behaviors.
If you’re interested in learning about how to create your own PowerPoint template from scratch, see our guide on how to create a PowerPoint template .
Printing Your PowerPoint Presentation
After finishing your PowerPoint presentation, you may want to print it out on paper. Printing your slides is relatively easy.

To open the Print dialog box, you can either:
- Hit Ctrl+P on your keyboard
- Or go to the Ribbon and click on File and then Print

Inside the Print dialog box, you can choose from the various printing settings:
- Printer: Select a printer to use (or print to PDF or OneNote)
- Slides: Choose which slides you want to print
- Layout: Determine how many slides you want per page (this is where you can print the notes, outline, and handouts)
- Collated or uncollated (learn what collated printing means here )
- Color: Choose to print in color, grayscale or black & white
There are many more options for printing your PowerPoint presentations. Here are links to more in-depth articles:
- How to print multiple slides per page
- How to print your speaker notes in PowerPoint
- How to save PowerPoint as a picture presentation
So that’s how to create a PowerPoint presentation if you are brand new to it. We’ve also included a ton of links to helpful resources to boost your PowerPoint skills further.
When you are creating your presentation, it is critical to first focus on the content (what you are trying to say) before getting lost inserting and playing with elements. The clearer you are on what you want to present, the easier it will be to build it out in PowerPoint.
If you enjoyed this article, you can learn more about our PowerPoint training courses and other presentation resources by visiting us here .
🔒 Unlock the PowerPoint Shortcuts Trusted by Industry Leaders KKR, American Express, HSBC, and More!
Join over 114,880 professionals from diverse fields including consulting, investment banking, advertising, marketing, sales, and business development who have supercharged their PowerPoint game with our proven methods.
✅ Customize compelling presentations effortlessly.
✅ Master time-saving techniques for faster deck creation.
✅ Boost your career prospects with top-notch PowerPoint skills.
Get FREE access to the Critical PowerPoint Shortcuts module of our premium training course by entering your name and email below.
DISCLAIMER: PC Users Only!
We respect your privacy and will keep your info safe and confidential.
About The Author

Popular Tutorials
- How to Strikethrough Text (l̶i̶k̶e̶ ̶t̶h̶i̶s̶) in Word, Excel & PowerPoint
- How to Make Animated Fireworks in PowerPoint (Step-by-Step)
- Strikethrough Shortcut (l̶i̶k̶e̶ ̶t̶h̶i̶s̶) for Word, Excel & PowerPoint
- How to Create a Flash Card Memory Game in PowerPoint (Like Jeopardy)
- Keyboard Shortcuts Not Working: Solved
PowerPoint Tutorial Categories
- Strategies & Opinions
- Shortcuts & Hacks
- Pictures, Icons, Videos, Etc.
- New Features
- Miscellaneous
- Charts & Data Viz
We help busy professionals save hours and gain peace of mind, with corporate workshops, self-paced courses and tutorials for PowerPoint and Word.
Work With Us
- Corporate Training
- Presentation & Template Design
- Courses & Downloads
- PowerPoint Articles
- Word Articles
- Productivity Resources
Find a Tutorial
- Free Training
- For Businesses
We help busy office workers save hours and gain peace of mind, with tips, training and tutorials for Microsoft PowerPoint and Word.
Master Critical PowerPoint Shortcuts – Secure Your FREE Training Module and Save Valuable Time!
⌛ Master time-saving expert techniques.
🔥 Create powerful presentations.
🚀 Propel your career to new heights.
We value your privacy – we keep your info safe.
Discover PowerPoint Hacks Loved by Industry Giants - KKR, AmEx, HSBC!
Over 114,880 professionals in finance, marketing and sales have revolutionized their PPT skills with our proven methods.
Gain FREE access to a full module of our premium PowerPoint training program – Get started today!
We hate spam too and promise to keep your information safe.
You are currently viewing a placeholder content from Facebook . To access the actual content, click the button below. Please note that doing so will share data with third-party providers.
We use essential cookies to make Venngage work. By clicking “Accept All Cookies”, you agree to the storing of cookies on your device to enhance site navigation, analyze site usage, and assist in our marketing efforts.
Manage Cookies
Cookies and similar technologies collect certain information about how you’re using our website. Some of them are essential, and without them you wouldn’t be able to use Venngage. But others are optional, and you get to choose whether we use them or not.
Strictly Necessary Cookies
These cookies are always on, as they’re essential for making Venngage work, and making it safe. Without these cookies, services you’ve asked for can’t be provided.
Show cookie providers
- Google Login
Functionality Cookies
These cookies help us provide enhanced functionality and personalisation, and remember your settings. They may be set by us or by third party providers.
Performance Cookies
These cookies help us analyze how many people are using Venngage, where they come from and how they're using it. If you opt out of these cookies, we can’t get feedback to make Venngage better for you and all our users.
- Google Analytics
Targeting Cookies
These cookies are set by our advertising partners to track your activity and show you relevant Venngage ads on other sites as you browse the internet.
- Google Tag Manager
- Infographics
- Daily Infographics
- Popular Templates
- Accessibility
- Graphic Design
- Graphs and Charts
- Data Visualization
- Human Resources
- Beginner Guides
Blog Beginner Guides How To Make a Good Presentation [A Complete Guide]
How To Make a Good Presentation [A Complete Guide]
Written by: Krystle Wong Jul 20, 2023

A top-notch presentation possesses the power to drive action. From winning stakeholders over and conveying a powerful message to securing funding — your secret weapon lies within the realm of creating an effective presentation .
Being an excellent presenter isn’t confined to the boardroom. Whether you’re delivering a presentation at work, pursuing an academic career, involved in a non-profit organization or even a student, nailing the presentation game is a game-changer.
In this article, I’ll cover the top qualities of compelling presentations and walk you through a step-by-step guide on how to give a good presentation. Here’s a little tip to kick things off: for a headstart, check out Venngage’s collection of free presentation templates . They are fully customizable, and the best part is you don’t need professional design skills to make them shine!
These valuable presentation tips cater to individuals from diverse professional backgrounds, encompassing business professionals, sales and marketing teams, educators, trainers, students, researchers, non-profit organizations, public speakers and presenters.
No matter your field or role, these tips for presenting will equip you with the skills to deliver effective presentations that leave a lasting impression on any audience.
Click to jump ahead:
What are the 10 qualities of a good presentation?
Step-by-step guide on how to prepare an effective presentation, 9 effective techniques to deliver a memorable presentation, faqs on making a good presentation, how to create a presentation with venngage in 5 steps.
When it comes to giving an engaging presentation that leaves a lasting impression, it’s not just about the content — it’s also about how you deliver it. Wondering what makes a good presentation? Well, the best presentations I’ve seen consistently exhibit these 10 qualities:
1. Clear structure
No one likes to get lost in a maze of information. Organize your thoughts into a logical flow, complete with an introduction, main points and a solid conclusion. A structured presentation helps your audience follow along effortlessly, leaving them with a sense of satisfaction at the end.
Regardless of your presentation style , a quality presentation starts with a clear roadmap. Browse through Venngage’s template library and select a presentation template that aligns with your content and presentation goals. Here’s a good presentation example template with a logical layout that includes sections for the introduction, main points, supporting information and a conclusion:

2. Engaging opening
Hook your audience right from the start with an attention-grabbing statement, a fascinating question or maybe even a captivating anecdote. Set the stage for a killer presentation!
The opening moments of your presentation hold immense power – check out these 15 ways to start a presentation to set the stage and captivate your audience.
3. Relevant content
Make sure your content aligns with their interests and needs. Your audience is there for a reason, and that’s to get valuable insights. Avoid fluff and get straight to the point, your audience will be genuinely excited.
4. Effective visual aids
Picture this: a slide with walls of text and tiny charts, yawn! Visual aids should be just that—aiding your presentation. Opt for clear and visually appealing slides, engaging images and informative charts that add value and help reinforce your message.
With Venngage, visualizing data takes no effort at all. You can import data from CSV or Google Sheets seamlessly and create stunning charts, graphs and icon stories effortlessly to showcase your data in a captivating and impactful way.

5. Clear and concise communication
Keep your language simple, and avoid jargon or complicated terms. Communicate your ideas clearly, so your audience can easily grasp and retain the information being conveyed. This can prevent confusion and enhance the overall effectiveness of the message.
6. Engaging delivery
Spice up your presentation with a sprinkle of enthusiasm! Maintain eye contact, use expressive gestures and vary your tone of voice to keep your audience glued to the edge of their seats. A touch of charisma goes a long way!
7. Interaction and audience engagement
Turn your presentation into an interactive experience — encourage questions, foster discussions and maybe even throw in a fun activity. Engaged audiences are more likely to remember and embrace your message.
Transform your slides into an interactive presentation with Venngage’s dynamic features like pop-ups, clickable icons and animated elements. Engage your audience with interactive content that lets them explore and interact with your presentation for a truly immersive experience.

8. Effective storytelling
Who doesn’t love a good story? Weaving relevant anecdotes, case studies or even a personal story into your presentation can captivate your audience and create a lasting impact. Stories build connections and make your message memorable.
A great presentation background is also essential as it sets the tone, creates visual interest and reinforces your message. Enhance the overall aesthetics of your presentation with these 15 presentation background examples and captivate your audience’s attention.
9. Well-timed pacing
Pace your presentation thoughtfully with well-designed presentation slides, neither rushing through nor dragging it out. Respect your audience’s time and ensure you cover all the essential points without losing their interest.
10. Strong conclusion
Last impressions linger! Summarize your main points and leave your audience with a clear takeaway. End your presentation with a bang , a call to action or an inspiring thought that resonates long after the conclusion.
In-person presentations aside, acing a virtual presentation is of paramount importance in today’s digital world. Check out this guide to learn how you can adapt your in-person presentations into virtual presentations .

Preparing an effective presentation starts with laying a strong foundation that goes beyond just creating slides and notes. One of the quickest and best ways to make a presentation would be with the help of a good presentation software .
Otherwise, let me walk you to how to prepare for a presentation step by step and unlock the secrets of crafting a professional presentation that sets you apart.
1. Understand the audience and their needs
Before you dive into preparing your masterpiece, take a moment to get to know your target audience. Tailor your presentation to meet their needs and expectations , and you’ll have them hooked from the start!
2. Conduct thorough research on the topic
Time to hit the books (or the internet)! Don’t skimp on the research with your presentation materials — dive deep into the subject matter and gather valuable insights . The more you know, the more confident you’ll feel in delivering your presentation.
3. Organize the content with a clear structure
No one wants to stumble through a chaotic mess of information. Outline your presentation with a clear and logical flow. Start with a captivating introduction, follow up with main points that build on each other and wrap it up with a powerful conclusion that leaves a lasting impression.
Delivering an effective business presentation hinges on captivating your audience, and Venngage’s professionally designed business presentation templates are tailor-made for this purpose. With thoughtfully structured layouts, these templates enhance your message’s clarity and coherence, ensuring a memorable and engaging experience for your audience members.
Don’t want to build your presentation layout from scratch? pick from these 5 foolproof presentation layout ideas that won’t go wrong.

4. Develop visually appealing and supportive visual aids
Spice up your presentation with eye-catching visuals! Create slides that complement your message, not overshadow it. Remember, a picture is worth a thousand words, but that doesn’t mean you need to overload your slides with text.
Well-chosen designs create a cohesive and professional look, capturing your audience’s attention and enhancing the overall effectiveness of your message. Here’s a list of carefully curated PowerPoint presentation templates and great background graphics that will significantly influence the visual appeal and engagement of your presentation.
5. Practice, practice and practice
Practice makes perfect — rehearse your presentation and arrive early to your presentation to help overcome stage fright. Familiarity with your material will boost your presentation skills and help you handle curveballs with ease.
6. Seek feedback and make necessary adjustments
Don’t be afraid to ask for help and seek feedback from friends and colleagues. Constructive criticism can help you identify blind spots and fine-tune your presentation to perfection.
With Venngage’s real-time collaboration feature , receiving feedback and editing your presentation is a seamless process. Group members can access and work on the presentation simultaneously and edit content side by side in real-time. Changes will be reflected immediately to the entire team, promoting seamless teamwork.

7. Prepare for potential technical or logistical issues
Prepare for the unexpected by checking your equipment, internet connection and any other potential hiccups. If you’re worried that you’ll miss out on any important points, you could always have note cards prepared. Remember to remain focused and rehearse potential answers to anticipated questions.
8. Fine-tune and polish your presentation
As the big day approaches, give your presentation one last shine. Review your talking points, practice how to present a presentation and make any final tweaks. Deep breaths — you’re on the brink of delivering a successful presentation!
In competitive environments, persuasive presentations set individuals and organizations apart. To brush up on your presentation skills, read these guides on how to make a persuasive presentation and tips to presenting effectively .

Whether you’re an experienced presenter or a novice, the right techniques will let your presentation skills soar to new heights!
From public speaking hacks to interactive elements and storytelling prowess, these 9 effective presentation techniques will empower you to leave a lasting impression on your audience and make your presentations unforgettable.
1. Confidence and positive body language
Positive body language instantly captivates your audience, making them believe in your message as much as you do. Strengthen your stage presence and own that stage like it’s your second home! Stand tall, shoulders back and exude confidence.
2. Eye contact with the audience
Break down that invisible barrier and connect with your audience through their eyes. Maintaining eye contact when giving a presentation builds trust and shows that you’re present and engaged with them.
3. Effective use of hand gestures and movement
A little movement goes a long way! Emphasize key points with purposeful gestures and don’t be afraid to walk around the stage. Your energy will be contagious!
4. Utilize storytelling techniques
Weave the magic of storytelling into your presentation. Share relatable anecdotes, inspiring success stories or even personal experiences that tug at the heartstrings of your audience. Adjust your pitch, pace and volume to match the emotions and intensity of the story. Varying your speaking voice adds depth and enhances your stage presence.

5. Incorporate multimedia elements
Spice up your presentation with a dash of visual pizzazz! Use slides, images and video clips to add depth and clarity to your message. Just remember, less is more—don’t overwhelm them with information overload.
Turn your presentations into an interactive party! Involve your audience with questions, polls or group activities. When they actively participate, they become invested in your presentation’s success. Bring your design to life with animated elements. Venngage allows you to apply animations to icons, images and text to create dynamic and engaging visual content.
6. Utilize humor strategically
Laughter is the best medicine—and a fantastic presentation enhancer! A well-placed joke or lighthearted moment can break the ice and create a warm atmosphere , making your audience more receptive to your message.
7. Practice active listening and respond to feedback
Be attentive to your audience’s reactions and feedback. If they have questions or concerns, address them with genuine interest and respect. Your responsiveness builds rapport and shows that you genuinely care about their experience.

8. Apply the 10-20-30 rule
Apply the 10-20-30 presentation rule and keep it short, sweet and impactful! Stick to ten slides, deliver your presentation within 20 minutes and use a 30-point font to ensure clarity and focus. Less is more, and your audience will thank you for it!
9. Implement the 5-5-5 rule
Simplicity is key. Limit each slide to five bullet points, with only five words per bullet point and allow each slide to remain visible for about five seconds. This rule keeps your presentation concise and prevents information overload.
Simple presentations are more engaging because they are easier to follow. Summarize your presentations and keep them simple with Venngage’s gallery of simple presentation templates and ensure that your message is delivered effectively across your audience.

1. How to start a presentation?
To kick off your presentation effectively, begin with an attention-grabbing statement or a powerful quote. Introduce yourself, establish credibility and clearly state the purpose and relevance of your presentation.
2. How to end a presentation?
For a strong conclusion, summarize your talking points and key takeaways. End with a compelling call to action or a thought-provoking question and remember to thank your audience and invite any final questions or interactions.
3. How to make a presentation interactive?
To make your presentation interactive, encourage questions and discussion throughout your talk. Utilize multimedia elements like videos or images and consider including polls, quizzes or group activities to actively involve your audience.
In need of inspiration for your next presentation? I’ve got your back! Pick from these 120+ presentation ideas, topics and examples to get started.
Creating a stunning presentation with Venngage is a breeze with our user-friendly drag-and-drop editor and professionally designed templates for all your communication needs.
Here’s how to make a presentation in just 5 simple steps with the help of Venngage:
Step 1: Sign up for Venngage for free using your email, Gmail or Facebook account or simply log in to access your account.
Step 2: Pick a design from our selection of free presentation templates (they’re all created by our expert in-house designers).
Step 3: Make the template your own by customizing it to fit your content and branding. With Venngage’s intuitive drag-and-drop editor, you can easily modify text, change colors and adjust the layout to create a unique and eye-catching design.
Step 4: Elevate your presentation by incorporating captivating visuals. You can upload your images or choose from Venngage’s vast library of high-quality photos, icons and illustrations.
Step 5: Upgrade to a premium or business account to export your presentation in PDF and print it for in-person presentations or share it digitally for free!
By following these five simple steps, you’ll have a professionally designed and visually engaging presentation ready in no time. With Venngage’s user-friendly platform, your presentation is sure to make a lasting impression. So, let your creativity flow and get ready to shine in your next presentation!
Discover popular designs

Infographic maker

Brochure maker

White paper online

Newsletter creator

Flyer maker

Timeline maker

Letterhead maker

Mind map maker

Ebook maker
- PRO Courses Guides New Tech Help Pro Expert Videos About wikiHow Pro Upgrade Sign In
- EDIT Edit this Article
- EXPLORE Tech Help Pro About Us Random Article Quizzes Request a New Article Community Dashboard This Or That Game Happiness Hub Popular Categories Arts and Entertainment Artwork Books Movies Computers and Electronics Computers Phone Skills Technology Hacks Health Men's Health Mental Health Women's Health Relationships Dating Love Relationship Issues Hobbies and Crafts Crafts Drawing Games Education & Communication Communication Skills Personal Development Studying Personal Care and Style Fashion Hair Care Personal Hygiene Youth Personal Care School Stuff Dating All Categories Arts and Entertainment Finance and Business Home and Garden Relationship Quizzes Cars & Other Vehicles Food and Entertaining Personal Care and Style Sports and Fitness Computers and Electronics Health Pets and Animals Travel Education & Communication Hobbies and Crafts Philosophy and Religion Work World Family Life Holidays and Traditions Relationships Youth
- Browse Articles
- Learn Something New
- Quizzes Hot
- Happiness Hub
- This Or That Game
- Train Your Brain
- Explore More
- Support wikiHow
- About wikiHow
- Log in / Sign up
- Computers and Electronics
- Presentation Software
- PowerPoint Presentations
How to Make a Great PowerPoint Presentation
Last Updated: March 2, 2024 Tested
This article was co-authored by Maureen Taylor . Maureen Taylor is the CEO and Founder of SNP Communications, a leadership communications company based in the San Francisco Bay Area. She has been helping leaders, founders, and innovators in all sectors hone their messaging and delivery for almost 30 years, and has worked with leaders and teams at Google, Facebook, Airbnb, SAP, Salesforce, and Spotify. There are 10 references cited in this article, which can be found at the bottom of the page. The wikiHow Tech Team also followed the article's instructions and verified that they work. This article has been viewed 497,917 times.
PowerPoint is a Microsoft Office Suite program which is used to make presentation slideshows, combining text and images to create captivating and motivating presentations. However, the skills and secrets to make these excellent presentations are often, simply not there within the ones who make them! If you feel your presentation could use a little extra something, read below for some helpful ideas to take it from so-so to absolutely amazing.
Create Your Narrative

- The structure of an academic presentation should follow roughly the same structure as an academic paper, first introducing your main point, supporting it with evidence, and then a short conclusion.
- The Problem
- Your solution
- Business model
- Underlying magic/technology
- Marketing and sales
- Competition
- Projections and milestones
- Status and timeline
- Summary and call to action
Utilize the Format

Nail Your Presentation

- It’s not enough to show why your information is important to someone else; you have to make it important to your audience. Make them understand why they should care. For example, don’t give a lecture on history and just expect students to care. You need to show them how that history directly ties to current events and affects their lives. Look for parallels and direct correlations to tie your information to your audience.
What Is The Best Way To Start a Presentation?
Sample PowerPoint Presentations

Expert Q&A

- If you're using Flickr Creative Commons images, make sure you give attribution to the owner of the picture (you can do a whole page of credits at the end of your presentation). Thanks Helpful 2 Not Helpful 0
- Remember the 10/20/30 Rule -- no more than 10 slides, no longer than 20 minutes, and no smaller than 30 point font. Thanks Helpful 2 Not Helpful 0
- Don't use someone else's image unless you are sure that you have permission to do so. Thanks Helpful 2 Not Helpful 0

- Even if you miss a slide or miss a topic, avoid fumbling to find it. Move along and just before the end, say that you need an important addition to be looked upon which you had skipped purposely and then revert to the slide that you have missed and fill in the gaps. At no point should it be felt that you are not in-charge of your own PPT. Thanks Helpful 19 Not Helpful 1
- Sometimes the projector you are using may develop a problem. Be patient and let the appropriate authorities handle it. Do not swear or sweat , it happens! Then, once it's fixed, you may continue from where you left with a smile or a short joke or, if the repair took a very long time, start from the beginning. Thanks Helpful 17 Not Helpful 1
- Never read your slides word for word. Thanks Helpful 23 Not Helpful 4
- Do not overdo with the transitions and slide animations, as it can become a distraction Thanks Helpful 9 Not Helpful 2
- Practice makes perfect. Finish your presentation and then speak it out loud. Try again until you have it "down." Thanks Helpful 0 Not Helpful 0
You Might Also Like

- ↑ https://www.inc.com/guides/201102/how-to-create-a-great-powerpoint-presentation.html
- ↑ http://www.forbes.com/sites/johngreathouse/2012/09/24/9-easy-ways-to-create-powerpoint-slides-that-suck-less/
- How to Make Animation or Movies With Microsoft PowerPoint
- How to Make a Computer Scrapbook Using Power Point
- How to Animate Your Own Show
- How to Animate Clay
- How to Animate With Pivot Stickfigure Animator
- How to Insert a PowerPoint to Google Page
- How to Add a PowerPoint File to a Blog
- How to Insert a PowerPoint to MySpace Profile
About This Article

- Send fan mail to authors
Reader Success Stories
Genesis Gallegos
Feb 20, 2017
Is this article up to date?
Yogendra Singh
Sep 20, 2016
Jan 7, 2017
Aug 26, 2016

Featured Articles

Trending Articles

Watch Articles

- Terms of Use
- Privacy Policy
- Do Not Sell or Share My Info
- Not Selling Info
Keep up with tech in just 5 minutes a week!
How to Play PowerPoint Slides Automatically

The PowerPoint autoplay feature is an amazing tool for creating slideshows that advance automatically . Self-running PowerPoint presentations are great for leaving in kiosks or publicity booths. You can even show them with recordings or voiceovers to make sure your audience gets the most out of it.
Forget worrying about clicking from slide to slide, today we will teach you how to play PowerPoint slides automatically!

We’ll cover the following topics:
Why should you use the automatic slideshow PowerPoint feature?
- How to Play PowerPoint Slides Automatically without Clicking - Option 1
- How to play slideshow in PowerPoint automatically - Option 2
How to make PowerPoint slides advance automatically with audio
- How to loop slides in PowerPoint
- Check out some experts’ best practices for Automatic slideshows in PowerPoint
How to automatically play PowerPoint presentations across devices
How to play powerpoint slides automatically without clicking on mac, elevate your presentation with professional designs: try 24slides today.
Using the automatic slideshow feature has many benefits . The main one is its practicality; it is a tool you can set up in advance so that you eliminate the need for ongoing attention and your presentation flow is better.
And that’s not all, you can even add voiceovers, recordings, and even laser pointer gestures to make sure your audience gets the most out of your presentation.
It becomes particularly beneficial in the following scenarios:
- Business presentations: An automatically progressing presentation can help you focus on your content without worrying about going slide by slide, which can often be distracting and disrupt your rhythm.
- Publicity: Self-running presentations can be great if you use them for publicity. For example, if you have a kiosk or booth, a self-running PowerPoint slideshow can help you reach more people without them having to speak one-on-one with a salesperson.
- E-Learning: In e-learning modules or training presentations, autoplay can help learners progress through the material while listening to your lecture. However, they can also pause and rewind to go to the specific section they wish to revisit.
- Photo or Video Slideshows: Autoplay is commonly used in photo or video slideshows for events such as weddings or birthdays. It can serve as a background loop, or you can present it at a special moment along with music or narration to enhance the experience.
How to Play PowerPoint Slides Automatically without Clicking: Option 1
There are a couple of different ways to make your slides run automatically, and we'll go over both options. This first option is for when you need a really customized presentation: personalized timing for each slide, voiceovers, or laser pointer gestures .
If this is your case, go ahead with this section, but if you’d like something a bit simpler, proceed to Option 2.
- The first step is to go to the Slide Show Tab. On the Set Up group, you’ll find the Set Up Slide Show option to start customizing your self-running presentation.

- Once the Set Up Show Window opens, deselect the Presented by a speaker option, as it refers to manually advancing your slides, either by clicking or using keys. Next, consider several options for the automatic slideshow:
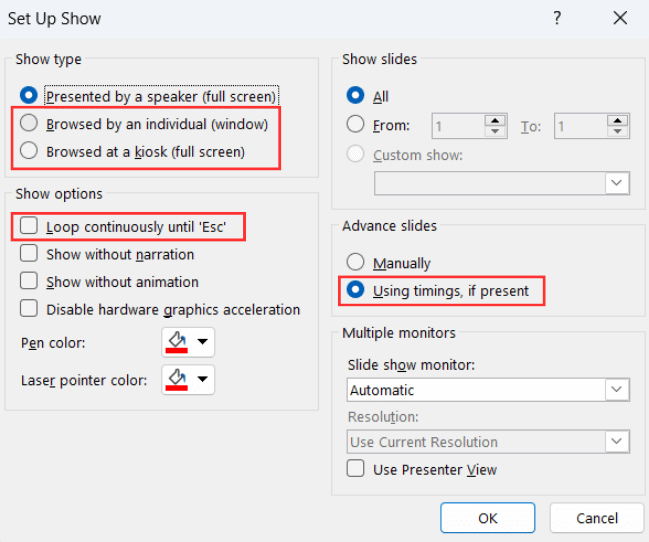
- Browsed by an individual is one choice for creating a self-running PowerPoint presentation. This option permits you to deliver your slides within a window, as opposed to the typical full-screen mode. Ensure that the Use timings, if present option is enabled for this feature to function correctly.
- Another option is the Browsed at a kiosk , which allows you to run a full-screen, continuous slideshow automatically. This option locks in both the looping and timing settings, ensuring that your slideshow will continue until you press the ESC key.
If you’re not sure what option is the best for you, remember you can always select manually the loop and timings option . Try different options with these and try out how your presentation will look like with the different settings.
- The next step is to set your timings. This means defining how much time you want your PowerPoint slideshow to spend on each slide before automatically advancing to the next one.
To set your timings, click on Rehearse Timings , which will allow you to go through your presentation slide by slide, and it’ll record how much time you spend on each one.

After you finish going through all your slides, a message will pop up to save your timings. Click yes so you can save the time spent on each slide.
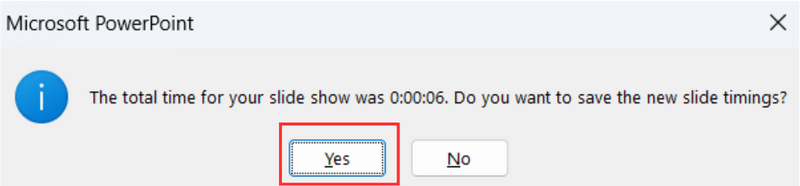
How to play slideshow in PowerPoint automatically: Option 2
Let’s take a look at a different way of using the PowerPoint autoplay feature. This option is great if you’re looking for something simple and just want your slides to advance automatically at regular intervals.
- First, open the Transitions Tab and locate the Timing Group.

- Go to the After option and manually add how much time you want to spend on each of your slides.

Select the Apply To All option so all your slides have the same timing.
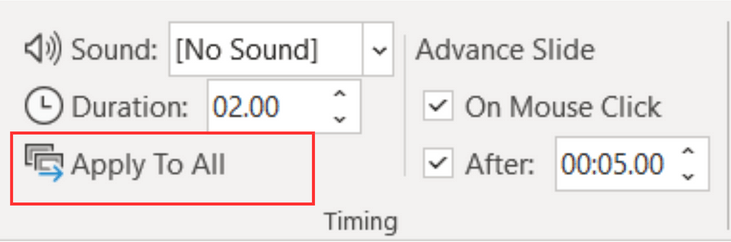
You can also deselect the On Mouse Click option, depending on whether you want to be able to advance your slides by clicking or not.
Adding audio to your automatic PowerPoint is a fantastic feature to enhance your professional image and communicate your content without needing to be present. Let’s take a look at how to do it:
- Go to the Slide Show Tab and select Record Slide Show . Choose Record From Beginning to start with the first slide.
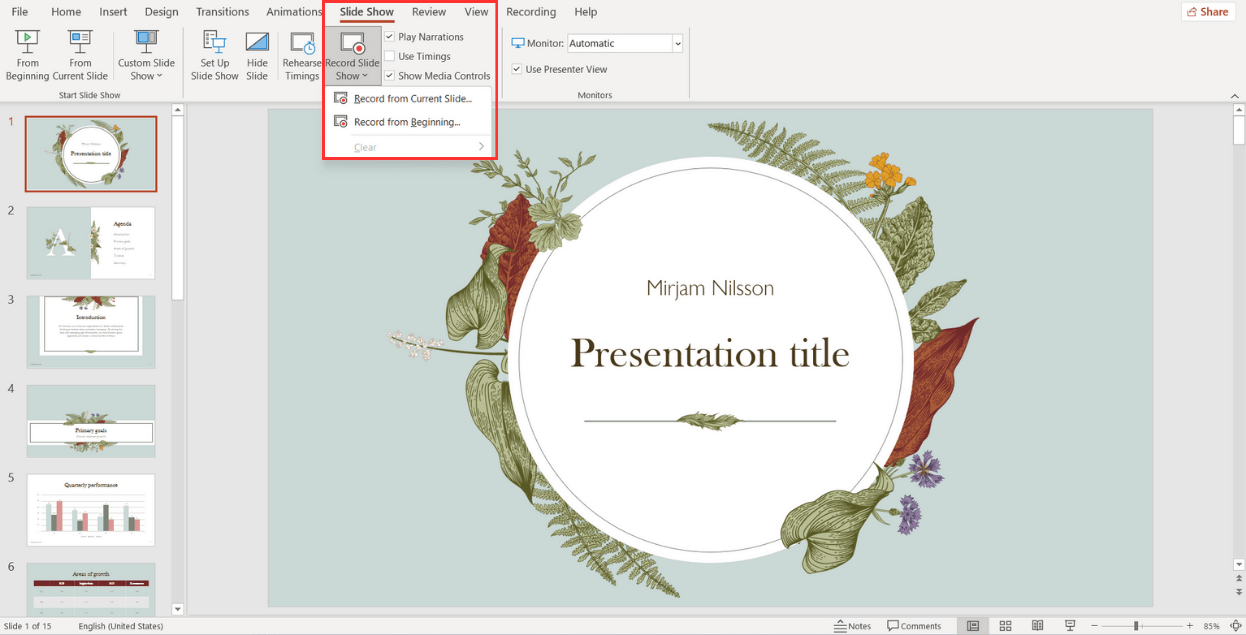
When the fullscreen opens, you will be able to see your first slide along with several options:
- Start in Settings (1) and select the tools you will be using. You have the option to use a microphone, or you can record yourself talking on camera. Choose your microphone and/or camera for recording.
- Next (2) , decide whether you want to have the microphone or camera you selected turned on. You can also choose to have a video preview.
- When you're ready to start recording, go to the top left corner (3) and click Record to start, Stop to pause, and Replay to review how it went.
- Once you finish with a slide, click on the right arrow (4) to move to the next slide.
- If you have Speaker notes in your slides, you can view them in (5) while you record.
- In the Pens and Markers section (6) , you can draw on the screen and make any annotations you want.
- Finally, the Clear option (7) allows you to clear existing recordings on the current slide or on all slides if you are unsatisfied and want to redo your recording.
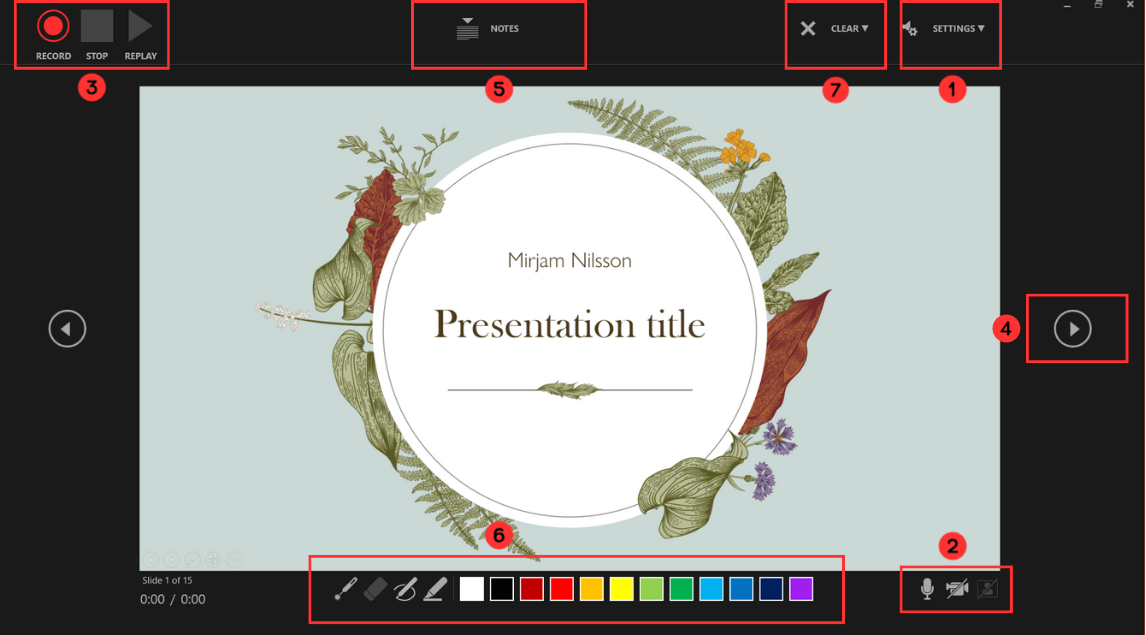
- Now, to review what you've recorded, go to Set Up and make sure Play Narrations and Use Timings are checked. Then, click on From Beginning to start the presentation.
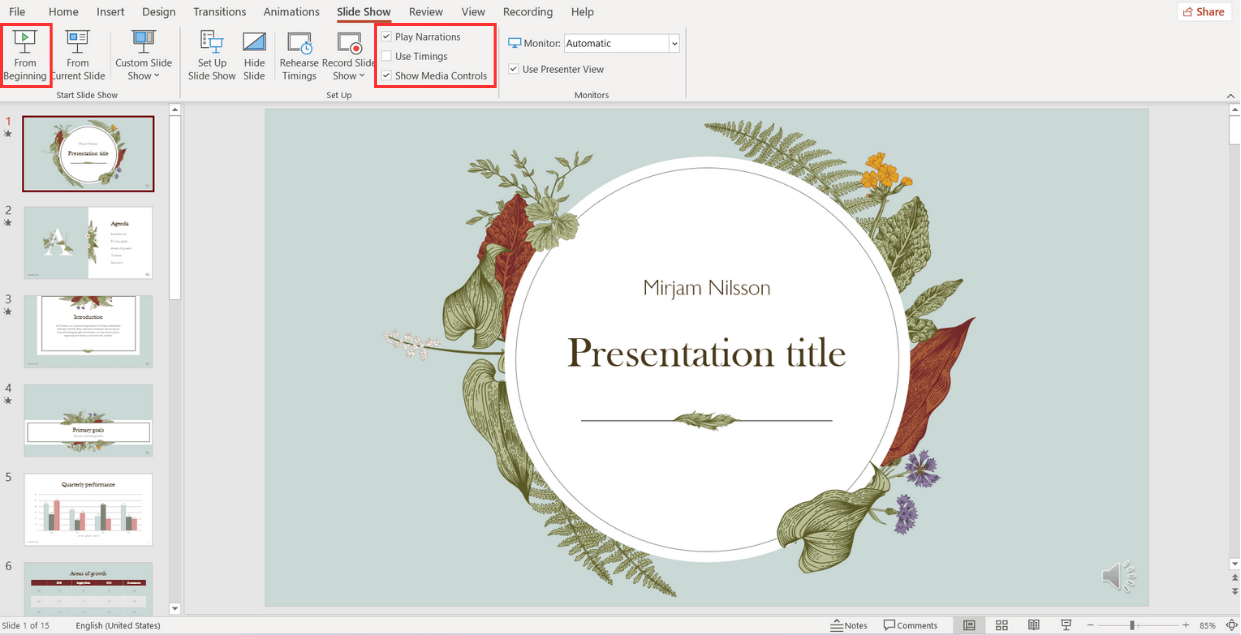
How to loop slides in PowerPoint
If you want to learn how to loop your slides in PowerPoint, follow these steps:
- Go to the Slide Show tab and select Set Up Slide Show .

- When the Set Up Show window appears, go to the Show options group and tick the Loop continuously until ‘Esc’ option. Don’t forget to click OK to apply the new setup!
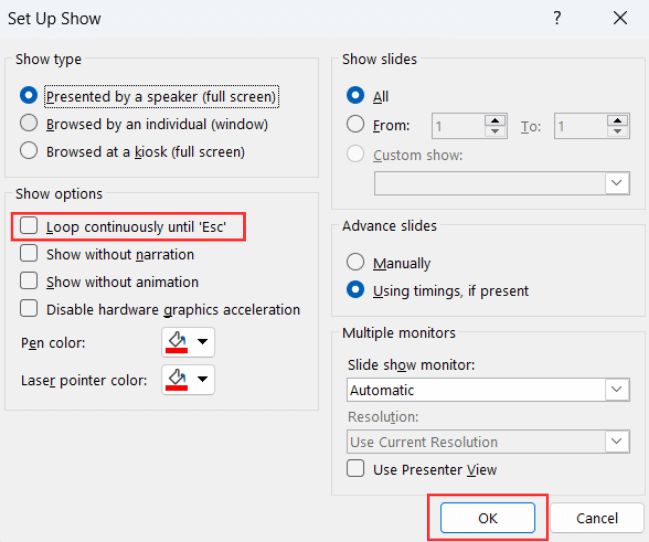
And all done! Now, your presentation will loop until you select ‘Esc’.
Check out some expert best practices for Automatic slideshows in PowerPoint
Now that you've learned how to make a PowerPoint slideshow run automatically, we'll give you the secrets to make your presentation stand out . Let's take a look at some insights from our expert designers .
Avoid too much text
Remember that your time per slide is limited , so it is important not to put too much text since your audience will not have time to read it. Try to express your message in the shortest possible text, and if necessary, revise and rewrite it as many times as necessary to synthesize it.
Limit interactive elements
Limit or avoid interactive elements such as hyperlinks that rely on user interaction since they may not function in PowerPoint autoplay mode.
However, if you want your audience or potential clients to take a specific action, consider using a QR code. Only make sure to leave the slide displayed for enough time for them to use it.
Practice, practice, practice
Keep in mind that your speech needs to fit perfectly with your timings for each slide. So, practicing your presentation multiple times is crucial to ensure a seamless and synchronized delivery.
First, go to the Slide Show Tab and select Set Up Slide Show .
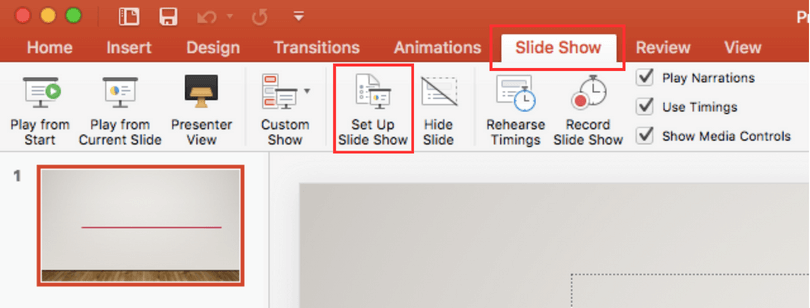
- When the Set Up Show Window opens, deselect the Presented by a speaker option and consider the following options to set up your automatic slideshow:
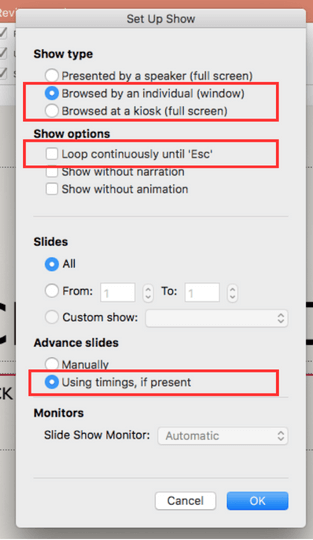
- Browsed by an individual : With this option, you can show your slides within a window instead of the typical full-screen mode. Make sure that the Use timings, if present option is selected.
- Another option is the Browsed at a kiosk : This option locks in both the looping and timing settings, ensuring that your slideshow will continue until you press the ESC key.
- Next, you need to set your timings. This involves determining the duration for each slide so that it advances automatically to the next one when you have finished presenting it.
To set your timings, go to the Slide Show Tab and click on Rehearse Timings.
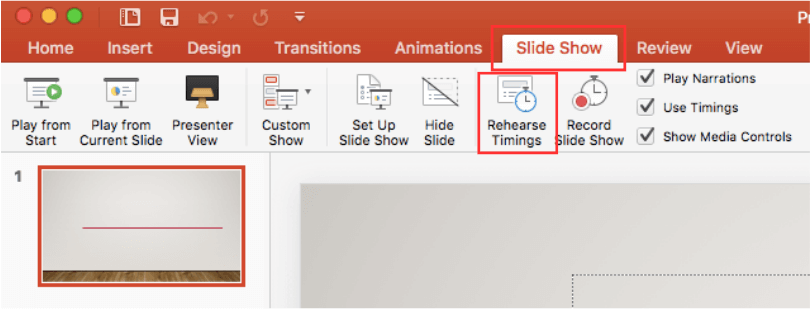
A window will open, allowing you to go through your presentation slide by slide, and it will record how much time you spend on each one . As you progress through each slide, it will confirm the time spent, and you can either agree or choose to re-record.
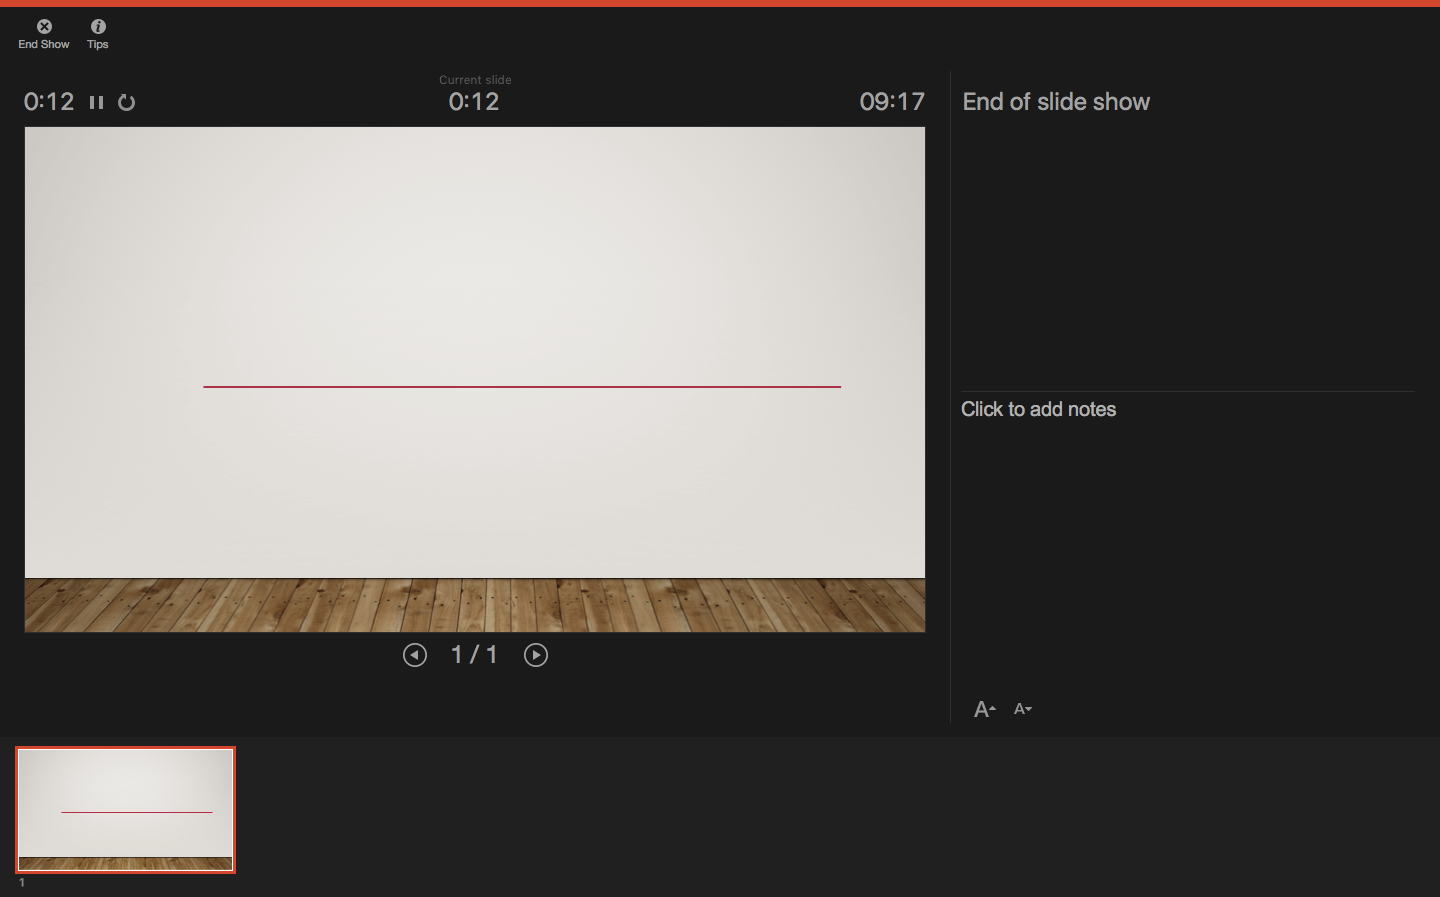
After you finish going through all your slides, a message will pop up to save your timings . Click yes so you can save the time spent on each slide.
If you’re looking to create a presentation that truly wows your audience, you might want to consider professional design assistance for your PowerPoint. Lucky for you, we’re here to help. Check out the fantastic designs 24Slides can help you create today!

You might also like
- How to Add a Timer to Your Powerpoint Presentations
- 11 Time-Saving PowerPoint Hacks For Creating Quick Presentations
- How To Loop a PowerPoint Presentation
- Add a PowerPoint Real-Time Clock to Your Presentations
Create professional presentations online
Other people also read

Tutorial: Save your PowerPoint as a Video
How To Convert Google Slides To PowerPoint and Vice Versa

How To Add Animations To PowerPoint
How Many Slides for a 20-Minute Presentation?
Last updated on May 25th, 2023
One of the most frequent questions asked by individuals preparing for a presentation is, “How many slides should I use for a 20-minute presentation?” While there’s no definitive answer to this question, as it can vary based on factors such as content, audience, and speaking style, there are general guidelines that can help in planning your presentation.
One such guideline is the 10-20-30 Rule , created by Guy Kawasaki, a venture capitalist and former chief evangelist of Apple.
This 10/20/30 rule, however, is not a one-size-fits-all solution and should be adapted based on the needs of your presentation. For a 20-minute presentation, the suggested amount of slides would typically align with the 10-20-30 Rule , but it could vary depending on the complexity and depth of your topic.
Adapting the 10-20-30 Rule for a 20-Minute Presentation
To apply the 10-20-30 Rule for a 20-minute presentation effectively, you need to take into account your speech speed and the depth of the information you are presenting. Generally, the rule of thumb is to allocate 2 minutes per slide, which would suggest 10 slides for a 20-minute presentation . However, if your presentation involves complex concepts or detailed information, you may need more slides to adequately cover the material.
On the flip side, if you’re giving a high-level overview or briefing, you might be able to stick with fewer slides. Be cautious of overloading your audience with information, though. Too many slides can lead to cognitive overload, and too few might leave your audience with unanswered questions.
Balancing Slides and Content in a 20-minute presentation
When planning your presentation, balance is key. Each slide should focus on one main point or idea, and this should be clearly conveyed to your audience. Avoid the temptation to fill your slides with text; instead, use visual slides and visual content such as infographics, charts, videos or images to support your points and maintain audience engagement.
Remember, slides are there to enhance your presentation, not to replace your verbal communication. A slide deck filled with text is likely to distract your audience and potentially lead to a less engaging presentation.
So, how many slides should I include in a 20-minute presentation?
In conclusion, the number of slides for a 20-minute presentation can vary greatly depending on various factors, including the depth and complexity of the information being presented, the speaker’s pace, and the audience’s prior knowledge and interests.
While guidelines like the 10-20-30 Rule suggest 10 slides for a 20-minute presentation, it’s important to remember that these are not rigid rules. Instead, consider them as flexible principles to guide your presentation planning.
For a standard, information-based presentation, a good baseline for the number of slides in a 20-minute presentation might be around 10 to 15 slides . This allows for approximately 1.5 to 2 minutes per slide, a pace that typically aligns with natural speaking and comprehension rates.
However, if your presentation is more data-intensive or requires detailed explanations, you might need more slides – perhaps up to 20 or 25. Conversely, if your talk is more of a high-level overview, you might manage with fewer slides.
Alternatively, check the estimated number of slides for a 10-minute presentation , or a 30-minute presentation .
In the end, the goal is to ensure each slide contributes valuable content to your presentation and engages your audience without overwhelming them. Your slides should support and enhance your message, not detract from it. Focus on delivering quality content and maintaining a good pace, and you’ll be on your way to delivering a successful 20-minute presentation.
Leave a Comment Cancel reply
Your email address will not be published. Required fields are marked *
Save my name, email, and website in this browser for the next time I comment.
Sign up to our newsletter
We will send you our curated collections to your email weekly. No spam, promise!
How Many Slides For Presentations (10, 15, 20, 30, 40, 50, 60 Minutes)

You should limit your presentations to one slide per minute at a maximum. Try to include the least amount of slides while trying to get your message across in a concise while still complete manner.
An alternative rule is the “10/20/30 Rule,” which suggests that a good presentation will limit itself to 10 slides, last 20 minutes in length, and include a font size no smaller than 30 points.
PowerPoint presentations can be overwhelming to the point that they put off people from learning new material and discourage them from taking in the presented information.
The purpose of this article is to help people make their presentations more exciting and easier to follow and discover how many slides are generally needed so you can time your presentations accordingly.
Of course, all of the below points are just suggestions and the number of slides that you will use for your own presentation will of course depend on the content as well your target audience.
How many slides for a 10-minute presentation?
How many slides for a 15-minute presentation, how many slides for a 20-minute presentation, how many slides for a 30-minute presentation, how many slides for a 40-minute presentation, how many slides for a 50-minute presentation, how many slides for a 60-minute presentation.
A 10-minute presentation would require no more than 10 slides. It’s much better to start with too few than too many, so users will likely appreciate the shorter list of bullet points. Your goal is to provide the right amount of information for your audience to understand the topic without overwhelming them.
If you are just giving an overview of something that you want the audience to remember in 10 minutes or less, then this is probably enough. Keep your slides simple and keep them limited to two-three bullet points per slide.
A 15-minute presention should have a maximum of 15 slides. This is the right amount of information for audiences to grasp without feeling overwhelmed or bored. If you can give this type of presentation in 10 minutes or less, it’s even better.
During a 15 minute presentation. These slides should be able to cover the basics of your topic, but if you try to make it too complicated, your audience will lose interest, and you will end up wasting their time.
A 20-minute presentation should require no more than 20 slides. On average, you should only be using 5-7 bullet points on each slide. You can also include one or two images on each slide to help facilitate understanding.
If you are giving an overview of something that you want the audience to remember in 20 minutes or less, this might be the perfect time to follow the 10/20/30 rule. This concept should relate to the audience or is a key part of your speech or presentation.
A 30-minute presentation would require no more than 30 slides. You can use 5-7 bullet points per slide or 8-10 bullet points if the presentation is necessary to convey ideas in great detail. If you are including lots of images and charts to help illustrate your point, then reduce the amount of bullet points used.
It’s a good idea to follow this rule because too many slides can make it challenging to keep track of all the points you are trying to make, and your audience will be more likely to lose interest in what you’re saying or miss important ideas as they go by quickly. It’s also easier for people to focus on your presentation when it’s broken up into smaller sections.
On 30 minute presentations, it is a good idea to leave a few minutes for Q&A. This will allow your audience to ask questions about things they didn’t understand or missed in the part of the presentation. It also gives your audience a reason to get involved in the session.
For a 40 minute presentation, you should try to keep it to 40 slides maximum, you can dole out some information in detail and leave a bigger chunk of time for Q&A. People will stay attentive when the material is broken up into smaller segments.
You should keep in mind that different people respond to different mediums and will better understand an idea when it’s presented to them in a way they are accustomed to receiving information (i.e. some people benefit from text and others from images, some people need the material broken up into small pieces while others prefer a long, steady stream of information).
It will also depend on the type of presentation you are doing. If it’s a demonstration or special event, then more slides are better (and less time per slide is good). If you’re there to present statistics, research, comparison charts, etc., fewer slides with more information per slide would be best.
A 50-minute presentation should include no more than 50 slides. You can have more slides than this if you have a very engaging visual presentation with limited amounts of information per slide.
Similar to a 40-minute presentation, a 50-minute presentation can allow you to go into a lot of detail in some places and remain at a high level. You should also feel free to leave out certain information if it is not essential in a particular presentation’s overall scheme of things.
As a general rule of thumb, experienced public speakers or subject matter experts are the ones who feel the most comfortable holding longer presentations and sessions, which allows them to go into greater detail in certain areas.
If you’re new to this kind of work, it might be best to keep your presentations between 30 and 40 minutes and leave the rest of the time slot open for questions from the floor.
A 50-minute presentation would require no more than 20-25 slides, as the only purpose they serve here would be just as a reminder for the speaker to stay on point as he conveys the story to the audience.
A 60-minute presentation should include no more than 60 slides. If you have a very engaging visual presentation with limited amounts of information per slide, you can have more slides than this.
If the presentation is going to be more interactive, then it’s better to cut down on the number of slides and instead focus on how much each slide will contribute to the overall story you’re telling. You must also leave plenty of time for a Q&A session at the end.
The number of slides for a presentation varies. While too many can bore your audience, not enough will leave them wondering what you’re talking about.
Your slides can serve as visual reminders of your talk and also help you maintain a narrative flow in your presentation. You must know what you want to accomplish with each slide, how long it will take to read the text and absorb information from a chart or graph and how much time you have for Q&A.
Remember that slides can and should be used as visual aids, not as the main point of the presentation. The speaker needs to convey that information, not just read it from their slides.
Related Posts:
")
- Presentation
How many slides in a 20-minute presentation?

- April 19, 2022

Presentations—whether they’re for business or school, they’re a part of life. One of the first things you may wonder about when you’re assigned a presentation is how long it needs to be. You may also wonder how many PowerPoint presentation slides to use per minute.
How many slides for a 20 minute presentation? This is a question that often confounds business professionals and students alike. The answer, however, is not as complicated as you might think. In this blog post, we will discuss how to create a presentation that is both effective and engaging. We’ll also provide tips on determining the correct number of slides for your PowerPoint presentation design services!

Table of Contents
1. How long is a 20-minute presentation?
The average person speaks at a rate of 125 words per minute. This means that a 20-minute presentation should be around 2500 words long. If you’re using slides as part of your presentation, you’ll want to keep this number in mind when determining how many slides to use.
If you’re unsure how long your presentation should be, you can always ask your audience how much time they have for it. This will help you to gauge how long your presentation should be and how many slides to use.

2. What are the average slide lengths for different presentations?
The average slide length for a business presentation is 40 seconds. For a student presentation, the average slide length is 50 seconds. These numbers will help you to determine how many slides you should have in your 20-minute presentation.
If you’re not sure how long your slides should be, you can always ask your audience how much time they have for your presentation. This will help you to gauge how long your presentation should be and how many slides to use.

3. How to figure out how many slides you need for a 20-minute presentation?
Now that you know how long a 20-minute presentation is and what the average slide length is, you can start to figure out how many slides you need for your specific presentation. To do this, simply divide the total number of words in your presentation by the average number of words per slide. For example, if your presentation is 2500 words long and you’re using an average of 40 words per slide, you’ll need 62.50 slides.

4. Tips for creating effective slides
Once you’ve determined how many slides you need for your presentation, it’s time to start creating your slides. When creating your slides, there are a few things you’ll want to keep in mind:
– Use images and graphics: People are more likely to remember information that is presented visually. Adding images and graphics to your slides will help make your presentation more memorable.
– Keep it simple: You don’t want to overwhelm your audience with too much information. Stick to the essentials and leave out any unnecessary details.
– Be clear and concise: Make sure your slides are easily understood. Use short sentences and bullet points to make your information easy to digest.
Tips for Creating a Short Presentation
The “Rule of Three,” a renowned writing principle, suggests that when things come in threes, they are inherently funnier, more satisfying, or more effective than other numbers of things. Think of a famous phrase or slogan and chances are it’s structured in three.
Tell them those three takeaways at the beginning. Flush them out in the middle. And at the end, remind them of those takeaways. Sticking to the power of three will make your short presentations memorable and incredibly effective.
Tell A Story
Telling a story is a surefire way to wrap your audience into your message. We do not suggest telling your story for the entire 5 – 10 minute talk. You may tell your audience you want to share a story that will drive home your point.
Stick To Your Purpose
Many times, speakers will go over the 10-minute mark of a short presentation because they’re not staying true to the purpose of the presentation or they’re adding in too many details that really aren’t vital to the purpose. At the beginning of any presentation, you create, think about the purpose and remind yourself of it so you’ll remember exactly why you’re giving the talk, to begin with.
tips to make a good presentation
1. create an easy-to-follow structure.
- A compelling introduction . Your introduction needs to briefly sum up what you’re going to talk about and why it’s useful or relevant to your audience.
- Offer a body of evidence . The body of your presentation is where you hit ’em with the facts, quotes, and evidence to back up your main points.
- Sum up with key takeaways . The conclusion is where you loop back to your original statement and give the audience some key takeaways on how they can put into practice what they’ve learned.
2. Limit the number of copies on each slide
- No more than six words per slide . Marketing king Seth Godin says we should have just six words per slide – that’s not a lot of copy. Choose your words carefully and rewrite them until you’ve got it just right.
- Think of ‘bite-size’ information . We called ourselves Biteable for a reason: studies have shown that information is retained better when it’s broken down into bite-sized chunks. Video is a great way to learn and research suggests it’s 95%more compelling than text.
3. Have a plan for a smooth delivery
- Have a practice run-through . There’s nothing like reading it out loud to ensure your message makes sense before you actually deliver it. Try recording your presentation on video — this way you’ll be able to review it with an accurate eye and notice whether your speech matches up with your slides. It’ll also help you sort out your run time.
- Use a remote . A clicker or remote will help you face the audience and not have to keep turning back to your laptop. Sought-after public speaker Garr Reynolds says a remote is essential to pause and advance your presentation so you have time to be spontaneous and control the flow of your delivery.
As a general rule, PowerPoint slides should contain brief, useful and simple information and cannot be used without the provider of that action. Proper timing for each slide can improve your presentation as a whole, and the final result is the impact of the presentation.
How many slides are in a 20-minute presentation?
The average person speaks at a rate of 125 words per minute. This means that a 20-minute presentation should be around 2500 words long.
What are the average slide lengths for different presentations?
The average slide length for a business presentation is 40 seconds. For a student presentation, the average slide length is 50 seconds.
How to figure out how many slides you need for a 20-minute presentation?
To do this, simply divide the total number of words in your presentation by the average number of words per slide.

- Graphic Design , UI-UX
How to Become a Motion Graphic Designer?

A Brief Overview of Lean UX

UX Strategy and Its Components
you'r more than welcome
7 days a week, 9:30 AM – 5:30 PM
contact info
[email protected] +971581974748
- LB07129, Jebel Ali Freezone, Dubai, UAE
Got a Project?
We’re a team of creatives who are excited about unique ideas and help companies to create amazing identity by offering wide range of digital services
© 2021 All rights reserved.
Be the first one who knows about updates!
enter your email address 📩
Welcome to the club 🎉.
From now on, Temis will inform you of its most valuable content and offers. You can also subscribe to this list at the moment. We will also protect your privacy
Scott Berkun
How to present well without slides.
If you were having an important conversation with a friend at a restaurant, would you pull out a projector and put your slides on the wall? They’d think you were crazy as would the people at other tables. Rather that look into your eyes or give full attention to your words, your friend would have their minds divided between you and the images you were showing simultaneously.
Which raises the question: why use presentation slides at all? Most important conversations you will have in your lifetime happen without slides. And ask anyone who works in media: if the power went out and they could only show your slides or broadcast your voice, they’d go with your voice. Your voice, what you say and how you say it, is the most important thing. If you listen to This American Life or The Moth , it’s clear how powerful a speaker can be with their voice alone.
Look at any list of the best speeches of all time and you won’t find a single use of slides or other props. Of course slides and presentation software hadn’t been invented then so it’s unfair to make a direct comparison (For fun see The Gettysburg Address as a bad Powerpoint deck ). Yet the question is easy to ask: would these speeches have been better if they were narrated over slides?
In many cases, no. You’d have to listen carefully to figure out when ideas would be better presented visually rather than with words alone, which is the secret for thinking about your own presentations: when do you truly need a visual image to express an idea? And when would it be better simply letting your voices tell the story?
Speaking without slides seems more challenging because:
- You feel naked without the familiar crutch of slides behind you
- It may require a different way to prepare
- It demands more thinking and refinement of your ideas
Speaking without slides is often better because:
- Audiences grant you more attention and authority over the room
- You have no fear of slide or A/V malfunctions
- You can never become a slave to your slides
- It forces you to clarify and improve your ideas, making you a better speaker
But slides do have some advantages, including:
- Some concepts are best expressed visually
- They can serve as a handout (but true handouts work better than slideuments )
When is it best to speak without slides?
If I’m asked to speak for 20 minutes or less I often go without slides. More than 20 minutes and the dynamics of attention are more complex and I typically use slides, though less than many speakers do. I give the same advice to others: the shorter the talk, the simpler your presentation should be.
How to prepare a slide-free presentation
In Chapter 5 of Confessions of a Public Speaker (“Do Not Eat The Microphone”) I provide a simple, well-tested method for preparing talks of any kind. In short it looks like this:
- Take a strong position in the title
- Think carefully about your specific audience (why are they here? what do they already know?)
- Make your 4 or 5 major points concisely (from a draft outline of 10 or 12 points)
- Practice making your points without a single slide.
- Revise #3 and repeat #4 until done.
This approach works with or without slides, but in all cases it forces you to develop your ideas into a solid outline and practice delivering it before you’d even consider making a slide . If you want to go entirely without slides, you’re already prepared for that. And if you decide as you revise that you need slides to best make your points, then add them, but only after you’ve proven their necessity by trying to present without them.
If you want your ideas to take center stage, the slides should come late in the process so that they are used only to support what you’re saying, rather than the other way around. Even if you are a visual thinker and need something to look at to develop your ideas, develop your ideas and rehearse assuming the slide deck is scaffolding you will remove . Don’t fall into the trap of polishing your slides and tweaking fonts when you should be revising your thoughts and practicing how you’re going to express them.
Given a choice between a great talk with lousy slides, and a lousy talk with great slides, what do you think most audiences would choose? Prepare accordingly.
What do you put on the screen if presenting at a slide-dominant event?
I simply put together a slide with my name, the title of the talk and the basic contact information I want to provide. There’s an argument that only having a single slide does far more to make you accessible to an audience interested in your work as the way to contact you is visible the entire time you’re speaking, instead of just at the end. Here are two examples from two different events:

How do you get over the fear of forgetting something?
Many speakers use slides to mitigate fear. Slides used for this reason often come at the audience’s expense. It’s common to see speakers reading their own slides, or facing their slides as they present, clear signs they made their slides first, rather than constructing the presentation first and using slides to support their thoughts. Slides should be for the audience, not for you.
If you work hard to have clear points, and you practice it’s unlikely you’ll forget anything important. Even if you did forget something, only you will know. Since there are no slides, as the speaker only you know what you planned to say. You could skip an entire point or express it in a completely different way than you intended and no one will know but you. Slides can lock you in and if you are a true expert on the subject you’re speaking about you may find advantages in flexibility.
The notecard
When I speak without slides I usually have one small piece of paper listing my 5 main points. For my recent keynote at Warm Gun 2013 on The Dangers of Faith in Data , here’s what I brought with me on stage:

This notecard is short and simple. Since I’ve thought hard about this topic and have practiced the talk, all that I need the notecard to do is remind me of the next point, and the overall structure. I cheated on #5 as it has sub-bullets, but I simply found while practicing I couldn’t recall all three, so I wrote them down. Churchill and some other famous speakers used similar lightweight systems for their speeches.
You can see the notecard on the conveniently transparent lectern:

What about the handout problem?
If I prepare my talk as described above, it’s easy to write up a blog post with the same structure.
Here’s the blog post, titled The Dangers of Faith In Data , which I wrote in less than an hour while the ideas were still fresh in my mind.
Watch the actual talk based on the above
Now that you know how I prepared and practiced, you can watch the actual talk and judge for yourself. You’ll see me look down at the notecard, but it’s typically while I’m silent and trying to let the audience digest what I just said, while I collect myself to lead into the next thought.
Free Checklist For Great Talks (with or without slides)
You can download a handy, comprehensive, printable checklist for giving great presentations here (PDF) based on the bestseller Confessions of a Public Speaker .
13 Responses to “How to present well without slides”

In the case of scientific seminar talks given to expert audiences, the slides are used to show actual data. So we have no choice but to use slides and make them the focus of the presentation. Although there is a special form of slideless presentation called a “chalk talk”, which entails explaining scientific shit using only a chalkboard, and usually with intensive audience participation: ongoing chiming in with questions, comments, and criticisms. The idea is that a chalk talk reveals whether someone can think on their feet without the crutch of slides, and they are used as an interviewing tool.

I love this! I’ve been doing this for years successfully. Even won an award. I’m glad I’m not alone!

For longer talks (more than 15 minutes) I like to have LOTS of notes when I speak, mostly to keep from getting ahead of myself; I also like to have those notes large enough to read from 10 feet away, so I can move around. “Presenter mode” with the notes section just doesn’t cut it, so I carry two laptops and write two sets of slides. One set is my speaking notes: very dense, lots of words, 100% inappropriate for showing to anyone but myself. The other set is what I show the audience: pictures, graphs, or just a few words to reinforce my point; often these slides will be repeated multiple times in a row so even though I’m clicking through them at a pretty fast clip, the audience sees a new slide only every 1-3 minutes.
The “secret” is to have exactly the same number of slides in each deck, and to have two receivers listening to a single “clicker.” I get as many notes as I want, in nice big fonts with plenty of color; the audience gets a very different “show”; everyone is happy.

Thanks for sharing your method – I hadn’t heard of anyone who makes two sets of slides before.
I’ve found that from speaking so often and experimenting that the less materials I depend on while I’m speaking, the more comfortable I am, not less. But everyone is different of course.
Yes, absolutely. Back when I was doing full-time technical training I practically knew the material by heart. These days, however, I give maybe five presentations a year, only two of which are usually the same talk. Some I’ve done before but often as long as a year ago (and by then I’ve usually updated the material), but the rest are new “this time” and will likely never be given again. Also, most of my “presentations” are actually half-day tutorials, which means about three hours worth of material; I simply can’t remember that much unless I’m teaching it several times per month.

My formal presentations always include slides because I’m talking about a visual subject, but it is ALL visual: no text, and certainly no bullet points (my personal pet peeve). It’s nice to know that I can give a presentation without them too, because any day I can literally be stopped in the hallway and told that there’s a tour group coming through and I need to give a talk *now*. It took me a while to get to that place, but knowing your subject inside and out and having a crazy passion about it helps.
I have to give props to Toastmasters too. I used to have a deathly fear of public speaking, but that environment really helped. Plus, it was all talk, no slides!
Makes sense to me. There are certainly plenty of situations where slides are essential. An artist talking about their work is one of many.
[…] E început de an, deci probabil toți discutăm o strategie, un buget sau planuri pentru 2014. Ce facem când trebuie să prezentăm ceva fără ajutorul unui suport grafic? Scott Berkun, autorul Confesiunile unui vorbitor public ne oferă câteva sfaturi pentru prezentări memorabile. […]
[…] How To Present Well Without Slides […]
[…] Interesting post by Scott Berkun on not using a presentation tool. […]
[…] Secret: Presentation expert Scott Berkun writes out his 3-5 main points on an index card and keeps it in his back pocket when he speaks. […]
[…] How to present well without slides (by Scott Berkun) […]
Leave a Reply
Click here to cancel reply.
- Presentations
- Most Recent
- Infographics
- Data Visualizations
- Forms and Surveys
- Video & Animation
- Case Studies
- Design for Business
- Digital Marketing
- Design Inspiration
- Visual Thinking
- Product Updates
- Visme Webinars
- Artificial Intelligence
How to Create a Successful Project Presentation

Written by: Unenabasi Ekeruke
You’ve spent time working on a project that could be a potential game-changer for your company or client. Now you’re buzzing to present it to your team, investors and other key stakeholders.
Creating and delivering project presentations can be nerve-racking and you probably have one question running through your mind.
How do you get the decision-makers to understand your project or secure their buy-in?
Considering that some companies have had about 12% of failed projects in the past year, you want to create presentations that are not only convincing but memorable.
With the right project presentation deck, you can win and keep your audience’s attention long enough to explain project details and why it’s sure to succeed.
Not sure how to create successful project presentations? We’ve got you covered.
This article will show you how to set project goals and create winning presentations that take your project to the next level.
Here’s a short selection of 8 easy-to-edit project presentation templates you can edit, share and download with Visme. View more templates below:

Let's get to it.
1 Set Goals for Your Project
Before you dive into the main details of your project presentation, you want to answer these questions:
- What is your project set out to achieve?
- Why is it important for you and your team to achieve your set goals?
- How do you plan to communicate your goals to your audience?
If you have to make long guesses before answering these questions, you’ve got a lot of work to do.
Here’s what you should know. Beautiful or well-articulated project presentations aren’t a substitute for project planning. Without clear goals, your project is already set up to fail. And your investors might think, “why bother listening?”
Many project managers tend to rush through the goal-setting phase, but we don't recommend this. That’s because you could be setting yourself up for failure.
Once you clearly define your project goals, you can get stakeholders to buy into them.
Now the question is, how do you set goals for your project and achieve them? One way to do that is by using the SMART goal setting method.
Setting SMART Project Goals
SMART is an acronym that stands for S pecific, M easurable, A chievable, R elevant and T ime-Bound.
SMART goals are a staple for planning and executing successful projects. It takes a deeper look into the finer details your audience care about, such as:
- Project plan and schedule,
- Project timelines,
- Milestones,
- Potential roadblocks and more
For example, let's say your project aims to improve customer experience on web and mobile devices. Notice this example describes the end goal. But it doesn’t specify how you’ll work to enhance customer experience.
Here’s how using SMART goals provides direction for your planned project.
When setting your goals, be clear and specific about what you want to achieve in the end.
A specific goal could be: “We want to build a responsive website and mobile app for our company to improve customer experience. This project will require inputs from our product design, software and marketing department”.
Measurable
During your presentation, you'd have to answer questions like:
- What metrics will you use to determine if you meet the goal?
- How will you know you’re on the right track?
Having metrics in place will help you evaluate your project. Plus, you’d be able to monitor progress and optimize your project to achieve better results.
It doesn’t matter if you’re planning a short-term or long-term project. Ensure you set metrics and milestones that count towards your goal.
From our earlier example, a measurable goal could be to have:
- Over 100,000 mobile app downloads on Google Playstore and Apple App Store.
- A 20% bounce rate on your website and a 15% conversion rate on mobile and web.
Attainable
One of the most critical questions you want to ask during goal-setting is, “Can we achieve our set goal?” Do we have the resources to accomplish the goal within the available time frame?
If the answer is no, then you’d have to consider what it would take to achieve those goals. This may require adjusting your goals or the resources needed to achieve your goal.
Although it’s okay to be ambitious, you should also be realistic. For example, getting 200,000 app downloads in one week could be overly ambitious if you’ve just launched your app. However, if you set out to achieve that goal in three months, that could make your project practicable.
Transform technical, complex information into easy-to-understand reports
- Create detailed diagrams of workflows , systems and processes to see how they interset
- Easily create and share resources for your team , from login credentials to security best practices
- Get more visual with your communication to ensure intricate information is resonating and sinking in
Sign up. It’s free.

Your project goals need to align with your broader business goals. Are your goals relevant to the growth and success of the company? Are they worth allocating resources for?
For instance, if your company is B2B and doesn’t plan to expand to the B2C market, launching an e-commerce website would be an irrelevant goal.
Time-Bound
Regardless of your project type and size, you should set time frames. Setting target dates for deliverables creates a sense of urgency and motivates you to hit your goals.
From our example above, a time-bound goal could be “We aim to achieve 100,000 mobile app downloads and a 15% conversion rate by the end of the fiscal year. Our company will launch the mobile app by Q3 with a robust marketing campaign that will run through the end of next fiscal year.”
Setting SMART goals doesn’t have to be a challenging task. Use the template below to set project goals that position your business for success.

Communicate Project Goals to Your Team Members
After you've set your goals, your team will play a key role in helping you achieve them. So you ensure they understand these things:
- Why the project goals are in place
- What it's supposed to deliver for your business and customers
- How their role, team and department contributes to the success of the project
Unless you’re clear on this, the project can derail and move in all sorts of unwanted directions.
Rather than slam the goals you’ve set on your team, make it a collaborative effort. Spend time talking to your team and stakeholders about the project goals.
Don't limit your communication to people within your department. You can reach out to people in other departments like sales, operations, finance, etc., to see how well your goals align with theirs.

To give your team a better understanding, you can communicate your project goals in a variety of ways, including:
- Visuals (videos, images, charts, infographics, etc.)
- Verbal presentation
- Documentations
By doing that, you’re sure to get their valuable feedback, buy-in and commitment to the project. Plus, getting your team on board with your project plan will up your chances of successful execution.

2 Lay Out Your Project Plan
Once you’ve set your goals, the next big step is to outline how you'll achieve them. An excellent place to start is by organizing your project into an actionable plan and steps for execution.
You might wonder why this step is important for creating a successful project presentation.
Whether you’re planning a small or big project, writing a detailed plan, structure and layout puts everything into perspective. It eliminates vagueness and helps your audience grasp the project roadmap without missing the points.
Your project plan should contain the technical and non-technical project details. Therefore, you want to give yourself an edge by using a project presentation template that clearly explains all the activities and steps.
Not only that, your presentation structure should be simple and easy to follow.
Depending on the project type, your plan could include key details such as:
- The goals and objectives you've outlined earlier
- Your project scope, methodology and framework
- Project milestones, deliverable and acceptance criteria
- Project schedule and timelines
- Resources and budget estimates, etc.

There's no hard and fast rule for laying out your project plan. However, if you want to create a memorable plan that will keep your audience engaged, you could break it down into three parts, including:
Introduction
- Conclusion and key takeaways
Your introduction should provide a brief overview of what you’re going to talk about and why it’s relevant to your audience. You could start by writing down the project name and the executive summary.
Think of your executive summary as an abridged version of the project plan.
If your audience read only your executive summary, would they have all the information they need about your project? If the answer is yes, your executive summary has served its purpose.
The length of your executive summary will depend on what you intend to cover in your project plan. However, we recommend keeping your executive summary one or two pages long.
You can include key information such as:
- Objectives of the project
- Key points of the project plan
- Results, conclusions and project recommendations
Keep in mind that not everyone will have the time to dive into the details of your project plan.
Having a snapshot of your project brings clarity to key stakeholders and collaborators. It also enables people who aren't actively involved in the project to understand it at a glance.
Ready to create your own presentation in minutes?
- Add your own text, images and more
- Customize colors, fonts and everything else
- Choose from hundreds of slide designs and templates
- Add interactive buttons and animations
The body of your project plan is where you have the full project details and everything relevant to its success.
Here you can break your project into deliverables, tasks, milestones and schedules (start and end dates).
Ensure you precisely define the resources you need to complete the project, including finances, team, time, technology, physical resources and more.
This is the part where you sum up your project plan with key takeaways. Your conclusion should include what you expect from your audience, including key action points and next steps.
Writing your intro, body and conclusion may sound like a lot of information. But instead of writing multiple pages of text, incorporating visuals can make your project presentations more effective.
By using images, videos, infographics and charts , you can capture all the vital information and help your audience understand your message better.
Visme presentation templates are effective for visualizing different sections of your project plan. They are professionally designed and easy for anyone to craft high-quality project plans that keep their team on track.
Use the project plan templates below to kickstart your project planning process.

3 Outline the Problem and Solution
You've just spent time crafting your project action plan. Now it’s time to communicate your project plan and goals with your audience.
Project presentations are a lot like sales pitches. Whether you’re presenting your project plan to clients or creating a pitch deck for investors, your job is to keep your audience hooked right from the start till the end.
One of the most potent ways of grabbing your audience's attention is by highlighting their pain points.
It’s not enough to have beautiful slides that showcase your amazing product features and project activities.
Make sure you set up your project presentation to:
- Outline your audience pain points
- Emphasize how your project, product or service works to address their pain points
- Explain how they’ll benefit from using your product or investing in your project
In a nutshell, your audience should have a clear insight into how your project makes their life better. When they’re clear on this, they’ll most likely listen to the solutions you bring to the table and take the desired action.
Don’t make sweeping assumptions about your audience.
If you’re looking to get them on board, dedicate a slide to discuss their problems and solutions. Make them understand how your project benefits them.

Not sure what your audience's pain points are? Go ahead and do these things:
- Run a persona survey or interview existing customers. This will help you build a data-driven user persona that you can use for all types of business and marketing decisions.
- Talk to your customer support and success team. They have close relationships with your customers, so they know their challenges and what they want. If they don’t know these things, do them a favor and create a customer success program .
- Interact with your community, ask for feedback and involvement. The more you engage with your consumers, the more you understand their challenges, work toward solving and get them invested in your brand.
- Keeping an eye on relevant social media trends, Twitter hashtags, Facebook trends
- Join relevant online forums like Quora, Reddit, Stack Exchange, etc.
RELATED: How to Write an Effective Presentation Outline
4 Keep Your Presentation Slides Short
When creating project presentations, prioritize quality over quantity. Be sure to keep your slides short and simple. When you do this, your audience will be glad you value their time.
Remember, this isn’t the time to slam your audience with lengthy and irrelevant jargon. Instead, keep your slides on topics and hit the main points without the boring and unnecessary details.
Here’s why you need to keep your presentation brief:
- Concise presentation slides are not only powerful, but they are also memorable.
- Studies have shown that during project or business presentations, attention levels drop sharply after 30 minutes . By creating lengthy presentations, you risk losing your audience's attention halfway.
- Nobody wants to sit and watch you flip tons of slides for hours. With shorter slides, you can capture your audience's attention and get them to focus on the message.
- Most people might have limited time or have short attention spans. So they’d want to quickly digest information and move on to the next best thing.
How do you keep your project presentations short?
- If your slide doesn’t add value to your presentation, it shouldn’t earn a spot on your deck.
- Supercharge your slide deck with captivating visuals that capture more information
- Adopt proven methods for preparing your slide
For example, the 10/20/30 rule by Guy Kawasaki is one of the most popular methods used by experts. The rule recommends using ten slides for 20 minutes presentations (about two minutes per slide). It also specifies using a font size of at least 30 for text.
This will enable your audience to digest the messages on your screen while you’re talking.

Keep in mind that this isn’t an iron-clad rule for presentation. There are other rules such as Pecha Kucha method , Takahashi method, Lessig method, etc. You can adapt any of these rules to suit your project presentation needs.
5 Use Less Text and More Visuals
Another great way to keep your slides brief yet interesting is using less text and more visuals.
Remember, your slide should aid your verbal presentation and not replace it. So you want to avoid crowding too much information on one slide.
Cluttering your presentation with too much text could:
- Overwhelm your audiences and bore them
- Shift your audience's attention to the text, making your presentation less effective.
Instead, use one slide to present each idea. Marketing guru Seth Godin recommends no more than six words per slide .
People retain more information when it’s presented in bite-size chunks and visuals. This applies to B2B, B2C audiences, project managers and corporate executives.
About 59% of business executives say they’d rather watch a video about a topic than read about it. Hence the need to supercharge your project presentation with compelling visuals that capture and bring your audience’s attention right where you want it.
Steve Jobs’ MacWorld Keynote presentation in 2007 is an excellent example of how to enhance your presentation with compelling visuals.

During the presentation, Steve Jobs used live and interactive visuals to show how the iPhone 1 works.
Read on to learn more tips on creating engaging presentations that will wow your audience.
With Visme's presentation maker , you can make stunning project presentations with a rich blend of text and compelling visuals. Hook your audience and inspire action with stellar project presentation templates like the one below.

6 Use Quality Visuals, Diagrams and Presentation Aids
Visuals are important for making successful project presentations. Beyond grabbing the audience’s attention and keeping them engaged, viewers recall 95% of a message when presented in visual form. But when shared via text, they retain only about 10%.
There are many types of visual aids you can use in your presentations, including:
- Graphs and charts
- Heat and choropleth maps
- Scatter plots
- Screenshots and more
Using images and videos will up your chances of getting audience engagements and positive responses to your call-to-action (CTA).
Gantt charts , whiteboard drawings and mind maps are ideal for visualizing early-stage project designs. You can use charts, diagrams, maps and trees to present the project architecture for technology-related projects.

If you’re working on product development projects, consider adding sketches, flowcharts , models and prototypes to your slide.
Pie charts are excellent for showing percentages. Vertical bar charts indicate changes over time, while horizontal bar charts help you compare quantities.
Infographics are perfect for visualizing data and explaining complex information like market trends.
Here’s the interesting part. Visme has the tools you need for every job. The software allows you to add different visuals, infographics, charts and graphs to your deck and customize them to suit your needs.
You can change design, text and background colors, add or remove legends, animate charts, etc.
You can also use maps to represent geographic information. Or, use progress bars, thermometers, radials and widgets to visualize stats and figures as shown in the template below.

When adding visuals to your slide, don’t go overboard. Stick to a minimum of two images per slide. In addition, make sure your visuals are relevant to your project presentation.
While designing your presentation slides , always stick to high-quality visuals. Blurry or low-resolution images or videos can be a major turn-off for viewers.
With high-quality visuals, your presentations will be crisp and clear, even on large screens.
The slide below is an excellent example of how to power your presentations with compelling visuals.

7 Pay Attention to Design
Want to create impressive presentations that pop? If the answer is yes, you need to pay attention to your design details. Your design can make or break your project presentation.
Whether you are an experienced designer or a novice, design tools like Visme give you an edge. You can create compelling presentation designs for your business in a few minutes.
The beautiful thing is that you don’t have to break the bank to make stunning project presentations. You'll find beautiful ready-made templates and millions of stunning royalty-free images for your slides.
Here are tips you should consider while designing your slides.
Use the Right Color Combination
If you want to make your presentations appealing, use color moderately.
We get it; everyone loves color. But using too many colors can make your presentations look chaotic and unpleasant.
Your color choice can influence how your audience grasps and responds to your presentation. A general rule of thumb is to pick colors that evoke positive emotions in your audience.
For example, warm colors like yellow, orange and red convey feelings of excitement and positivity. On the other hand, cool colors (blue, green and violet) reflect an aura of calmness.
When combining colors, aim for a balanced color scheme. For example, if your slide or image background is dark, your text and design elements should have bright colors. This contrast will make your project presentation legible and visually appealing.
You can learn about color psychology and how to use it in your next presentation design by watching the video below.

Use Clear and Consistent Typography
Optimizing your typography can make a difference in how people perceive your message. So you want to make sure your slide looks organized, professional and sends the right message.
Here’s how you can make this happen:
- Use fonts that embody the spirit of your brand
- Keep your text styles consistent throughout your presentation. We recommend you stick to a maximum of three fonts.
- Avoid fancy fonts and tiny text that strain the reader's eyes. Rather use fonts like Arial, Time News Roman, Calibri and other legible fonts suited for small and large screens.
- Use a font size of at least 30 for the body text and 36 for titles.
In addition, remember to present your text using the color scheme we mentioned earlier. This will keep your text visible over your background.
Take a look at this slide from one of our presentation templates. Notice how the design, fonts and color combination blends in to make the visuals pop.

8 Start With a Presentation Template
Whether you’re a newbie or pro, creating project presentations that pack a punch can be time-consuming.
Let’s say you’ve got a deadline looming. You’d have to deal with writing your project outline, preparing your slide notes, designing your slides, sourcing and incorporating visuals and more.
Handling these things from scratch could slow you down or make your presentations untidy.
Using presentation templates could save you from all the stress. They help you make professional-looking project presentations fast and easy.
Since the slides are pre-designed, you’ll find a place to insert every possible piece of content you need. Be it a progress bar, chart, graph, table, video or image, the design is right there.
All you need to do is type your content, input data or insert the image. And boom, your presentation is ready to go.
In addition, using presentation templates offers brand consistency in terms of font, style, layout, colors and overall design. You can customize and share templates with your project team to keep your presentations uniform.
The title and main body slide, image and chart layout and fonts are set in the template. Therefore formatting your slide becomes a breeze—no more messy or cluttered project presentations.
Visme has a wide selection of templates designed to make your presentations shine. You’ll find millions of pixel-perfect graphics, icons, design elements and professionally designed templates for any purpose, industry and project type.
Regardless of your skill level, you can customize your templates like the one below. Just add your content and your project presentations will be ready in a few minutes.

9 Present Your Project Like a Pro
If you follow all the tips we shared above, you’ve probably got the perfect project presentation on paper. Great stuff, but your job isn’t done yet.
Your delivery is the final piece of the puzzle, and you’ve got to make it count.
Here’s the thing. Your presentation could flop if the delivery isn’t convincing. Hence the need to plan your delivery and drive your message across with passion and enthusiasm.
Here's how to deliver project presentations that leave an impact.
Practice Makes Perfect
Did you know that Steve Jobs used to spend two days prepping for presentations? Yes, you read that right.
Practice is one of the key steps to nailing your delivery.
You can practice by reading out loud in your quiet space. While you’re at it, make audio and video recordings and watch them repeatedly.
Ask your friends and colleagues to serve as a test audience and give feedback on your presentation.
This run-through will help ensure your presentation captures the main points within the allotted time. It will also help you maintain the correct body posture during your project presentation.
Make time to check if the equipment is working and get familiar with the settings and operations. This is especially important if you plan to use video or audio in your slides.
Start With a Strong Opening
Your audiences could have short attention spans, so make those first moments count. With solid openings, you can hook your audience and set the mood for a successful presentation.
Steve Jobs’ 2005 Stanford commencement speech at Stanford is an excellent example of having a solid opening. With over 4 million views on YouTube, it’s one of the most memorable and watched speeches in history.

Notice how he hooks the audience with powerful anecdotes about his life, beginning from dropping out of college. And then, he goes on to share the lessons he learned in his early days at Apple, losing his job in 1985 and reflections on death.
Here’s how to make an excellent opening speech that grabs the audience’s attention and convinces them you’re worth listening to:
- Ask a question
- Tell a compelling story
- Share mind-blowing facts and statistics
- Show captivating video and visuals that spark curiosity
- Open your presentation with humor
Be sure to tailor your opening hook to your audience. To make this effective, it’d help to know about your audiences, including their likes, dislikes, cultural and ethical dispositions, etc.
If you want to learn more about making captivating presentation openings and more, read our guide on starting a presentation .
While presenting your project, focus on your audience’s needs. By doing this, you’ll build an emotional connection and drive action.
However, don’t go overboard. Be genuine and focus on getting the points across to them. This way, you’ll gain their trust and build excitement about your project.
Keep in mind that everything may not go as planned. It’s best to have backup materials and be flexible enough to make necessary adjustments. Preparing for unexpected events will give you more control over them.
End Your Presentation on a High Note
After you've delivered a fantastic presentation, make sure you wrap it up in a memorable way. Doing this will leave a lasting impression and nudge your audiences to take action.
One way to end your project presentation is to use a powerful call to action.
You can also tell memorable stories, summarize the main points and highlight compelling figures about the project.
For example you can mention some really intriguing figures like:
- Expected growth rate, return on investment and profit margin
- Potential company valuation in the next five to ten years.
- Projected earnings and market position etc.
The goal is to hype your audiences and stimulate them to take action.
You can check out our other article to learn more about ending your presentation on a great note.
Get To Work: Create Powerful Project Presentations With Visme
Creating a successful project presentation starts with setting your goals and having a clear plan to achieve them. It also requires crafting compelling content, paying attention to design and excellent delivery.
If you’re going to close those deals, you need a solid pitch deck to explain your project details and why it will succeed. We recommend using an intuitive project presentation software like Visme .
Visme is the perfect design tool for creating stunning and engaging project presentations . With Visme, you’ll have access to a wide range of features and tools to help bring your project ideas to life.
The tool has hundreds of presentation templates, design elements, font styles, built-in stock images and videos, data visualization tools and more to make your project presentation a hit. You can download your design in different formats and share it across multiple social media channels.
Now you have all the tips and tools for nailing your next project presentations. Go ahead and make it memorable with Visme's project presentation software.
Create beautiful presentations faster with Visme.

Trusted by leading brands
Recommended content for you:

Create Stunning Content!
Design visual brand experiences for your business whether you are a seasoned designer or a total novice.
About the Author
Unenabasi is a content expert with many years of experience in digital marketing, business development, and strategy. He loves to help brands tell stories that drive engagement, growth, and competitive advantage. He’s adept at creating compelling content on lifestyle, marketing, business, e-commerce, and technology. When he’s not taking the content world by storm, Unenabasi enjoys playing or watching soccer.
IMAGES
COMMENTS
Remove Physical Barrier and Crutches: There's no podium between the speaker and the audience. The speaker just feels more accessible. Focus on Making Attractive Visual Aids: Though PowerPoint is used, there's not a single template. There are no bullet points. The slides have vivid, dramatic images and few words.
Use them. 2. Storyboard the content. Speaking of sketch artists, it helps to think like an artist when preparing a presentation. Before you open PowerPoint, head to a white board or take out good ...
The 10-20-30 Rule. The 10-20-30 Rule means: 10 Presentation Slides that run for 20 minutes and have font size no less than 30 points. According to this calculation, you can have 2 minutes to each slide. Guy Kawasaki introduced and proved this formula as most effective for an average presenter.
Guy Kawasaki believes the ideal presentation has 10 slides, lasts 20 minutes, and has no font smaller than 30 points. That's his 10/20/30 rule. Here are some tips for a 20-minute presentation: 1. Go Longer. With 20 minutes, you can go longer. Some recommend 20 slides for a 20-minute presentation, with an allocation of a minute of speaking time ...
Get started with PowerPoint for Beginners. Follow this 20-Minute step by step Beginners Guide to PowerPoint and start creating presentations confidently. If playback doesn't begin shortly, try restarting your device. Videos you watch may be added to the TV's watch history and influence TV recommendations. To avoid this, cancel and sign in to ...
2. Think about the speed at which you speak. If you speak quite quickly, you will be able to get through a great number of slides. If, on the other hand, you speak more slowly, you'll probably require a smaller number of slides. Use your rate of speech to determine how many slides your presentation can accommodate. 3.
To reveal one bullet at a time in PowerPoint, right-click on your text box, select Custom Animation > Add Entrance Effect and then choose the effect you want. In Keynote, click Animate > Build in and choose the effect you want. 7. Leave the fireworks to Disney.
The recommended slide use is to speak for 2 minutes per slide, so if you're giving a 20 minute presentation, aim for around 10 slides. Open up PowerPoint and insert the right number of slides before you begin writing so you can see how big the canvas is. Populate your PowerPoint slides, using a font size of no less than 30 pts.
In this tutorial we teach you all the skills required to create and deliver presentations with Microsoft PowerPoint. This tutorial is aimed at people learnin...
To do that, simply go up to the Home tab and click on New Slide. This inserts a new slide in your presentation right after the one you were on. You can alternatively hit Ctrl+M on your keyboard to insert a new blank slide in PowerPoint. To learn more about this shortcut, see my guide on using Ctrl+M in PowerPoint.
Apply the 10-20-30 rule. Apply the 10-20-30 presentation rule and keep it short, sweet and impactful! Stick to ten slides, deliver your presentation within 20 minutes and use a 30-point font to ensure clarity and focus. Less is more, and your audience will thank you for it! 9. Implement the 5-5-5 rule. Simplicity is key.
Here are 4 tips that you can employ to make your presentation longer, during the presentation: 1. Speak slowly yet deliberately. Your nerves when public speaking can cause you to speak in a rush or in a panic. Take control of your voice and speak more slowly and include short pauses when making a point.
Time-saving PowerPoint hack #3: Use PowerPoint Templates. If you prefer non-paid options, however, there's still a lot of PowerPoint tips and hacks you can use to save time when working on your presentations. And one of the most effective ones is definitely to work with templates.
2. Present as if there were no PowerPoint. Don't use your slides as a crutch. They're there to add to your speech, not carry it along. If you present as if there were no slide, by being an engaging, enthusiastic speaker, your audience will be enthralled and remember your presentation for years to come.
Time: 10 minutes. 2. Converted planner to 20 slides. I typed what I wanted to say into the format of 20 slides: Time: 1 hour. 3. Packaged into 15 second blocks. I then used the "rehearse timings" button and delivered the presentation: The Slide Sorter view (above) showed me how long I spent talking on each slide.
The Power of Positive Thinking. Cybersecurity in the Digital Age. The Importance of Financial Literacy. The Role of Education in Economic Development. Mental Health Stigma and Society. The Psychology of Procrastination. Bridging the Gender Gap in STEM Fields. The History and Impact of the Internet.
Start in Settings (1) and select the tools you will be using. You have the option to use a microphone, or you can record yourself talking on camera. Choose your microphone and/or camera for recording. Next (2), decide whether you want to have the microphone or camera you selected turned on.
Thanks for this video watching 🙏👉 Follow My Facebook ID: https://www.facebook.com/ahmed.armanusuf/👉 Follow My Instagram Account: https://www.instagram.com...
For a standard, information-based presentation, a good baseline for the number of slides in a 20-minute presentation might be around 10 to 15 slides. This allows for approximately 1.5 to 2 minutes per slide, a pace that typically aligns with natural speaking and comprehension rates. However, if your presentation is more data-intensive or ...
21 Get crafty (ripped paper details) Sometimes to tell a story, visual details can really help get a mood across. Ripped paper shapes and edges can give a presentation a special feel, almost as if it was done by hand. This visual technique works for any type of presentation except maybe in a corporate setting.
A 30-minute presentation would require no more than 30 slides. You can use 5-7 bullet points per slide or 8-10 bullet points if the presentation is necessary to convey ideas in great detail. If you are including lots of images and charts to help illustrate your point, then reduce the amount of bullet points used.
The average person speaks at a rate of 125 words per minute. This means that a 20-minute presentation should be around 2500 words long. If you're using slides as part of your presentation, you'll want to keep this number in mind when determining how many slides to use. If you're unsure how long your presentation should be, you can always ...
Make your 4 or 5 major points concisely (from a draft outline of 10 or 12 points) Practice making your points without a single slide. Revise #3 and repeat #4 until done. This approach works with or without slides, but in all cases it forces you to develop your ideas into a solid outline and practice delivering it before you'd even consider ...
Well if you listen to Guy Kawasaki and his 10/20/30 rule, the answer's quite simple. a PowerPoint presentation should have ten slides, last no more than twen...
For example, the 10/20/30 rule by Guy Kawasaki is one of the most popular methods used by experts. The rule recommends using ten slides for 20 minutes presentations (about two minutes per slide). It also specifies using a font size of at least 30 for text. This will enable your audience to digest the messages on your screen while you're talking.