- Skip to primary navigation
- Skip to main content
- Skip to primary sidebar

- FREE Experiments
- Kitchen Science
- Climate Change
- Egg Experiments
- Fairy Tale Science
- Edible Science
- Human Health
- Inspirational Women
- Forces and Motion
- Science Fair Projects
- STEM Challenges
- Science Sparks Books
- Contact Science Sparks
- Science Resources for Home and School

Tea bag diffusion!
January 2, 2012 By Emma Vanstone 9 Comments
I love a good cup of tea. In fact, I cannot actually function without one first thing in the morning. If you’re like me, then this investigation is definitely needed in your house so that you can ensure your kids are equipped with the best tea-making skills and have the best scientific knowledge to back up what makes a good cup of tea! This investigation looks at diffusion through the partially permeable membrane of a tea bag.
So firstly, we want to know what type of teabag makes the best drink?
Is it a square, a pyramid or a circle bag?
The activity involves using hot water, so adult supervision is essential.
Teabag diffusion
You’ll need
A stopwatch/timer
A piece of white paper
3 clear glass mugs (you are going to add hot water, so not thin ones that could crack)
Circle, triangle and pyramid tea bags
Thermometer or kettle
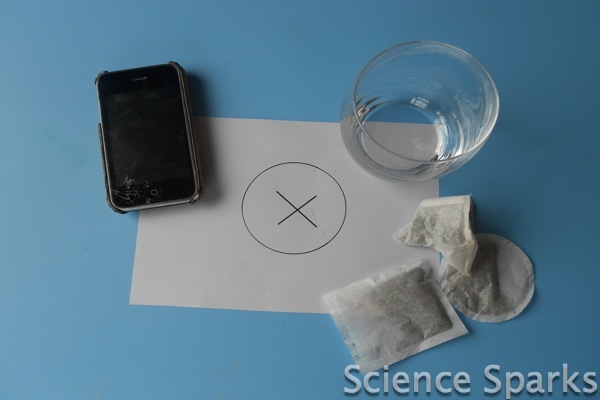
1. On the piece of white paper, draw a cross with a marker pen
2. Place one mug over the cross
3. Add the circle teabag
4. Boil water from the kettle and measure out 150ml (if you have a thermometer, you can improve reliability by keeping the temperature constant)
5. Pour over the teabag and start the stopwatch
6. Time how long it takes for the cross to disappear
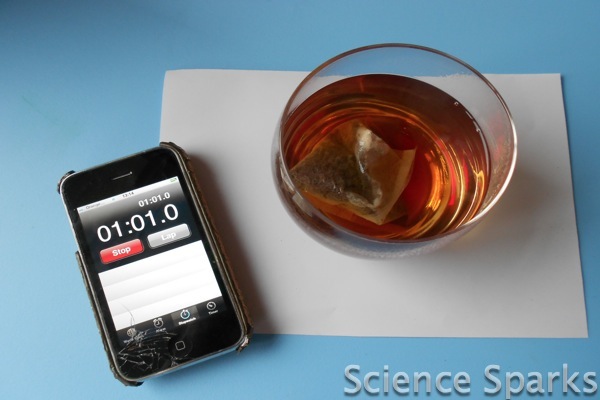
7. Repeat with the pyramid and square teabag.
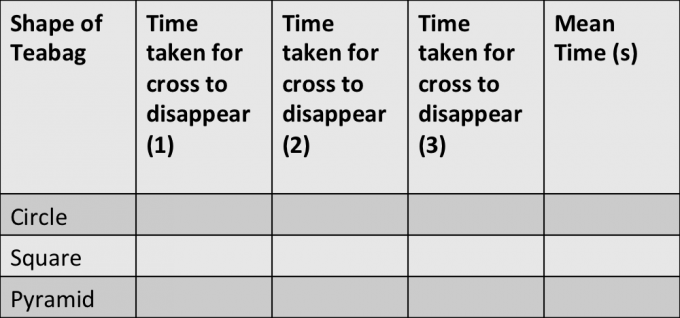
8. To make the investigation results more accurate, repeat with each teabag three times.
Record your results in a table
How does the tea diffuse into the water?
So which teabag was quicker?
You should find that the pyramid teabag was the quickest.
Why do you think this is?
As the water is added to the teabag, it causes the tea leaves to move and triggers diffusion of the leaves. Diffusion is defined as the movement of a substance from an area of higher concentration to an area of lower concentration. There are lots of tea molecules in the bag and none outside. The leaves themselves can’t pass through the bag, but their smaller particles containing colour and flavour can (the teabag itself acts as the partially permeable membrane). The addition of heat (from the hot water) to the tea bag causes its molecules to move much faster than at room temperature. This energy is more readily released in a shorter period of time than a tea bag filled with room temperature or cold water. The teabag shape affects the surface area and the pyramid due to its 3D shape providing more surface area for diffusion to take place and more area in the middle for the tea molecules to move around in spreading the colour and flavour.
Ok, so now they know which is the best teabag to use and how to let it brew…so I suggest you ask for a nice cuppa now!
Last Updated on February 23, 2023 by Emma Vanstone
Safety Notice
Science Sparks ( Wild Sparks Enterprises Ltd ) are not liable for the actions of activity of any person who uses the information in this resource or in any of the suggested further resources. Science Sparks assume no liability with regard to injuries or damage to property that may occur as a result of using the information and carrying out the practical activities contained in this resource or in any of the suggested further resources.
These activities are designed to be carried out by children working with a parent, guardian or other appropriate adult. The adult involved is fully responsible for ensuring that the activities are carried out safely.
Reader Interactions
January 06, 2012 at 8:20 pm
What a fun experiment. You always find ways to make the most ordinary things interesting. Thanks for sharing on Monday Madness.
January 06, 2012 at 9:43 pm
January 08, 2012 at 5:37 pm
Interesting especially since all my tea bags are rectangular. I don’t drink it a lot, but and getting to like it more and more. I haven’t tried many brands yet so I will have to start exploring it more. Fun exploration with the kids and I think they probably learned a lot about figuring things out on their own from it.
October 23, 2013 at 2:29 am
awesome job
February 17, 2014 at 8:32 pm
Jah hey thnx.i have learned smthng http://
February 23, 2014 at 12:40 am
Where did the square teabags come from? I have enjoyed tea in that shape but can’t recall what brand. Thanks!
April 29, 2014 at 7:13 pm
thanks! thats really helpful we’re doing a science project on how the shape of the tea bag affects the taste so that was really helpful!!
September 17, 2017 at 11:32 pm
Interesting and helpful. Thanks a lot. Although the cross takes a long time to remove for some reason. Wasnt sure in what marker to use though.
September 29, 2019 at 5:28 pm
WOW i love talking about tea irs so fun wowowowow i learnt science from tea omg wowowowowow omg tea is so interesting
Leave a Reply Cancel reply
Your email address will not be published. Required fields are marked *
STEM Little Explorers
Knowing through exploring.
Home » Articles » STEM » STEM Science » How to Demonstrate Diffusion with Hot and Cold Water

How to Demonstrate Diffusion with Hot and Cold Water
We all need some space sometimes, right that’s true down to a molecular level. molecules don’t like to stay too close together and will try to move to less crowded areas. that process is called diffusion and we will explore all about it in this simple but revealing experiment., article contents.
What is Diffusion?
Have you ever smelled your neighbor’s lunch on your way home? Or smelled someone’s perfume minutes after that person was gone? You experienced the diffusion!
Diffusion is a movement of particles from the area of high concentration to an area of low concentration. It usually occurs in liquids and gases.
Let’s get some complex-sounding terminology out of the way. When talking about diffusion, we often hear something about the concentration gradient (or electrical gradient if looking at electrons). Gradient just means a change in the quantity of a variable over some distance. In the case of concentration gradient, a variable that changes is the concentration of a substance. So we can define the concentration gradient as space over which the concentration of our substance changes.
For example, think of the situation when we spray the air freshener in the room. There is one spot where the concentration of our substance is very high (where we sprayed it initially) and in the rest of the room it is very low (nothing initially). Slowly concentration gradient is diffusing – our freshener is moving through the air. When the concentration gradient is diffused, we reach equilibrium – the state at which a substance is equally distributed throughout a space.
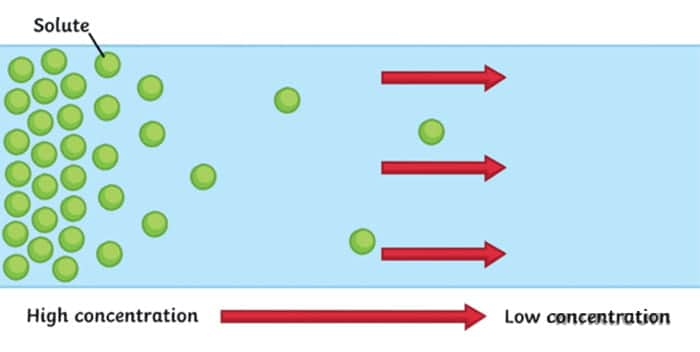
It’s important to note that particles never stop moving , even after the equilibrium is reached. Imagine two parts of the room divided by a line. It may seem like nothing is happening, but particles from both sides are moving back and forth. It’s just that it is an equal probability of them moving from left to right as it’s from right to left. So we can’t notice any net change.
Diffusion is a type of passive transport . That means it doesn’t require energy to start. It happens naturally, without any shaking or stirring.
There is also a facilitated diffusion which happens in the cell membranes when molecules are transported with the help of the proteins.
You may remember hearing about Osmosis and think about how is this different from it. It is actually a very similar concept. Osmosis is just a diffusion through the partially permeable membrane. We talked about it more in our Gummy Bear Osmosis Experiment so definitely check it out.
What causes Diffusion?
Do particles really want to move somewhere less crowded? Well, no, not in the way we would think of it. There is no planning around, just the probability.
All fluids are bound to the same physical laws – studied by Fluid mechanics , part of the physics. We usually think of fluids as liquids, but in fact, air and other types of gas are also fluids ! By definition , fluid is a substance that has no fixed shape and yields easily to external pressure.
Another property of the fluids is that they flow or move around. Molecules in fluids move around randomly and that causes collisions between them and makes them bounce off in different directions.
This random motion of particles in a fluid is called Brownian motion . It was named by the biologist Robert Brown who observed and described the phenomenon in 1827. While doing some experiments with pollen under the microscope, he noticed it wiggles in the water. He concluded that pollen must be alive. Even though his theory was far off, his observation was important in proving the existence of atoms and molecules.
Factors that influence Diffusion
There are several factors that influence the speed of diffusion. The first is the extent of the concentration gradient . The bigger the difference in concentration over the gradient, the faster diffusion occurs.
Another important factor is the distance over which our particles are moving. We can look at it as the size of a container. As you may imagine, with the bigger distance, diffusion is slower, since particles need to move further.
Then we have characteristics of the solvent and substance. The most notable is the mass of the substance and density of the solvent . Heavier molecules move more slowly; therefore, they diffuse more slowly. And it’s a similar case with the density of the solvent. As density increases, the rate of diffusion decreases. It’s harder to move through the denser solvent, therefore our molecules slow down.
And the last factor we will discuss is the temperature . Both heating and cooling change the kinetic energy of the particles in our substance. In the case of heating, we are increasing the kinetic energy of our particles and that makes them move a lot quicker. So the higher the temperature, the higher the diffusion rate.
We will demonstrate the diffusion of food coloring in water and observe how it’s affected by the difference in temperature. Onwards to the experiment!
Materials needed for demonstrating Diffusion
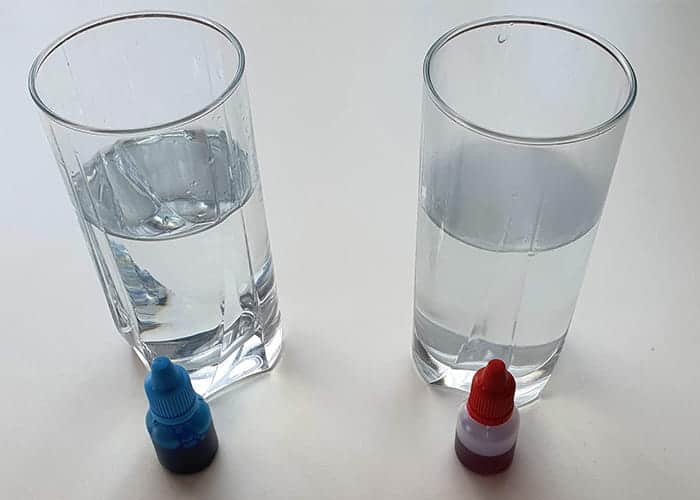
- 2 transparent glasses – Common clear glasses will do the trick. You probably have more than needed around the house. We need one for warm water and one for cold water so we can observe the difference in diffusion.
- Hot and cold water – The bigger the difference in temperature in two glasses, the bigger difference in diffusion will be observed. You can heat the water to near boiling or boiling state and use it as hot water. Use regular water from the pipe as “cold water”. That is enough difference to observe the effects of temperature on diffusion.
- Food coloring – Regular food coloring or some other colors like tempera (poster paint) will do the trick. Color is required to observe the diffusion in our solvent (water). To make it more fun, you can use 2 different colors. Like red for hot and blue for cold.
Instructions for demonstrating diffusion
We have a video on how to demonstrate diffusion at the start of the article so you can check it out if you prefer a video guide more. Or continue reading instructions below if you prefer step by step text guide.
- Take 2 transparent glasses and fill them with the water . In one glass, pour the cold water and in the other hot water. As we mentioned, near-boiling water for hot and regular temperature water from the pipe will be good to demonstrate the diffusion.
- Drop a few drops of food coloring in each cup . 3-4 drops are enough and you should not put too much food color. If you put too much, the concentration of food color will be too large and it will defuse too fast in both glasses.
- Watch closely how the color spreads . You will notice how color diffuses faster in hot water. It will take longer to diffuse if there is more water, less food color and if the water is cooler.
What will you develop and learn
- What is diffusion and how it relates to osmosis
- Factors that influence diffusion
- What is Brownian motion
- How to conduct a science experiment
- That science is fun! 😊
If you liked this activity and are interested in more simple fun experiments, we recommend exploring all about the heat conduction . For more cool visuals made by chemistry, check out Lava lamp and Milk polarity experiment . And if you, like us, find the water fascinating, definitely read our article about many interesting properties of water .
If you’re searching for some great STEM Activities for Kids and Child development tips, you’re in the right place! Check the Categories below to find the right activity for you.

STEM Science
Videos, guides and explanations about STEM Science in a step-by-step way with materials you probably already have at your home. Find new Science ideas.

STEM Technology
Videos, guides and explanations about STEM Technology in a step-by-step way with materials you probably already have at your home. Find new Technology ideas.

STEM Engineering
Videos, guides and explanations about STEM Engineering in a step-by-step way with materials you probably already have at your home. New Engineering ideas!

Videos, guides and explanations about STEM Math in a step-by-step way with materials you probably already have at your home. Find new Mathematics ideas.
Find out all about development psychology topics that you always wanted to know. Here are articles from child psychology and development psychology overall.


First year of Child’s Life
Following a Child’s development every month from its birth. Personal experiences and tips on how to cope with challenges that you will face in parenting.
4 thoughts on “ How to Demonstrate Diffusion with Hot and Cold Water ”
- Pingback: How to Make Colorful Milk Polarity Experiment - STEM Little Explorers
- Pingback: How to make a Lava Lamp | STEM Little Explorers
- Pingback: Learn about pressure with Can Crush Experiment - STEM Little Explorers
- Pingback: Gummy bear Osmosis Experiment - STEM Little Explorers
Leave a Reply Cancel reply
You must be logged in to post a comment.
Get Fresh news from STEM fields
I'm not interested in STEM
- Biological molecules
- Photosynthesis
- Respiration
- Cell structure
- Cell division
- Active transport
- Surface area
- Classification
- Carbon cycle
- Ecological terms
- Food chains
- Sampling techniques
- Bioinformatics
- Evidence for evolution
- Natural selection
- Selective breeding
- Genes and inheritance
- Kidneys and osmoregulation
- Drug discovery
- Microorganisms and scale
- Infection and response
- Vaccines and vaccination
- Digestive system
- Heart and circulatory system
- Nerves and hormones
- Respiratory system
- Reproduction in humans
- Skeletal system
- Plant reproduction
- Transpiration
- Onion enquiry
- Acids, alkalis and salts
- Writing chemical formulae
- Balancing and writing chemical equations
- Atomic structure
- Bonding, structure and properties teaching resources
- Covalent bonding
- Intermolecular forces
- Ionic bonding
- Metallic bonding
- Electrolysis
- Particle pictures
- Gas pressure teaching resources
- Elements, mixtures and compounds
- Filtration and crystallisation
- Distillation
- Chromatography
- Reactivity or physical change
- Reactivity of metals
- Group 1 alkali metals
- Extraction of metals
- Halogens (Group VII)
- Tests for ions and gases
- Catalysts and activation energy
- Collision theory
- Rates of reaction graphs
- Earth and space
- Electricity
- Heating and cooling
- Internal energy
- Specific heat capacity
- Air resistance and free body diagrams
- Floating and sinking teaching resources
- Newton’s laws
- Weight, gravity and free fall
- Electromagnets
- Nuclear fission
- Speed and motion
- Electromagnetic waves
- Apparatus and techniques in science
- Assessing scientific skills
- Accuracy and precision
- Reproducible and repeatable
- Rearranging equations
- Scientific investigations
- Science revision games
- Biology revision
- Chemistry revision
- Physics revision
- Lesson planning
- Lesson objectives in science lessons
- Quick Do Now
- Check prior knowledge
- Use a context
- Challenge all appropriately
- Board work is not boring
- Model abstract ideas
- Question for understanding
- Check for understanding
- Troubleshooting your science lessons
- Building a curriculum towards big ideas
- Powerful ideas of science
- Knowledge in the science curriculum
- Coherence in the curriculum
- Powerful knowledge
- Structuring struggle
- Deep learning
- Diagnostic science teaching
- Knowledge versus understanding
- Errors are not misconceptions
- Novices and Experts
- Progression
- Zooming in and out in science
- Argumentation
- Dangers of definitions
- Oracy for science
- Writing in science
- Demonstrations in science teaching
- Managing whole-class practical work
- Scientific inquiry
- Next steps for practical lessons
- Using drama
- Summative assessments
- Assessment design
- Standarisation of marking
- Question level analysis in science
- Planning for reteaching
- Peer assessment in science
- Written feedback
- Reflections of a science teacher – ten years on
Diffusion teaching resources
Worksheets and lesson ideas to challenge students aged 11 to 16 to think hard about diffusion (gcse and key stage 3).
Overview: diffusion is the spreading out of of particles from an area of higher concentration to an area of lower concentration resulting in the net movement of a substance. Note that particles will diffuse in all directions and are constantly in motion. In biology, diffusion is responsible for the movement of oxygen particles from inside the alveolus into a red blood cell. Diffusion can only happen in solutions, liquids and gases where particles are free to move. When teaching diffusion for the first time it is worth considering what a rate is i.e. a change in the concentration of something/change in time.
Key concept: diffusion is a passive process (does not require additional energy) involving the net movement of a substance down its concentration gradient. The rate of diffusion can be increased by steepening the concentration gradient, increasing the temperature and increasing the surface area of the exchange surface.
From big idea: all matter in the Universe is made of very small particles
Prior knowledge: particle model (kinetic theory of matter), elements/mixtures/compounds
Teaching resources
Where to start.
Start the lesson by frying some food at the front of the class. This should definitely stimulate some interest and get students thinking about particles mixing, and moving randomly from one place to another.
Observing diffusion
There are some great demonstrations to observe diffusion. Give students a stop clock and ask them to record when they first smell deodorant that has been sprayed in the middle of the class. If you also get students to raise their hands when they first smell the deodorant you will get a lovely ‘ mexican wave’ effect. I used to do this demo standing at the front of the class, but this introduces the misconception that particles move in one direction. Try adding l ead nitrate and potassium iodide to a Petri dish of water, yellow lead iodide will form – this provides a great starting point for introducing the idea that particle size affects the rate of diffusion.
Measuring the rate of diffusion
GCSE practical to investigate how the rate of diffusion is affected by temperature . Students measure the rate of diffusion of food dye at different temperatures. Students also apply their understanding of diffusion and temperature to gas exchange in cold-water worms. ( PDF )
Factors affecting the rate of diffusion
Key Stage 3 worksheet on factors that ef fect the rate of diffusion . In this activity, students put a series of particle pictures in order of diffusion rate. The idea of this task is that it (hopefully!) will illicit the idea that the rate of diffusion depends on temperature and particle size. ( PDF )
Thinking deeper
- Why don’t all particles at the same temperature diffuse at the same rate?
- Is diffusion the same as mixing? Explain your answer.
- How is the spread of fire through a forest similar and different to the diffusion of partciles?
Further reading
- Student misconceptions about diffusion
- Particle pictures and the particle model
- Particles and gas pressure
- Elements mixtures and compounds
- Separating techniques
↵ Back to Chemistry teaching resources
- International
- Education Jobs
- Schools directory
- Resources Education Jobs Schools directory News Search
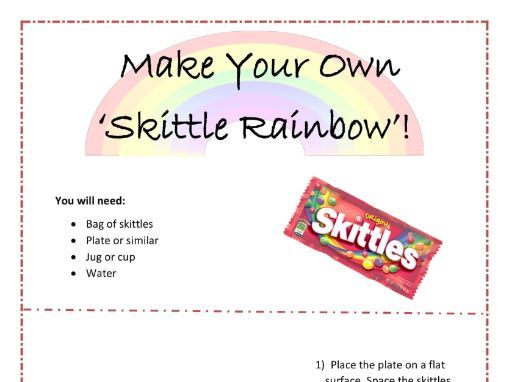
Skittle Diffusion Activity - science at home
Subject: Primary science
Age range: 7-11
Resource type: Worksheet/Activity
Last updated
11 May 2020
- Share through email
- Share through twitter
- Share through linkedin
- Share through facebook
- Share through pinterest

Get hands on with science at home! Make your own skittle rainbow using resources you most likely already have at home, or you can easily purchase from a supermarket.
A fun activity that most primary and secondary students can engage with (ideally suited to KS2/KS3). Includes a list of resources, easy to follow method, scientific description of how it works, things to think about and questions to answer.
Please comment if you have any questions or feedback.
Creative Commons "NoDerivatives"
Your rating is required to reflect your happiness.
It's good to leave some feedback.
Something went wrong, please try again later.
This resource hasn't been reviewed yet
To ensure quality for our reviews, only customers who have downloaded this resource can review it
Report this resource to let us know if it violates our terms and conditions. Our customer service team will review your report and will be in touch.
Not quite what you were looking for? Search by keyword to find the right resource:
WHYPLANTEACHING
Exploring diffusion with a fun and interactive skittles experiment for students.
Updated: Jul 20, 2023

Teaching scientific concepts to students can sometimes be challenging, especially when making abstract ideas tangible and engaging. In today's blog post, we'll discuss an educational resource I've created that aims to teach students the concept of diffusion using a hands-on, interactive Skittles experiment. This simple yet effective experiment allows students to observe the process of diffusion in action and offers a variety of benefits to reinforce their learning experience. Check out the resource here to get started!

In the Skittles Diffusion Experiment , students place Skittles candies around the circumference of a plate and then add water to the center. As the water spreads outwards, the Skittles dissolve, creating a vibrant and colourful display. This visually engaging process enables students to observe and understand the movement of molecules as they diffuse through the water.
Benefits of the Skittles Diffusion Experiment
A study titled Learning Environment, Attitudes, and Achievement among Middle-school Science Students Using Inquiry-based Laboratory Activities highlights the positive impact of inquiry-based laboratory activities on middle-school students' learning environment, attitudes, and achievement. This research supports using hands-on experiments like the Skittles Diffusion Experiment in middle school science classrooms. Incorporating inquiry-based activities allows students to actively explore scientific concepts , fostering a deeper understanding and promoting positive attitudes toward learning. By engaging students in such experiments, educators can create a stimulating learning environment that enhances students' overall academic achievement in science. The Skittles Diffusion Experiment is an excellent example of an inquiry-based activity that can be seamlessly integrated into middle school science curricula to encourage curiosity and foster a love for learning.
Some benefits of this experiment:
Hands-on Learning: By participating in this experiment, students engage with the material tangibly and interactively, leading to better comprehension and retention of the concepts being taught.
Real-world Applications: Diffusion is a fundamental process occurring in various real-world situations, from the movement of gases in the air to the absorption of nutrients in the body. This experiment helps students relate the concept of diffusion to the world around them.
Developing Scientific Skills: The Skittles Diffusion Experiment requires students to follow procedures, collect and analyze data, and draw conclusions based on their observations. Hands-on experiments like this one can develop and strengthen essential scientific skills.

Guidelines for a Good Lab Report
To further enhance the educational value of this experiment, students can be asked to write a lab report that includes the following elements:
Purpose: Clearly state the purpose of the experiment and the question being addressed.
Materials methods : Describe the materials and techniques, including relevant measurements and controls.
Data Presentation: Present the collected data in a clear and organized manner, using tables, graphs, or other appropriate visual aids.
Data Analysis: Analyze the data to draw conclusions about the experiment and answer the question.
Discussion: Discuss any potential sources of error and how they may have affected the results.
Summary: Provide an overview of the essential findings and their implications.
Formatting: Use proper scientific design and language throughout the report.
In addition to the Skittles Diffusion Experiment, this resource includes an example lab report for an Egg Drop Challenge to help students visualize a well-written lab report and understand the steps involved in experimenting.
Recent Posts
AI in Modern Education with ChatGPT
The Importance of Incorporating Indigenous Perspectives in History
Engaging Science - Grade 7 Ontario Science Resource Forms and Functions
- STEM Ambassadors
- School trusts
- ITE and governors
- Invest in schools
- Student programmes
- Benefits and impact
- Our supporters
- Advertising and sponsorship
- Become a STEM Ambassador
- Request a STEM Ambassador
- Employer information
- Training and support
- STEM Ambassadors Partners
- Working with community groups
- Search icon
- Join the STEM Community
These downloadable videos and animations are part of the multimedia package Stuff and Substance, developed by the Gatsby Science Enhancement Programme (SEP). They can be used to develop ideas relating to the intrinsic motion of particles and diffusion phenomena involving the liquid and gas states.
Due to the intrinsic translational movement of particles, samples of substances in the liquid and gas states will mix without the need for external agitation (stirring of some kind). Some students find it difficult to believe that the particles in a still volume of liquid are moving – they are happier to say the particles can be moved around. The gas state is less problematic. One animation is a formative assessment task which links particle diagrams to a diffusion experiment involving a coloured and colourless liquid. The video shows the classic diffusion experiment using ammonia and hydrogen chloride (evaporating from concentrated solutions). The second animation can be used to explain the difference between intrinsic motion of individual particles and bulk movement caused by external agitation.
These video and animation files form part of the resources in the section Diffusion in the Stuff and Substance multimedia package, which provides a series of interactive pages that can be used by teachers or students in the classroom.
Please note: From 2021, Adobe has discontinued support for Flash player and as a result some interactive files may no longer be playable. As an alternative method to accessing these files a group of volunteers passionate about the preservation of internet history have created project Ruffle ( https://ruffle.rs/ ). Ruffle is an entirely open source project that you can download and run many interactive Flash resources. For further information regarding STEM Learning’s policy for website content, please visit our terms and conditions page.
Show health and safety information
Please be aware that resources have been published on the website in the form that they were originally supplied. This means that procedures reflect general practice and standards applicable at the time resources were produced and cannot be assumed to be acceptable today. Website users are fully responsible for ensuring that any activity, including practical work, which they carry out is in accordance with current regulations related to health and safety and that an appropriate risk assessment has been carried out.
Show downloads
| Subject(s) | Science, Chemistry |
|---|---|
| Age | 11-14 |
| Published | 2000 - 2009 |
| Published by | |
| Collections | |
| Direct URL |
Share this resource
Did you like this resource, lists that tag this content, cells and diffusion , posted by.

IMAGES
VIDEO
COMMENTS
Diffusion is the movement of a substance from an area of high concentration to an area of low concentration. Diffusion occurs in gases and liquids. Particles in gases and liquids move around randomly, often colliding with each other or whatever container they are in.
Discover what the process of diffusion is and how substances move from an area of high concentration to lower concentration in this Chemistry Bitesize guide.
In this experiment, students place colourless crystals of lead nitrate and potassium iodide at opposite sides of a Petri dish of de-ionised water. As these substances dissolve and diffuse towards each other, students can observe clouds of yellow lead iodide forming, demonstrating that diffusion has taken place.
This investigation looks at diffusion through the partially permeable membrane of a tea bag. So firstly, we want to know what type of teabag makes the best drink? Is it a square, a pyramid or a circle bag?
Learn all about Diffusion, Brownian Motion and how to demonstrate Diffusion with this fun and simple STEM Science Experiment.
Through this diffusion activity worksheet, students will review the definition of diffusion and will conduct a diffusion simulation. The activity suggests placing balloons around the room that contain different smells. Suggested smell sources include things like coffee, vinegar, lavender etc.
Measuring the rate of diffusion. GCSE practical to investigate how the rate of diffusion is affected by temperature. Students measure the rate of diffusion of food dye at different temperatures. Students also apply their understanding of diffusion and temperature to gas exchange in cold-water worms. (PDF)
A fun activity that most primary and secondary students can engage with (ideally suited to KS2/KS3). Includes a list of resources, easy to follow method, scientific description of how it works, things to think about and questions to answer.
This simple yet effective experiment allows students to observe the process of diffusion in action and offers a variety of benefits to reinforce their learning experience. Check out the resource here to get started!
The video shows the classic diffusion experiment using ammonia and hydrogen chloride (evaporating from concentrated solutions). The second animation can be used to explain the difference between intrinsic motion of individual particles and bulk movement caused by external agitation.