- Skip to main content
- Skip to primary sidebar
Second Grade teachers! Join me Around the 2nd Grade Kampfire on Facebook! JOIN HERE
- Facebook Group
- Search this website
Around the Kampfire
Elementary Teaching Blog
Last updated by Linda Kamp on December 10, 2022 • 4 Comments

Solid, Liquid & Gas: Pop Rocks Science Experiment

This Pop Rocks science experiment is a fun way for students to investigate how combining a solid and liquid forms a gas.
Solid, Liquid, Gas: Pop Rocks Science Experiment
Most kids know the fizz that bubbles up when you pour a glass of soda is carbon dioxide gas called carbonation. What they may not know is how it is made. Carbonation is made by forcing carbon dioxide gas and water into the soda at high pressures. This easy science experiment aligns to Next Generation Science Standards and is perfect for students to explore the properties of gas.
- 12 oz. bottle of soda
- medium sized kitchen funnel
- 8 inch round balloon
- Pop Rocks candy
- student lab sheet

1. Place the balloon over the end of a small kitchen funnel. We stretched the balloons first and even blew them up a little then released the air to stretch them further so the candy would fall in easier.

2. Pour the Pop Rocks candy into the funnel. Tap the funnel until the candy flows into the balloon. Gently shake the balloon so the candy falls to the bottom.

3. Stretch the balloon over the mouth of the soda bottle. Lift the balloon up so the candy pours into the bottle. Listen for the popping sound as the gas releases, rises, and fills the balloon.

Students use the lab sheet in this science unit to collect data by drawing the steps they took and recording observations they made. I ask them to think about the properties of gas, then analyze their data, explain their result, and what caused the balloon ti inflate.

Explain the Pop Rocks Science to Your Students
The science behind the experiment is pretty simple. Each tiny piece of Pop Rocks candy contains a small amount of carbon dioxide gas. When it is dropped into a liquid the candy gets wet releasing tiny gas bubbles that make a popping sound as they burst out of the candy shells.
Carbonated drinks contain a lot of pressurized carbon dioxide. When Pop Rocks are poured into the soda some of the gas in the soda collects as millions of bubbles on the candy. As more gas is released from the candy it moves upward and in to the balloon to fill the space.
Remember, gases fill their container or space. Since the balloon fits tightly around the mouth of the bottle, the gas has nowhere else to go up and into the balloon!
Are you a 2nd grade teacher planning a matter unit soon?
Be sure to check out this complete States & Properties of Matter unit and teaching Power Point because I’ve done all the planning for you!

Click here for States & Properties of Matter
I know your class will enjoy this Pop Rocks science experiment as a fun way to explore combining a solid and liquid to form a gas.

For more science experiments and properties of matter activities visit these posts:

Exploring Solids, Their Properties & Flexibility

Marvelous Matter Activities for 2nd Grade Scientists

Properties of Matter Cracker Lab
Happy teaching and experimenting!
Share this:

Back to School
Free Grammar Review Activities!
Start the year in grammar off right! Grab a full week of lesson plans, teaching slides, and printables to review and practice parts of speech!

You May Also Enjoy These Posts

Reader Interactions

September 23 at 5:34 pm
Hi! Is there a way to purchase the lab sheet only? Thanks!?

September 1 at 9:46 am
It felt unprofessional to show the write up and then only make available when the $14 unit is purchased. Since you show it, it should of been a freebie.

September 12 at 9:41 am
Hi Liz, You are certainly welcome to use the idea I shared.
Leave a Comment Cancel reply
Your email address will not be published. Required fields are marked *
Notify me of new posts by email.
Hello Friends
I’m Linda Kamp, a 20 year primary grade teacher with a passion for creating educational materials that excite students and make learning fun! I'm so glad you're here!

Trending Post: How to Make Hydro-Dipped Sand Dollars
Pop Rocks and Soda Experiment
Sharing is caring!
Get ready to explore the fizz-tastic world of Pop Rocks and soda as we go on an exciting adventure to discover this legendary (and somewhat infamous) experiment that combines two of our favorite treats. You might have heard whispers of the explosive consequences when these two forces meet, but don’t worry—we’re here to uncover the truth behind the bubbling action safely and excitingly.
So, grab your safety goggles, and let’s pop into the fizzy world of Pop Rocks and Soda experiment that’s perfect for kids and the young at heart! This is a fun chemistry experiment for younger kids, and we have more fun Lego and Stem Activities here.

This post contains affiliate links meaning I get commissions for purchases made through links in this post at no cost to you. Read my disclosure policy here.
Table of Contents
What happens when you mix pop rocks and coke?
It’s a question that has intrigued, and perhaps even scared some ever since these two iconic products hit the market. The rumor mill has churned out some pretty wild claims about this supposed deadly duo. But don’t worry, we got you covered! We’re here to demystify the fizzy phenomenon of mixing pop rocks and soda experiments with a dash of science.

When Pop Rocks meet Coke, the carbon dioxide trapped in the candy is released more rapidly due to the presence of even more carbon dioxide in the soda. The result? A bubbly, foamy extravaganza! But despite the dramatic display, it’s hardly earth-shattering. The fantastic reaction is relatively mild and completely harmless.
What is the science experiment with pop rocks?
So, what makes these tiny, crackling candy pebbles explode with flavor in your mouth? It all comes down to the magic of carbon dioxide gas, trapped inside those sugary crystals. When Pop Rocks meet moisture, such as your saliva, the sugar dissolves, releasing the carbon dioxide gas with a snap, crackle, and pop that tickles your taste buds and dazzles your senses.
In other words, pop rocks are like a party in your mouth, with carbon dioxide gas as the life of the party and sugar as the DJ spinning the tracks. And with every snap, crackle, and pop, you can feel the chemistry doing its thing, creating a delightful dance of flavor and fizz that leaves you begging for more.
How do you make pop rocks explode?

What materials do you need for the pop rocks and soda experiment:
Pop Rocks Candy
3 (16.9 to 20-ounce bottles) of soda in different varieties

What’s the science behind Pop Rocks and Soda?
Stretch the balloon with your hands, making an effort to expand its neck. Avoid blowing into the balloon, as the moisture from your mouth will make the candy stick to the inside of the balloon.

Place the balloon’s mouth over the small opening of a funnel. Pour one package of Pop Rocks into the funnel and tap the funnel to force the Pop Rocks down into the balloon. TIP: If the candy refuses to move through the funnel, try pushing it with a bamboo skewer.

Open each soda and place the balloon’s opening over the top, taking care to have the balloon’s mouth completely over the top of the bottle without dropping the candy into it.

Tip the balloon up and shake slightly (if needed) to transfer the candy into the soda. Gas will begin to form immediately. Expect the soda to get fizzy, the candy to crackle, and the balloons to fill with air and foam.
Tips: Use a level surface so the bottles do not fall over.

Expand the experiment:
Using one variety of soda, test the different varieties of Pop Rocks to see if each has a similar reaction. Measure the balloons to decide which variety created the most gas.

Using the same variety of pop rocks, test different varieties of soda to see which emits the most gas. (Diet Coke tends to win.)

If a balloon fails to expand, examine the experiment to see what happened. (Typically, this will happen if the balloon is not completely over the top of the soda bottle.)

Can pop rocks and soda inflate a balloon? Let’s find out
Soda is carbonated, meaning it’s also filled with carbon dioxide gas. You’ve got a double whammy of fizziness when you combine Pop Rocks and soda. Let the fizzy face-off begin!
When Pop Rocks dissolve in the soda, the carbon dioxide gas from the candy and the soda is released simultaneously. This creates excess gas in a small space, leading to a rapid and chaotic expansion. In other words, it’s like a science experiment gone wild! The result is an explosion of bubbles, fizz, and foam—a true spectacle for the senses.
So, why does this dynamic duo cause such an uproar? It all comes down to the rapid release of carbon dioxide gas in a confined space. When too much gas is unleashed quickly, it needs somewhere to go. And that’s when you get the exciting explosion of bubbles and fizz.
Movies about Math and Science:
51 STEM Movies about Science for Teens and Kids
46 Stem and Math Movies for Kids and Teens

And there you have it! We’ve bubbled through the effervescent escapades of Pop Rocks and soda, decoding the candy chemistry of this explosive pairing. As we pop away, let’s keep our curiosity alight and embrace life’s fizzy wonders. Stay bubbly, and keep on popping!

Leave a Reply Cancel reply
Your email address will not be published. Required fields are marked *
- Skip to main content
- Skip to primary sidebar
Fun with Mama
Toddler and preschool activities
Written by Brenda • Aug 25, 2022 • Leave a Comment
Pop Rocks and Soda Experiment

Simple science experiments are tons of fun to do with kids at home or in the classroom. This pop rocks and soda experiment is a fun twist on the classic baking soda volcano experiment. With the power of chemical reactions, children can inflate a balloon using pop rocks!
Speaking of fun science activities, be sure to check out my Exploding Ziploc Bag Science Experiment for Kids as well! Show the kids that science is tons of fun!
The really great thing about making this pop rocks and coke experiment are that the kids will be intrigued and part of the process. It’s no secret that fizzing experiments are some of the best!
If you’re wondering what truly happens when pop rocks are mixed with soda, this science pop rocks experiment will show you!
Supplies need for this pop rocks and soda experiment
You only need a few things to do this experiment! You will need:

- Diet soda in a plastic bottle
- Regular soda in a plastic bottle
How does the pop rocks and soda experiment work?
Poprocks are a hard candy made of sugar and flavoring. The candies are filled with a small amount of carbon dioxide. When the sugary shell melts, the candies “pop” and release the carbon dioxide gas into the air.
When the pop rocks are dropped into the soda, the soda melts the candies and the carbon dioxide is released. Since soda also contains carbon dioxide, the candy pulls some of the carbon dioxide from the soda into the air, which inflates the balloon.
How much the balloon expands is based on how many pop rocks are added to the balloon, how fresh the soda is, and what type of soda it is.
We found that diet soda created a bigger reaction than regular soda but this is where the kids can create a hypothesis and try different flavors of soda.
How to do the pop rocks and soda experiment
First, open the neck of a balloon as wide as you can with your fingers. Take care not to break the balloon while doing this or you’ll have to throw out the balloon and get a new one.
The balloon must make an airtight seal around the neck of the bottle to work. Because of this, have a few more balloons on hand than you think you will need.
Pour two bags of pop rocks into the balloon. Repeat with a second balloon.

Open the two soda bottles.
While holding the pop rocks inside of the bigger part of the balloon, carefully slide the neck of the balloon over the top of the bottle.
Again, if the balloon rips, you’ll have to start over with a new balloon.

Tip the pop rocks from inside the balloon into the soda. Try to do this at the same time with regular soda and diet soda.
Watch as the balloon expands.

For an even bigger reaction, shake the soda gently to release more carbon dioxide into the balloon.
Follow Up Pop Rocks Experiment Questions for the Kids
- Did the diet soda or regular soda create a bigger reaction (by blowing the balloon up to more)?
- Do you think that changing the type of soda used changed the outcome?
As you can see, STEM experiments and science activities for kids like this one are a great way to help them learn and have fun at the same time.
More Fun Science Activities for Kids
- How To Grow Beans In A Bag – Bean in a Bag Science Experiment for Kids
- Fizzy Egg Dyeing Science Experiment – The Best Way To Dye Easter Eggs
- Homemade Thermometer Science Experiment – Making a DIY STEM Thermometer

Brenda MacArthur is a STEM curriculum writer, STEM author, and STEM accessibility advocate. She founded the site STEAMsational.com in 2012 which offers hands-on STEM activities for kids and STEM lesson plans for teachers.
View all posts from this author
You May Also Enjoy These Posts:
Get easy and instant access to ALL of our printable activities and resources by joining the Fun With Mama printables club.
Get all the details and join here.
Reader Interactions

Leave a Comment Cancel reply
Your email address will not be published. Required fields are marked *
This site uses Akismet to reduce spam. Learn how your comment data is processed .
Have you grabbed the latest FREE printables?


Fizz, Pop, Inflate: The magical balloon experiment with a chemical reaction
Sharing is caring!
- Pinterest 3

Chemical reactions happen all around us, sometimes without even knowing it. From baking a loaf of bread in the kitchen to rust forming on a metal surface outside, chemical reactions are happening everywhere. This experiment is a stepping stone to open your child’s eyes to chemical reactions!
This hands-on activity helps children grasp the concept that mixing different substances can create entirely new ones with unique properties. As they see the balloon inflate, they learn about the interaction between an acid (vinegar) and a base (baking soda), resulting in the production of carbon dioxide gas.
So take a deep breath of oxygen and breathe out carbon dioxide (a chemical reaction!), because it’s time to start the experiment!

How to make the Fizz, Pop, Inflate Balloon science experiment
Supplies you will need.
For this experiment, you will need the following:
- Soda bottle

Before you start
Since we’re dealing with a chemical reaction, please watch your child when doing this experiment. You could even use safety goggles if you have them on hand.
Instructions
Here is how to do this experiment with your child:
Step 1: Pour baking soda into balloon
Take your balloon and, if needed, use a funnel to pour about one or two tablespoons of baking soda into it.

Step 2: Add vinegar to soda bottle
Next, pour about half a cup of vinegar into the plastic bottle. I used a funnel again (made sure to clean out the baking soda first!) and poured it into the soda bottle.

Step 3: Stretch balloon neck over the soda bottle
Stretch the opening of the balloon over the neck of the plastic bottle, making sure it’s secure.
As long as the balloon stays off to the side of the bottle (like in my picture below), the reaction shouldn’t begin yet.

Step 4: Watch the balloon inflate!
Here comes the exciting part! Lift the balloon so that the baking soda falls from the balloon into the vinegar in the bottle. It happens quickly, so be prepared!
As soon as the baking soda mixes with the vinegar, you’ll see a bubbling reaction occur. This is because the vinegar (an acid) and baking soda (a base) react together to produce carbon dioxide gas. The gas fills up the balloon, causing it to inflate.

The science behind the Fizz, Pop, Inflate Balloon experiment
This experiment teaches:
Chemical reactions
Measurement skills, critical thinking, how it works.
In the Fizz, Pop, Inflate experiment, we are mixing a base (baking soda) and an acid (vinegar) to create a chemical reaction.
The balloon is holding the baking soda and the plastic bottle holds the vinegar. When we place the balloon on the neck of the bottle and allow the baking soda to fall into the bottle, the chemical reaction between the acid and base begins.
When baking soda and vinegar mix, it creates carbon dioxide, which is what causes our balloon to inflate.
This experiment demonstrates a basic chemical reaction between an acid (vinegar) and a base (baking soda) to produce carbon dioxide gas. It helps kids understand that mixing different substances can lead to entirely new substances with different properties.
By measuring and pouring specific amounts of baking soda and vinegar, kids can practice basic measurement skills, such as using tablespoons and cups.
Here’s another measuring activity that dives into the very basics of measuring.
As we watch the balloon inflate, we can think critically about why it’s happening.
Prompt your child with questions like, “What do you think is causing the balloon to get bigger?” and “Why does this happen when baking soda and vinegar mix?”.
More chemical reaction experiments to try out with your child
- Fizzing Lemons: What happens when you mix baking soda and lemons?
- Race a Chemical Reaction Car!
- Make a Homemade Lava Lamp to Explore Chemistry
Related experiments
Rev Up with Engineering Fun: Build a Chemical Reaction Car!
The Rev Up engineering experiment is so great because it combines engineering with science while keeping your child engaged in the excitement! This experiment involves science and engineering by...
Homemade Lava Lamps: Chemistry in action!
Did you have a lava lamp growing up? As it turns out, it is easy and inexpensive to create your own lava lamp while learning a thing or two about chemistry. Creating your own lava lamp is a great...
- Experiments
- Secret Science of Stuff
- Science ABCs
- You are here:
- American Chemical Society
- Adventures in Chemistry
Have you ever noticed that when you put a straw in soda pop, the straw gets covered with bubbles? The bubbles are made from a gas called carbon dioxide. The soda pop company puts the carbon dioxide in the soda to give it that special fizz. You can see some of this carbon dioxide fizz, bubble, and pop in this activity with soda pop!
Here's what to do:
- Fill a cup about 3/4 full of soda pop. Place a straw in the soda and look closely at the straw from the side of the cup. What do you notice?
- Try putting a pipe cleaner or a popsicle stick into the soda and looking at them from the side. Do bubbles form on these too?

- Try dropping a pinch of sugar or salt into the soda. What do you notice?

What to expect
Bubbles form on the straw, salt, sugar, pipe cleaner and popsicle stick.
What's happening in there?
Bubbles form on the different objects because of the carbon dioxide gas in the soda pop. Even though the straw, popsicle stick, and other objects might seem smooth, they actually have many tiny little bumps, indentations, and scratches where the carbon dioxide molecules attach. Once the carbon dioxide molecules have a surface to attach to, the molecules build up and form bubbles.
What else could you try?
As you’ve seen, carbon dioxide from soda pop can form bubbles on lots of different objects. Some of the greatest soda bubble formers are round candies like M&Ms, Skittles, and especially Mentos. Let’s compare them!
What you'll need:
- Any clear colorless soda (Club soda, Sprite, or 7-Up)
- 3 clear plastic cups
Be sure to review the safety instructions on page 1 before proceeding.
- Pour about 1/2 cup of the same soda into each of three clear plastic cups.

- At the same time, place an M&M, Skittle, and Mento in each cup and watch from the side. What do you notice? Was there a difference in how fast or how many bubbles formed on each candy?

Tiny bubbles quickly form on all the candies and rise to the surface in a stream. The candy does not rise to the surface but some of the coloring from the M&M and Skittle comes off and some of the coating from the Mento seems to come off too.
Even though the candies seem smooth, they have extremely tiny bumps and uneven areas on the surface where carbon dioxide molecules attach and form bubbles. The most bubbles form on the Mento maybe because it’s the biggest or maybe because its surface is rougher and better for carbon dioxide molecules to attach and form bubbles.
- Resources for Parents and Teachers
- Terms of Use
- Accessibility
Copyright © 2024 American Chemical Society

Super Fun (and Explosive) Soda Pop Geyser Experiment
June 25, 2019 by OneMommy
Kids are natural scientists. From the moment they are little, sitting in the high chair and dropping their spoon over and over again, they are experimenting and learning.
As they get older it is important to keep that love of science growing, and there is no better way to do it than with fun experiments.
This soda and Mentos experiment is one that your child will beg to do over and over again. Making a soda pop geyser is one of our favorite STEM activities to do outside.
This soda pop experiment is best done outdoors, preferably in a grassy area.
You can use either regular cola or diet cola for this experiment. Diet cola is often chosen because it is less sticky and therefore easier to clean up. It also has the most explosive reaction.
The brand doesn’t matter a lot, so feel free to buy a cheaper brand, which is helpful if you want to do the experiment several times. (Trust me, your kids will want to do it several times.)
Looking for more explosive experiments? Check out how to make elephant toothpaste .
Affiliate links have been used below for your convenience. See my full disclosure for more details.
Soda and Mentos Experiment
Materials Needed:
- 2-liter bottle of cola
- 1 roll of Mentos mints
To begin the Mentos geyser science project get out 7 of the mints (half the package) and line them up so they are touching each other.
Pull off just enough tape and secure one side of the mints to the tape. This will enable you to get all the mints into the cola quickly, while still leaving enough surface area of the mints for the experiment to work. (You can also buy this special Geyser Tube to help get the Mentos in all at one time.)
Once your mints are ready, position your pop bottle firmly on the ground so it won’t tip over.
Then carefully open the bottle of soda pop. Try not to shake it, as this will reduce the effects of the experiment.
Drop the tape holding your mints into the cola and quickly back away. Watch the amazing soda pop eruption!
Why does the Mentos geyser experiment work?
Carbon dioxide is pumped into pop bottles at the factory. This is what causes bubbles to rise to the surface when you first open the soda.
Mentos candies actually have tiny pits all over the surface. These pits are the perfect place for those little carbon dioxide bubbles from the cola to collect.
Since the Mentos are heavy, they quickly sink to the bottom of the bottle. Eventually all those little air bubbles that collect on the candy work to push the cola up and out of the bottle in a dramatic way.
Extensions for the Coke and Mentos Experiment
Want to take the experiment even further?
- Have your child guess how high the soda pop will erupt. Then measure to see how close they are. Mark distances with sidewalk chalk or tape on an outdoor wall and place your bottle against the wall to see how high it goes.
- Determine whether temperature affects the results. Try the the soda pop experiment with a cold bottle of soda and a warm bottle. Does one react better than the other?
- Experiment to find out which type of soda pop has the biggest reaction with Mentos. Try cola, diet cola, orange, and a clear soda pop.
- Experiment with the candies used. Do you get a bigger reaction if you use more Mentos? What if you use a different flavor?
Making things explode is definitely one of my son’s favorite types of science experiments.
Luckily I planned ahead and had enough materials to do the soda and Mentos experiment several times. It was definitely a huge hit.
Other kids science experiments you may like:
- How to Create Beautiful Egg Geodes
- Amazing Rising Water Experiment
- Ivory Soap Explosion
- How to Make a Rubber Egg
You can find this fun experiment and many more in our co-authored book, Up!
Originally published July 25, 2016
Erin Vincent says
August 4, 2016 at 6:49 am
I’ve heard about this experiment but we’ve yet to do it. I think you’ve inspired me! This looks so fun and fascinating!
OneMommy says
September 1, 2016 at 8:26 pm
Oh, you have to give it a try! My daughter has actually done it in Girl Scouts, but I wanted to make sure her brother got to see it. He was hooked. I lost count how many times we did it.
[…] Mentos and Soda Pop Geyser […]
Recent Posts
- Make Learning Easier with DIY Math Manipulatives
- Engineer a Truss Bridge with Craft Sticks
- Dragon STEM Activities
- Fun and Foamy Elephant Toothpaste Experiment
- Shark Party Games — Perfect for Shark Week or a Shark-Themed Birthday Party
Proud Member
How to Keep Fizz in Your Soda
Explore the properties of carbon dioxide in your soda pop..
Print this Experiment

Rarely do you ever drink an entire 2-liter bottle of soda at one sitting. Since leftovers are inevitable, the soda tends to go flat. Besides screwing on the cap, is there anything that can be done to keep the fizz in a bottle of soda?
Here's What You'll Need
Wintergreen lifesavers, 2-liter bottle of soda, clean, empty soda bottle (1-liter or smaller works best), fizz keeper (or a similar pressurizing pump), small, fresh marshmallows.
You don’t have to shake a soda in order to produce a flowing, foaming river of scientific inquiry.
- Open a brand new 2-liter bottle of soda and drop in three or four Wintergreen Lifesavers. Oh, by the way, stand back! The dissolved carbon dioxide gas makes a mad dash for the breath mints (lots of nuclei sites–see below) and forms big bubbles that burst out of the liquid. Please remember that this is not a way to keep the soda from going flat. This little gem of an activity actually speeds up the bubbling process. But isn’t science fun?
BONUS FIZZ KEEPER ACTIVITY
Here’s a great activity to explore the properties of air pressure (and it will keep the kids busy for hours!):
- Fill the bottom of the empty bottle with marshmallows (a dozen or so). Screw the pump on the bottle.
- Carefully observe the marshmallows as you start pumping the piston up and down. Hey, they’re shrinking! The marshmallows are shriveling up. Why? The Fizz Keeper is like a miniature bicycle pump that forces molecules of air into the bottle. The increased pressure, in turn, pushes on the marshmallows. Since marshmallows are just puffy pockets of air, the increased pressure compacts the molecules and the marshmallows shrivel up.
- Release the pressure by unscrewing the cap, but don’t take your eyes off the marshmallows. Let’s just say the rapid decompression is well worth all of the effort of pumping!
What else might work in place of marshmallows? Are all gases compressible? Can you compress a liquid using the pump? Notice the change in temperature of the bottle when you’re pumping the piston. Why does the bottle get warmer? Does the bottle temperature drop when the pressure is released?
How Does It Work?
There are really three factors that you should keep in mind when searching for the ultimate solution to the fizz factor dilemma:
Reactions with Carbon Dioxide Lucky for soda drinkers, carbon dioxide gas easily dissolves in water forming carbonic acid. That’s what gives soda a tangy taste. The goal is to keep the molecules from escaping. Everyone knows that shaking a soda makes it explode (what fun!). Why? In order to escape, the molecules have to find some rallying points, some unique meeting places at which they can congregate and form groups (bubbles) that are big enough to push their way up and out of the bottle. Scientists refer to these congregation sites as nuclei. Shaking a soda allows it to mix with air molecules trapped in the bottle. These air bubbles are the best possible nuclei for the further growth of bubbles. Carbon dioxide molecules latch onto the air molecules, which grow bigger and bigger. And before you know it, the foaming mess is out of control. In other words, if you want to keep your soda from going flat, don’t shake it. Duhhh!
Pressure At first glance, this part of the equation makes the most sense. Here’s what we know… the higher the gas pressure above the liquid in the bottle, the more gas will be pressed into the liquid. Makes sense. However, here’s the kicker. Once you open the bottle, the vast majority of the carbon dioxide molecules that were forced into the soda at the bottling plant come flying out. It’s that unmistakable sound of PSSSSST!
What about those gadgets called Fizz Keepers (you know, those pumps sold at the grocery store that supposedly re-pressurize the soda)? Do they work? When you pump the piston up and down, you’re pumping plain old air (mainly oxygen and nitrogen) into the bottle. However, scientists tell us that the escaping gas can be pushed back into the liquid only by forcing more molecules of that particular gas (in this case carbon dioxide) into the space above the liquid. In reality, there isn’t one more molecule of carbon dioxide in the liquid after pumping the Fizz Keeper gadget than if you had simply screwed the cap on tight. You guessed it, the gadget is just a glorified soda bottle cap. Yes, it gives you that satisfying PSSSSST! sound, but that’s all it does. So, in terms of pressure, there’s not much that can be done.
Temperature Let’s cut to the chase. The secret to keeping your soda alive with plenty of reusable fizz is to keep the soda cold, plain and simple. The higher the temperature, the less the carbon dioxide molecules will dissolve. (By the way, try letting the bottle of soda sit out in the sun before dropping in the breath mints and watch out!) It’s especially important to keep the bottle tightly sealed while it is out of the refrigerator since the higher temperature makes the gas want to leave the liquid. Pour yourself a glass of refreshing soda, cap the bottle, and put it right back in the refrigerator. Keep it cold… keep the fizz.
Source Information: If you find this sort of stuff interesting, you’ll want to rush out and pick up a copy of What Einstein Didn’t Know by Robert Wolke. The book is packed full of great information that is sure to get your creative ideas flowing.
Browse more experiments by concept:
Remember Me
Shop Video Measuring the Solubility of Gases with Soda Pop Videos

Measuring the Solubility of Gases with Soda Pop
Presenter: Nus Hisim
Duration: 60:52
Looking for new techniques to help your students learn about gas laws and solubility of gases? Get your students excited about creating solubility curves by experimenting with soda pop. We’ll be demonstrating My Flat Soda Pop from our new Food Chemistry book (Food Chemistry Experiments, Experiment 04).
Experiment: My Flat Soda Pop
Filter By Tag
- Education Level +
- Elementary School
- Middle School
- High School
- Agricultural Science
- Analytical Chemistry
- Biochemistry
- Biomedical Engineering
- Biotechnology
- Coding and Robotics
- College Chemistry
- Earth Science
- Elementary Science
- Engineering
- Engineering Outreach
- Environmental Science
- Environmental Systems and Societies
- General Chemistry
- General Science
- Human Physiology
- Life Science
- Middle School Science
- Organic Chemistry
- Physical Chemistry
- Physical Science
- Renewable Energy
- Sports, Exercise, and Health Science
- Water Quality
- Product Family +
- Makeblock®
- Skip to primary navigation
- Skip to main content
- Skip to primary sidebar

- FREE Experiments
- Kitchen Science
- Climate Change
- Egg Experiments
- Fairy Tale Science
- Edible Science
- Human Health
- Inspirational Women
- Forces and Motion
- Science Fair Projects
- STEM Challenges
- Science Sparks Books
- Contact Science Sparks
- Science Resources for Home and School
Fizzing Rocks – Baking Soda Activity
August 31, 2012 By Emma Vanstone 23 Comments
We love a good baking soda experiment. I spotted this brilliant and simple idea on Reading Confetti , who kindly said I could post it here. These are our fizzing rocks.

How to make fizzy rocks
You’ll need.
Bicarbonate of soda/baking soda
Food colouring
Instructions
Mix a little water with the bicarbonate of soda. I used a whole packet of bicarbonate of soda and added water slowly until I had a very thick paste type mixture.
Add a few drops of food colouring, mould the paste into rock shapes, and leave it to dry for a few hours.
Once the rocks have hardened, slowly add vinegar and watch as they fizz and dissolve.

The science behind baking soda rocks
Vinegar (an acid ) and bicarbonate of soda ( an alkali ) react to neutralise each other. This reaction releases carbon dioxide, a gas that causes the bubbles you see.
Other ideas
Add small objects to the rocks and drop them into a bowl of vinegar like Reading Confetti did.
Make one big rock and see how much vinegar is needed to dissolve it.
Try one of my other fantastic baking soda experiments .

Last Updated on May 20, 2024 by Emma Vanstone
Safety Notice
Science Sparks ( Wild Sparks Enterprises Ltd ) are not liable for the actions of activity of any person who uses the information in this resource or in any of the suggested further resources. Science Sparks assume no liability with regard to injuries or damage to property that may occur as a result of using the information and carrying out the practical activities contained in this resource or in any of the suggested further resources.
These activities are designed to be carried out by children working with a parent, guardian or other appropriate adult. The adult involved is fully responsible for ensuring that the activities are carried out safely.
Reader Interactions
August 31, 2012 at 1:13 pm
Thanks for the link. Love your idea of making one big rock. We might have to try that next!
August 31, 2012 at 1:23 pm
I’m glad you spotted it! We had so much fun 🙂
September 01, 2012 at 12:30 am
I like that you made your own fizzing rocks! We may have to try that sometime.
September 05, 2012 at 8:15 pm
you should it was great!
September 01, 2012 at 3:12 am
Oh – this idea really does rock!!
September 01, 2012 at 1:22 pm
Oooh this looks like great fun. Love the addition of colour.
September 05, 2012 at 8:14 pm
Thanks Maggy, it was very fun!
September 06, 2012 at 5:17 pm
PS Thanks for sharing on Kids Get Crafty!
September 01, 2012 at 5:53 pm
looks great fun
IT was great!
September 01, 2012 at 10:51 pm
This really looks like fun!
It really was!
September 04, 2012 at 4:17 am
Try this: make a batch, make small balls out of it in one color and let it dry. Then make a second batch, make it a different color, wrap it around the first balls and let dry. When you add the vinegar, the outside fizzes away in one color, then the inside ball fizzes a second color. Next we want to try putting something inside like you suggested.
oooh that sounds fantastic! Thanks for the idea.
September 06, 2012 at 11:34 am
How fun! You guys always have the neatest experiments!!! Thanks for linking up to TGIF! Looking forward to seeing you linked up again tomorrow =-) Beth
September 07, 2012 at 8:44 pm
Thanks Beth!
October 14, 2016 at 11:41 pm
Great idea! I’m going to add this to my list of fun baking soda & vinegar activities with my kids. Thank you!!!
Leave a Reply Cancel reply
Your email address will not be published. Required fields are marked *
Cool Science Experiments Headquarters
Making Science Fun, Easy to Teach and Exciting to Learn!
Science Experiments
Balloon Blow-up Science Experiment
Can you blow up a balloon without using your mouth? In this simple science experiment, we’re going to show you how to do it with only a few everyday items you probably already have in your home. It makes a great experiment for young children because the set-up is simple and it only takes a few minutes to get to the exciting finale.
In addition to a video demonstration and detailed printable instructions, we also have the scientific explanation of how this simple chemical reaction works making it perfect for older scientists too.

JUMP TO SECTION: Instructions | Video Tutorial | How it Works
Supplies Needed
- Small Soda Bottle
- Baking Soda
Balloon Blow-up Science Lab Kit – Only $5
Use our easy Balloon Blow-up Science Lab Kit to grab your students’ attention without the stress of planning!
It’s everything you need to make science easy for teachers and fun for students — using inexpensive materials you probably already have in your storage closet!
Balloon Blow Up Science Experiment Instructions
Step 1 – Start with some questions: How do you blow up a balloon? What if I told you that you couldn’t blow air into it, do you think you could still inflate (blow-up) the balloon? Then observe the supplies for the experiments. Do you think they can be use to blow up the balloon? If so how? Write down your hypothesis (prediction).
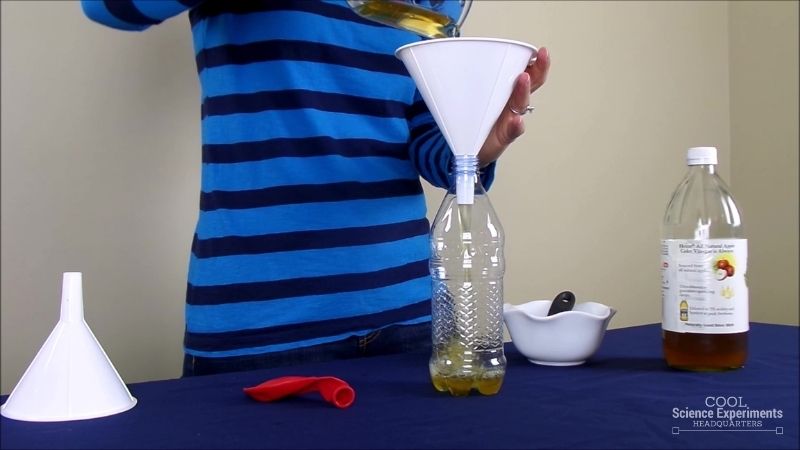
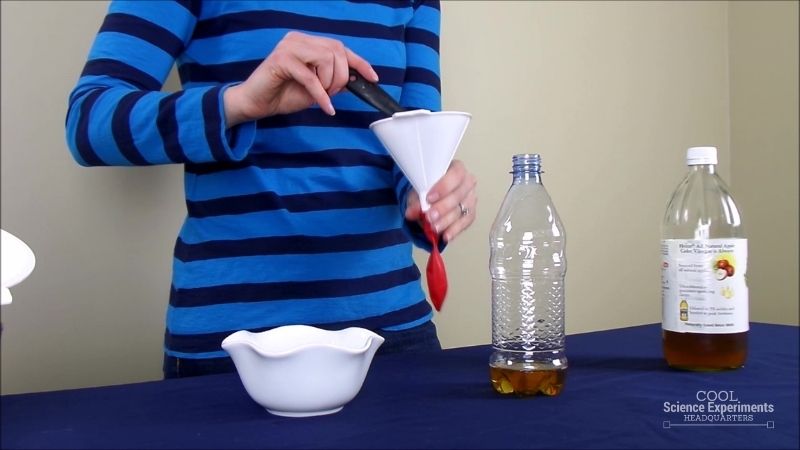
Step 2 – Using a funnel, pour about a third of a cup of vinegar into the bottle. We used Apple Cider Vinegar, but any type of vinegar will work.
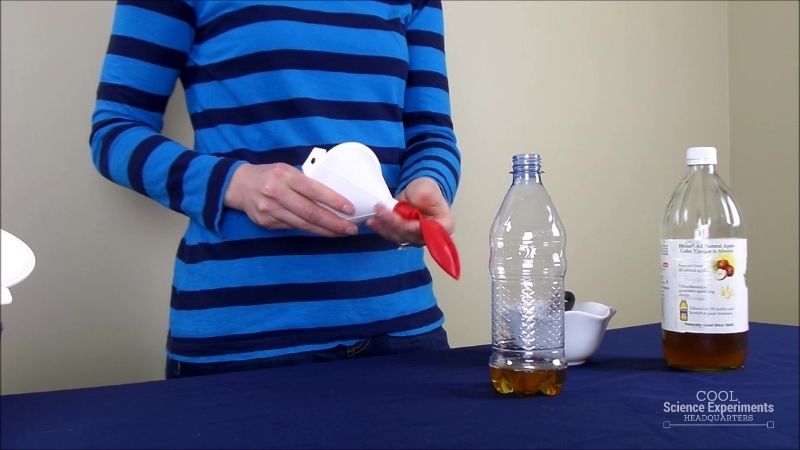
Step 3 – Then insert another funnel into the mouth of the balloon. We recommend using two different funnels. One funnel for filling the bottle with vinegar and one for the balloon. However, you can do the experiment with only one funnel. Just make sure you completely wash and dry the funnel after you add the vinegar and before you put it into the balloon. This is very important.
Step 4 – Place two teaspoons of baking soda into the funnel so it falls into the balloon. When the balloon is filled with the baking soda, carefully remove it from the funnel.
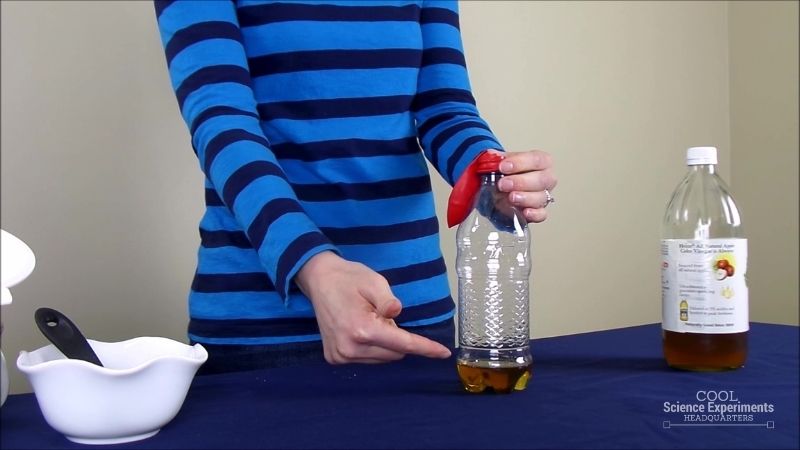
Step 5 – Next, secure the mouth of the balloon over the mouth of the bottle. Take your time doing this and don’t let any of the baking soda fall out of the balloon and into the bottom of the bottle. Take a moment to make some observations. What will happen if we lift up the balloon? Write down your hypothesis (prediction) and then test to see if you were right!
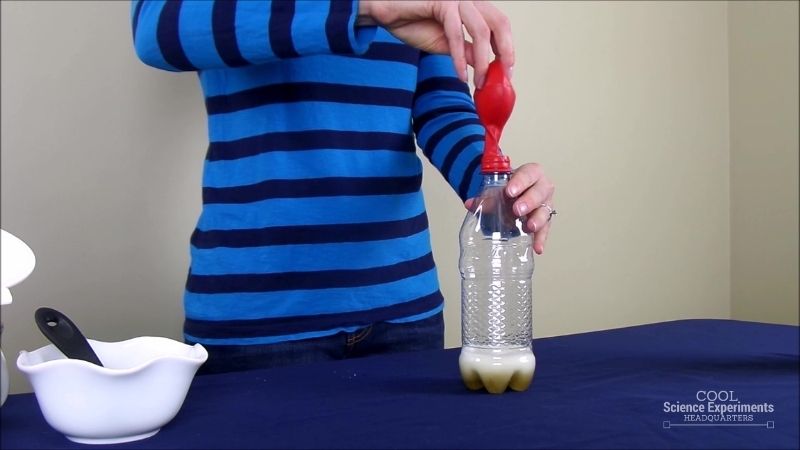
Step 6 – While holding the bottle, lift the end of the balloon and allow the baking soda to drop into the bottle.
Step 7 – What happens to the balloon? Was your hypothesis correct? Wondering what caused the balloon to inflate? Find out the answer in the how does this experiment work section below.
Video Tutorial
How Does the Science Experiment Work?
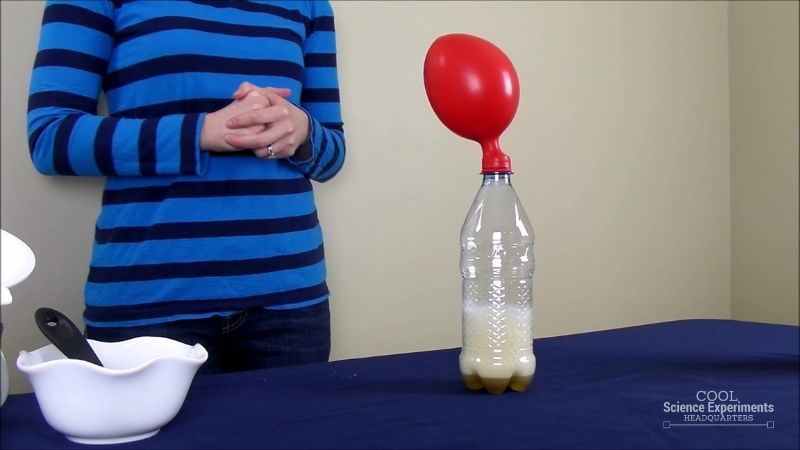
When baking soda (a base) and vinegar (an acid) are mixed together they create a chemical reaction that results in the formation of carbon dioxide gas. Gases do not have a specific shape or volume, rather they expand rapidly filling their container. Gases expand rapidly because their particles move at high speeds in all directions. As the carbon dioxide gas fills the bottle, it has nowhere else to go so it begins to fill the balloon. As the carbon dioxide gas fills the balloon, the balloon inflates. The more gas that is created, the larger the balloon will inflate.
The baking soda and vinegar chemical reaction will continue to inflate the balloon as long as there is still baking soda and vinegar to react. Once the reaction between baking soda and vinegar has stopped, the balloon will slowly begin to deflate.
An acid is a substance that tastes bitter, reacts with metals and carbonates, and turns blue litmus paper red. A base is a substance that tastes bitter, feels slippery, and turns red litmus paper blue.
Other Ideas to Try
Does changing the amount of baking soda and vinegar change the size of the balloon when it inflates? What would happen if you used another acid like lemon juice instead of the vinegar? Would it react the same with the baking soda?
I hope you enjoyed the experiment. Here are some printable instructions:

Instructions
- Using a funnel, pour about a third of a cup of vinegar into the bottle. Tip: I used Apple Cider Vinegar, but any kind of vinegar will work.
- Then insert another funnel into the mouth of the balloon. Tip: It is best to have two funnels, one for filling the bottle with vinegar and one for the balloon. If you only have one funnel, it is important that you completely wash and dry the funnel after you add the vinegar and before you put it into the balloon.
- Place two teaspoons of baking soda into the funnel so it falls into the balloon. Then remove the balloon from the funnel.
- Next, secure the the mouth of the balloon over the top of the bottle. Tip: Don’t let any of the baking soda drop into the bottle…yet!
- While holding the bottle, lift the end of the balloon allowing the baking soda to drop into the bottle.
- Watch in amazement as the balloon magically inflates!

Reader Interactions

November 2, 2017 at 11:00 am
Yeah but don’t just eyeball the measurements of things because if you use to much baking soda it will make the baloon spring a leak and all sorts of stuff will fly out and make a big mess.
I speak form experience
Seriously, don’t do this

April 21, 2018 at 10:26 am
I did this experiment and it is perfect!
You need to hold properly the bottle when you mix the baking soda into vinegar.

May 22, 2019 at 8:57 am
We’re doing science experiments at school and this one is brilliant! I loved it a lot.

June 22, 2020 at 11:15 am
I love this experiment! My balloon grew 6 inches!

June 19, 2023 at 11:17 pm
I tried and it worked well – Exited to do such experiment
Leave a Reply Cancel reply
Your email address will not be published. Required fields are marked *
Save my name, email, and website in this browser for the next time I comment.

- Privacy Policy
- Disclosure Policy
Copyright © 2024 · Cool Science Experiments HQ
Get Your ALL ACCESS Shop Pass here →
Soda Balloon Experiment
Combine some fun science and balloons with this easy to set up science experiment for kids. Can you blow up a balloon with soda? What happens when you add salt to soda?

Soda Balloons
Blow up a balloon using only soda and salt. We love fizzing experiments and have been exploring chemistry for kindergarten, preschool, and elementary kids for 10 years now.
Our science experiments are designed with you, the parent or teacher, in mind! Easy to set up, quick to do, most activities will take only 15 to 30 minutes to complete, and are fun!
Our supply lists usually contain only free or cheap materials you can source from home. Grab some soda and balloons, and see if you can blow up a balloon with a bit of chemistry! What is Chemistry? Find out more!
Also, check out these other fun science experiments with soda…
- Pop rocks and Soda
- Crushing Soda Can
- Dancing Raisins
- Mentos and Coke
FREE PRINTABLE SODA SCIENCE PROJECT!

Put the scientific method into practice with this easy-to-set-up science experiment. Extend the activity by changing one variable. For example, explore what happens if you add the same amount of salt to different types of soda.
W A TCH THE SCIENCE VIDEO:
- 2 bottles of soda
EXPERIMENT SETUP:
STEP 1: Open a bottle of soda and quickly place a balloon over the opening. What happens?

STEP 2: Pour about a half teaspoon of salt into the other balloon.

STEP 3: Attach the salted balloon to the other soda, but without letting the salt fall into the bottle.

STEP 4: Once secure, lift the balloon, allowing the salt to fall into the soda.

What happens? What was the difference between the two bottles? How were they similar?

Soda Balloon Science Information
The fizzy bubbles in the soda are a gas called carbon dioxide. Unopened soda has large amounts of carbon dioxide gas dissolved into the water at high pressure. This process of adding the fizz to soda is called carbonation .
Typically, you can find these gas bubbles coming out of the soda on the sides of the bottle, which is why it becomes flat after a while.
When you open the bottle of soda, the bubbles have room to escape. The balloon grows in size because the carbon dioxide gas is filling it!
What about the second balloon? You would have noticed that when you add salt to the soda, you get a lot of fizzing and foaming! Also, the balloon blows up more quickly and bigger than the first balloon. This is similar to our Mentos and Coke eruption !
You might be surprised to know that what you observe is a physical reaction , not a chemical reaction like baking soda and vinegar .
Adding salt to soda speeds up the process of dissolved carbon dioxide gas forming bubbles and escaping into the air. This is because more bubbles can form on the salt crystals’ surface, pushing the liquid up.
Salt in soda is a great example of a change of states of matter ; the carbon dioxide dissolved in the liquid soda moves to a gaseous state.
We love exploring simple chemistry you can do at home or in the classroom that isn’t too crazy, but is still lots of fun for kids! Make sure to check out more fun chemistry experiments !
Turn It Into A Science Fair Project
Science projects are an excellent way for older kids to show what they know about science. They can also be used in all sorts of environments, including classrooms and groups.
Kids can take everything they have learned about using the scientific method , stating a hypothesis, choosing variables , making observations , and analyzing and presenting data.
Want to turn one of these experiments into an awesome science fair project? Check out these helpful resources.
- Science Project Tips From A Teacher
- Science Fair Board Ideas
- Easy Science Fair Projects
Helpful Science Resources To Get You Started
Here are a few resources that will help you introduce science more effectively to your kiddos or students and feel confident yourself when presenting materials. You’ll find helpful free printables throughout.
- Best Science Practices (as it relates to the scientific method)
- Science Vocabulary
- 8 Science Books for Kids
- All About Scientists
- Free Science Worksheets
- Science Supplies List
- Science Tools for Kids
- Scientific Method for Kids
- Citizen Science Guide
- Join us in the Club
Printable Science Projects For Kids
If you’re looking to grab all of our printable science projects in one convenient place plus exclusive worksheets and bonuses like a STEAM Project pack, our Science Project Pack is what you need! Over 300+ Pages!
- 90+ classic science activities with journal pages, supply lists, set up and process, and science information. NEW! Activity-specific observation pages!
- Best science practices posters and our original science method process folders for extra alternatives!
- Be a Collector activities pack introduces kids to the world of making collections through the eyes of a scientist. What will they collect first?
- Know the Words Science vocabulary pack includes flashcards, crosswords, and word searches that illuminate keywords in the experiments!
- My science journal writing prompts explore what it means to be a scientist!!
- Bonus STEAM Project Pack: Art meets science with doable projects!
- Bonus Quick Grab Packs for Biology, Earth Science, Chemistry, and Physics!

Subscribe to receive a free 5-Day STEM Challenge Guide
~ projects to try now ~.


Blow Up a Balloon with Soda Pop
Let’s learn how much air is in a bottle of soda pop! This carbonation experiment for kids combines a fondness for balloons and the fascination with the fizzy bubbles found in soda pop. With just a few supplies and a few steps, you can blow up a balloon with carbon dioxide bubbles. For even more carbonation fun, try one of the variations below!
Uninflated or broken balloons can be hazardous for kids under 8, so keep a close eye on the kids and follow any warning labels that come with your balloons when you do this activity.

- Unopened bottle of soda pop
- Balloon of any shape
For an expanded version of the experiment, you’ll also need:
- Another unopened bottle of soda pop, any flavor
- Another balloon
- A spoonful of salt
Instructions
- Stretch the uninflated balloon a few times to make it easier to inflate.
- Place the soda bottle on a table or countertop.
- Open the soda bottle.
- Immediately stretch the balloon’s opening over the neck of the bottle; pull the balloon far enough onto the bottle so it fits snugly.
- Check on the balloon every 10 minutes or so to see how much it has inflated. It will be slow going, but it will get there!
Why It Works
Soda and similar fizzy drinks are carbonated, which means carbon dioxide gas is dissolved into the liquid under high pressure. When you open the bottle, the pressure is relieved, gas expands into bubble formations, and the bubbles of gas begin to escape. The balloon expands with the trapped carbon dioxide gas.
As a bonus lesson, do this experiment with an ice-cold bottle and a bottle at room temperature. You’ll see the balloon attached to the warmer bottle expands at a faster rate. When the soda liquid’s temperature rises, molecules in the drink are more active and allow the gas bubbles more chances to form and to escape.
Extra Credit
Expanded experiment.
- With a fresh bottle and new balloon, repeat the first two steps above.
- Pour a spoonful of salt into the balloon – NOT the bottle. Otherwise you’ll have a big mess!
- Follow steps 3 and 4, being careful not to spill any of the salt into the bottle yet.
- Quickly lift the balloon to pour the salt into the bottle.
- Observe the rapid release of gas bubbles.
Explanation
Get free activities and exclusive offers, blog categories.
- Craft & DIY
- World Holidays
Watch the Video!
Recent Posts
- Celebrate Your Daughter with This Japanese Girls’ Day Craft
- Enjoy a Fun-Filled Day with 10 Non-Screen Activities for Kids
- Spinning Science: How to Make a Tornado in a Bottle
- These Cute Easter Bunny Crafts Are a Hopping Good Time
- 3 Adorable DIY Gifts for Your Kids’ Favorite Teachers
IMAGES
COMMENTS
Try this EPIC pop rocks science experiment at home with your kids for a fun and educational way to explore simple chemical reactions.
What happens when you drink Pop Rocks and soda? Try this easy and fun Pop Rocks and soda experiment to find out.
Easy Pop Rocks science experiment for students to explore combining a solid and liquid to form a gas. Learn how to do this fun second grade science experiment and add it to your properties of matter activities!
The soda, a carbonated liquid to begin with, contains lots of pressurized CO 2. When the Pop Rocks are dropped into the soda, some of the gas in the soda collects in gazillions of bubbles on microscopic nucleation sites (imperfections, dents, bumps) on the candy. Some of the gas escapes from the water and corn syrup that hold it and moves upward.
Why does soda shoot out of the can when you open it? When soda companies add carbon dioxide gas to a soda mixture, the water is very cold so it can hold a lot of gas. They also use pressure to put more gas in the water than it could normally hold at that temperature.
When Pop Rocks dissolve in the soda, the carbon dioxide gas from the candy and the soda is released simultaneously. This creates excess gas in a small space, leading to a rapid and chaotic expansion. In other words, it's like a science experiment gone wild! The result is an explosion of bubbles, fizz, and foam—a true spectacle for the senses.
In this fun science activity, students will demonstrate Boyle's law and test how gases change their volume depending on pressure.
Pop Rocks and Soda Experiment Simple science experiments are tons of fun to do with kids at home or in the classroom. This pop rocks and soda experiment is a fun twist on the classic baking soda volcano experiment. With the power of chemical reactions, children can inflate a balloon using pop rocks!
The Soda and Pop Rocks Easy Science Experiment for Kids uses candy and pop to engage, excite and teach at the same time. Kids will love this experiment for its explosive chemical reaction. No matter what time of year it is, cool and easy science experiments for kids deliver. So go ahead and harness that explosive energy with an explosion of your own!
The soda also contains pressurized carbon dioxide gas. When the Pop Rocks are dropped into the soda, some carbon dioxide is able to escape from the high fructose corn syrup of the soda and, because the carbon dioxide gas has no where to go in the bottle, it rises into the balloon.
Set up a quick and simple Pop Rocks experiment to explore cool chemical reactions and fun candy science. How do Pop Rocks work?
Floating and Sinking Soda Pop Cans Science Experiment Are you ready for a 'Does It Float?" science experiment? We have done experiments with Floating Eggs, and Sinking Oranges, now we are going to experiment with pop cans (or soda cans depending on what part of the world you live in)! Grab your supplies and try this experiment with us.
When baking soda and vinegar mix, it creates carbon dioxide, which is what causes our balloon to inflate. Chemical reactions This experiment demonstrates a basic chemical reaction between an acid (vinegar) and a base (baking soda) to produce carbon dioxide gas.
Fizz Bizz. Have you ever noticed that when you put a straw in soda pop, the straw gets covered with bubbles? The bubbles are made from a gas called carbon dioxide. The soda pop company puts the carbon dioxide in the soda to give it that special fizz. You can see some of this carbon dioxide fizz, bubble, and pop in this activity with soda pop!
In this chemistry demonstration, we'll explore how Pop Rocks work and how the unique makeup of this candy can be combined with soda to blow up a...
Can you make a balloon inflate without using air? Sure you can! You just need to make carbon dioxide gas, which is easier than you think. When your vinegar and baking soda touch, get ready to watch the bubbly reaction! Want to explore more hands-on science experiments without the hassle of gathering materials?
Looking for a fun explosive science experiment for kids? This soda and Mentos experiment will be a huge hit! Kids of all ages love making this soda pop geyser.
It's especially important to keep the bottle tightly sealed while it is out of the refrigerator since the higher temperature makes the gas want to leave the liquid. Pour yourself a glass of refreshing soda, cap the bottle, and put it right back in the refrigerator. Keep it cold… keep the fizz.
Looking for new techniques to help your students learn about gas laws and solubility of gases? Get your students excited about creating solubility curves by experimenting with soda pop. We'll be demonstrating My Flat Soda Pop from our new Food Chemistry book (Food Chemistry Experiments, Experiment 04).
The science behind baking soda rocks Vinegar (an acid ) and bicarbonate of soda ( an alkali ) react to neutralise each other. This reaction releases carbon dioxide, a gas that causes the bubbles you see.
The more gas that is created, the larger the balloon will inflate. The baking soda and vinegar chemical reaction will continue to inflate the balloon as long as there is still baking soda and vinegar to react. Once the reaction between baking soda and vinegar has stopped, the balloon will slowly begin to deflate.
Blow up a balloon using just soda with this fun and easy balloon experiment. Watch what happens when you add salt to soda.
This experiment shows kids how carbonation works - the bubbles in soda pop can expand and make a balloon inflate. Check out the bonus experiments, too!