In this practice project for Word, students create a document with a title and table. The table has two columns that have different font alignment and incluces various fonts.
In this practice project for Word, students create a document using a different size and color font for the title than the rest of the paragraph.
In this practice project for Word, students create a document with two different types of bullets showing points and subpoints.
In this practice project for Word, students create a letter. Included in the letter is a heading on the right, indented paragraphs, and the closing and signiture near the middle of the document.
In this practice project for Word, students create a document that contains several paragraphs of text and also includes an outline with key points and subpoints.
In this practice project for Word, students create a document with the heading on the right, a boldfaced, centered title, and indented paragraphs. The document is double-spaced.
In this practice project for Word, students create a document with the heading on the right, a boldfaced title that is centered, and several paragraphs that are indented.
In this practice project for Word, students create a document using the preset headings to create a title bar. The document has different alignment and font, blanks, and a short outline.
In this practice project for Word, students create a document that shows some different effects that can be used with the same font.
In this practice project for Word, students create a document that includes a centered title followed by a numbered list.
In this practice project for Word, students create a document that has a centered title, a heading in the upper right corner, and indented paragraphs.
In this practice project for Word, students create a document with a table showing a school schedule. The blocks in the table are different sizes and will take individual work within the blocks to create the correct layout. The document includes a title and has the date in the top right corner.
In this practice project for Word, students create a document with a header and two colomns. The columns include boldfaced and italic font and different alignment.
In this practice project for Word, students create a document with two identical columns in landscape orientation. Included in each are indented lines and different alignment and font.
In this practice project for Word, students create a document like a student handout. This includes an outline with several levels, blanks for students to write on, and different font.
In this practice project for Word, students create a document with a header and two outlines. Students are asked to use the automatic numbering and outlining features in Word. They must use different font, some with all captials, and some that is boldfaced.
In this practice project for Word, students create a scoresheet using a table. Students must use different sizes, colors and styles of font, including different alignment.
In this practice project for Word, students create an outline using the automatic outline in Word, including many levels of subpoints.
In this practice project for Word, students create a document with a centered title in all capitals, the first letter of each word slightly larger than the rest. Throughout the document the font is different sizes, sometimes boldfaced or in color. Students must number the main points and indent for subpoints.
In this practice project for Word, students create a document similar to a test or quiz. They must include points and subpoints, blanks, boldfaced text, tabs, and spacing.
Subject Explorer
School Subjects
Math & Science
Business & Technology
Electives & Health
Board & Administration
Teaching & Learning
Audio/Video Lectures
Books & Documents
Classifieds
Jobs & Resources
Discussions
Language & Literature

Practice Projects for Microsoft Word

Word 9 Table Practice Document

Word 8 Formatting Text Practice Document

Word 7 Bullets Practice Document

Word 6 Letter Practice Document

Word 5 Text And Outline Practice Document

Word 4 Modified Text Practice Document
Word 3 basic text practice document.

Word 22 Preset Headings Practice Document

Word 21 Formatting Options Practice Document

Word 20 Numbered List Practice Document

Word 2 Heading 2 Practice Document

Word 19 Advanced Table Practice Document

Word 18 Columns Practice Document

Word 17 Columns Practice Document

Word 16 Lesson Notes Handout Practice Document

Word 15 Lesson Notes Practice Document

Word 14 Table Practice Document

Word 13 Outline Practice Document

Word 12 Formatting Practice Document

Word 11 Formatting Practice Document
Resource Type:
Pass it on:
Leave a Reply
- Skip to main content
- Skip to secondary menu
- Skip to primary sidebar
- Skip to footer
Erin Wright Writing
Writing-Related Software Tutorials
How to Use Microsoft Word (10 Core Skills for Beginners)
By Erin Wright
Do you want to learn how to use Microsoft Word quickly? This tutorial teaches ten core skills for beginners.
Table of Contents
How to Start a New Document
How to change the font, size, and color, how to change the alignment, line spacing, and indentations, how to add headings, how to change the margins, how to add images, how to add page numbers, how to add headers and footers, how to run the editor (spelling and grammar check), how to save and print your file.
Please note that this is a quick start guide. I have in-depth tutorials for most of these topics for those who would like to learn more.
Watch all the steps shown here in real time!
Explore more than 250 writing-related software tutorials on my YouTube channel .
The images below are from Word for Microsoft 365. These steps are similar in Word 2021, Word 2019, and Word 2016.
We will cover these ten core skills in Word for Mac in a separate tutorial.
- Open Word on your computer.
When Word opens, you will be in the Home screen of the Backstage view.
- Select Blank document to start a new document. (Alternatively, select Open if you want to open an existing Word document.)

When the new document opens, you will be in the Home tab in the ribbon , and your cursor will automatically be placed towards the top, left-hand corner of the page, ready to type.

You can change the font, size, and color before or after you type text. However, if you want to change existing text, first left-click, hold, and drag with your mouse to select the text.

- Select the Home tab in the ribbon if you are not already there (see figure 2).
- Select the menu arrow to open and choose from the (A) Font , (B) Font Size , or (C) Font Color menus in the Font group.

If you selected existing text, that text will change immediately. If you haven’t selected existing text, all new text will feature the choices you just made.
Further Reading: How to Change the Font, Font Size, and Font Color in Microsoft Word
Like the font choices shown above, you can change the alignment, line spacing, and indentations before or after you type text. However, if you want to change existing text, first left-click, hold, and drag with your mouse to select the text.
- Select the Home tab, if you are not already there (see figure 2).
- Select the Align Left , Center , Align Right , or Justify button to position the text on the page.

- Select the Line and Paragraph Spacing menu arrow and then choose a spacing option from the drop-down menu.

- Select the Decrease Indent or Increase Indent buttons to adjust the indent as necessary.

Further Reading: How to Adjust Line Spacing in Microsoft Word and Three Ways to Indent Paragraphs in Microsoft Word
You can turn existing text into a heading or choose a heading level before typing the heading text.
- Select the Home tab if you are not already there (see figure 2).
- Select a heading level from the Styles group.

- If the heading level you want isn’t visible, select the More button.

- Select a heading level from the menu that appears over the Styles group.

Further Reading: How to Create and Customize Headings in Microsoft Word
You can change the page margins for your entire Word document at once.
- Select the Layout tab in the ribbon.

- Select the Margins button and then select an option from the drop-down menu.

Further Reading: How to Adjust the Page Margins in Microsoft Word
- Place your cursor where you want to insert the image.
- Select the Insert tab in the ribbon, select the Pictures button, and then select the location of the image:
- This Device lets you choose an image stored on your computer or network server.
- Stock Images lets you choose stock images, icons, cutout people, stickers, and illustrations. The full stock image library is only available to users signed into Word for Microsoft 365.
- Online Pictures lets you search for images through Bing, Microsoft’s search engine.

For this tutorial, we will insert an image stored on the device.
- (For “This Device” option only) Locate and select the image in the Insert Picture dialog box and then select the Insert button.

Your image should now appear in your Word document.
- (Optional) Select one of the resizing handles and then drag the image to a new size.

- (Optional) Select the Layout Options button and then choose how the image is positioned with the surrounding text:
A. In Line with Text
E. Top and Bottom
F. Behind Text
G. In Front of Text
The effect of each option will depend on the size of your image and the density of your text. So, you may need to experiment with several options to find the one most suited to your content.

Further Reading: How to Insert and Modify Images in Microsoft Word
- Select the Insert tab in the ribbon (see figure 13).
- Select the Page Number button and then select a location from the drop-down menu, followed by a design from the submenu.
- Select the Close button to close the Header and Footer tab. (This tab only appears when the Header and Footers areas are active.)

Further Reading: How to Add Page Numbers in Microsoft Word
- Select the Header or Footer button and then select a design from the drop-down menu.

- Type your text into the placeholders.

- Select the Close button to close the Header and Footer tab (see figure 18).
Further Reading: How to Insert Headers and Footers in Microsoft Word
In Word for Microsoft 365, the spelling and grammar check is called the Editor. Your spelling and grammar options will depend on which version of Word you are using. Therefore, your interface may look different than the images shown below.
- Select the Review tab in the ribbon and then select the Editor button. (Older versions of Word will have a Check Document button, instead.)

- Select the corrections or refinements category you want to review in the Editor pane.

- If Word finds a possible error, select a recommendation or select Ignore Once or Ignore All .

Word will automatically move to the next issue within the category.
- Select a new category or select the closing X to close the Editor.

What Is the Difference between the Editor Button and the Spelling and Grammar Button?
You may notice a Spelling and Grammar button next to the Editor button in the Review tab. This button provides a quick way to check only spelling or spelling and grammar without checking the additional refinements reviewed by the Editor.

Further Reading: How to Use the Editor in Word for Microsoft 365
I recommend saving your file before printing just in case there is a disruption during the printing process.
- Select the File tab in the ribbon.

- Select the Save tab in the Backstage view.

- Select the location where you want to save the File.

- Type a name in the File Name text box and then select the Save button.

- Once you have saved your document to a specific location, you can then select the Save icon if you make changes to the document later.

- To print, reselect the File tab (see figure 26) and then select the Print tab in the Backstage view.

- Ensure the correct printer is selected and turned on, enter the number of copies into the text box, and then select the Print button.

From there, follow any additional dialog boxes provided by your printer.
Updated November 26, 2023
- Microsoft Word Tutorials
- Adobe Acrobat Tutorials
- PowerPoint Tutorials
- Writing Tips
- Editing Tips
- Writing-Related Resources

Basic tasks in Word
Word 2016 is designed to help you create professional-quality documents. Word can also help you organize and write documents more efficiently.
When you create a document in Word, you can choose to start from a blank document or let a template do much of the work for you. From then on, the basic steps in creating and sharing documents are the same. And Word's powerful editing and reviewing tools can help you work with others to make your document great.
Tip: To learn about new features, see What's new in Word 2016 .
Start a document
It’s often easier to create a new document using a template instead of starting with a blank page. Word templates come ready-to-use with pre-set themes and styles. All you need to do is add your content.
Each time you start Word, you can choose a template from the gallery, click a category to see more templates, or search for more templates online.
For a closer look at any template, click it to open a large preview.
If you’d rather not use a template, click Blank document .

Open a document
Every time you start Word, you’ll see a list of your most recently used documents in the left column. If the document you’re looking for isn’t there, click Open Other Documents .

If you’re already in Word, click File > Open and then browse to the file’s location.
When you open a document that was created in earlier versions of Word, you see Compatibility Mode in the title bar of the document window. You can work in compatibility more or you can upgrade the document to use Word 2016.
Save a document
To save a document for the first time, do the following:
On the File tab, click Save As .
Browse to the location where you’d like to save your document.
Note: To save the document on your computer, choose a folder under This PC or click Browse . To save your document online, choose an online location under Save As or click Add a Place . When your files are online, you can share, give feedback and work together on them in real time.
Click Save .
Note: Word automatically saves files in the .docx file format. To save your document in a format other than .docx, click the Save as type list, and then select the file format that you want.
To save your document as you continue to work on it, click Save in the Quick Access Toolbar.

Read documents
Open your document in Read Mode to hide most of the buttons and tools so you can get absorbed in your reading without distractions.

Open the document you want to read.
Note: Some documents open in Read Mode automatically, such as protected documents or attachments.
Click View > Read Mode .
To move from page to page in a document, do one of the following:
Click the arrows on the left and right sides of the pages.
Press page down and page up or the spacebar and backspace on the keyboard. You can also use the arrow keys or the scroll wheel on your mouse.
If you’re on a touch device, swipe left or right with your finger.
Tip: Click View > Edit Document to edit the document again.
Track changes
When you’re working on a document with other people or editing a document yourself, turn on Track Changes to see every change. Word marks all additions, deletions, moves, and formatting changes.
Open the document to be reviewed.
Click Review and then on the Track Changes button, select Track Changes .

Read Track changes to learn more.
Print your document
All in one place, you can see how your document will look when printed, set your print options, and print the file.
On the File tab, click Print .

Do the following:
Under Print , in the Copies box, enter the number of copies you want.
Under Printer , make sure the printer you want is selected.
Under Settings , the default print settings for your printer are selected for you. If you want to change a setting, just click the setting you want to change and then select a new setting.
When you’re satisfied with the settings, click Print .
For details, see Print a document .
Beyond the basics
For more on the fundamentals of using Word, see What's new in Word 2016 .
Top of Page
With Word for the web, you use your web browser to create, view, and edit the personal documents that you store on OneDrive . If your organization or college has a Microsoft 365 plan or SharePoint site, start using Word for the web by creating or storing documents in libraries on your site.Save changes
Word saves your changes automatically. Look on the status bar at the bottom left corner of Word for the web. It will either show Saved or Saving .

Share documents online
Because your document is online, you can share it by sending a link instead of an email attachment. People can read it in their web browser or mobile device.
Click File > Share > Share with People .

Comment in the browser
A comment balloon shows where comments have been made in the doc.

Reply to comments, and check off items you’ve addressed.

Edit in the browser
If you try to type in the document and nothing happens, you’re probably in Reading view. Switch to Editing view: click Edit Document > Edit in Word for the web .

Type and format text, add pictures, adjust the layout of the page, and more. For more advanced editing, click Open in Word .

Work together on the same doc
To work together in Word for the web, you edit a document as you normally would. If others are also editing it, Word for the web alerts you to their presence. You can see everyone who is currently working in the document by clicking in the ribbon.

Clicking on an author’s name jumps you to where they’re working in the doc. And you’ll see the changes they make as they’re happening.
Add a header or footer
Go to Insert > Header & Footer to add headers and footers to your document.

Click Options to choose how you’d like them to appear.

Add page numbers
Click Insert > Page Numbers and then choose from the gallery where you’d like the page numbers to appear.

Select Include Page Count to show the current page number along with the total number of pages (page X of Y).
Find and replace text
Quickly search for every occurrence of a specific word or phrase in your document by clicking Home > Find (or type Ctrl+F). Results appear next to your document so you can see the term in context. Clicking on a search result jumps you to that occurrence.

Click Replace (or type Ctrl+H) to find and replace text.
Print in Word for the web
Go to File > Print . Word for the web creates a PDF preview of your document that keeps all the layout and formatting of your document. Send the PDF to your printer and it will print the way you expect.

Need more help?
Want more options.
Explore subscription benefits, browse training courses, learn how to secure your device, and more.

Microsoft 365 subscription benefits

Microsoft 365 training

Microsoft security

Accessibility center
Communities help you ask and answer questions, give feedback, and hear from experts with rich knowledge.

Ask the Microsoft Community

Microsoft Tech Community

Windows Insiders
Microsoft 365 Insiders
Was this information helpful?
Thank you for your feedback.

Want to create or adapt books like this? Learn more about how Pressbooks supports open publishing practices.
Word Practice 1

Here is a video demonstrating the skills in this practice. Please note it does not exactly match the instructions:
Complete the following Practice Activity and submit your completed project.
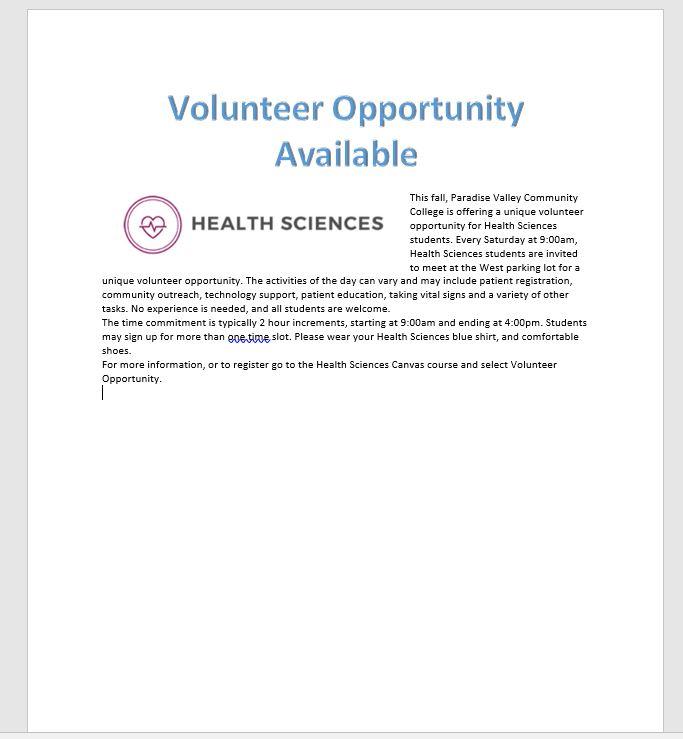
For our first assignment in Word, we will create a flyer to be printed or posted online. The flyer will advertise a volunteer opportunity for Health Sciences students at Paradise Valley Community College. Key skills in this practice are inserting text and pictures, textboxes, formatting text and footers.
- Start Word. Click Blank Document .
- Show formatting marks by navigating to the Home Tab, Paragraph Group, and selecting the Show/Hide icon. This is a Toggle Button . This means it has two modes, on and off. To turn it on, click it once, to turn it off, click it again.
- Show the ruler by navigating to the View tab, Show Group, and selecting the Ruler Check Box . A Check Box is a type of input control . A checkboxes value is only included in the submitted data if the checkbox is currently checked. In other words, when the box is checked, the value is included.
- Navigate to the File Tab to enter Backstage View. In backstage view, select File, then Save As. Click the Browse button. In the Save As dialog box , navigate to your file structure from the previous chapter, then open the Word folder. In the Name field, type Yourlastname_Yourfirstname_Word_Practice_1 as the file name, and then save.
- Type Volunteer Opportunity Available and press Enter twice.
- Type the following text: This fall, Paradise Valley Community College is offering a unique volunteer opportunity for Health Sciences students . Press spacebar.
- Navigate to the Insert Tab, Text group, and choose the Object arrow. Then choose text from file. In the Insert File dialog box, browse to the location where you saved the files from Canvas. Select the file Text_Word_Practice1. Click OK. The text will automatically update your document.
- Select all of the text in the document. On the Home Tab, Font Group, ensure the Font is Calibri and font size is 12.
- Select the title, Volunteer Opportunity Available, including the paragraph mark. On the Home Tab, Font Group, select the arrow next to Text Effects and Topography . In the third row, third column, a pply the Fill: Blue, Accent color 5; Outline: White, Background color 1; Hard Shadow: Blue, color 5 text effect.
- With the title still selected, change the font size to 36.
- On the Home Tab, Paragraph Group, choose Center to align the title centered on the page.
- On the Home Tab, Font Group, change the font color to Blue, Accent 1 for the title.
- With the title still selected, on the Home Tab, in the Font Group, choose the arrow next to the Text Effect and Typography icon. Apply a Shadow and under Inner, click Inside: Right text effect.
- Position the insertion point at the beginning of the paragraph that begins with This Fall.
- On the Insert tab, Illustrations group, choose Pictures . Navigate to your saved files from Canvas and choose the HSPicture_Word_Practice1 image.
- Be sure the picture is selected, and apply the Square text wrapping option.
- Using the sizing handle at the lower right hand corner of the picture, drag up and to the left until the bottom of the graphic is aligned at approximately 3.5 inches on the vertical ruler.
- Click Undo to return the picture to its original size. The Undo icon is located in the quick access toolbar in the upper left hand corner.
- On the Picture Tools, Format tab, in the size group, change the shape width to 4”.
- On the Quick Access Toolbar , click the Save icon. Then, compare your document to the image below.
- Ensure the picture is still selected. Display the Layout dialog box by selecting the Layout Options shortcut menu, then choose see more. In the Layout dialog box for the picture, make sure the Position tab is selected.
- Set the horizontal alignment to Left, relative to Margin.
- Set the vertical alignment to Top, relative to Line. Select OK to close the dialog box.
- With the picture selected, apply the Soft Edges 10 Point picture effect. This is on the Picture Tools Format Tab, Picture Styles group, under Picture Effects, Soft Edges.
- With the picture selected, on the Picture Tools, Format tab, in the Adjust Group choose the Artistic Effects arrow. Apply the Pastels Smooth artistic effect. Dese lect the picture .
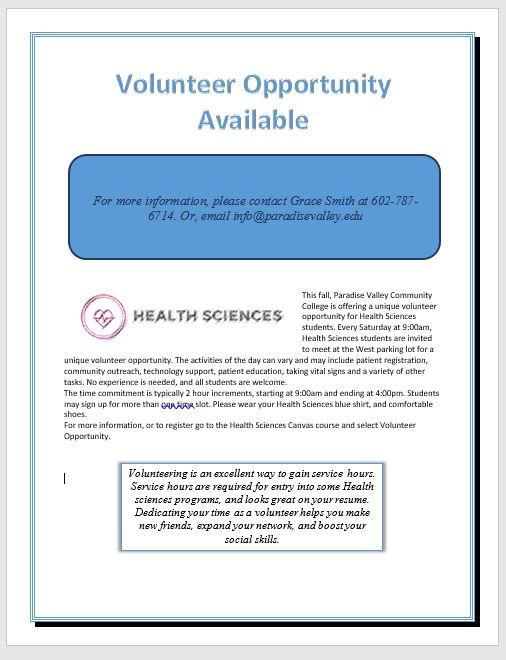
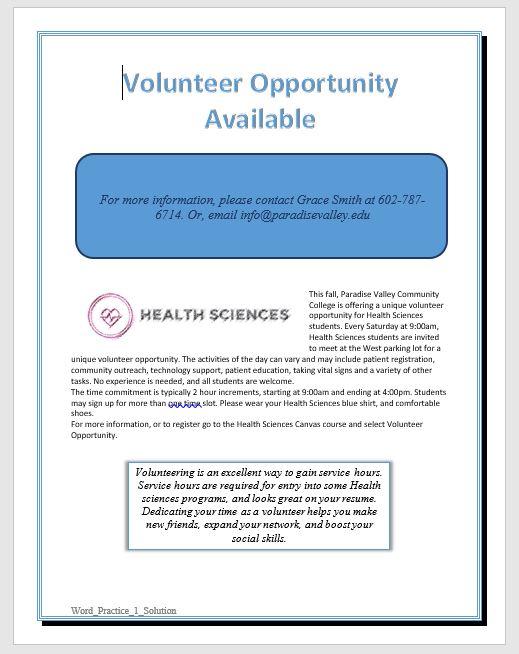
- On the Design Tab, in the Page Background Group, select Page Borders. Add a page border selecting the:
- Shadow setting
- Triple Lines style
- Blue, Accent 1 color
- Whole document
- Position the insertion pointer at the blank paragraph below the title and press Enter six times.
- On the Insert Tab, in the Illustrations group, choose Shapes . Insert a Rounded Corners Rectangle shape at the left margin at approximately 1.5 inches on the top ruler. Click once to insert a 1-inch by 1-inch Rounded Rectangle, or use the drag and drop feature.
- On the Drawing Tools, Format Tab in the Size group, Change the shape height to approximat ely 1.8 and the shape width to 6.4.
- Select the Rectangle shape and type the following text: For more information, please contact Grace Smith at 602-787-6714. Or, email [email protected]
- Italicize the text, change the font to Calibri and increase the font size to 16. Deselect the text.
- Select the same text as above and explore the mini-toolbar , by clicking the Font Color button arrow and under Theme Colors, click on Blue, Accent 5, Darker 50%.
- With the shape still selected, go to the Drawing Tools, Format Toolbar, the Shape Styles Group. Select the arrow next to Shape Outline and under Theme Colors, click on Blue, Accent 5, Darker 50%. Change the weight to 3pt.
Compare your document to the image below.

- Using the keyboard shortcut CTRL+END , navigate to the end of your document. If your keyboard does not have these keys, click to put your insertion point after the period on opportunity. Hit enter 3 times.
- Your insertion point should be approximately at the 8” mark on the side ruler. On the Insert tab, in the text group, click the arrow next to the textbox and draw a text box at approximately the 1”mark on the vertical ruler. Draw a text box by dragging down to create a text box that is approximately 1.5 inches high by 4.5 inches wide. Type the following in the text box: Volunteering is an excellent way to gain service hours. Service hours are required for entry into some Health sciences programs, and looks great on your resume. Dedicating your time as a volunteer helps you make new friends, expand your network, and boost your social skills.
- Select and Drag the textbox, by clicking and holding on the outer edge, until the horizontal green alignment guide displays above the first blank paragraph mark and the vertical green alignment guide displays in the center of the page. To be more precise:
- In the Layout dialog box on the Position Tab for the text box set the horizontal alignment to Centered, relative to Margin.
- Set the Vertical alignment by typing .25 in the Absolute position box and selecting Below Paragraph .
- On the Size tab, type 1.5 in the Absolute Height box and 4.5 in the Absolute Width box. Then, click OK.
- With the textbox still selected, on the Drawing Tools, Format Tab, in the Shape Styles group Apply the Colored Outline – Blue, Accent 1 shape style.
- Under Shape Effects , apply the Offset Center outer shadow shape effect to the text box.
- Select the text in the text box, change the font size to 13 italics, and center the text.
- Save the document. Compare your document to the image below.
- On the Insert tab, in the Header & Footer Group, choose Edit Footer. On the Header & Footer Design Toolbar, in the Insert Group, choose Document Info. Use Document Info to insert the file name in the footer. Select the File Name Field . The File Name should display in the lower left hand footer of the document. Do not type it in, rather use the Document Info Field.
- In Backstage view, click on Show All Properties, and type the following:
- In the Tags box: trainee, flyer, internship
- In the Subject box: Your course name and section number
- In the Author box: Your first and last name
- Turn off formatting marks. As a reminder, formatting marks are on the Home Tab, Paragraph Group.
- Take a moment to compare your document to the image below and make any modification based on what you have learned.
- Using Find and Replace, (Home tab | Editing | Replace), change all instances of pvcc and Paradise Valley to spscc or South Puget Sound.
- Zoom in to view the document in a larger size. Zoom is located in the lower right hand corner of the Word window.
- Save again, and ensure you have your file saved in a safe location. Take note of that location because you will need to find your file to upload it for grading.
- Submit the file for grading per your instructor’s instructions.
A starting point for creating a new document in Microsoft Word
Characters that display on the screen but do not print, indicating where the Enter key, the Spacebar, and Tab key were pressed, also called non printing characters
A button that can be turned on and off by clicking it once to turn on, and clicking again to turn it off
A small box which can be clicked to indicate a check is turned on or off to indicate an on or off response
Allows the user specify the drive, directory, and name of a file to save their file
Decorative formats, such as shadowed or colors that make text stand out
Images or graphics that are stored locally on a computer or flash drive and can be uploaded to a document to add visual interest
The manner in which text displays around an object
Located above the Ribbon (top-left) and provides access to commonly used features and commands, such as Save and Undo/Redo, and is customizable
Picture formatting options that control the manner in which text wraps around a picture or other object
Formats applied to images that make pictures resemble sketches or paintings
A decorative border that appears outside the margins on each page and can be solid, dashed, or an artistic style
Lines, arrows, starts, banners, ovals, rectangles, and other basic shapes with which you can illustrate an idea, a process or a workflow
Appears whenever you right-click text in Word, Excel or PowerPoint and provides a quick-access version of the Font group on the Home tab, plus a few extra buttons from other groups
Allows you to apply preset colors and effects to quickly change the appearance of your shape
Allows you to change the outline color, weight (thickness), and style of a the outline surrounding a shape
One or more keys used to perform a menu function or other common functions
A moveable, resizable container for text or graphics
A green vertical or horizontal line that displays when you are moving or sizing an object to assist with proper placement
A grouping of coordinating effects that can be applied to a shape including shadows, glows, reflections, soft edges, bevels, and three-dimensional (3-D) rotations
Placeholders that store and display data, and can perform simple tasks like returning the page number or current date and time
Any word, phrase, or number string related to the file that may help you locate the file later
Intro to Microsoft Office Copyright © 2021 by Abby Rusu & Maricopa Millions is licensed under a Creative Commons Attribution 4.0 International License , except where otherwise noted.
Share This Book
Templates for college and university assignments
Include customizable templates in your college toolbox. stay focused on your studies and leave the assignment structuring to tried and true layout templates for all kinds of papers, reports, and more..

Keep your college toolbox stocked with easy-to-use templates
Work smarter with higher-ed helpers from our college tools collection. Presentations are on point from start to finish when you start your project using a designer-created template; you'll be sure to catch and keep your professor's attention. Staying on track semester after semester takes work, but that work gets a little easier when you take control of your scheduling, list making, and planning by using trackers and planners that bring you joy. Learning good habits in college will serve you well into your professional life after graduation, so don't reinvent the wheel—use what is known to work!
- WordPress.org
- Documentation
- Learn WordPress
- Members Newsfeed
20 Microsoft Word Activities for Middle School Students
- Middle School Education
1. Introduction to Microsoft Word: Begin by teaching students the basics of opening and closing documents, along with formatting text and paragraphs. This will give them a solid foundation for using Word in the future.
2. Font Exploration: Allow students to experiment with different fonts, sizes, and colors to create unique and eye-catching designs.
3. Personal Biography: Students can write a brief personal biography or autobiography, practicing their formatting skills, such as headers, bullet points, and indentation.
4. Themed Brochure: Students create a brochure for a fictitious event or destination utilizing images, text boxes, and different formatting options.
5. Creating Tables: Teach students to create tables in Word for organizing data or creating simple charts.
6. Collaborative Storytelling: Assign groups of students to create a shared story using Word’s collaboration feature, adding a sentence or paragraph one at a time.
7. Label Making: Instruct students to design their own labels or stickers using Word’s template library.
8. Interview Questions: Have students create a list of questions for an imaginary interview with their favorite celebrity, then format the document professionally.
9. Newspaper Article Writing: Students write a short newspaper-style article about an event occurring at their school or community.
10. Creative Book Cover Design: Using Word’s formatting tools and images from various sources, students design their own book covers inspired by their favorite stories.
11. Recipe Cards: Students type up and format a family recipe on card-sized documents that can be printed out later in class.
12. Class Newsletter: Assign different sections to groups of students who collaborate on creating a monthly class newsletter using Word templates and features like columns and page breaks.
13. Letter Writing: Teach students the proper format for writing personal letters or business correspondence while using Word’s various font choices and layout options.
14. Poetry Anthology: Have each student type up one of their own poems and combine them all into a professionally formatted anthology using Word.
15. Infographic Creation: Encourage students to create visually appealing infographics with Word’s Shapes, Clip Art, and SmartArt tools.
16. Market Research Survey: Students develop a survey in Word, utilizing tables or checkboxes for data gathering.
17. Reading Log: Have students create and maintain a reading log, documenting the books they’ve read and their thoughts or ratings.
18. Vocabulary Lists: Students can practice new vocabulary by creating weekly word lists complete with definitions, part of speech, and an example sentence.
19. Creating Forms: Teach students how to create fillable forms within Word, incorporating checkboxes, text boxes, drop-down lists, and more.
20. Resume and Cover Letter Tutorial: Provide students with guidance on crafting a resume and cover letter using Microsoft Word templates while cultivating valuable career skills for the future.
Related Articles

Starting at a new school can be an exciting yet nerve-wracking experience…

Introduction: As middle schoolers transition into more independence, it's crucial that they…
1. Unpredictable Growth Spurts: Middle school teachers witness students entering their classrooms…
Pedagogue is a social media network where educators can learn and grow. It's a safe space where they can share advice, strategies, tools, hacks, resources, etc., and work together to improve their teaching skills and the academic performance of the students in their charge.
If you want to collaborate with educators from around the globe, facilitate remote learning, etc., sign up for a free account today and start making connections.
Pedagogue is Free Now, and Free Forever!
- New? Start Here
- Frequently Asked Questions
- Privacy Policy
- Terms of Service
- Registration
Don't you have an account? Register Now! it's really simple and you can start enjoying all the benefits!
We just sent you an Email. Please Open it up to activate your account.
I allow this website to collect and store submitted data.
Academia.edu no longer supports Internet Explorer.
To browse Academia.edu and the wider internet faster and more securely, please take a few seconds to upgrade your browser .
Enter the email address you signed up with and we'll email you a reset link.
- We're Hiring!
- Help Center

Microsoft Word Practice Exercises Beginning Microsoft ® Word: Practice 1

Objectives: The Learner will be able to 1. Find and use the copy command at least 75% of the time 2. Find and use the paste command at least 75% of the time 3. Explain that both Word and Excel have the same paste command 4. Find and use the cut command at least 75% of the time 5. Explain the function of the copy, paste, and cut commands
Loading Preview
Sorry, preview is currently unavailable. You can download the paper by clicking the button above.
- We're Hiring!
- Help Center
- Find new research papers in:
- Health Sciences
- Earth Sciences
- Cognitive Science
- Mathematics
- Computer Science
- Academia ©2024
- Skip to primary navigation
- Skip to main content
- Skip to primary sidebar
Teaching Expertise
- Classroom Ideas
- Teacher’s Life
- Deals & Shopping
- Privacy Policy
20 Microsoft Word Activities For Middle School: Writing Exercises, Research, And Art Projects
November 9, 2023 // by Kaitlyn Punzalan
Microsoft Word is an effective tool in the classroom. The platform can assist in student learning, organizing, and the development of 21st-century skills. These skills develop critical thinking, collaboration, communication, and creativity. Microsoft Word helps develop and cultivate these skills in a variety of ways.
Students can use Microsoft Word to explore new content or deepen their understanding of the topic. It can also help students take notes or organize their learning throughout the school year.
Use the lessons, activities, and other ideas listed here to help enhance your students' learning using Microsoft Word.
1. My Life As a Movie
A great beginning of the year lesson is to have students create an autobiography in Microsoft Word. This project gets creative by asking students to create a DVD cover inside of a booklet to share about their life with their peers.
Learn more: Teachers Pay Teachers
2. Name Acrostic
Another great beginning of the year project is an acrostic poem. Students type their name's vertically, then write adjectives that would describe them horizontally. Students can use bold, italics, colors, and shadows to express their personalities. This is a fun and easy activity to have students complete on the first day of school as you can display them throughout the year!
Learn more: Student Web
3. Annotate Digital Texts

Annotating the text, or highlighting and taking notes in the margin, is a literacy skill middle school students should develop. Students can annotate a text digitally in Microsoft Word using the highlight and comment feature. Students can highlight the text using a variety of colors and make digital comments on each of these highlights. This is an extremely valuable tool as it allows students to annotate a variety of texts, not just print!
Learn more: Groovy Post
4. Peer-Review and Writing Feedback

Microsoft Word is a great tool for peer review. Students can collaborate on their writing with their classmates by sharing the document and then using the track changes feature. This allows one student to provide feedback and changes to another student’s writing while allowing the original owner of the writing to keep the original document and see the writing suggestions.
Learn more: Microsoft
5. Resume Writing
Students can practice writing a resume in Microsoft Word. Since Word offers a variety of basic functions, tools, and templates, students can choose a template that would best represent a future career of their choice. This activity provides students with real-world practice and develops an essential skill they will need in the future.
Learn more: Resume Genius
6. Formal Letter Writing
Another amazing writing skill to practice with students is teaching how to write a formal letter. This lost form of communication is still incredibly important for students to learn. Students can learn how to properly format a letter to include the heading, address, body, and signature. Teachers can easily use the templates provided in Microsoft Word to help students learn the proper writing structure for formal letters.
Learn more: Lisa Doe
7. Write a Newspaper
Microsoft Word also has accessible templates to teach students how to write a newspaper article. Students can practice their expository writing skills by creating a newspaper article. This is a great assignment that teaches students real-world writing skills and is fun! Writing prompts could include both fiction and non-fiction and can be embedded in a variety of units.
8. Mini-Book Project

This project takes the idea of a traditional book report to a new level! Students use Word to create a mini-book using colorful templates and tables. This assignment asks students to demonstrate their comprehension of a novel while allowing the students to practice their technology skills as well!
9. Create Flashcards
Microsoft Word offers students a ton of amazing critical learning tools to help study and organize their learning. Students can create flashcards using Microsoft Word to help them study. These flashcards can be saved in OneDrive and students can access them at all times.
Learn more: Andrew Who
10. Digital Planner
Another great way to use Microsoft Word to help students organize is by creating a digital planner. Word offers a variety of planner templates to help students keep track of assignments, homework, and other important dates.
Learn more: Template.net
11. Online Notebook
Microsoft OneNote allows students access to a variety of features to create a digital notebook. Students can take notes, add photos, and include audio and video recordings in their notebooks. This is a great resource for students who attend online school. Teachers can also create OneNote notebooks for their students to allow them to all have the same note-taking experience or basic school report.
Learn more: Microsoft OneNote
12. Make a Family Tree
Students can create a genogram in Microsoft Word to learn more about their families. This project allows students to discover more about their ancestors through the formation of a family tree.
Learn more: It Still Works
13. Create a Word Cloud
Word clouds can be a great way to allow students to demonstrate their overall understanding or summary of a topic. Microsoft Word allows users to create a word cloud using one of the add-on features.
Learn more: The Tech Train
14. Create Digital Art
Microsoft Word allows students to practice their writing skills , but it also has a variety of features for creative expression. Students can create digital art using the drawing tools such as shapes, fill, shading, and other features in Word.
15. Create a Book Cover

This project is another fun deviation away from the traditional book report. Students can use Word to create a book cover connected to the theme of the novel. Using the borders, images, fonts, and colors students can demonstrate their comprehension of a book in a new way!
Learn more: Innovations in Techology
16. Invent an Animal

Students can get creative and invent their own animals. Students can draw the animal using the shapes and images in Microsoft Word. After drawing their own animal, students can use text to describe their animal and make connections to other cross-curricular areas.
Learn more: Innovations in Technology
17. Plan a Vacation
Students can research and budget their own faux vacation. This lesson idea teaches students real-life skills such as organizing and money planning. Students then compile their research in Microsoft Word and create a travel brochure.
18. Progress Monitor Student Work
While Microsoft Word offers a variety of ways to expand student learning, it also has many tools to help teachers. One way teachers can use Microsoft Word is to progress monitor student learning. Using the "activity" feature, teachers can view student progress including the date and time of each activity completed.
Learn more: Foetron Academy
19. Create Handouts
Teachers are always doing their best to individualize the learning for all their students. Microsoft Word is a great way to create handouts that best meet their students' needs no matter the lesson plan.
Learn More: Techwalla
20. Transfer Work Documents to iPad
Many students, teachers, and parents use Apple products, but that does not limit their ability to use Microsoft Word. Documents can be transferred to pages allowing for unlimited access to the resources for any school project.
Learn More: Trusoljahs
Search our database of 10,000+ Microsoft Office templates.
28+ Best Free Assignment Cover Page Formats for MS Word
What is an assignment cover page, key elements for a comprehensive front page.
- Institution Details: Begin by prominently featuring the name of your school, college, or institute. This establishes credibility and provides context for your assignment.
- Personal Information: Include your own name to indicate authorship and ownership of the assignment. This adds a personal touch and facilitates easy identification.
- Assignment Title: Clearly state the title of your assignment, conveying its purpose and focus. A concise and informative title sets the tone for your work.
- Course Information: Specify the relevant course title or code to indicate the academic context in which your assignment was completed. This assists in proper categorization and organization.
- Instructor’s Name: Acknowledge the teacher or professor who will be evaluating your assignment by including their name. This demonstrates respect and professionalism.
- Due Date: Clearly indicate the deadline or due date for the assignment submission. This ensures timely assessment and helps you stay organized.
What are the basic tips?
- Font style : It is always in the best interest to use bold, simple, and clear text instead of using fancy text fonts and styles. This helps the reader understand things in a better way. Moreover, the usage of pictures behind texts must be avoided as it creates poor visibility for the reader when reading the text printed on it.
- Presentation: Presentation plays an important role in expressing what you need to convey to someone and how you need to communicate it. Presenting the title page in the most effective manner is essential as this leaves an impression on the teacher reading the assignment. It also acts as a decisive tool for the teacher whether or not he/ she interestingly goes through the whole document.
- Spell Check: Before handing over the assignment, one should take a brief review of all the spelling and also look for any grammatical errors.
- Avoid plagiarism: A student must always be honest in what he writes. He should avoid copying material or texts from anywhere.
- Personal detail: One should never forget to mention his/her name. The font size used for writing the name must be bigger so that it makes the name visible to the teacher.
Advantages of an Impressive Assignment Cover Page
- Showcasing Professionalism: By meticulously designing your cover page, you demonstrate a strong commitment to professionalism. This attention to detail reflects positively on your work ethic and sets you apart as a dedicated student.
- Creating a Positive Impression: A well-crafted front page sets the tone for your assignment, capturing the attention of your teacher or professor. It establishes a positive first impression, arousing their interest and encouraging them to delve further into your work.
- Enhancing Visual Appeal: A visually appealing cover page enhances the overall presentation of your assignment. With carefully chosen fonts, colors, and layouts, you create an engaging and aesthetically pleasing introduction that captivates the reader’s attention.
- Communicating Pertinent Information: It provides a concise summary of essential details, such as the assignment title, your name, and the due date. This ensures clarity and facilitates seamless identification and organization of your work.
- Reflecting a Professional Attitude: By dedicating time and effort to creating an impressive cover page, you exemplify a professional attitude towards your academic pursuits. This level of dedication and care leaves a lasting impression on your teacher or professor.
Download Free Cover Page Templates
#1 – best format.

#2 – Assignment Cover Page for Case Study

#3 – Best Design for Critical Review

#4 – For Any Kind of Educational Assignment

Video Tutorial
#5 – essay assignment.

#6 – Syllabus Assignment

#7 – Cover Page For University Assignments

#14 – Cover Page for Business Assignment

#16 – Academic

#17 – Generic Cover Page for any Assignment

#18 – Biology Assignment

#19 – For Chemistry Projects

#20 – Cover Page for Computer Projects

#21 – For Engineering-Related Assignments

#22 – For English Assignment

#23 – For Geography Projects

#24 – Mathematics

#25 – Physics

#26 – Cover Page for School Assignments

#27 – Best for Science Projects

#28 – For Social Study Assignment

Versatile Designs and Layouts for Every Purpose
- Assignment Types: Our templates are designed specifically for different types of assignments, such as case studies, critical reviews, essays, syllabi, and business projects. Each template is tailored to suit the requirements and objectives of its respective assignment type.
- Academic Disciplines: Our collection includes templates suitable for various academic disciplines like biology, chemistry, computer science, engineering, English, geography, mathematics, physics, and social studies. Each template aligns with the themes and aesthetics of its corresponding discipline.
- Purposes: Whether you are a student, educator, or professional, our templates serve multiple purposes. They can be used for university assignments, school projects, research papers, or any academic or professional endeavor that requires a polished cover page.
- Designs, Layouts, and Styles: Our templates offer a diverse range of designs, from minimalistic and clean to visually captivating and sophisticated. You can choose from different layouts that creatively arrange text, images, and graphics. Our templates cater to a variety of styles, ensuring there is something for everyone’s preferences.
User-Friendly Customization: Make It Your Own
- Easy Modifications: We believe in keeping things simple. With just a few clicks, you can effortlessly modify our templates to suit your specific requirements. Change colors, fonts, and layouts with ease, and watch your cover page transform before your eyes.
- Colors and Themes: Infuse it with the perfect color scheme and themes that truly represent your assignment. Our templates offer a wide range of options, so you can find the ideal palette and theme that resonate with your content.
- Font Selection: The right font can make all the difference. Choose from our diverse selection of fonts to enhance the visual appeal and readability. From elegant and professional to modern and bold, we have fonts to suit every style.
- Layout Flexibility: It should reflect your unique presentation style. With our templates, you have the freedom to experiment with different layouts, arranging titles, subtitles, images, and text blocks in a way that best suits your assignment.
Benefits of Using Professionally Designed Templates: Make an Impact with Ease
- Time and Effort Saving: Our professionally designed templates eliminate the need to start from scratch. With pre-designed layouts, styles, and graphics, you can save valuable time and effort in creating visually appealing front pages. Simply customize the template to suit your assignment’s requirements, and you’re ready to impress.
- Consistency and Professionalism: Using our templates ensures consistency in your assignment submissions. The standardized design elements and formatting guidelines help maintain a professional appearance throughout your work. Presenting your assignments with a polished title page enhances the overall quality and credibility of your content.
- Visual Appeal: A visually appealing title page grabs attention and sets the tone for your assignment. Our templates are thoughtfully crafted by design professionals, incorporating aesthetically pleasing elements, color schemes, and typography. By leveraging these designs, you can effortlessly create eye-catching cover pages that captivate your professors or readers.
- Positive Impression: First impressions matter, and a well-designed cover page leaves a positive impact on professors and readers alike. Showcasing your assignment in a professional and visually appealing manner demonstrates your dedication and attention to detail. It sets the stage for an engaging reading experience, encouraging your audience to delve deeper into your work.
- User-Friendly Customization: Our templates are designed to be easily customizable, allowing you to add your personal touch without technical expertise. You can modify text, colors, images, and other elements to align with your assignment’s theme and requirements. This flexibility ensures that your cover page reflects your unique style while maintaining a professional look.
Tips for Maximizing the Impact: Make Your Cover Page Stand Out
- Choose Colors Wisely: Select colors that complement your assignment’s theme and evoke the desired emotions. Vibrant colors can grab attention, while muted tones create a sense of elegance. Maintain consistency with your assignment’s overall design and avoid using too many colors that may distract from the main message.
- Opt for Legible Fonts: Use clear and readable fonts to enhance the accessibility and professionalism of your cover page. Avoid overly decorative or complex fonts that may hinder readability. Opt for fonts that align with your assignment’s tone and maintain consistency throughout the document.
- Incorporate Relevant Graphics: Graphics can enhance the visual appeal of your cover page and reinforce the assignment’s subject matter. Choose images or icons that are directly related to the topic or convey the assignment’s main concept. Ensure that the graphics are high-quality and appropriately sized to maintain clarity.
- Organize Information Effectively: Arrange the information in a logical and visually appealing manner. Use headings, subheadings, and bullet points to break down content and make it easier to read. Highlight key details such as the assignment title, your name, course information, and submission date.
- Maintain Simplicity: While it’s important to make it visually appealing, avoid cluttering it with excessive elements. Keep the design clean and uncluttered, allowing the key information to stand out. Remember, simplicity often has a greater impact than complexity.
- Preview and Proofread: Before finalizing, preview it to ensure that all elements are properly aligned and visually balanced. Proofread the content to eliminate any spelling or grammatical errors. A polished and error-free cover demonstrates your attention to detail and professionalism.
← Previous Article
Next Article →
You may also like

- Doctor Prescription Pad Formats
- Printable ID Cards
- Creative Resume Formats for Freshers
- Modern Resume Templates
- Best Cover Page Formats
- Printable Report Cards
- Business Proposal Templates
- 22 Raffle Ticket Templates
- Free Certificate Templates
- 5+ Free Food Diary Templates to Transform Your Eating Habits
- Make it Memorable: Free 4th of July Flyer Templates
- Say Goodbye with Style: Free Impactful Resignation Letter Templates
- Share Your Appreciation: Free Memorial Day Card Templates
- Crafted with Love: Free Mother’s Day Cards to Warm Mom’s Heart
- Stand Out from the Crowd: 14+ Free Fact Sheet Templates
- Make Your Mark: Free Printable Dog Name Tags for Every Tail-Wagger!
- 7+ Free Stunning Easter Templates for Joyful Celebrations
- 9+ Free Admit-One Ticket Templates: Flexible and Easy to Edit
- Get Cooking with Style: 8+ Free Customizable Recipe Card Templates
- 11+ Free Mortgage Flyer Templates to Elevate Your Marketing
- Enhance Your Events with 20+ Unique and Free Ticket Voucher Templates
- Certificates
- Cover Pages
- Educational
- Event Templates
- Invoices & Receipts
- Letterheads
- Office Related
- Personal Use
- 137+ Professional Reports – MS Word & Excel
- 70+ Printable & Editable ID Card Designs
- 95+ Proposal Formats
- 31+ Best Flyer Designs & Formats
- 100+ Cover Page Templates
- 22+ Free Letterhead Designs and Formats
- 24+ Free Resume Designs & for Freshers and Professionals
- 136+ Printable Certificate Templates
- 55+ Quotations & Invoices
- Create FREE PDF Calendar Online
10 Simple Design Rules for Professional Microsoft Word Documents

Your changes have been saved
Email is sent
Email has already been sent
Please verify your email address.
You’ve reached your account maximum for followed topics.
This Task Management Tool Is the Best I've Found for Actually Getting Things Done
How custom colors made my google calendar look amazing, this note-taking system finally made schoolwork easier for me.
Microsoft Word is packed with so many features that you can produce pretty much whatever you want with it. But these features don't always result in the kind of beautiful, high-quality, and professional document designs that you may expect.
It's one thing to know everything about Microsoft Word, all of its intricacies and quirks and functions—it's something else entirely to know what makes a great document. Here, we'll show you how to format a Word document to make it look professional.
1. Keep It Simple, Less Is More
Want to know how to make a Word document look good? Just keep it simple, and take advantage of the hidden features that Microsoft Word comes with. If you remember one thing from this article, let it be this, and you'll be able to make the right design decisions in the future!
When writing a document, the content should be the main focus. Document formatting guidelines exist to make that content easier to read and digest.
Eliminate the temptation to introduce eye-catching elements that only serve to distract. Maximize whitespace. Keep your wording tight and revise any wordy sentences or paragraphs. Simple and minimal rules overall.
2. Choose a Context-Appropriate Typeface

Your first big design decision should be which typeface you're going to use. Traditional knowledge says that serif fonts are easier to read in printed documents, whereas sans-serif fonts are better on the eyes when read on a digital screen.
Good examples of serif fonts include Garamond, Georgia, Hoefler Text, and Palatino, while good examples of sans-serif fonts include Arial, Gill Sans, Helvetica, and Lucida Sans.
Skip Comic Sans if you want to avoid one of the most common presentation design mistakes . And whatever you end up using, stick to the same typeface throughout to make your Word document professional. If desired, you can use a different typeface for headings.
3. Use Standard Font Size and Color

You can't learn how to format a word document to look professional without paying attention to the look of the text. Business and academic papers generally use 12-point font sizes, which produce the most readable paragraphs when used in combination with the guidelines discussed below for page size, margins, and line spacing.
Some information-dense reports may sometimes go down to 10-point font size, but never less than that.
In general, it's best to keep your hands off of anything related to colors, especially for printed documents. You'll have to pay more for the color ink, and it won't carry over if the document ever gets copied. For digital documents, reserve colored text for critical warnings and the like. Prefer to emphasize using bolded and italic text.
4. Use Standard Page Size and Margins

Nearly all office documents are formatted to the same page size as they are printed for standard 8½" x 11" pages, known as US Letter size (also known as A4 elsewhere, which is 210mm x 297mm). This is the only size that's guaranteed to be available regardless of which printer you use.
As for margins, most style manuals and style guides call for a 1" margin on all sides of the page, which produces the best readability for line lengths and allows for written annotations if necessary. In Word, you can select Normal under Margins to do so. However, if the document is going to be bound in a binder, you may want to use Custom Margins to increase the side margins to 1½" to accommodate the rings.
5. Align Paragraphs to the Left

You may be tempted to use justified alignment because that's what's used in newspapers, novels, and some textbooks, but it's the wrong choice for office and academic documents. Why is it important to make a document formal? Without formality, your document becomes unreadable.
What you want is left alignment for text. This produces jaggedness on the right side of paragraphs, but it keeps letter spacing as intended by whatever typeface you're using, and that means optimal legibility.
Otherwise, you may end up with typographic rivers , which are extremely distracting and simply look ugly. This is something you certainly want to avoid when you want to make your Word document look professional.
6. Indent the First Lines of Paragraphs

Paragraphs should have no extra spacing between them, and the first lines of paragraphs should be indented to make each paragraph stand out. The only exception is for paragraphs that directly follow a section heading, which can be left unindented because the surrounding context makes it clear that it's its own paragraph.
To make a document look professional, a general rule of thumb is to have the indent size the same as the font size. Make sure you use Word's paragraph styling features to handle the indents rather than using the Tab key!
7. Place Images Between Paragraphs

Inserting images is a part of designing your Word document. It may be okay to place images inside a paragraph and allow the surrounding text to flow around it, and if your organization follows this document formatting guideline, then go ahead and do that.
But generally speaking, it can damage readability, especially in data-driven reports. The safest option, particularly for graphs, charts, and tables, is to put images in between paragraphs and keep them center aligned. That way, your images help to make your document attractive, but they are never vying for attention with the surrounding text. It also helps captions to stand out.
8. Choose Context-Appropriate Line Spacing

To format a document to look professional, the right choice for line spacing (the whitespace that separates a line of text from the next line of text) really depends on what kind of document you're writing.
Academic papers should first follow any academic style guides in place, then prefer double-spacing if no style guide exists. Business and office documents tend to be single-spaced to minimize the number of pages needed when printing, but digital documents may be easier to read if spaced at somewhere between 120-150 percent.
9. Break Up Text With Headings and Lists

The longer the document, the more important headings become. Would you rather read a 20-page report that's nothing but a wall of text from end to end? Or a 30-page report that's organized into proper sections, subsections, and headings? It’s highly likely you’ll prefer the latter.
Lists are also good for breaking up walls of text and drawing eyes to important points. In Word, use Numbering to create numbered lists when counting a set of items (e.g., "the five attributes of a successful entrepreneur") or when providing step-by-step instructions. Otherwise, use Bullets to make bulleted lists .
Just be sure to avoid overusing lists, which detracts readability from your Word document design. This is especially important when it comes to using Word to format a screenplay .
10. Separate Sections With Breaks

When you want to learn how to make your report look professional, you need to get acquainted with section breaks. In Microsoft Word, section breaks allow you to differentiate certain pages with changes in orientation, columns, headers, footers, page numbers, and more. Section breaks come in four forms:
- Next Page: Start the next section on the following page.
- Continuous: Start the next section on the current page.
- Even Page: Start the next section on the next even page.
- Odd Page: Start the next section on the next even page.
If your document is large enough to need chapters, this is the best way to format them in a clean way. Each chapter should be made with a Next Page section break, or the Even Page or Odd Page section breaks if you're going to place it within a binder. We've shown how to remove page breaks if needed, too.
Learn How to Format a Word Document to Look Professional
Unless your organization or school requires a specific layout and format, you can skip the hard work of setting up your own template and just download one instead. This helps you quickly achieve a professional document design.
- Productivity
- Digital Document
- Microsoft Word
- Skip to primary navigation
- Skip to main content
- Skip to primary sidebar
- Skip to footer
Legal Templates
Home Lease Agreement One-Page
One-Page Lease Agreement

Published September 13, 2024 Written by Josh Sainsbury | Reviewed by Brooke Davis
A one-page lease agreement simplifies the rental process, offering a clear and concise contract between landlord and tenant. It comprehensively covers vital terms, such as rent, lease duration, and party responsibilities, in an easy-to-understand format.
Ideal for less complex or short-term rentals, it guarantees transparency and minimizes misunderstandings, making it a practical choice for securing quick and uncomplicated leasing agreements.
Why Use a Simple Lease Agreement?
A simple lease agreement is perfect for those who want a quick and easy way to formalize a rental arrangement. It covers all the essential details without the complexity of a longer lease document.
Download: PDF or MS Word .
What To Include
- Parties: The names and addresses of both the landlord and tenant.
- Property: The rental property’s address and type (apartment, house, condo, etc.).
- Lease Type: Options for fixed-term or month-to-month leases.
- Rent: The monthly rent amount and due date.
- Security Deposit: The amount required as a security deposit, if any.
- Utilities: Specifies which utilities are the tenant’s responsibility.
- Signatures: Signature lines are used by both the landlord and tenant to make the agreement legally binding.
- Legal Resources
- Partner With Us
- Terms of Use
- Privacy Policy
- Cookie Policy
- Do Not Sell My Personal Information

The document above is a sample. Please note that the language you see here may change depending on your answers to the document questionnaire.
Thank you for downloading!
How would you rate your free template?
Click on a star to rate
How To Trigger Donald Trump With These Simple Words
It doesn’t take much to get Donald Trump to react. Just say one of these words.
The Daily Beast

Photo Illustration by Thomas Levinson/The Daily Beast/Getty/Reuters
Listen to this full episode of The New Abnormal on Apple Podcasts , Spotify , Amazon and Stitcher .
If the last few weeks have proven anything about Donald Trump , it’s that he’s sensitive. That sensitivity was amplified on the debate stage Tuesday night as the former president raged against his Democratic opponent, Kamala Harris .
And according to co-host Danielle Moodie in the latest episode of The New Abnormal , it’s no surprise he couldn’t stick to the script.
“It was so easy, just watching the vice president just needle at Donald Trump with the things that we know, this small, petty, narrow, weak man would melt down over. And if you had had any training Trump–‘they’re going to try and get under your skin about X, Y, and Z. Don’t take the bait’—but he can’t help himself.”
Subscribe to The New Abnormal on Apple Podcasts , Spotify , Google Podcasts , Stitcher , Amazon Music , or Overcast .
Moodie says all it takes is to “say things like, ‘crowd size,’ ‘weak’ and ‘loser,’ to Trump to make him lose “his goddamn mind.”
Plus! Parker Molloy , founder, the creator of The Present Age newsletter and writer at the New Republic, joins the show to talk about his recent piece for the magazine, “ How the Media Sanitizes Trump's Insanity ” and the newly-coined term, “sanewashing.”
Then we talk to The New Times tech reporters Kate Conger and Ryan Mac about their upcoming book, Character Limit: How Elon Musk Destroyed Twitter .
Got a tip? Send it to The Daily Beast here .
READ THIS LIST
IMAGES
VIDEO
COMMENTS
Microsoft Word Exercises for Practice: - This article is very important for a basic computer course, for college and school students learning Microsoft Word online and offline. ... Steps to create a simple business plan using templates in Word App. 6. Make book content page or index page ... Yes, I can evaluate through giving you assignment and ...
Word 6 Letter Practice Document. Kendall Myers November 15, 2017. In this practice project for Word, students create a letter. Included in the letter is a heading on the right, indented paragraphs, and the closing and signiture near the middle of the document. ….
With Word you can: Create a document from scratch or from a template. Add text, images, art, and videos. Research a topic and find credible sources. Access your documents from a computer, tablet, or phone via OneDrive. Share your documents and collaborate with others. Track and review changes. On the File tab, select New. Select Blank document ...
MS Word is a popular word-processing program used primarily for creating documents such as letters, brochures, learning activities, tests, quizzes and students' homework assignments. There are many simple but useful features available in Microsoft Word to make it easier for study and work.
Select Blank document to start a new document. (Alternatively, select Open if you want to open an existing Word document.) Figure 1. Blank document and Open buttons. When the new document opens, you will be in the Home tab in the ribbon, and your cursor will automatically be placed towards the top, left-hand corner of the page, ready to type.
Instructor: Ms. Fouzia Altaf (MPhil. Bioinformatics)Instagram: https://www.instagram.com/energysaverbyfouziaaltafFacebook: https://www.facebook.com/energysav...
Switch to Editing view: click Edit Document > Edit in Word for the web. Type and format text, add pictures, adjust the layout of the page, and more. For more advanced editing, click Open in Word. Work together on the same doc. To work together in Word for the web, you edit a document as you normally would.
a document or as a PDF. To open a PDF file in Word, do either of the following: In File Explorer, right-click or long-press (tap and hold) the PDF file, select Open with, and then select Word. If you don't see Word in the list of apps, select Choose another app, select Word, and then select. Just once.
For our first assignment in Word, we will create a flyer to be printed or posted online. The flyer will advertise a volunteer opportunity for Health Sciences students at Paradise Valley Community College. Key skills in this practice are inserting text and pictures, textboxes, formatting text and footers. Start Word. Click Blank Document.
1. Getting Started with Word Get to know the Ribbon, Quick Access Toolbar, and Backstage view to produce Word documents. 2. Understanding OneDrive Learn all about working with your Microsoft account and OneDrive. 3. Creating and Opening Documents Learn all about opening existing documents and creating new ones. 4.
Ms Word Practical Questions Collections - Free download as PDF File (.pdf), Text File (.txt) or read online for free. This document contains 15 multiple choice questions about performing various formatting tasks in Microsoft Word such as justifying paragraphs, changing line spacing, inserting numbering, tables, headers, footers, watermarks, equations, setting page layouts, formatting text, and ...
Templates for college and university assignments. Include customizable templates in your college toolbox. Stay focused on your studies and leave the assignment structuring to tried and true layout templates for all kinds of papers, reports, and more. Category. Color. Create from scratch. Show all.
Microsoft Word sees anything from a single word to an entire page of text as a paragraph. Paste: Adds previously copied or cut text at the insertion point. Print Preview: Print Preview lets you see how your document will look on the page before it is printed. Wrapping: Text automatically wraps to the next line when typing in Microsoft Word.
6. Collaborative Storytelling: Assign groups of students to create a shared story using Word's collaboration feature, adding a sentence or paragraph one at a time. 7. Label Making: Instruct students to design their own labels or stickers using Word's template library. 8.
Insert a picture from ClipArt. Select the picture and copy and paste. Go to New and open a blank document Paste the picture into a new blank sheet. Copy and Paste into a different program: Insert a picture in Microsoft Word and copy it Start the program Microsoft Excel Paste the picture into Excel.
If you like this video, here's my entire playlist of Word tutorials: http://bit.ly/2FY6NVTLearn the basics of effectively using Microsoft Word, including how...
Microsoft Word Practice Exercises Page 1 Beginning Microsoft® Word: Practice 2 Objectives: The learner will be able to: 1. Find and use the Insert Clip Art command at least 75% of the time 2. Select and resize a picture using the picture handles 3. Use the alignment buttons to center and left align text and pictures 4.
A Mail Merge pane will open on the right that will take you through the mail merge process in 6 steps. Step 1 - Notice Select document type prompt. By default, the radio button for letters is checked, check the radio button next to Labels. Click on Next: Starting Document at the bottom of the Mail Merge pane.
Microsoft Word is an effective tool in the classroom. The platform can assist in student learning, organizing, and the development of 21st-century skills. These skills develop critical thinking, collaboration, communication, and creativity. Microsoft Word helps develop and cultivate these skills in a variety of ways. Students can use Microsoft Word to explore new content or …
The document contains 20 assignments related to formatting text, inserting tables, charts, images, and other objects in Microsoft Word documents. The assignments cover skills like applying styles and formatting, counting and replacing text, sorting and filtering tables, inserting page breaks and bookmarks, creating mail merges, and more. Completing the assignments would help a student learn ...
Download Free Cover Page Templates. Explore our collection of 23 beautifully designed cover page templates in Microsoft Word format. These templates feature captivating colors and layouts that are sure to make a lasting impression. Simply click on the preview image of each template and download it for free.
To make a document look professional, a general rule of thumb is to have the indent size the same as the font size. Make sure you use Word's paragraph styling features to handle the indents rather than using the Tab key! 7. Place Images Between Paragraphs. Inserting images is a part of designing your Word document.
Download: PDF or MS Word. What To Include. Parties: The names and addresses of both the landlord and tenant. Property: The rental property's address and type (apartment, house, condo, etc.). Lease Type: Options for fixed-term or month-to-month leases. Rent: The monthly rent amount and due date. Security Deposit: The amount required as a security deposit, if any.
Listen to this full episode of The New Abnormal on Apple Podcasts, Spotify, Amazon and Stitcher. If the last few weeks have proven anything about Donald Trump, it's that he's sensitive. That ...