
How to video record yourself presenting a PowerPoint

What type of content do you primarily create?
Recording yourself presenting a PowerPoint can be challenging, especially getting the technical aspects right. You need to capture your screen, webcam, and audio seamlessly while delivering your content naturally and avoiding awkward transitions between slides.
Finding a tool that integrates all these components can seem daunting. However, recording yourself presenting a PowerPoint doesn't have to be reserved for the tech-savvy or professional speakers.
Whether you're a teacher creating online lessons, a marketer producing a product demo, or someone looking to improve their presentation skills, this guide will walk you through user-friendly tools and strategies that will teach you how to video record yourself presenting a PowerPoint.
- Recording yourself presenting a PowerPoint can be challenging, but it doesn't have to be reserved for experts.
- Video recording offers unlimited reach, repurposing opportunities, and a more engaging experience.
- Use PowerPoint's built-in recording feature or tools like Descript for a polished presentation.
- Other tools like Zoom, Loom, OBS Studio, Clipchamp, and Quick Time Player can also be used for recording.
- Tips include practicing your script, using slide notes, ensuring high-quality audio and lighting, and incorporating storytelling techniques.
Why video record yourself presenting a PowerPoint?
Video recording your PowerPoint presentations offers several advantages:
- Unlimited reach : Unlike in-person presentations confined to a specific time and location, recorded videos allow your message to reach audiences globally at their convenience.
- Repurposing opportunities: Recorded presentations can be repurposed as evergreen content across multiple platforms, such as social media, online courses, webinars, and internal training materials, maximizing their value.
- Personal and engaging : Recording yourself narrating a presentation adds a personal touch and dynamic element that static slides alone cannot replicate. Your viewers can see and hear you deliver the content, creating a more immersive and engaging experience.
How to record your presentation with the PowerPoint app
Built-in recording feature in powerpoint.
1. Open the PowerPoint slide you want to record.
2. Click on the Record tab of the top toolbar.
3. Click on the Record button and choose from any of the following options:
- From Current Slide
- From Beginning
4. You'll see the PowerPoint screen recording window.
5. Select the microphone and camera from the icon on the top-right.
6. Click the Stop and Replay buttons to end or replay your recording.
7. To export your presentation's recording, click Export to Video within the Recording tab.
Benefits : Easy to use, no external tools needed
Limitations : Limited editing capabilities.
How to make a more polished recording of your presentation with Descript
While PowerPoint's built-in recording features are helpful, they may not produce the refined result you want for your presentation. That's where Descript comes in handy.
It’s a whole production studio at your fingertips, with video recording, transcription, and editing capabilities, ready to transform dull PowerPoint slides into an engaging experience for your audience. Descript also has a built-in screen recorder.
You can use Descript on Windows, Mac, or even straight from your web browser.
Here's step-by-step guide to recording your PowerPoint presentation with Descript.
Set up your screen recording
1. Install and open Descript. At the top of the editor, click and open the Record panel.
2. Select Screen.
3. Set Recorder settings:
Adjust the default recording settings to your liking, including the transcription language, the maximum recording resolution, and more.
4. Set recording options. Choose which audio and video sources to record (e.g., microphone, computer audio, camera). Remember to turn the camera on to capture your talking head video alongside your PowerPoint presentation.
5. Click the Additional Settings icon for
- Studio Sound (Optional): Enhance audio quality with noise reduction and background removal
- Transcription (Optional): Enable automatic transcription for easier editing
- Recording separate audio tracks
6. Add (optional) Speaker labels for each audio track (e.g., "Narrator," "Expert") by typing them in the text box next to your audio inputs.
Capture your screen recording
1. Select the right recording option:
- Recording into script : Choose this if you haven’t recorded anything yet.
- Replace selection : Choose this if you already have a script and want to replace a specific section with a new recording.
- Record new layer : Pick this for recording your video as a new layer on top of an existing recording.
2. Click Record at the bottom of the Record panel.
3. Drag over the area of your screen you wish to record. Click Start Recording. Press Space to start recording the full screen.
4. Click Stop to finish recording
Bonus: Descript creates separate tracks for camera, microphone, and computer audio. You can edit each track individually for more precise control.
- Do a short test recording to ensure everything is set up correctly.
- Set your recording to transibe for easier editing.
Editing and polishing your PowerPoint recording in Descript
Descript's AI video editing tool makes it a breeze to trim, cut, and splice your video footage, ensuring a seamless flow from start to finish. You can add smooth transitions and other visual effects to make your presentation pop.
Here’s a glimpse of how to edit and polish your PowerPoint recording in Descript:
Edit your recording like a doc
Did you make a mistake during a slide transition? No problem. Just delete those sections in the text transcript (created automatically by Descript) and the video will adjust to match.
Remove filler words
Sound smoother and more confident by easily removing filler words like "um" and "uh" from the transcript.
Fix voiceover mistakes by typing
Didn't nail your delivery on a specific slide? No need to start from scratch! Descript's Overdub feature lets you simply type in the correct narration and replace the audio on that slide with AI voice cloning.
Boost video quality and engagement :
- Crisp up audio quality by reducing background noise and room reverb with the AI-powered Studio Sound feature.
- Replace your background completely with the Green Screen Video Editor —look like you're presenting in a sleek studio or broadcasting from a beach.
- Enable Eye Contact simulation with AI, so it appears you're making direct eye contact with viewers, even if you’re looking or reading something off-camera.
Other ways to video record yourself presenting a PowerPoint
Use Zoom’s meeting recording feature to record yourself giving a PowerPoint presentation. Start a Zoom meeting with yourself, share your PowerPoint window, and enable recording
Loom is a handy screen recording tool that also offers a webcam overlay. Launch the Loom app or Chrome extension and set it to record your screen and webcam. Expect high-quality recordings but no advanced editing features. The free plan offers only five minutes of recording at a stretch.
3. OBS Studio
OBS Studio is a free, open-source screen recorder/streaming software with a steeper learning curve. It’s popular among advanced or tech-savvy users who need granular customization and control.
To record your presentation, add a "Screen Capture" source to capture your PowerPoint window and a "Video Capture Device" source for your webcam.
4. Clipchamp: Recording natively in Windows
You can use Microsoft’s Clipchamp , the built-in screen recorder and video editor for Windows, to simultaneously capture your computer screen, webcam, and audio for recording your PowerPoint presentation. It’s also available as a browser-based app. You can record up to 30 minutes on screen and webcam recordings.
Users can also adjust the screen and webcam recordings in the editing timeline separately.
5. Quick Time Player Recording natively in Mac
Use Mac’s Quick Time Player to record your PowerPoint presentation. It’s not as straightforward as the other options on this list, so here’s a quick guide to help you out:
- Launch Quick Time Player.
- Select File and go to New Movie Recording.
- You'll be recording your entire screen in addition to recording your face, so adjust the size and location of the recording window so that it's in a nonintrusive corner of your PowerPoint.
- Go to View and select Float on Top .
- Next, go to File and select New Screen Recording.
- On the menu that appears, select Record Selected Portion and drag a border around your PowerPoint and the webcam recording window.
- Press Record and start presenting.
- You can adjust the video quality and the audio source in the webcam recording window.
How to turn your PowerPoint presentation slides into a video
Did you know PowerPoint lets you save your presentation as a video, too?
Here's a breakdown of the two ways you can do so—keeping all the presentation elements (narration, animation, pointer movements, timings, and so on) intact in the presentation itself.
Save your PowerPoint presentation as a video
This creates a separate video file (MP4 or WMV) that anyone can play, even without PowerPoint.
Follow these steps:
- Save your presentation
- Go to File > Export > Create a Video
- Ultra HD (4K): Best for large screens (if you have Windows 10+)
- Full HD (1080p): Great for computers and TVs
- HD (720p): Good for streaming online or on DVDs
- Standard (480p): Smallest size, good for phones
4. Decide on narration
- If you haven't recorded yourself talking, choose "Don't Use Recorded Timings and Narrations" from the dropdown menu
- If you have a recording, choose "Use Recorded Timings and Narrations." You can also set how long each slide shows for (default is 5 seconds)
5. Click Create Video
6. Name your video, pick a folder to save it in, and choose a file type (MPEG-4 or Windows Media Video)
Creating the video might take a while, especially for longer presentations. You can even leave it running overnight. Once done, find your video in the chosen folder and double-click to play it.
Save your PowerPoint presentation as a slideshow
This saves your presentation as a special file (PPSX) that starts playing automatically on full screen when opened. It only works with PowerPoint.
Here’s how it works:
- Make sure your presentation is saved (regular PowerPoint file)
- Go to File > Save As .
- Pick a folder to save the slideshow in.
- Under Save as type, choose PowerPoint Show (*.ppsx) .
- Click Save .
Now when someone opens the file, it will automatically play the slideshow.
Pro tips for making better video PowerPoint presentations
Practice your script.
Recording a flawless PowerPoint video rarely happens in one take. The key is practice.
Record practice run-throughs and watch them back. Make notes on areas that need improvement or parts lacking clarity. The more you drill your script, the more confident and natural you'll sound in the final recording.
Take advantage of PowerPoint's built-in Speaker Coach . The feature shows you whether your pace is too fast or slow, your use of filler words like "um," and suggestions to improve your voice modulation.
Use slide notes for coherent delivery
Wouldn’t a personal teleprompter make presentations so much easier? That’s what slide notes are for.
Having your thoughts and talking points organized within your PowerPoint file lets you have all crucial information and prompts readily available when recording.
Go ahead and add detailed notes or even a full script for each slide. This will help you stay on track and provide a handy transcript reference if you need to do any editing or voiceover work in post-production.
Use high-quality audio equipment or turn on Studio Sound
Poor audio recording quality is a surefire way to make even the most visually polished video feel amateurish. Do your presentation justice by investing in a decent external or Bluetooth microphone and audio interface to capture clear voiceover audio.
If you must use a built-in mic, record in a quiet environment to minimize background noise pickup. Or better yet, pair up with an AI-powered audio enhancement tool like Descript's Studio Sound , which reduces background noise , reverb, and other artifacts.
Ensure a clean background and even lighting
Ditch cluttered backgrounds. You want people to focus on the content of your PowerPoint and not be distracted by the funny shapes and colors in your video.
Your video lighting and framing matters, too. Position yourself facing a natural light source or bring supplemental video lighting to eliminate weird shadows and squinting-level glare.
Look directly into the camera or turn on Eye Contact
Looking directly into the camera is essential to create a sense of connection with the audience. Position your webcam or camera at eye level and imagine you're talking to a friend. If you're using Descript, enable the Eye Contact feature to auto-adjust your gaze towards the camera.
- Dress professionally and maintain a good posture to project confidence and authority.
- Use visuals, animations, and multimedia elements to enhance your presentation and keep your audience engaged.
- Consider adding closed captions or subtitles to your video for better accessibility and engagement, especially for those watching without sound.
- Speak clearly and at a moderate pace, using vocal variety to emphasize key points and maintain interest.
- Incorporate storytelling techniques, real-life examples, or personal anecdotes to make your video presentation more relatable and memorable .
Take your PowerPoint presentations from amateur to amazing
Recording yourself virtually presenting a PowerPoint allows you to distribute your message using the most engaging type of content: video. And there are many screen recording tools out there that can capture your screen and web camera footage with just a few clicks.
But how do you stand out?
By focusing on the presentation's depth, your delivery, and the video's quality. The first two are the bare minimum to communicate your message effectively.
But the right screen capture software and all-in-one video creation tool like Descript can help you with third. Use the tool to improve the quality of your recorded PPT presentations.
With Descript, it's easier than ever to record your screen, polish up the audio, and create stunning visuals all in one place. So why wait?
Sign up for Descript today and simplify your workflow while creating a PowerPoint presentation video that sticks with your audience in the long term.
How do you make a presentation video with your face?
To create a presentation video with your face, follow these steps:
- Open your presentation in PowerPoint.
- Go to the Slide Show tab.
- Click on Record and choose From Current Slide or From Beginning .
- Choose your microphone and camera by clicking on a sound icon on the top-right.
- Start recording by clicking on the record button.
- Speak into your microphone to narrate the presentation.
- Your webcam will capture your face during the recording.
- Click Stop when you finish recording.
- Export your recorded presentation by clicking on File> Export>Create a video.
How do you present yourself in PowerPoint?
To present yourself effectively in PowerPoint, follow these steps:
- Determine the key information to include in your presentation.
- Design and prepare your PowerPoint slides with a cohesive theme.
- Craft a compelling introduction to engage your audience.
- Tailor your presentation to different time constraints for flexibility.
- Capture the audience's attention before you begin speaking.
Related articles

Featured articles:

Product Updates
Descript Season 7: Rooms, Zoom & Automatic Multicam
Descript's newest release makes recording and editing video with multiple people easier than ever.

How and why to add a game show segment to your podcast
Get ideas and tips for a successful game show segment to freshen up your content and engage your audience.

10 excellent Loom alternatives to record your screen
Looking for the best ways to record your screen without Loom? Find out 10 Loom alternatives, their features, and pricing.

How to record a YouTube video: A guide for all devices
If you want to record a YouTube video for personal use or fair-use repurposing, here are the steps to get started.

For Business
Social media video marketing: Everything you need to know
Learn how to win over potential customers (and the algorithms) with the right social media video marketing tools, strategy, and optimizations.

How to record a podcast on Zoom: A beginner’s guide
Follow this step-by-step guide on how to record a podcast on Zoom, then learn about why it may not be your best recording option.

Articles you might find interesting

Boosting your social reach with short-form video: a #MadewithDescript Q&A
Podcaster Evan Lian credits Descript's video features for helping his show reach thousands of followers and hundreds of thousands of views on social media. We asked him to tell us more.

AI for Creators
Generate better AI summaries with the new Chain of Density prompt
AI summaries can be hit or miss. The Chain of Density prompt is a way to fine-tune AI summaries to make them as detailed as you need.

Screencast Video Recording: Definition + Use Cases
Turn an idea or presentation into an easily accessible video with relatively little effort by using a screencast recording to show what’s happening on your computer.

How They Made It
Low Orbit's Josh Mattison on becoming a self-taught producer of "slow radio"
Josh Mattison got his start in graphic design. Here's how he learned to create the critically acclaimed audio storytelling of Low Orbit.
%20(1).JPG)
How to convert video to audio: A step-by-step guide
There are many reasons you’d want to convert video to audio effortlessly. Luckily, there are also many ways to do it in our step-by-step guide.

Join millions of creators who already have a head start.
Get free recording and editing tips, and resources delivered to your inbox.
Related articles:
Share this article
How-To Geek
How to make a microsoft powerpoint presentation into a video.

Your changes have been saved
Email is sent
Email has already been sent
Please verify your email address.
You’ve reached your account maximum for followed topics.
Quick Links
Why convert a powerpoint to video, convert a powerpoint presentation to a video.
Microsoft PowerPoint presentations are great, but they are not as easily accessible as videos. Luckily, you can convert your presentations to videos with a built-in option. We'll show you how.
There are many reasons to turn a presentation into a video. Maybe you want to send someone a presentation but they don't have PowerPoint installed. Or, maybe you want to upload your presentation to a site that only accepts videos.
PowerPoint has a built-in option to convert presentations to videos. When you perform this conversion, all your original animations, transitions, and media items are preserved. Your resulting video also includes all recorded timings , narrations , ink strokes, and laser pointer gestures (though you can choose not to include these if you want).
Related: How to Burn Your PowerPoint to DVD
To turn a PowerPoint presentation into a video, first, open your presentation with the PowerPoint app on your Windows or Mac computer.
In the top-left corner of PowerPoint, click the "File" option.
From the sidebar that opens after clicking the "File" option, select "Export."
In the "Export" menu, click "Create a Video."
To the right of the "Export" menu, you will now see a "Create a Video" section. In this section, you will define the options for your video file.
First, choose the quality for your video by clicking the "Full HD" option.
You will see multiple video quality options. Select the one that you think works the best for you. Know that the higher the quality you select, the larger the file size of your video will be.
To include the recorded timings and narrations in your video, then beneath the video quality menu, click the "Don't Use Recorded Timings and Narrations" option.
Select the "Use Recorded Timings and Narrations" option. If this option is grayed out, that's because you don't have any recorded timings or narrations in your presentation.
You will now specify how long each slide appears in the video. Click the "Seconds Spent on Each Slide" box and enter the duration in seconds. By default, this duration is set to 5 seconds.
Finally, at the bottom of the "Create a Video" section, click "Create Video" to start making your video.
Your computer's standard "save" window will open. Here, select the folder to save your video in, type a name for your video, and click "Save."
PowerPoint will take you back to the main interface. At the bottom of this interface, you will see the progress of the conversion.
When your video is made, you will find it in the specified folder on your computer.
And that's how you make your presentations available to a wider audience by converting them to a video format!
Need your video in another format? Use VLC to convert your video to other formats.
Related: How to Convert a Video or Audio File Using VLC
- Microsoft Office
- Microsoft PowerPoint
- Accessories
- Entertainment
- PCs & Components
- Wi-Fi & Networks
- Newsletters
- Digital Magazine – Subscribe
- Digital Magazine – Info
- Smart Answers
- Ultimate Holiday Shopping Guide
- Best laptops
- Best antivirus
- Best monitors
- Laptop deals
- Desktop PC deals
When you purchase through links in our articles, we may earn a small commission. This doesn't affect our editorial independence .
How to make a PowerPoint presentation into a video

Looking to turn your PowerPoint slides into a video? Well, you’re in luck. Microsoft PowerPoint has a built-in feature that lets you convert the presentation. This is especially useful if you want to share the presentation with someone, especially if they don’t have PowerPoint.
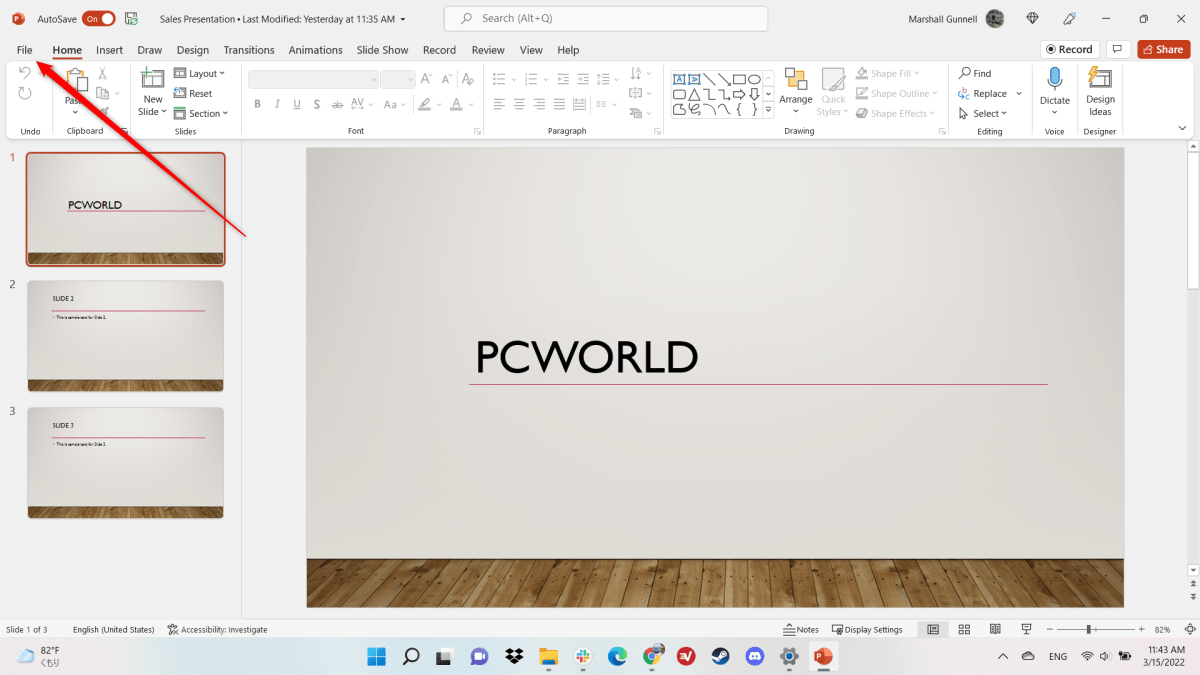
To get started, open the PowerPoint presentation you would like to turn into a video and click the “File” tab in the top-left corner of the window.
IDG / Marshall Gunnell
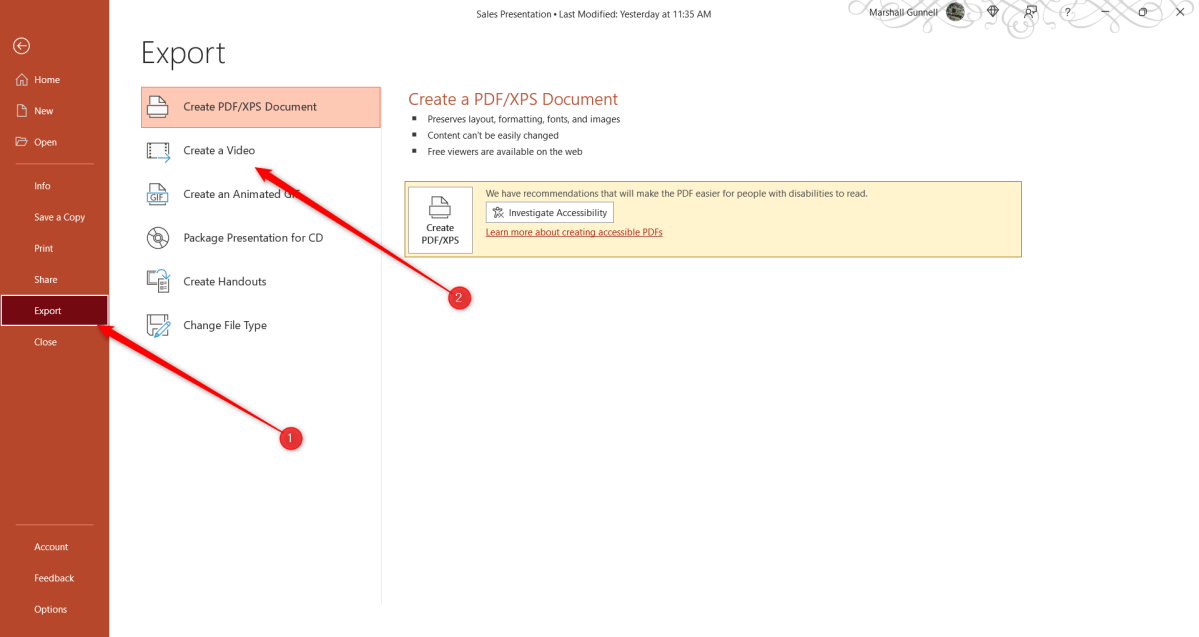
Next, click “Export” in the left-hand pane, and then select “Create a Video” under the Export options.
Now it’s time to pick the video quality and the recorded timings and narrations . There are four different options to choose from when it comes to video quality:
- Ultra HD (4K) : The largest file size available with ultra-high quality.
- Full HD (1080p) : A large file size with full high quality.
- HD (720p): A medium file size with moderate quality.
- Standard (480p): The smallest file size with the lowest quality.
Once you’ve selected the video quality, use the option below it to choose if you want to include recorded timings and narrations or not.
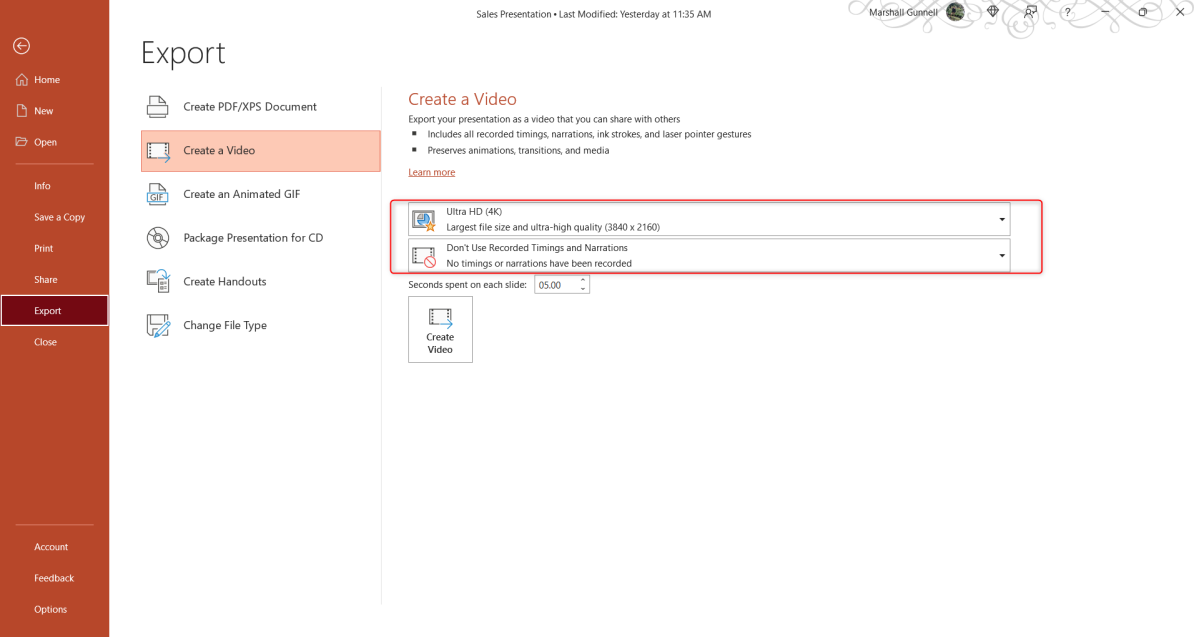
Next, you can adjust how many seconds each slide should be shown during the video. The default is 5 seconds. Click the up or down arrow to increase or decrease the timing by 1-second increments. When ready, click “Create Video.”
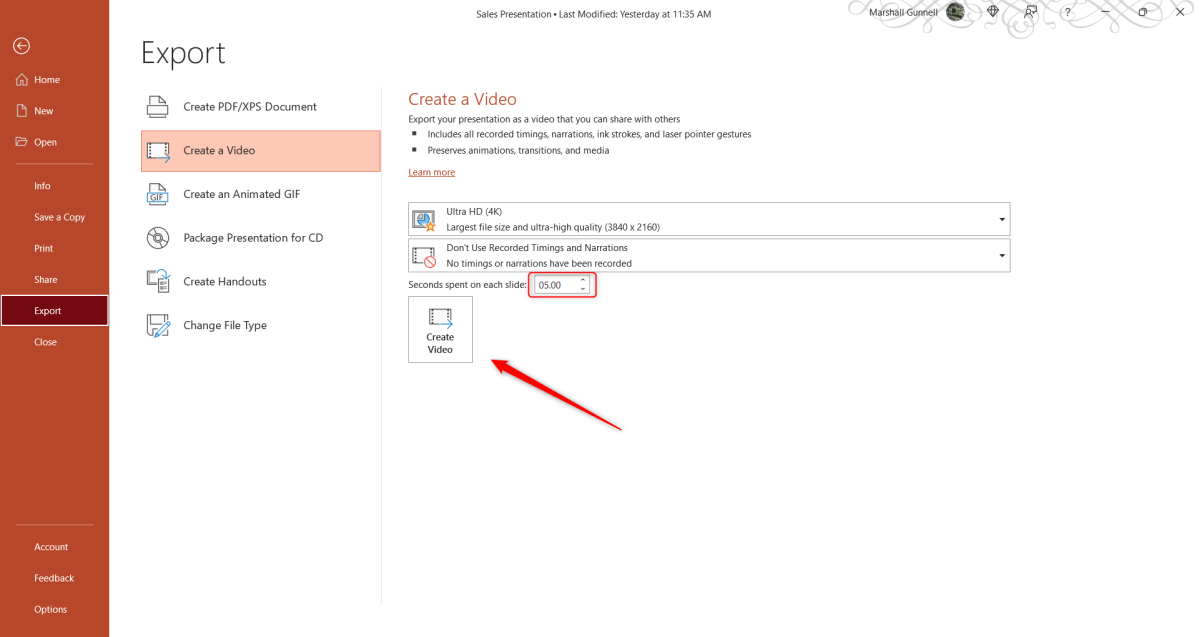
Finally, choose a location to save the video on your computer. Once selected, PowerPoint will then begin the conversion. The amount of time required to convert the presentation to video depends on the size of the presentation and the quality of the video you selected.
You can monitor the progress of the conversion at the bottom of the PowerPoint presentation. You’ll receive a notification when the conversion is complete.
Author: Marshall Gunnell
Recent stories by marshall gunnell:.
- How to add the Developer tab to the Microsoft Office Ribbon
- How to block (and unblock) someone in Gmail
- How to enable dark mode in Microsoft Office
Convert PPT to Video
Go Beyond Slides: Use Our Video Converter to Turn Your PowerPoint into Video
Transforming PPTs into Interactive Videos Has Never Been Easier!
Say goodbye to static slides and hello to the future of storytelling! Flixier's breakthrough toolkit transforms your PowerPoint presentations into stunning films, packed with spinning text, captivating transitions, and powerful soundtracks. Moreover, you can easily record your screen and even yourself during your slides presentation in order to increase the engagement of your video. Edit, enhance, and empower your material in real time, then share it with the world in minutes.
Transform PPTs to Engaging, Dynamic Videos
Tired of the classic and static PowerPoint slides? Make your presentations more appealing by turning them into captivating videos. For an attractive message delivery, choose to record yourself. Now you may quickly record your PowerPoint presentation, webcam, audio, and screen using Flixier. Layout, background, and camera feed can all be customized.
Craft Immersive Videos with Voice and Animations
Video conversion goes beyond visual communication by engaging numerous senses. If you choose to add text to video , visuals, transitions, and music, you can create a full experience that resonates with the viewer. Flixier's interface makes this process easier by allowing you to experiment with multiple combinations until you find the appropriate balance of elements.
Infuse Stories with Emotion by Converting PPTs into Video
Use Flixier’s online slides recorder to add more emotional depth to your storytelling. Besides using your own voice on the recording, you can easily combine your slides with well selected music.. Moreover, Flixier allows you to record your webcam. Don’t worry, you can always stop the recording, go back and add other scenes, everything will be saved!

Broaden Your Audience by Sharing Videos Online
How long does it typically take to share your content online after it has been created? Converting PPTs to videos expands your sharing options. Videos are cross-platform and device adaptable, ensuring that your interactive material reaches a wider audience. Whether it's for a business presentation that you are preparing, teaching tools or a personal story.
How to Convert PPT to Video with Flixier’s Online Video Editor?
Record your ppt presentation.
Start by accessing Flixier's dashboard and choose “Record” from the menu. Choose from a variety of layout options available. You can opt to record the slides or your slides and webcam at the same time, granting access to your screen, camera, or microphone with a simple click. Capture your screen, webcam, or both concurrently, enhancing your recording flexibility and creative possibilities. The wait for the recordings to process won’t be long and it will vary depending on the length of the PPT presentation.
Review, Edit and Enhance Your Recording
After your simple screen recording or webcam and slides is finished, the new video will appear in the Flixier library. To make it more engaging for you audience, you can use text overlays, transitions, effects, modify the playback speed and combine various soundtracks to unleash your creativity. To keep the spirit of engagement, merge your work with other videos and turn everything into a cohesive video or choose to crop video pieces from your recording.
Download or Publish the Final Video
After you've finished editing, click the Export button in the upper right corner. Your transformed PowerPoint Presentation will be saved as an MP4 file, which is the most widely supported format. You can then easily share your video on social media, websites, or any other platform.
Why use Flixier to Convert a PPT to Video?
Turn ppts into video with a user-friendly interface.
The user-friendly interface of Flixier is intended for everyone, allowing you to easily cut video segments, drag and drop items, and create new storylines. By adding a personal touch with webcam and microphone recording, or through animating text, weaving transitions, or background sounds, everything is available with a few clicks.
No Downloads Needed: Make Captivating Videos Online
Flixier's online PPT editor does not require any downloads. It's a simple method to turn your presentations into captivating videos, and it's easily accessible through your browser. You can reach your creative goals with ease, eliminating the requirement for laborious software installations.
Quickly Create, Edit, and Share Content Across Platforms
Easily share the newly crafted video with your audience on YouTube, Instagram or any other social media platform. Flixier allows you to easily upload your PPT online after recording it and converting it into a video format that suits you best. Adding annotations, images and various elements will improve the quality of your video.
Universal Compatibility: Share Your Message Anywhere
Flixier allows you to personalize and add a personal touch to your PPT in video formats that are universally recognized. Your creation resonates across screens, whether viewed on a PC or a mobile device. Share it without concerns for compatibility, ensuring that your message reaches your target audience: family, friends, colleagues, or others.
Need more than a PPT to Video convertor ?

Edit easily
With Flixier you can trim videos or add text, music, motion graphics, images and so much more.

Publish in minutes
Flixier is powered by the cloud so you can edit and publish your videos at blazing speed on any device.

Collaborate in real-time
Easily collaborate on your projects with Flixier, we offer real-time feedback and sharing of projects.

You`re in good hands
Over 1 million creators use Flixier every month including brands like:
I like Flixier because I can use it anywhere I go and I don`t need a lot of computer requirements but great internet connection. I like how fast it is when it comes to rendering videos and still have the opportunity to continue or start another project while waiting. I appreciate the continuous updates and adjustments because it is necessary for a video editing tool.
My main criteria for an editor was that the interface is familiar and most importantly that the renders were in the cloud and super fast. Flixier more than delivered in both. I've now been using it daily to edit Facebook videos for my 1M follower page.
I like Flixier because I can use it anywhere I go and I don't need a lot of computer requirements but great internet connection. I like how fast it is when it comes to rendering videos and still have the opportunity to continue or start another project while waiting. I appreciate the continuous updates and adjustments because it is necessary for a video editing tool.
What I like most about Flixier is the flexibility to edit the captions, both in terms of the text and the time where it starts and finish showing it. It gives you full control.
This online free program was extremely easy to use, implement, and integrate into my 9-12th grade tech classes. The projects turned out great and were easy to export. I liked having multiple ways to upload pictures. The software was also easy to understand.
Frequently Asked Questions
How long does it take powerpoint to convert to video.
The time it takes to turn your PowerPoint presentation into a video is determined by many factors, the most important of which is the complexity and size of your original content. Flixier's technology is meant to speed up this process, allowing you to record your PowerPoint in just a few clicks. conversions to be accomplished in a matter of minutes.
Can I upload the video from PPT to YouTube?
Absolutely! Flixier allows you to record and personalize your PowerPoint presentation and turn it into a dynamic video that is smooth and compatible, the resulting file format being ready to go up on YouTube and already aligned to its uploading requirements.
Sharing your material on the world's largest video-sharing platform is simple, whether it's a business presentation, an educational session, or creative storytelling that you’ve personalized with Flixier.
Is it free to convert PPT to video?
Yes. Flixier provides a variety of plans designed to meet a large pool of needs and preferences. The free plan gives you access to important tools, such as recording, reviewing, editing and exporting your PowerPoint presentations to videos with basic edits. Upgrade to a premium subscription if you want extra features. These tools are perfect for adding text, different subtitles and polished enhancements to the PPT screen recording.
Other PPT converter tools
Articles, tools and tips, ready to start creating videos.

- PRO Courses Guides New Tech Help Pro Expert Videos About wikiHow Pro Upgrade Sign In
- EDIT Edit this Article
- EXPLORE Tech Help Pro About Us Random Article Quizzes Request a New Article Community Dashboard This Or That Game Forums Popular Categories Arts and Entertainment Artwork Books Movies Computers and Electronics Computers Phone Skills Technology Hacks Health Men's Health Mental Health Women's Health Relationships Dating Love Relationship Issues Hobbies and Crafts Crafts Drawing Games Education & Communication Communication Skills Personal Development Studying Personal Care and Style Fashion Hair Care Personal Hygiene Youth Personal Care School Stuff Dating All Categories Arts and Entertainment Finance and Business Home and Garden Relationship Quizzes Cars & Other Vehicles Food and Entertaining Personal Care and Style Sports and Fitness Computers and Electronics Health Pets and Animals Travel Education & Communication Hobbies and Crafts Philosophy and Religion Work World Family Life Holidays and Traditions Relationships Youth
- Browse Articles
- Learn Something New
- Quizzes Hot
- Happiness Hub
- This Or That Game
- Train Your Brain
- Explore More
- Support wikiHow
- About wikiHow
- Log in / Sign up
- Computers and Electronics
- Presentation Software
- PowerPoint Insertions
5 Ways to Embed a Video File in Microsoft PowerPoint
Last Updated: June 14, 2024 Fact Checked
Embedding a Web Video
Embedding a video file, embedding a stock video, using android, linking movie files (powerpoint 2007).
This article was co-authored by Mitch Harris and by wikiHow staff writer, Rain Kengly . Mitch Harris is a Consumer Technology Expert based in the San Francisco Bay Area. Mitch runs his own IT Consulting company called Mitch the Geek, helping individuals and businesses with home office technology, data security, remote support, and cybersecurity compliance. Mitch earned a BS in Psychology, English, and Physics and graduated Cum Laude from Northern Arizona University. This article has been fact-checked, ensuring the accuracy of any cited facts and confirming the authority of its sources. This article has been viewed 1,155,670 times.
If you want to spruce up your PowerPoint presentations, you can add a video to your slides. If you have a video file on your computer, you can easily embed it into your presentation. You can also embed YouTube videos, use looping stock videos, or, on older versions of PowerPoint, link to the videos. This wikiHow will show you how to add a video to Microsoft PowerPoint using your Windows, Mac, or Android device.
The Best Ways to Embed a Video in PowerPoint
- Copy a YouTube URL. In PowerPoint, click "Insert' → "Video" → "Online Videos/Movie". Paste the URL and click "Insert".
- To embed a video file, click "Insert" → "Video" → "This Device" → select a file → "Insert".
- To use a stock video, click "Insert" → "Video" → "Stock Videos" → select a video → "Insert".

- You must have a subscription to use Office 365 . [1] X Trustworthy Source Microsoft Support Technical support and product information from Microsoft. Go to source
- Adding a video to your PowerPoint can help you make a great presentation .

- You can insert a video from supported websites such as: YouTube, SlideShare, Vimeo, Microsoft Stream, and Flip.

- On Mac, this will look like Online Movie .

- You'll see a preview of the video.

- To adjust when the video plays, click the drop-down menu next to Start: . Select In Click Sequence , Automatically , or When Clicked On .
- Check the boxes to apply any of the following: Play Full Screen , Hide While Not Playing , Loop until Stopped , and/or Rewind after Playing .
- Click Volume to adjust the video's volume. Select Low , Medium , High , or Mute .

- Select the web video and click the Video Format tab.
- Click Poster Frame on the left of the toolbar.
- Click Image from File… .
- Select From a File , Stock Images , Online Pictures , or From Icons .
- Select the image source from the chosen method, and then click Insert .

- Stock videos work best as a background graphic to your PowerPoint text, since these videos loop seamlessly

- The stock video will be added to your slide. By default, it will cover the entire slide.

- PowerPoint is available for Android in the Google Play Store .

- The menu will open.

- If you want to take a video using your camera, tap Open Camera instead.
- The video file will be added to your PowerPoint.

- Videos can only be "embedded" (included in the presentation file itself) in PowerPoint 2010 or newer.

- Click the Office button and select "Publish."
- Select "Package for CD" and then select your presentation.
- Ensure that "Linked files" is selected in the "Options" menu.
Community Q&A
Tips from our Readers
- In the newest version of PowerPoint, to embed a YouTube video, all you have to do is go to insert, video, online video and then paste the link for the video.
You Might Also Like

- ↑ https://support.microsoft.com/en-us/office/insert-a-video-from-youtube-or-another-site-8340ec69-4cee-4fe1-ab96-4849154bc6db#OfficeVersion=Windows
- ↑ https://support.microsoft.com/en-us/office/insert-audio-or-video-in-powerpoint-for-android-95e0a2af-35fb-405a-8536-cdcd934f659a
- ↑ https://support.office.com/en-us/article/My-movie-doesn-t-play-190cf574-183d-4b7f-b627-3783a14b7b07?ui=en-US&rs=en-US&ad=US
- ↑ https://support.office.com/en-us/article/Add-and-play-a-movie-in-a-presentation-f3fcbd3e-5f86-4320-8aea-31bff480ed02
About This Article

1. Open the slide. 2. Click Insert . 3. Click Movie . 4. Click Movie from File or Video on my PC . 5. Select the video and click OK . 6. Click Playback . 7. Choose how to play the video. 8. Save your presentation. Did this summary help you? Yes No
- Send fan mail to authors
Reader Success Stories
Rjan Berglund
May 26, 2017
Is this article up to date?

Jun 20, 2017
Nov 7, 2016
Jul 27, 2016

Featured Articles

Trending Articles

Watch Articles

- Terms of Use
- Privacy Policy
- Do Not Sell or Share My Info
- Not Selling Info
wikiHow Tech Help:
Tech troubles got you down? We've got the tips you need
Convert PPT to VIDEO
You have the option to convert your ppt file to video, as well as a variety of other formats, using our free online converter.
How to convert ppt to video?
Upload ppt-file, select «to video», download your video file, the security of your files is our priority.
Understanding the importance of the security of our users' data, we have implemented a number of measures to ensure reliable file conversion without the risk of information leakage or privacy violations.
Data encryption
Safe storage, harmless scripts, best tool to convert ppt to video, ppt to video fast and easy, secure ppt to video conversion, no software installation required, microsoft powerpoint, faqs on ppt to video conversion, ppt converter, convert to video.
How to Embed a Video in PowerPoint

Table of Contents
What is microsoft powerpoint.
Microsoft PowerPoint is a powerful and widely-used presentation software developed by Microsoft. It allows users to create, edit, and share interactive slideshows for various purposes, including business, education, and entertainment. You can find more information on the Microsoft PowerPoint website .
Who is Microsoft PowerPoint best suited for?
Microsoft PowerPoint is best suited for professionals in fields such as Product Marketing . It's useful for creating engaging presentations for product launches, marketing strategies, and stakeholder meetings. The software is beneficial due to its user-friendly interface, rich features for customizing slides, and the ability to integrate multimedia elements effectively.
Common FAQs on How to Embed a Video in PowerPoint
To embed a video from your computer, go to the slide where you want to insert the video, click on the "Insert" tab, select "Video," and then choose "Video on My PC." Browse to find the video file, select it, and click "Insert."
Yes, you can embed a YouTube video by going to the "Insert" tab, selecting "Video," and then choosing "Online Video." Paste the YouTube video URL in the search box and click "Insert."
PowerPoint supports a variety of video formats, including .mp4, .mov, .avi, and .wmv. However, .mp4 is recommended for best compatibility.
You can set the video to play automatically by selecting the video in your slide, navigating to the "Playback" tab, and choosing "Automatically" under the "Start" dropdown menu.
If your video isn't playing, it could be due to an unsupported format, issues with the file path, or a missing codec. Try converting the video to .mp4 format and ensure it's properly inserted.
Enjoyed this interactive product demo of Microsoft PowerPoint?
Create your own interactive product demo in minutes. Drive growth, scale enablement and supercharge product led-onboarding with Supademo.
Sign up for free here with no credit card required.
Create elegant interactive product demos in minutes.
Start a 14-day free trial, no credit card required.
Related articles

How to use the SEMRush keyword gap tool

How to Create a Zoom Account

How to create a campaign in MailerLite
Get the fastest, easiest interactive demo platform for teams.

IMAGES
VIDEO
COMMENTS
On the File menu, select Save to ensure all your recent work has been saved in PowerPoint presentation format (.pptx). Select File > Export > Create a Video. (Or, on the Recording tab of the ribbon, select Export to Video.) In the first drop-down box under the Create a Video heading, select the video quality you want, which pertains to the ...
Learn how to publish your own video using Microsoft PowerPoint with narration, annotations, animations, and timings. As full disclosure, I work at Microsoft ...
Join 400,000+ professionals in our courses here 👉 https://link.xelplus.com/yt-d-all-coursesLearn how to create a video using PowerPoint. I'll first show you...
Record new layer: Pick this for recording your video as a new layer on top of an existing recording. 2. Click Record at the bottom of the Record panel. 3. Drag over the area of your screen you wish to record. Click Start Recording. Press Space to start recording the full screen. 4. Click Stop to finish recording.
A video file is not created by this recording process. However, if you want a video file, you can save your presentation as a video with a few extra steps. Preview the recorded slide show. On the Slide Show tab, click From Beginning or From Current Slide. During playback, your animations, inking actions, laser pointer, audio and video play in sync.
You can record your PowerPoint presentation—or just a single slide—and capture voice, ink gestures, and your video presence. The completed recording is like any other presentation. You can play it for your audience in Slide Show or you can export it as a video file. So instead of just handing the deck to someone, people can see your ...
On the PowerPoint window, in the left sidebar, click the slide in which you want to add a video. At the top of the PowerPoint window, click the "Insert" tab. In the "Insert" tab, under the "Media" section (which is to the extreme right side of the interface), click "Video." You'll now see an "Insert Video From" menu.
In this video, I will go over everything you need to know about creating, saving, and publishing a video with PowerPoint. We will cover 0:00 - Introduction0:...
To turn a PowerPoint presentation into a video, first, open your presentation with the PowerPoint app on your Windows or Mac computer. In the top-left corner of PowerPoint, click the "File" option. From the sidebar that opens after clicking the "File" option, select "Export." In the "Export" menu, click "Create a Video."
To get started, open the PowerPoint presentation you would like to turn into a video and click the "File" tab in the top-left corner of the window. Next, click "Export" in the left-hand ...
PowerPoint is by far the most popular presentation app, and it's easy to see why. There are many themes, layouts, and tools inside PowerPoint that help you build professional presentations quickly.. Two apps, one presentation: on the left, my presentation file is open in PowerPoint, while the Windows Media player on the right is playing a video person of the presentation.
Record Your PPT Presentation. Start by accessing Flixier's dashboard and choose "Record" from the menu. Choose from a variety of layout options available. You can opt to record the slides or your slides and webcam at the same time, granting access to your screen, camera, or microphone with a simple click. Capture your screen, webcam, or ...
Watch this video to learn how to convert your PowerPoint presentation into a video. When you make a recording of a presentation, all its elements (narration,...
This wikiHow will show you how to add a video to Microsoft PowerPoint using your Windows, Mac, or Android device. Copy a YouTube URL. In PowerPoint, click "Insert' → "Video" → "Online Videos/Movie". Paste the URL and click "Insert". To embed a video file, click "Insert" → "Video" → "This Device" → select a file → "Insert".
Select Format to put frames and effects on your video. Select Video Effects, Video Border, or Video Shape to add effects, borders, or crop your video to a shape. Select Corrections or Color to adjust the video's color tone. Select Poster Frame to choose the video's opening frame, and then click and drag with your mouse to select your ...
PPT files can contain text, images, videos, animations, and formatted dataThey are widely used in business, education, and training settings for presenting information in a structured and visually appealing mannerThe .ppt format was more common in versions of PowerPoint up to 00, after which it was largely replaced by the .pptx format.
In this step-by-step tutorial, learn how to record your PowerPoint presentation as video. Watch how to insert a narration, video, and then export your PowerP...
To embed a video from your computer, go to the slide where you want to insert the video, click on the "Insert" tab, select "Video," and then choose "Video on My PC." Browse to find the video file, select it, and click "Insert." Can I embed a YouTube video in my PowerPoint presentation? Yes, you can embed a YouTube video by going to the "Insert ...
In the Seconds spent on each slide box, select the default time you want to spend on each slide. Select Create Video. Enter a file name and then browse to the location you want to save your video. In the Save As type box, select if you want to save the video as a MPEG-4 Video or Windows Media Video. Tip: The MPEG-4 Video format is recommended ...
On the Insert tab, click the arrow under Video, and then select This Device (or Video on My PC). In the Insert Video box, click the file that you want to link to, click the down arrow next to the Insert button, and then click Link to File. Newer versions of PowerPoint support the playback of video with multiple audio tracks.
Training: Add and record audio, such as music, narration, or sound bites, to your PowerPoint presentation and select the playback options. Watch this video to learn how. Related topics. ×. Animation, audio, & video Add animation ...